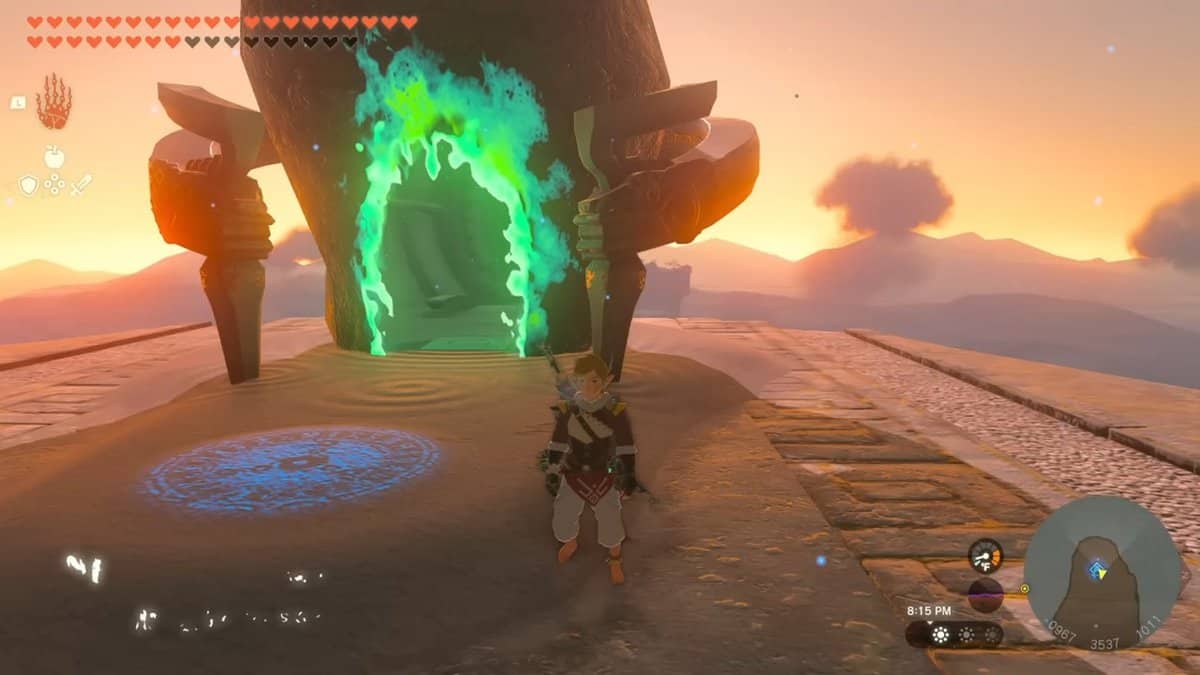
Finding and completing all 152 Shrines in Zelda, Tears of the Kingdom can be a lengthy and daunting process, but it rewards you with a cool Ancient Hero’s Aspect outfit among other things.
Shrines in Zelda TotK are scattered all throughout the Surface and the Sky in different regions, including the Necluda region.
While it may be difficult to target all of the Shrines one by one, breaking them down by region may be helpful because it can even allow you to keep track of which shrines you have visited so far.
That said if you are trying to find all of the Necluda region Shrine locations in Zelda: TotK, including the East, West, and Sky Necluda, then you do not need to look any further.
Where to find Necluda Sky Shrines in Zelda: TotK
There are 4 different Shrines located around the Necluda Sky as well.
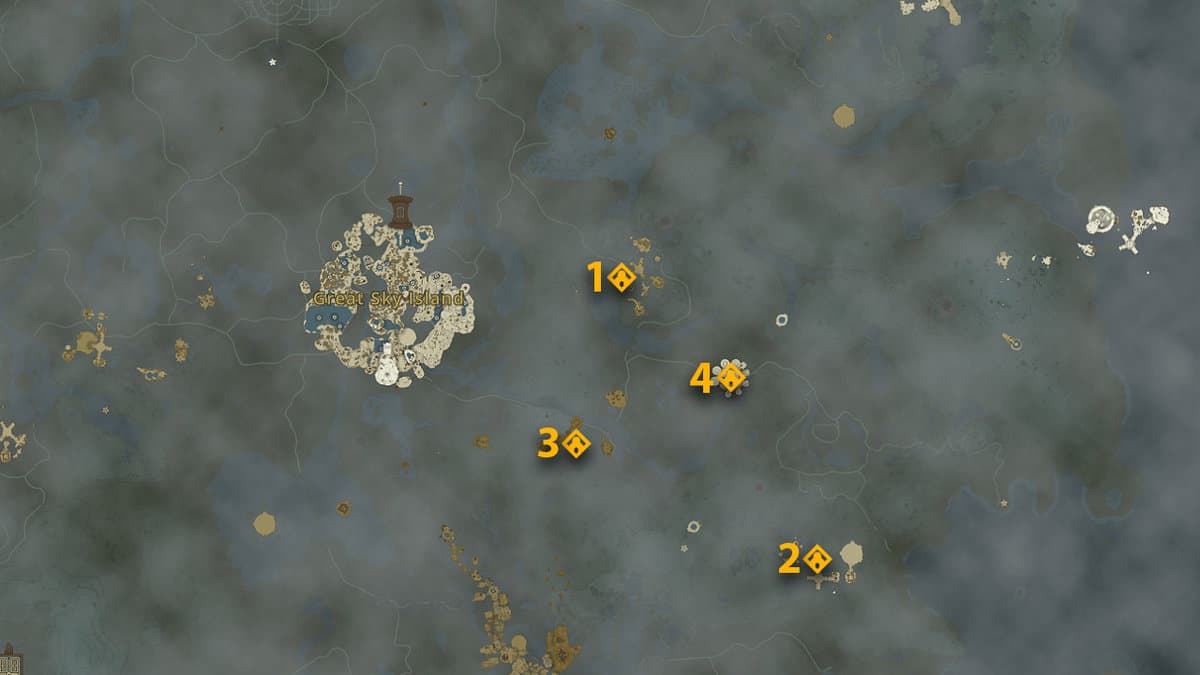
1) Josiu Shrine
The first Shrine of the Necluda Sky region is the Josiu Shrine. This shrine is located directly east of the main Great Sky Island, at coordinates 1759, -1208, and 0924.
This is the first Sky Island that you can reach by directly heading east from the Great Sky Island. To reach this Sky Island, you must first make your way over to the Sahasra Slope Skyview Tower on the Surface.
From there, you can travel up to the Sky, and luckily, right on the island with the Josiu Shrine. You must solve a small puzzle here to make the Shrine appear.
2) Kumamayn Shrine
To reach the Kumamayn Shrine, we must first head over to the Rabella Wetlands Skyview Tower, which is just south of Meda Mountain.
Once launching up from the Skyview Tower into the Sky, you must follow the coordinates and head east in the direction of the shrine.
There are a couple of small islands along the way, but the one to the south holds a launcher that can give you a boost forwards. The plus-shaped island directly ahead of this one is the one that holds the Kumamayn Shrine.
3) Ukoojisi Shrine
The Ukoojisi Shrine is located to the northwest of the Kumamaym Shrine, directly above where you would find the South Dueling Peak on the Surface, at coordinates 1470, -2170, and 0585.
This Sky Island is unnamed and surrounded by three other miniature islands. To reach the Ukoojisi Shrine, you first have to make your way to the Popla Foothills Skyview Tower on the Surface and travel up to the Sky.
Before embarking on your journey, make sure that you have an adequate amount of stamina in store since this could be a long journey.
Once you are in the sky, all you have to do is pull out your map and make sure that you are traveling in the direction of the Ukoojisi Shrine following the coordinates mentioned previously.
4) Yansamin Shrine
The Yansamin Shrine is located just west of the Ukoojisi Shrine, directly above where you would find the Ash Swamp on the Surface, at the coordinates 2350, -1784, and 1475.
To reach the Yansamin Shrine, you have to take a complex journey through the Surface. First, you must reach the waterfall.
This waterfall is located in the water pool between Phalian Heights (to its west), the Lanayru Bluff (to its east), and the Peak of Awakening (to its southeast).
Once you reach the waterfall, you must swim up it with the help of Zora’s Armor Piece to reach a small platform.
From here, you can use the rockets provided to you to make your way to the Zonaite Forge Island, and hence the Yansamin Shrine.
Where to find Necluda Surface Shrines in Zelda: TotK
On the Necluda region (Surface), you will find 14 different Shrines spread through it.
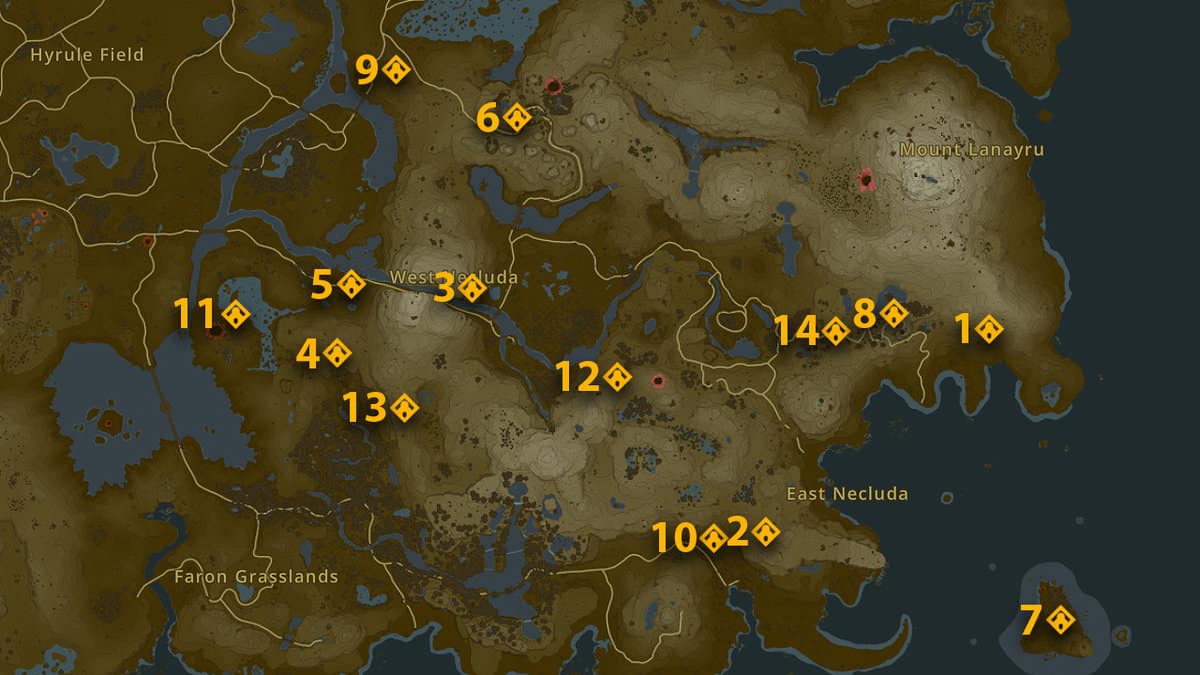
1) Anedamimik Shrine
The Anedamimik Shrine is located in the northeastern corner of the East Necluda region, just before the Mount Lanayru region starts. This shrine is found inside a cave called the Deepback Bay Cave, coordinates 4202, -2293, and 0000.
You will find the Anedamimik Shrine in the flooded moat inside the Deepback Bay Cave, specifically at the coordinates 4231, -2179, and -001. You can reach the entrance to this cave by flying in the southeastern direction from Mount Lanayru Skyview Tower.
Once you enter the cave, you can follow the path ahead until you reach the Anedamimik Shrine in Zelda: TotK.
2) Bamitok Shrine
The Bamitok Shrine is located in the East Necluda region, located inside the Mount Dunsel Cave at coordinates 3094, -3209, and 0082. The Mount Dunsel Cave itself is located at coordinates 3171, -2990, and 0147.
The Mount Dunsel Cave entrance is located at the center of the ridge connection between Cape Cales and Mount Dunsel.
You can reach this location as well by simply gliding towards its direction – southeast – from the Rabella Wetlands Skyview Tower.
Once at the cave entrance’s coordinates, you will find a large hole in the ground with a pit at the center. All you have to do is jump inside this pit to enter Mount Dunsel Cave.
Right as you enter the cave, you must swim from the dead end and make your way right. Once you reach the plank on the ground, lift it up to a spot from where you can use Ascend to climb up. At the top, follow the path ahead to reach the Bamitok Shrine.
3) Eshos Shrine
The Eshos Shrine is found in the West Necluda region, located all the way to the eastern end of the region at coordinates 1566, -1495, and 0157.
The closest points of interest to this Shrine are the North and South entrances to the Dueling Peaks Caves.
Following the water-filled valley, the Eshos Shrine is on a small cliff on the western edge of the northern Dueling Peak Mountain.
To reach the Eshos Shrine, you can directly climb the Dueling Peaks mountain from the east.
Alternatively, you can also make your way south through the mountain from the Sahasra Slope Skyview Tower, which is just north of the shrine across Mable Ridge.
4) Jiukoum Shrine
The Jiukoum Shrine is located, at coordinates 0867, -2280, and 0141. This Shrine is found atop the small hill of the Popla Foothills subregion, directly north of the Dracozu Lake.
The Popla Foothills Skyview Tower is the closest point of interest to this Shrine. The easiest way you can reach the Jiukoum Shrine is to first make your way to the Popla Foothills Skyview Tower and then glide in the southwestern direction towards the Shrine.
Once at the proper coordinates mentioned above, you can glide directly downwards to land atop the Jiukoum Shrine.
5) Jochisiu Shrine
The Jochisiu Shrine is located at coordinates 0927, -1905, and 0030. This Shrine is right next to the path stretching across the Squabble River.
To reach the Jochisiu Shrine, you once again have to start from, the Popla Foothills Skyview Tower since it is the nearest point of view to it. Once there, glide in the northwestern direction from it towards Squabble River.
Right next to the path stretching across the river, you should see a Steward Construct that gives you the Keys Born of War Shrine Quest. This particular quest will bring forward a challenge that is concerned with the Jochisiu Shrine.
All you have to do then is to activate the Fire and Ice Emitters, then battle a couple of Constructs to complete the challenge, after which the Jochisiu Shrine is unlocked.
6) Makasura Shrine
The Makasura Shrine is located in the northern portion of the West Necluda region, at coordinates 1700, -1051, and 0166. The Shrine is located above land but is surrounded on all four sides by cave entrances.
On the north and south of it are the Byroad to Lanayru Wetlands Cave entrances, to its east are the Cucco Hideaway and Kariko Village Cave, and to its west is the Sahasra Slop Cave.
Given that caves aren’t a good reference point for finding a location in Zelda: Tears of the Kingdom, a major point near it is the Sahasra Slop Skyview Tower, which is located just southwest of it.
You can either reach this Shrine directly from the Sahasra Slope Skyview Tower or follow the path to it from the Tukarok Shrine Stables.
The path will lead you toward the Kakariko Village, and you can use Ascend upwards using the slates at the edge of the cliff to reach the Makasura Shrine.
7) Marari-In Shrine
The Marari-In Shrine is located on a small island in the southeastern corner of the map, at coordinates 4632, -3712, and 0018. The Shrine is located inside a cave, the entrance to which is in the southeast corner of the island.
This cave is called the Eventide Island Cave and is located at coordinates 4729, -3768, and 0025. To reach this island, you first have to head over to Mount Lanayru Skyview Tower and make your way to the Hateno Ancient Tech lab from there.
Alternatively, you can also make your way south towards the shore as well. Once at the shore, you must combine a slate, battery, fan, and control stick together to make a vehicle.
You can use this vehicle to get across the water and reach the island. Once at the island, you must solve a puzzle to unlock the Marari-In Shrine in Zelda: TotK.
8) Mayahisik Shrine
The Mayahisik Shrine is also located on the northern edge of the East Necluda region, just west of the Anedamimik Shrine. This Shrine is located at the coordinates 3730, -2058, and 0189. However, to reach this Shrine, you must first enter the Retsam Forest Cave, the entrance to which is located at coordinates 3755, -2073, 0214.
To reach the cave entrance, you must first make your way to the Hateno Ancient Tech Lab. Right across the hollow here is the entrance to the Retsam Forest Cave, but its entrance is blocked by a couple of rocks.
You can break the rocks with your weapon to clear the entrance. Once inside, turn right and walk forward along the path until you reach the Mayahisik Shrine.
9) Morok Shrine
The Morok Shrine is located on the northern edge of the West Necluda region, just below the Lanayru Wetlands region. The coordinates of this location are 1182, -0779, and 0133.
The Morok Shrine is found just before the bridge that leads away from the Lanayru Wetlands and towards West Necluda. The nearest point of interest to its location is the Sahasra Slope Skyview Tower, which is just to the south of it.
To reach this shrine, all you have to do is glide north from the Sahasra Slop Skyview Tower and drop down once you reach the coordinates mentioned above. Alternatively, you can also use a horse to get here from the Tukarok Shrine, which is slightly north of it.
10) Sifumim Shrine
The Sifumim Shrine is located in the eastern region of East Necluda, on top of the hill overlooking Lurelin Village at coordinates 2825, -3269, and 0078.
This hill can be found to the southwest of the Dunsel Plateau and right above the path leading away from Atun Valley.
Since this shrine lies in an open field at the edge of the hill, it is pretty easy to locate. This is the same reason why this Shrine is easy to reach as well.
All you have to do to reach the Sifumim Shrine is to glide, yet again, southeast from the Rabella Wetlands Skyview Tower.
Once you reach the correct coordinates that are mentioned above, you are simply to go down vertically and you will find yourself on top of the Sifumim Shrine.
11) Susub Shrine
The Susub Shrine is located at the westernmost end of the West Necluda region, at coordinates 0348, -2051, -0026. This Shrine is located to the south of the Deya Village Ruins.
The closest points of interest to the Susub Shrine are the Popla Foothills Skyview Tower and the Popla Foothills Excavation Site Cave.
To reach the Susub Shrine, we can start from the Popla Foothills Skyview Tower and may our way northwest towards the Deya Village Ruins. Technically, you can walk the way, but gliding there would be much faster.
At the center of the village is the Deya Village Ruins Well, at coordinates 0323, -927, and 0012. You must enter this well and start making your way south.
Not long into the southern direction, you will be able to see a small cliff next to a waterfall leading up to the Susub Shrine.
12) Tokiy Shrine
The Tokiy Shrine is located inside a cave on the northern edge of the ridge connecting Breman Peak and Meda Mountain. The coordinates of the Tokiy Shrine are as follows: 2299, -2380, and 0028.
The closest point of interest from which we can form a route toward the shrine is the Rabella Wetlands Skyview Tower. From this Skyview tower, you can glide directly south toward Oakle’s Navel Cave, which holds the Tokiy Shrine.
Once inside, proceed along the cave till you see a Green Crystal, upon interacting with which you will start a challenge. Once that challenge is completed, the Tokiy Shrine will appear in its place.
13) Utojis Shrine
The Utojis Shrine is located inside a cave atop a mountain adjacent to the Jia Highlands. The coordinates of the Utojis Shrine are 1217, -2542, 0096. This particular mountain is the one west of the Tobio’s Hollow or the Tobio’s Hollow Chasm.
The closest point of interest next to the Utojis Shrine is the entrance to the cave it is located in, the Tobio’s Hollow Cave entrance.
If a major point of view were to be considered, then that would be the Popla Foothills Skyview Tower to its northwest.
This cave entrance is located at the coordinates 1166, -2440, and 0170, and you must first reach this cave to make your way toward the Shrine. You can directly glide toward Tobio’s Hollow Cave from the Popla Foothills Skyview Tower.
Right as you enter the cave, you should start a challenge by examining the first note not far ahead from the entrance. Upon completion of the Utojis Shrine’s challenge, the shrine itself should appear.
14) Zanmik Shrine
The Zanmik Shrine is also located in the north of the East Necluda region, slightly to the west of the Mayahisik Shrine mentioned previously. The coordinates of this specific location are 3469, -2179, and 0148.
At the east of the Zanmik Shrine, you can also find the entrance to the Retsam Forest Cave, while to its southwest is the Rabella Wetlands Skyview Tower.
Getting to this Shrine is simple because it is above ground. To reach this Shrine, you can either use the Rabella Wetlands Skyview Tower and travel northeast toward the coordinates, or travel southwest from the Mount Lanayru Skyview Tower.
Either way, the Zanmik Shrine is located pretty easily, and once you get inside, you must solve a puzzle to get your rewards.