Traveling from one region to another can be pretty tedious and time-consuming in Zelda: TotK even with all the Shrines and Skyview Towers to fast travel to. By completing the Presenting: The Travel Medallion! side adventure in Zelda: Tears of the Kingdom, you can unlock the ability to fast-travel anywhere!
Robbie will offer to provide you with this upgrade on your Purah Pad. But before you can do so, you will need to complete some prerequisites. The entire process will have you do some side quests. To help you, we have written the step-by-step process down.
How to unlock Presenting: The Travel Medallion! in Zelda: TotK
Unlocking Presenting: The Travel Medallion isn’t as straightforward as one might think in Tears of the Kingdom. You have to put in some serious effort, and you must complete several quests beforehand.
When you talk to Robbie at Lookout Landing, he will tell you that he is the creator of Purah Pad and can upgrade its modules. However, to make him move to his lab, you will need to complete a lot of prerequisite quests.
Crisis at Hyrule Castle – Meet Captain Hoz
The first quest you need to complete as soon as you reach the Lookout Landing is to talk to Captain Hoz. He is standing in the middle of the area, above the shelter’s gate. Upon talking to him, he will open the gate to the shelter.
You can now enter the shelter and interact with the goddess statue. This will also progress your main quest to find the source of trouble at Hyrule Castle and begin the Regional phenomena main quest.
Camera Work in the Depths
To start this quest, you need to complete at least one part of the Regional Phenomena main quest. We recommend going to Rito Village and completing the Wind Temple first. Return to the Lookout Landing to have a meeting with Robbie.
You start things off by visiting Josha and Robbie in Lookout Landing. After your conversation with them, you will start the Camera Work in the Depths Quest. This is where you will enter the Depths for the first time through the Hyrule Field Chasm.
Inside you will have to complete a couple of tasks that will end with you unlocking the Camera on your Purah Pad. Once the quest is complete, you will return to Josha and Robbie in Lookout Landing.
Mystery in The Depths
This time you will be sent again to the Depth on your second quest in the questline – A Mystery in The Depths. In an overview, you will return to depth, take photos of the marked Statue, and keep following the path the Statue is pointing towards. Finally, you will come face-to-face with Master Kohga.
You need to defeat him and then complete the Mystery in The Depths quest. In the process of completing this side quest, you will learn the Autobuild ability.
Hateno Village Reserach Lab

After the quest ends, you will return to Lookout Landing to visit Josha and Robbie. You will be given yet another quest to do.
Now you will have to help Robbie fix his Hot air Balloon so he can return to Hateno Village Research Lab. You can do that by simply using your Autobuild ability which you picked up earlier.
With that being done, Robbie will move to his lab in Hateno Village which is where you need to go. The lab can be found South of Hyrule Castle Ruins in East Necluda at the following coordinates: (-0247, 0134, 0019). The nearest shrine is the Zanmik Shrine.
The lab is located on the top of the hill to the east of the Hateno Village. It will require a lot of trekking to get there. Enter the lab and talk to Robbie.
Robbie will then have you test his Shrine Detector. Use it to find a shrine and the objective will be completed. Now return to Robbie after completing the quest.
Presenting: The Travel Medallion!
The time has come. All the efforts led to this moment when we can finally start upgrading our Travel Medallion. When you visit Robbie after completing the Hateno Village Research Lab quest, he will tell you about a couple of features you can upgrade on your Purah Pad.
Among those features will be the Travel Medallion. Pick the option to start Presenting: The Travel Medallion Side Adventure.
Retrieve the Travel Medallion Prototype
You will start by getting Robbie the Travel Medallion Prototype in Zelda: Tears of the Kingdom.
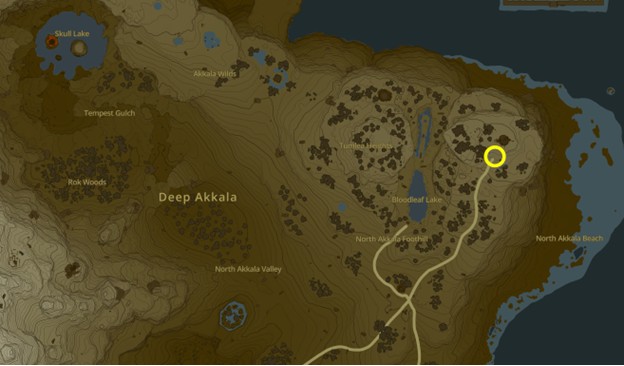
For that, you will be sent to the Akkala Ancient Tech Lab in the Akkala Region. This is found Northeast of Bloodleaf Lake and North Akkala Foothill at the following coordinates: (4505, 3144, 0245). It is Robbie’s old lab, and it is to the northeast of the Hyrule map. The nearest shrine is the Jochi-iu shrine.
When you reach the location and try to enter, you will be ambushed by two Yiga Clan Members. They are a bit tricky to take down but with a bit of effort and patience, you can deal with them.
The best tip is to use anything that stuns them in their place because their mobility is their biggest weapon. Once you have dealt with both of them, you can enter the Lab, and toward the left will be Konba who will give you a Yiga Clan Armor.
Towards the right of the room will be a chest containing the Travel Medallion Prototype. Take it and head back to Robbie.
Hand it over to him and he will upgrade your Purah Pad and you will now be able to use the Travel Medallion to fast travel to any location on the map in Zelda: Tears of the Kingdom minus the irregular terrain.
How to upgrade and use Travel Medallion in Zelda: TotK
Even though you have acquired the Travel Medallion, you must know how to use it. To use it, you need to have a certain number of Map Points. You receive a map point every time you unlock a Skyview Tower. The more towers you unlock, the more gates you get, and the more places you will be able to fast travel to.
| Map Points | No. of Gates |
| 1 | 1 |
| 10 | 2 |
| 15 | 3 |
As you unlock more Map Points, you can head back to Robbie to get the upgraded gates.
To use the Travel Medallion, you will first have to place gates in Tears of the Kingdom. To do this, just travel to the location you want to place a gate at and open the Items Menu, scroll over to Travel Medallion, select, and then place. A gate will appear right below where Link is Standing.
Now, you can fast-travel to this point anytime you want as long as the gate is still there.
With this, Presenting: The Travel Medallion side adventure will be concluded.