Baldur’s Gate 3 does not fall short when it comes to special items. You will find tons to explore and even more when it comes to picking items for your arsenal. Although the possibilities are endless when it comes to combination sometimes you have got to pick the best out of the bunch due to lack of resources. The same might be the case for Adamantine Items in Baldur’s Gate 3.
Out of 6 possible choices, you can not get all of them. That is why we are here to help you make the right decision and get you the most out of your time, effort, and resources.
What are Adamantine Items in Baldur’s Gate 3?
The Adamantine Items in Baldur’s Gate 3 are specially forged items that have some special perks. These items cannot normally be found but rather only be crafted using the particular mold of that item along with Mithral Ore. For their uniqueness and effectiveness, we have categorized Adamantine items as the best loot items to find in BG3.
You can forge these items at the Grymforge after you have completed Baldur’s Gate 3 Adamantine Forge quest. You will most likely encounter this quest near the end of chapter 1. While the quest itself is not tricky, it can give you a hard time if you don’t know what you are doing.
After you have successfully cleared all the objectives and have defeated Grym, the boss in Grymforge, you will now be able to craft the Adamantine Items. BG3 has a limited number of resources and some of them are scarce, just like Mithral Ore.
You will only find two of these in the whole game and forging each of the Adamantine Items requires 1 ore, along with the mold of the item.
If you have both of them, place the Ore in the middle chamber and the mold in the Mold Chamber. You will see a lever to the right of these chambers. Pulling on it will activate the forge. The Lava will rise and you will have your shiny new Adamantine Item.
The best Adamantine Items ranked in Baldur’s Gate 3
Due to the scarcity of Mithral Ore, you can only get your hands on two of the six possible Adamantine Items in BG3. That is why you have to pick favorites so make sure to get it right the first time.
To help you pick the best out of the bunch, we have tried to objectively rank them based on how useful each item might be to every player.
The items are mentioned in order of worst to best.
Adamantine Mace
Item Type: Melee Weapon
Crafting Material Required: 1x Mace Mold, 1x Mithral Ore
Reeling Debuff: 1 Turn
The best thing about the mace is that you can sell it for 190 gold. Other than that, if you put it in comparison with all the other Adamantine Items in BG3, you won’t find much use for it. Stats-wise, it gives you a 1d6+1 Bludgeoning Damage but it is going to fail against enemies who have immunity for it.
It is good for bashing the enemies in the head with it because of the Concussive Smash action. You are going to end up Dazing an enemy. Lastly, if you want to smash items in a single blow then you can go for it because the chance of you landing a critical strike is 100%.
Adamantine Scimitar
Item Type: Magic Weapon
Crafting Material Required: 1x Scimitar Mold, 1x Mithral Ore
Reeling Debuff: 1 Turn
With a 1d6+1 Slashing damage, the Adamantine Scimitar isn’t too far ahead of the Mace but is surely a better choice. You are going to be able to inflict a bleeding effect on enemies because of Lacerate Proficiency.
Similar to the Mace, you can also smash any object in a single hit due to high critical chances. Another perk it has over the Mace is the ability to dual-wield it. You must love it dearly to use both of your Mithral Ore on it. With all of the downsides, the Lacerate proficiency is what keeps it in the running.
Adamantine Longsword
Item Type: Magic Weapon
Crafting Material Required: 1x Longsword Mold, 1x Mithral Ore
Reeling Debuff: 1 Turn (One-Handed)/ 2 Turns (Two-Handed)
Amongst all of the other Adamantine Items in BG3, the Adamantine Longsword serves as the best “weapon” out of the group. With decent amounts of damange and Lacerate Proficiency, you’ll find yourself using this Longsword, more often you predicted.
Unlike the pervious two entires on the list, it is actually viable against bosses and enemies. This also gives you the ability to do Rush attack that can stagger enemies if done properly. If you don’t have any other weapon in your hands, you can two-hand the longsword to double its abilities; damage, reeling effect, etc. All in all, this is a solid pick but due to the lack of verstality, it still doesn’t count as the best Adamantine Item.
Adamantine Scale Mail
Item Type: Medium Armor
Crafting Material Required: 1x Scail Mail Mold, 1x Mithral Ore
Reeling Debuff: 2 Turns
Jumping into another category of Adamantine Items – Armors. The Adamantine Scale Mail is a medium-weighted armor and can be worn by pretty much any player running a build or class with Medium Armor Proficiency.
If you can’t wear it, there is a good chance that someone from your party can wear it, making it an asset to the whole party.
Since it is armor it has got to protect which it does. The Sacle Mail offers great protection against most kinds of attacks, especially magic. Due to its high reeling effect, enemies won’t be able to precisely land shots on you so you always have the upper hand in that sense.
The only reason this armor is not at the top spot is due to the high Dex value it requires if you want a greater AC value. Other than that, it is a solid pick for any build.
Adamantine Shield
Item Type: Shield
Crafting Material Required: 1x Shield Mold, 1x Mithral Ore
Reeling Debuff: 2 Turns
You want a shield that offers solid protection and can be used by anyone, regardless of their stats. That’s where the Adamantine Sheild comes in. It can be wielded by any player regardless of their armor proficiency.
The unique thing about the shield is the reeling effect it applies on the enemies, every time they miss a melee shot. This allows even fewer chances of them landing a shot on you. Not only that, with the shield, the enemies are not able to land critical hits at all.
On top of all of the protection, you can hit back as well with the Shield Bash ability. Knocking enemies off their feet is something you can do with ease using the Adamantine Shield. All of the abilities combine to give it the second spot on the list.
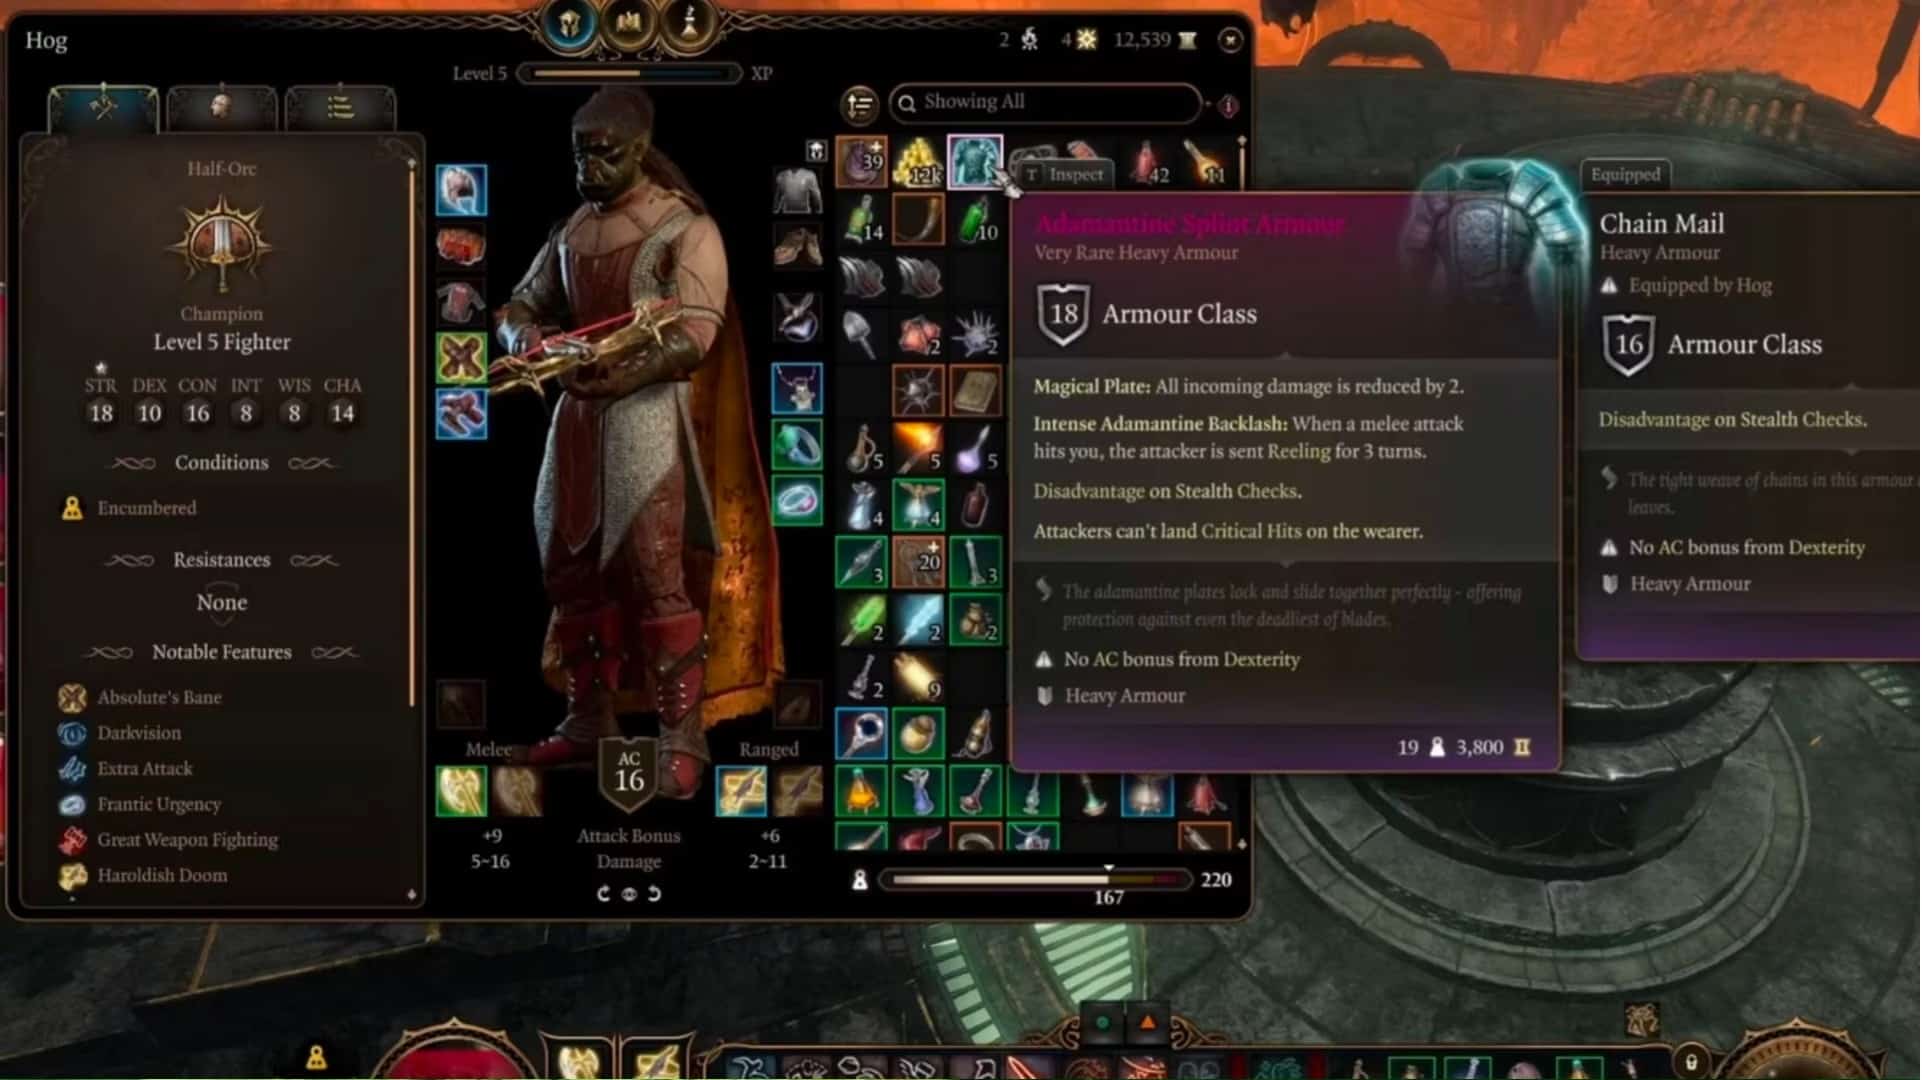
Adamantine Splint Armor
Item Type: Heavy Armor
Crafting Material Required: 1x Splint Mold, 1x Mithral Ore
Reeling Debuff: 3 Turns
The Adamantine Splint Armor is a very Rare Armor in Baldur’s Gate 3 and certainly a solid one. Wearing it is going to make you feel pretty invincible due to the damage reduction of all incoming attacks. This effect is stackable and during a battle, it proves to be life-saving.
You can use it in tandem with the Shield and you have got yourself an invincible build where damaging you is going to be a skill most enemies won’t have.
The reason why it earns the top spot on the list is because of the damage reduction plus the 3 reeling effects it inflicts on the enemies.
Both of these combined make it the best choice when it comes to Forging Adamantine Items in BG3.