
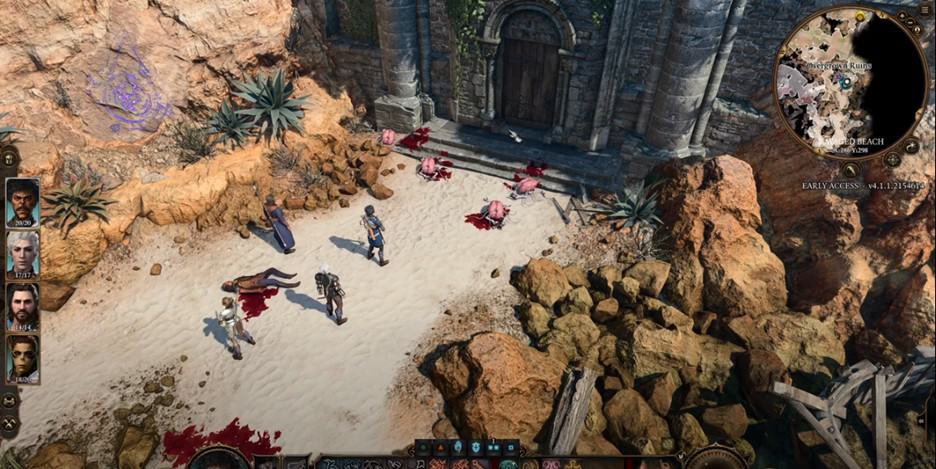
Overgrown Ruins is the first secret area you will come across in Baldur’s Gate 3. After the Nautiloid crash during the prologue, you will wake up on the Ravaged Beach. The first person you will encounter is Shadowheart, who you can recruit. She is trying to enter a locked area to find some supplies. This will start the Investigate the Ruins side quest.
Overgrown Ruins in Baldur’s Gate 3 is your first taste of the grand adventure awaiting you. From difficult enemies to mind-boggling puzzles, this area has it all. In this guide, we will tell you how you can enter it, defeat the bandits, disarm the traps, and find one of the most important companions of the game.
Overgrown Ruins Location and how to enter it
Overgrown Ruins is to the North of where you found Shadowheart on the beach. Once you travel in that direction, you will find a locked door beside a waypoint known as the Beach waypoint. This door leads to the Dank Crypt inside the Overgrown Ruins. There are three additional locations from where you can enter it. We will be covering all of them in detail.
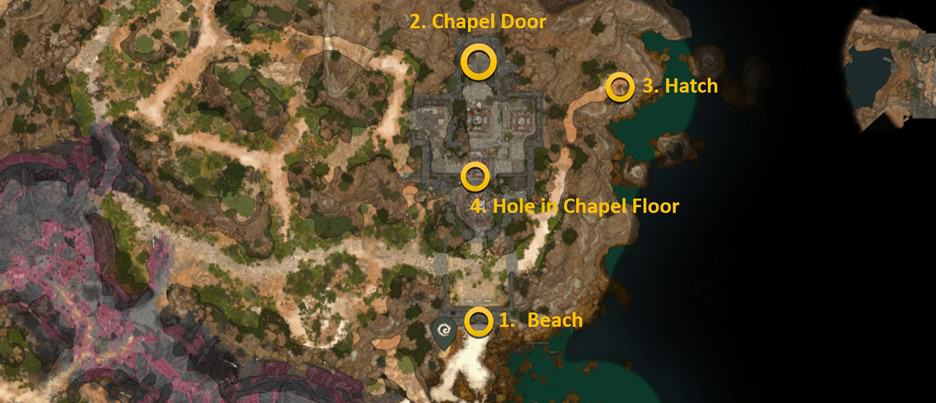
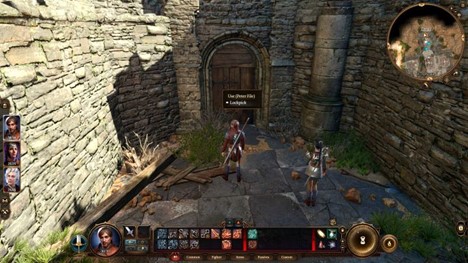
1. Ancient Door (South Entrance)
The ancient door on the beach is locked. If you have Thieves Tools in your inventory, you can try to lockpick it. You will need to pass the DC20 Dexterity check. We recommend you find and recruit Astarion first, as he has the best chance of passing the check.
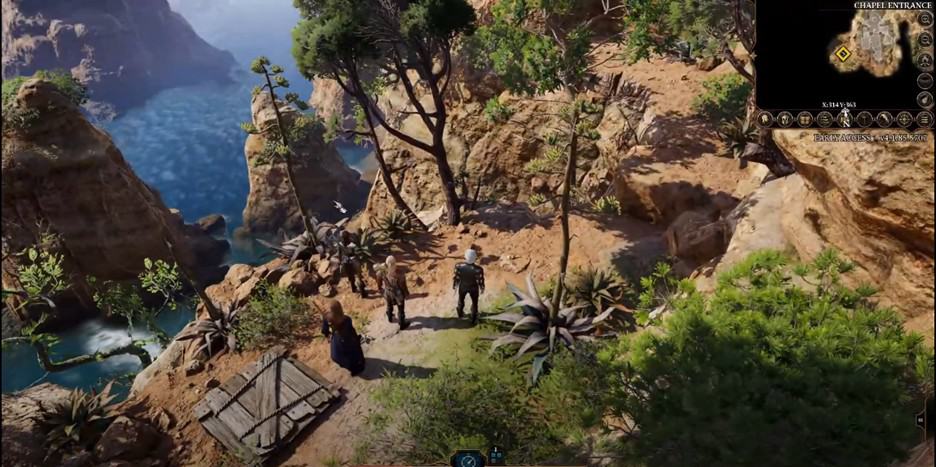
2. Chapel Door (North Entrance)
If you go to the Northernmost area of the Overgrown Ruins, you will find an Ornate locked door. Make sure to loot the backpack and Burlap sack on your way. There is a bandit doorkeeper beside it. You can talk to him and deceive him into opening the door. He will never open the door if you tell him about the other two bandits.
If you manage to get the door opened, kill the bandit. Otherwise, he will run away and join his group.
3. Hatch in Ruins (East Entrance)
If you go east of the Overgrown Ruins, you will find a narrow track that leads downwards. It is locked and requires Thieves Tools in addition to passing a DC10 Dexterity check. Opening this will lead you directly to the Dank crypt without any confrontations.
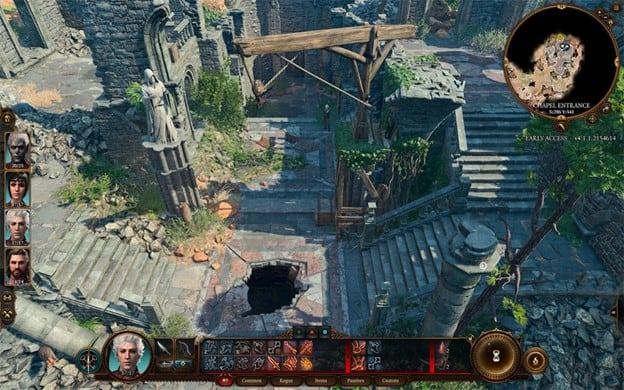
4. Chapel Floor (Central Entrance)
The final entrance is at the center of the Overgrown Ruins in Baldur’s Gate 3. There are three bandits in this area. You can either persuade or intimidate them into leaving the area. If you fail, you can always kill them. There is a massive crack in the floor with a huge rock hanging above.
Use any ranged attack, like arrows or spells, to break the rope. The rock will create a gap for you to enter the kitchen area. Before jumping down the hole, remember this is a way one trip. You can’t use the same hole to get out.
There are five bandits in this area. You can either deceive them into letting you in or kill them. They are powerful for beginners. Make sure to ignite the oil barrels to kill them fast. You can also explore the beach more to level up your party to level 3. Below this level, the fight will be a bloodbath.
Defeat the Bandits
The next major task you will get is to defeat all the bandits inside the Bedchamber. It depends on how you entered this area. If you drop from the hole, you must face all six in a narrow place. If you manage to deceive Andorn the doorman and kill him, you will face five more bandits in the bedchamber
Go down to the library and find a statue in the alcove (South region). As you go near it, a perception check will occur. If any party member passes it, it will reveal a skull-shaped lever. Pull the lever to open the locked door leading to the Dank Crypt. If you fail here, try to open the hatch in the East of the ruins.
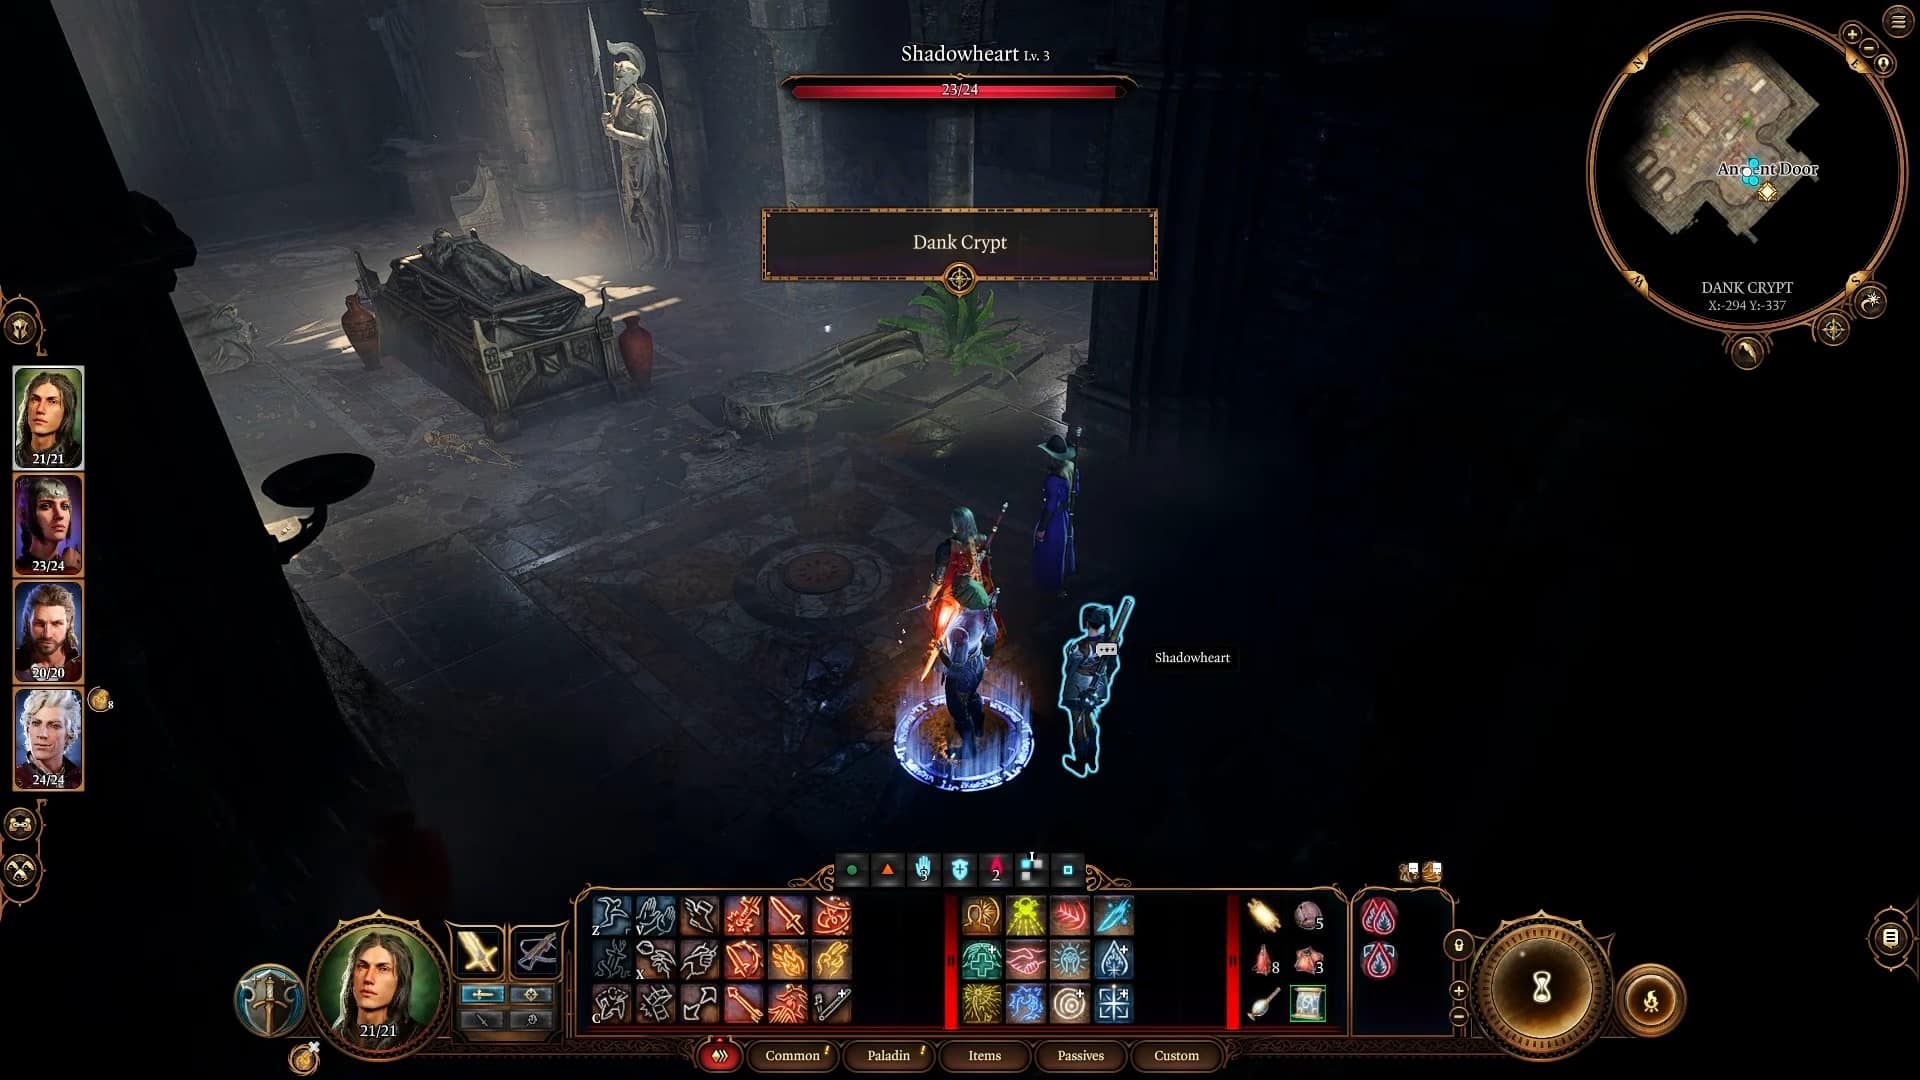
Recruit Withers in Dank Crypt
The Dank Crypt map is divided into three main areas. As soon as you enter it, you will notice a few chests that you can search for rudimentary loot. There are two doors in this area. One is locked, and the other one is open.
1. Sarcophagus Room
This room is full of sarcophagi, which you can loot. This room has many traps, including grease and fire arrows, which will be activated if you touch the central sarcophagus.
Travel across the room to pass the perception checks and locate all the traps. These include vents to pour grease and gargoyle heads to shoot fire arrows. You will also locate a Button on a pillar near the central sarcophagus.
We don’t recommend trying to deactivate traps at this moment. You won’t be able to pass the checks, and failing them will instantly trigger the traps. Pick heavy things and place them on the vents. Once you are done, interact with the Sarcophagus. This will trigger the traps, but the objects will block the vents from spreading grease. Press the button pillar to deactivate Gargoyle’s head.
You can loot the sarcophagus to obtain a versatile spear, The Watcher’s Guide. This weapon grants you an advantage against the same enemy if you miss hitting them previously. Also, please pick up the Engraved Key, which we need to open the locked door in the previous room.
2. Jergal Room
Open the locked door in the main room of the Dank Crypt with the Engraved Key. This will lead you to a room with a Jergal statue. Pass the religion checks to learn more about history.
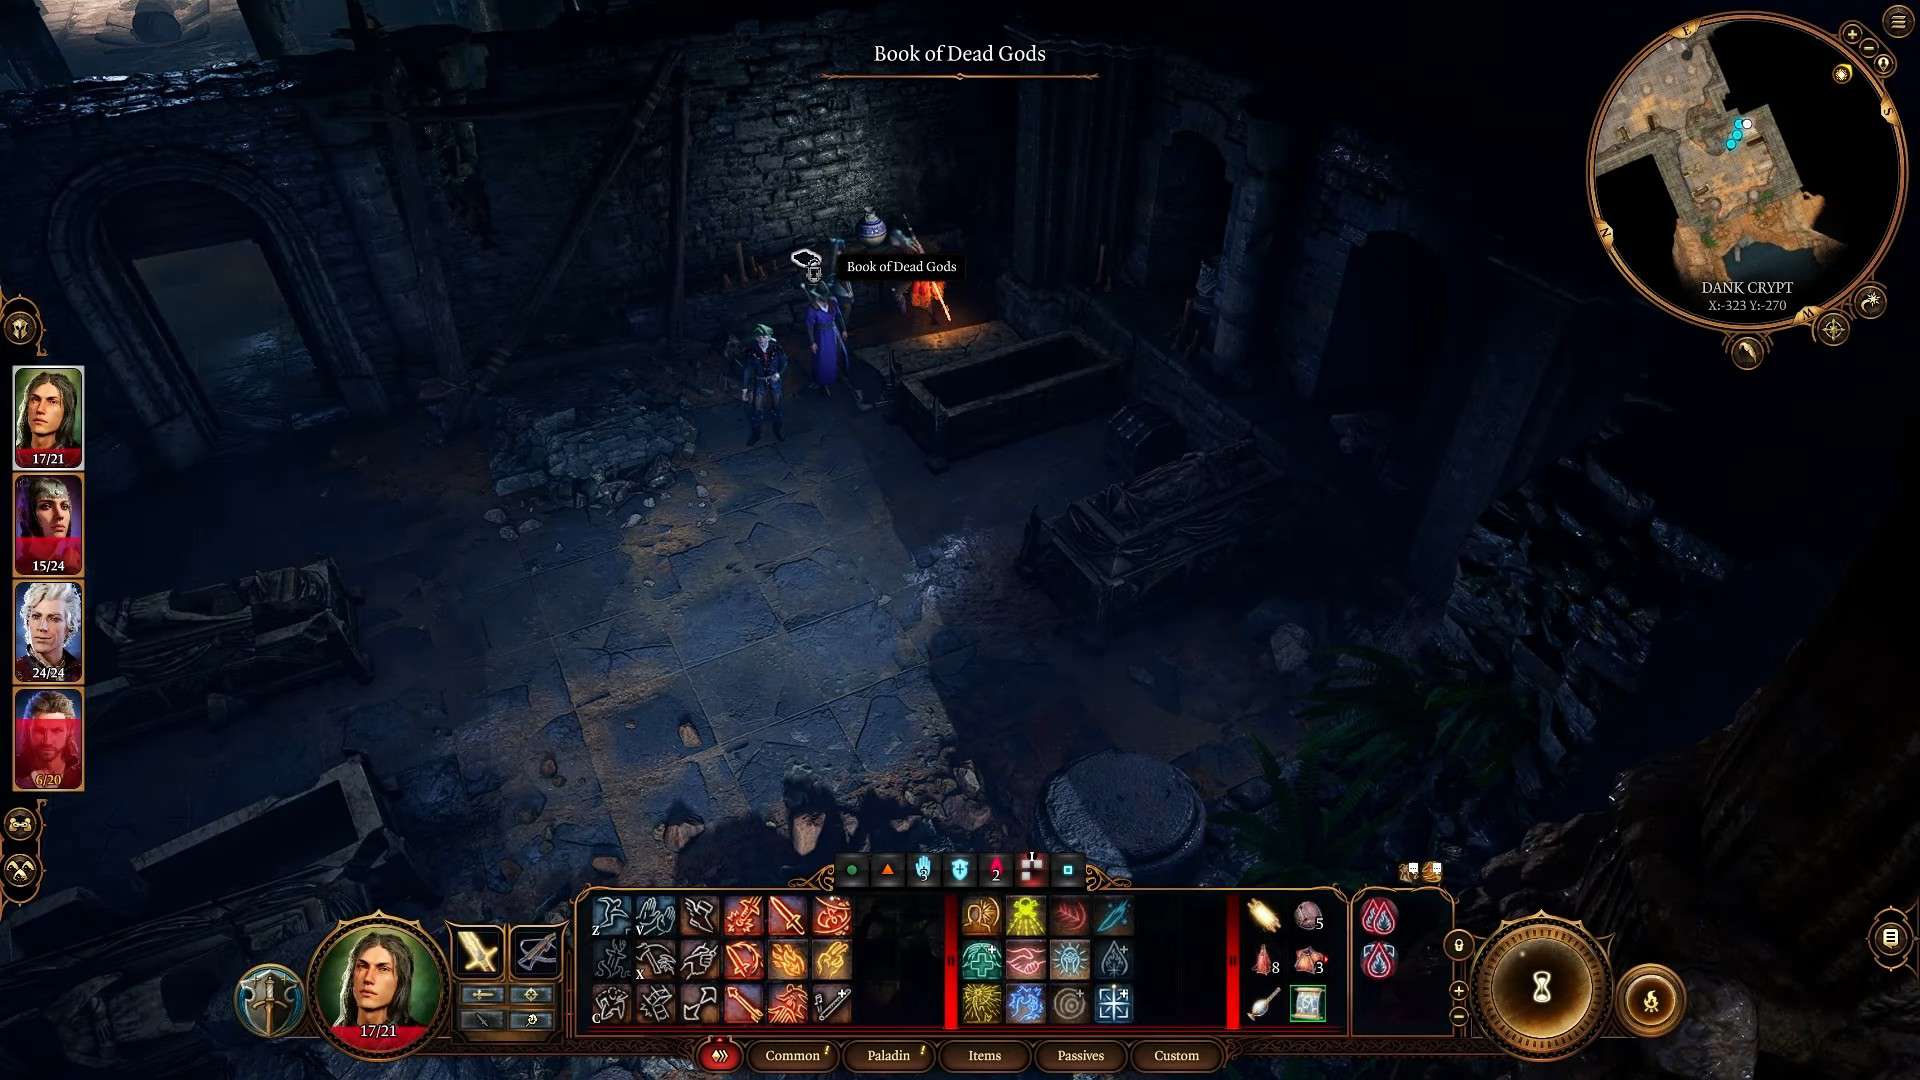
Go to the west part of the room to find another chamber. Loot the sarcophagus inside it and open the heavy Chest to obtain the Book of the Dead Gods. You can read it to obtain a random scroll, but reading it requires you to pass several intelligence checks.
Go west to find a hole leading downstream. This will lead you to the locked hatch in the eastern part of the Overgrown Ruins.
3. Withers in the Hidden Room
Once you are done in the Jergal Room, go to its Northeast corner to find another button by passing a perception check. Press this button to open a hidden room. However, this will also reanimate the Dead Scribes. You need to defeat all five of them before moving forward.
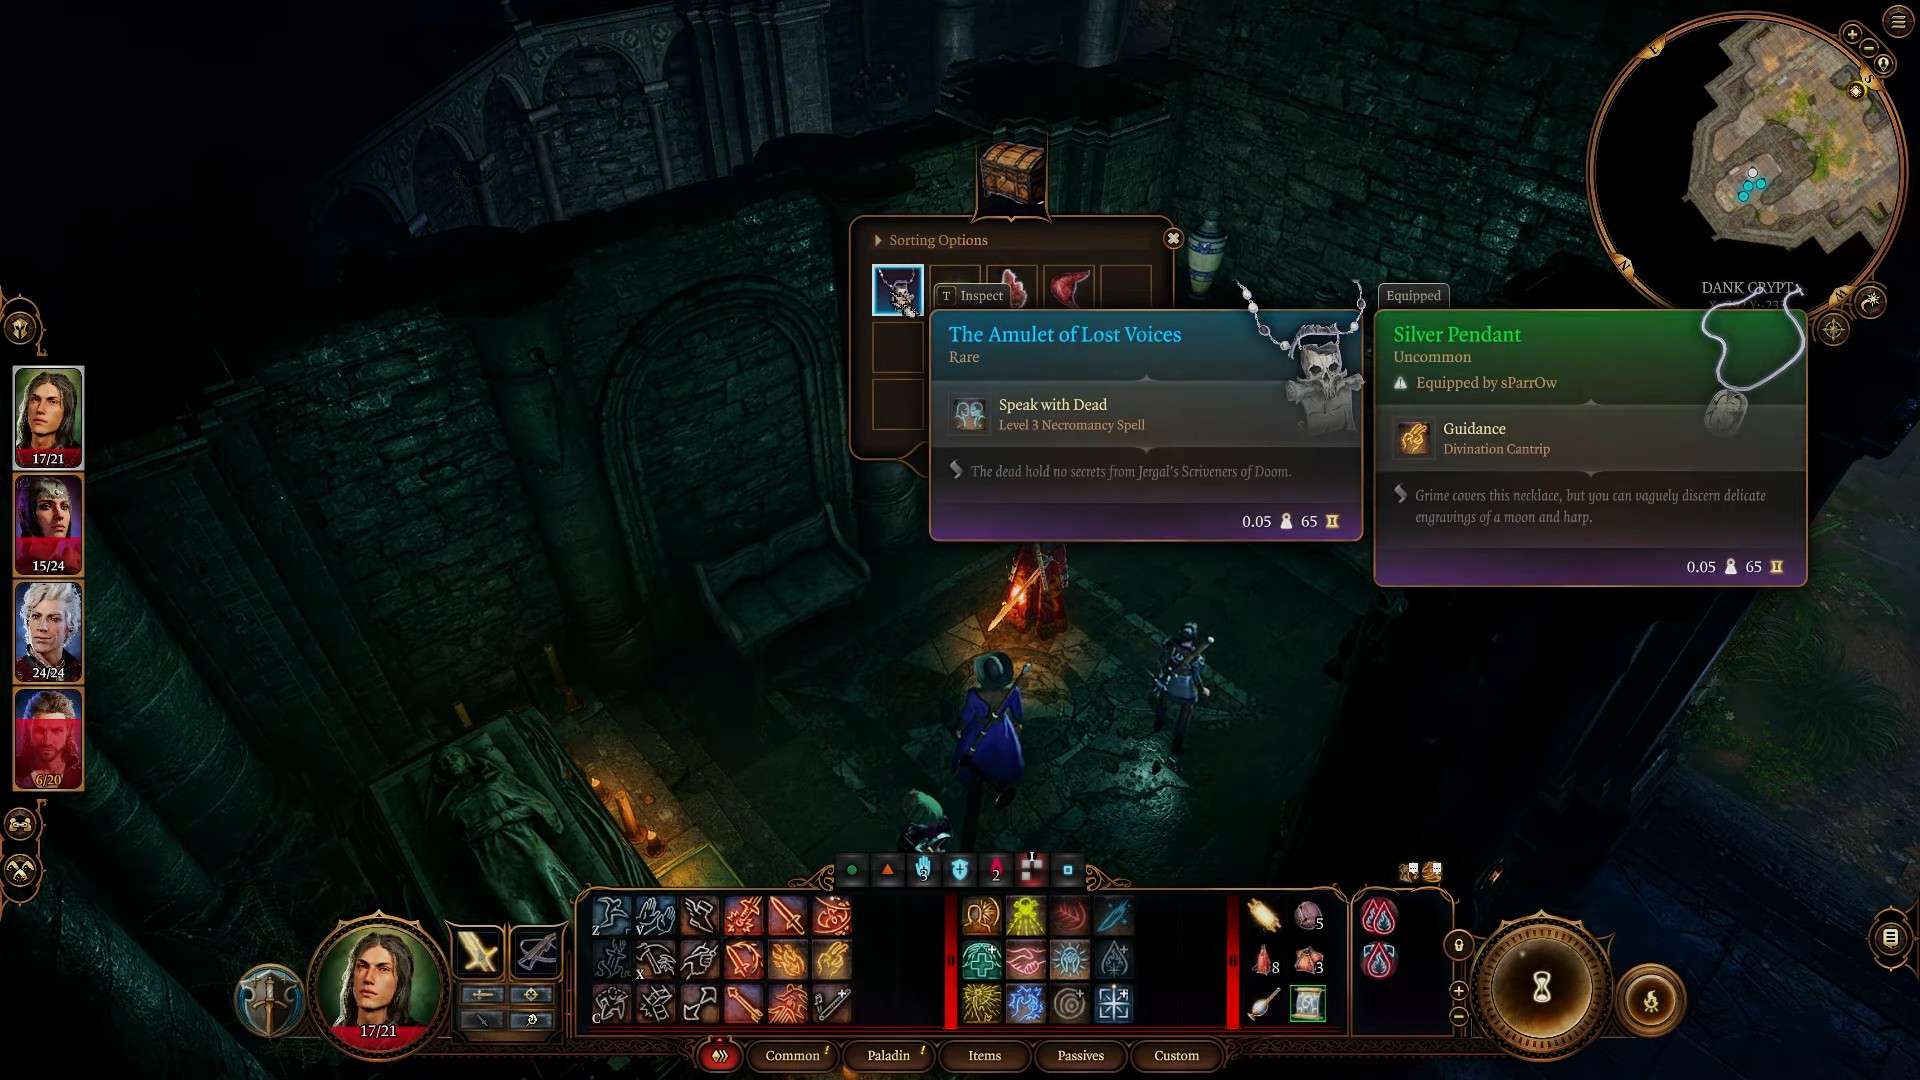
There is another Heavy Chest in the room. Open it to obtain the Amulet of Lost Voices. This accessory allows its wearer to use Speak with the Dead spell without learning it. Now talk to a hooded figure near the Richly Adorned Sarcophagus. Don’t attack him. Answer his few questions, and he will agree to join your camp.
He is Withers, who can bring any member of your party back to life with a small payment of 200 gold. He will always revive your party members with more than half health, which is impossible with other spells and scrolls.