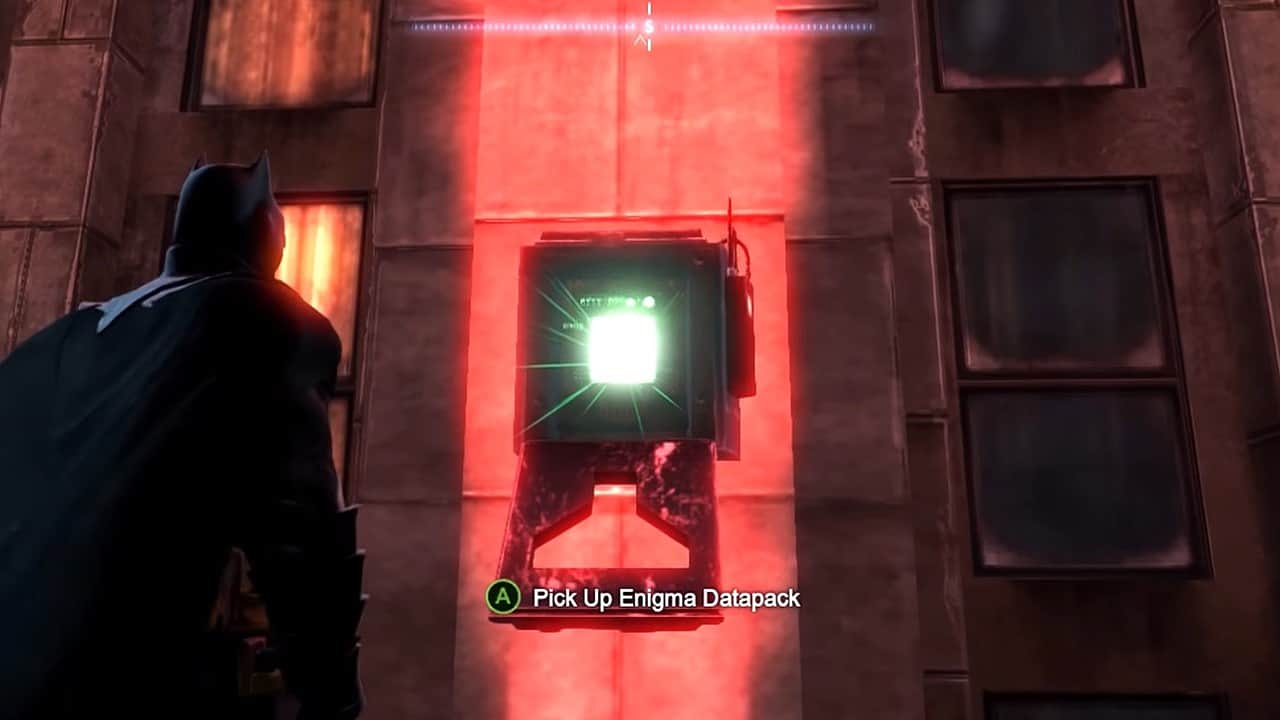
Enigma Datapacks are collectible data files found across all districts in Batman: Arkham Origins. These files contain sensitive information regarding influential figures of Gotham City that were hidden by Enigma, who later becomes the Riddler. He threatens to sow chaos in Gotham by making the information public unless you retrieve all of it before Christmas.
There are 20 Extortion Files, each split into 10 Datapacks. You must collect all 10 Datapacks of the corresponding file to compose it. This makes a total of 200 of these Enigma Datapacks that you need to retrieve in the game.
There is a way to mark the Datapacks on your in-game map in Arkham Origins by interrogating the Data Handler. Each Extortion file has its own Data Handler and a simple interrogation will mark the Datapacks of the corresponding file on your map.
While some Datapacks are out in the open, most of them are locked behind cases and areas. You will need to bring your gadgets like Explosive Gel, Shock Gloves, Batarangs, Cryptographic Sequencer, and the Batclaw to be able to reach them.
We advise you to only start collecting Enigma’s Extortion Files after unlocking all of your gadgets and beating the main campaign. This is because some of the Datapacks are locked behind areas that can only be accessed after completing certain missions. If you want to avoid backtracking, it’s best to start later in the game.
Each Datapack gives you 2000 XP while completing the file will grant you another 10,000 XP. After collecting all the Datapacks in Arkham Origins, you can visit Enigma’s hideout to get the Riddler Trophy and an additional 100,000 XP.
We have mentioned all the Datapacks corresponding to each file for your ease so let’s get started on saving Gotham once again.
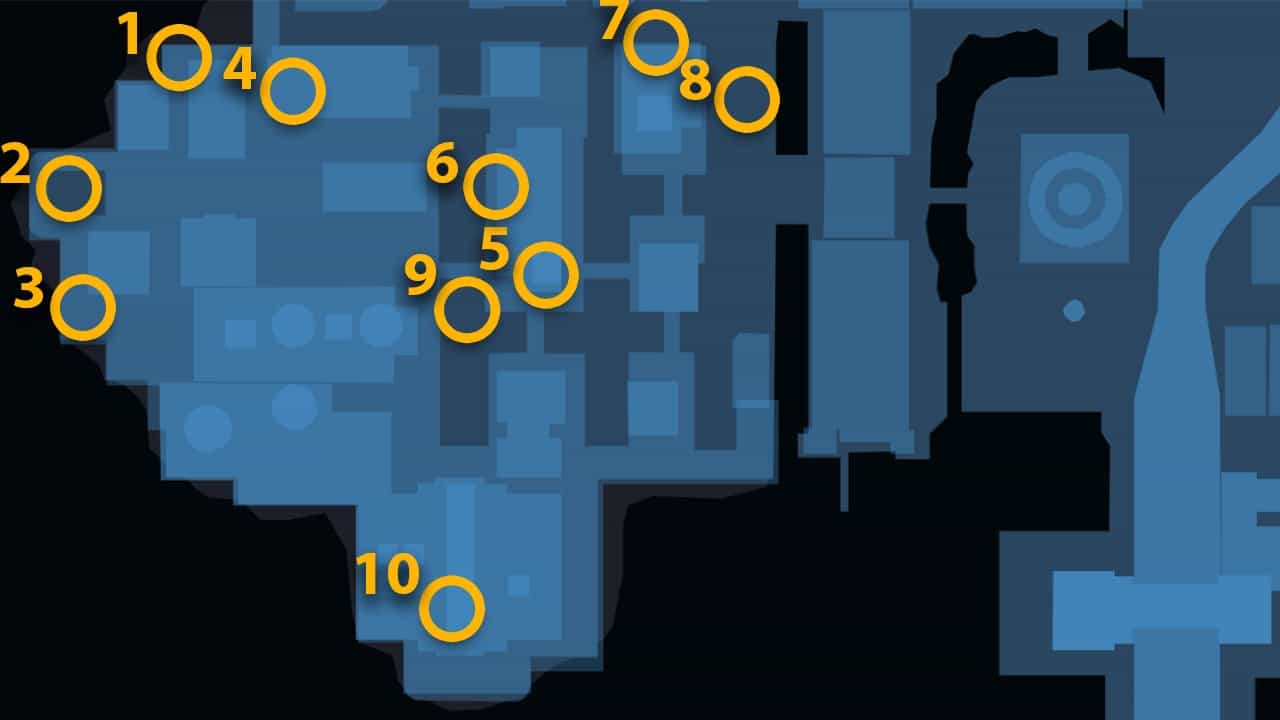
Extortion File 1 locations – Park Row
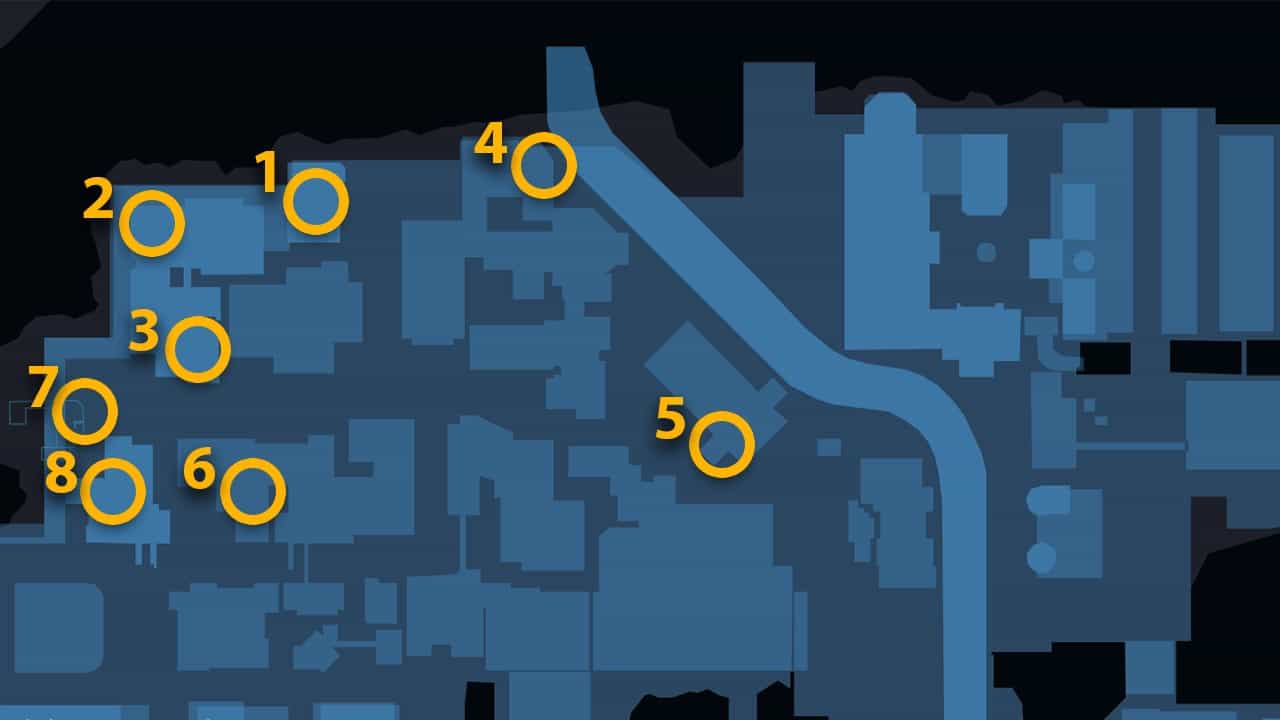
Datapack 1/10
Requirements: Explosive Gel.
Head on the rooftop of the building east of the Comms Tower, near the riverside. Drop down the ledge and you will find a shack with a destructible wall. Use the Explosive Gel to blast open the weakened wall and grab the first Datapack in Batman: Arkham Origins.
Datapack 2/10
Requirements: Shock Gloves.
The next Datapack is in a locked box at the end of the path just west of the Comms Tower. To unlock it, use your Shock Gloves to power the generator and then quickly run across the 4 pressure pads.
Datapack 3/10
Requirements: None.
This is a gliding challenge where you need to press 3 pressure pads within 10 seconds to successfully complete it.
Head to the rooftop south of the Comms Tower and press the pressure pad to start the challenge. Glide to the building across, the pressure pad is under the sign.
To maintain momentum for the next glide, hold the jump button after coming in contact with the pressure pads.
The last one is at the base of the first building and next to it is the data file in the wall-mounted metal box.
Datapack 4/10
Requirements: None.
This Enigma Datapack is locked in a fenced area behind the building west of the highway in the northeast area of Park Row. Destroy the computer next to it to release the Datapack. You can also glide down from the nearby buildings to reach it easily.
Datapack 5/10
Requirements: Batclaw.
This is a time trial where you need to grab the Datapack within 7 seconds after stepping on the pressure pad. This pad can be found on the west rooftop behind the Church in the east corner of Park Row.
Grapple towards the stairs after the challenge starts and quickly pull out your Bat Claw to grab the Datapack from the box on the Church wall.
Datapack 6/10
Requirements: Explosive Gel.
It is inside a shack with a destructible wall that you can break using the Explosive Gel similar to the first Datapack. You will find it on top of the Soder Cola neon sign building, in central Park Row.
Datapack 7/10
Requirements: Batclaw.
This Datapack is found in the corner of the “Transatlantic By Air” Billboard sign near the western border of Park Row. Use your Batclaw to snatch it for yourself.
Datapack 8/10
Requirements: Batarang.
There is a light puzzle on the east wall behind the building with the big pink neon sign in the southwest area of Park Row. It is just a few meters southeast of the 7th datapack. There are five lights that light up from left to right, just wait for the last (right-most) to glow and throw your Batarang at it. It will unlock the box holding the Enigma Datapack in Batman: Arkham Origins.

Datapack 9/10
Requirements: None.
To get this data file, you need to use the back entrance of the Courthouse. Head to the main room through the door on your right and turn right from the pig graffiti in the center. The Enigma Datapack is lying on the ground, in front of the eastern door.
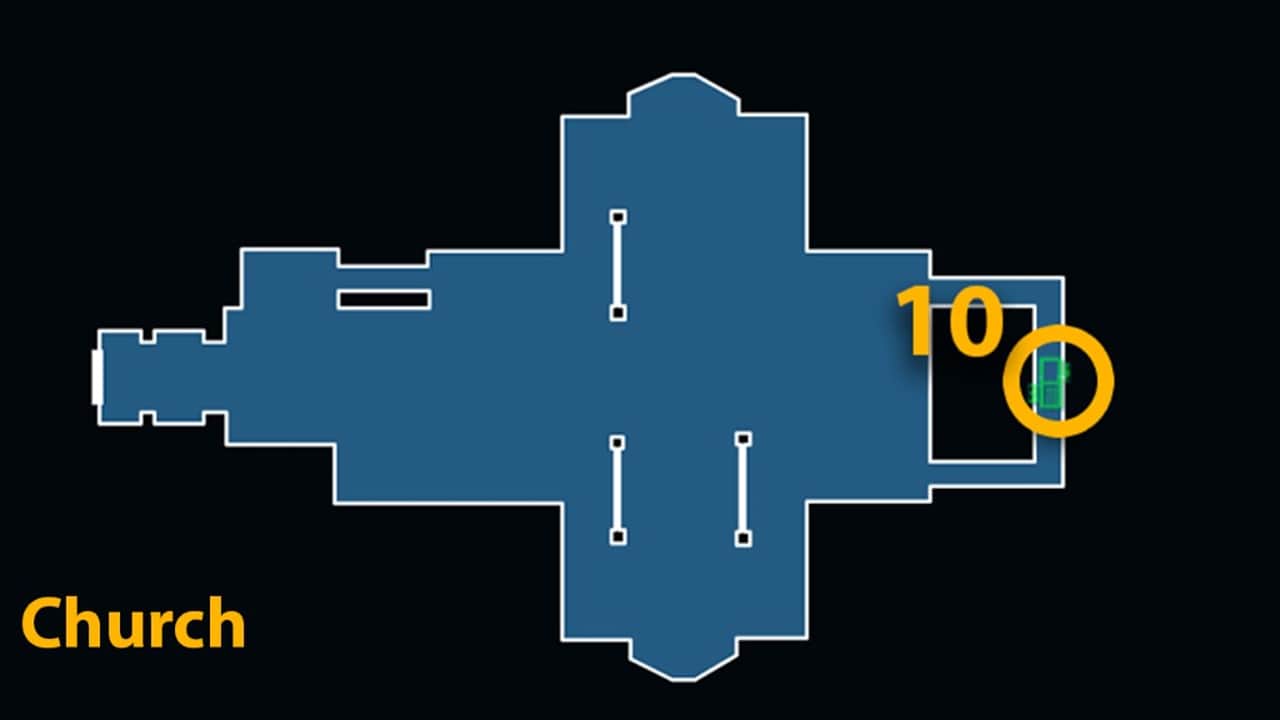
Datapack 10/10
Requirements: None.
Enter the Church using the main entrance and head to the very back of the room. There are two vents on either side and since they are connected, you can use any one of them to enter. Head inside, and you will find the Datapack around the corner.
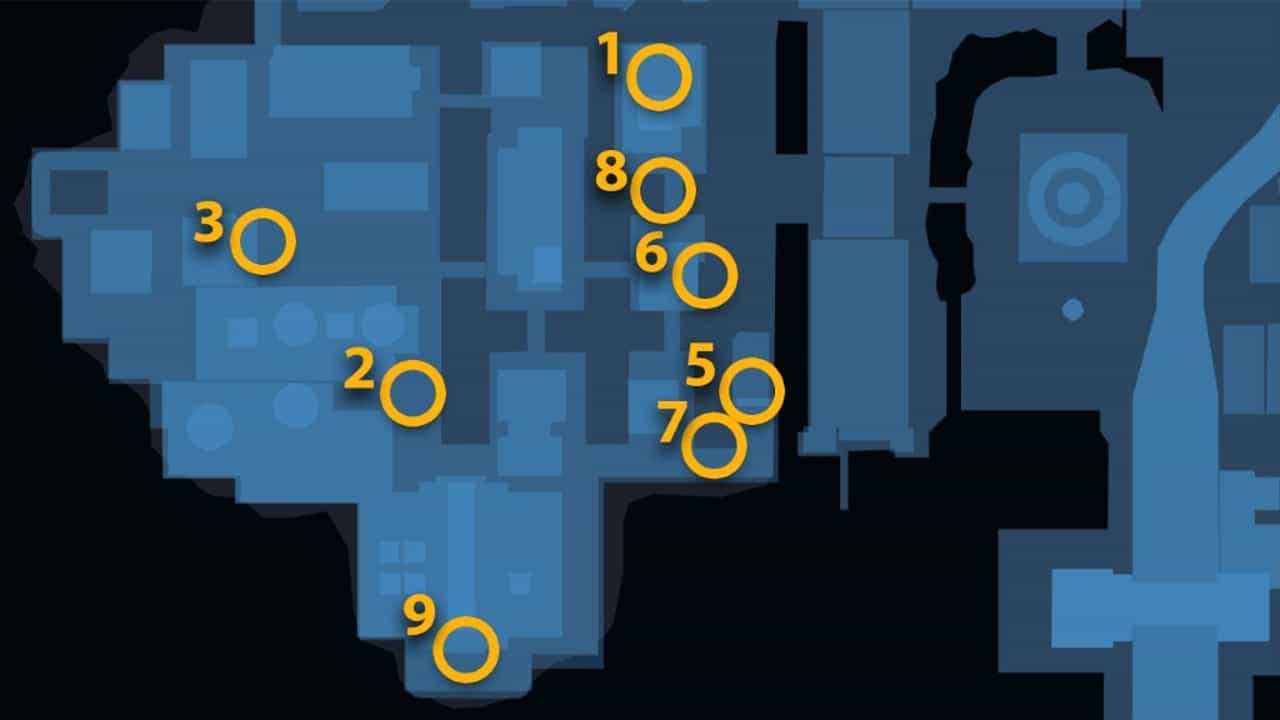
Extortion File 2 locations – Park Row
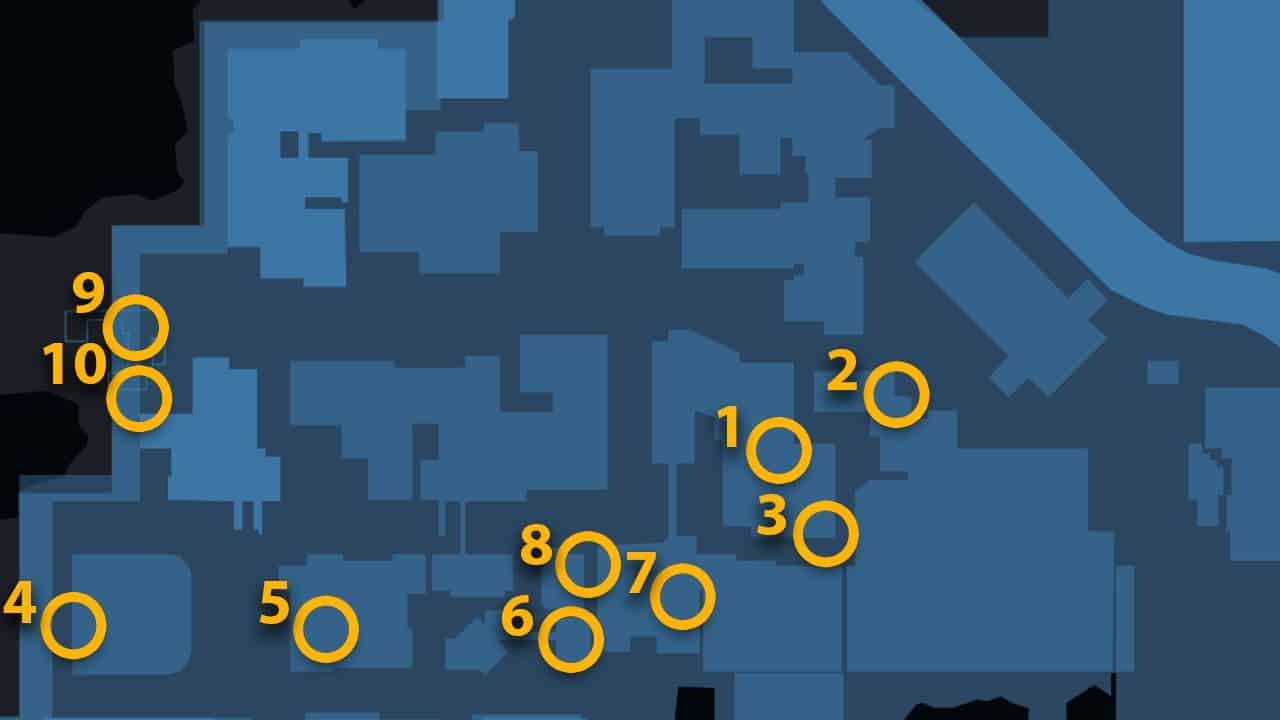
Datapack 1/10
Requirements: Explosive Gel.
Head up to the rooftop of the building east of the Gotham City Light & Power building, with the blue sign in front. Use your Bat Scanner to find the weakened wall and blast it with Explosive Gel. The Enigma Datapack will be on the other side.
Datapack 2/10
Requirements: None.
Glide from the Church with gargoyles on top towards the huge blue light bulb sign of the Light & Power building. Land on top of the west building, the one across the water tank. The Datapack is hidden between the wall and the ventilation shaft in Batman: Arkham Origins.
Datapack 3/10
Requirements: None.
There is a cage below the blue light bulb north of the Gotham City Light & Power building. Slide under the gate, just below the water tank to grab your Datapack.
Datapack 4/10
Requirements: Cryptographic Sequencer.
The next Datapack is in a locked box on the north side of The Comms Tower. Just jump down onto the top balcony of the building across the “Ferris Aircraft” billboard. Hack the panel beside it using your Sequencer to unlock the Datapack box. The correct password is “QUANDARY”.
Datapack 5/10
Requirements: Shock Gloves and Remote Control Batarang.
Head to the rooftop of the building west of the Gotham Light & Power building, adjacent to the Ace Chemical Plant, in the southern center of Park Row. Use your Shock Gloves to power the antennas and throw your Remote Control Batarang towards it. The fuse box is next to the Datapack on the chimney wall.
Datapack 6/10
Requirements: Remote Claw.
There is a shack with a wooden wall that you can break through to get this Enigma Datapack. Head up to the Ace Chemicals’ rooftop and look east to find the shack. Use your Remote Claw on the anchor point and zipline towards the entrance to burst through.
Datapack 7/10
Requirements: Shock Gloves and Batclaw.
There is a square area between buildings directly east of Ace Chemicals that you can only enter by gliding from the rooftops. Use your Shock Gloves to power the generator and step on the pressure pads corresponding to the illuminated lights below it. Lastly, just your Batclaw on the Datapack box to open it.
Datapack 8/10
Requirements: Glue Grenade and Cryptographic Sequencer.
In the alleyway north of the Ace Chemicals building, a leaking steam pike is blocking your path to the Datapack. Use your Glue Grenade to secure it and then crawl under the gate. Hack into the security panel to unlock the Datapack. The correct password is “TRICKERY”.
Datapack 9/10
Requirements: Remote Control Batarang and Remote Claw.
On the upper west side of Park Row, there is a blocked sewer entrance at the end which is the door leading to Bane’s HQ. Head down the stairs and break through the vents to get to the Datapack puzzle in Batman: Arkham Origins.
Use your Remote Control Batarang and thread it through the fence gaps on the other side to hit the green-lit button. It will serve as the anchor point for your Remote Claw that you can grapple onto to grab the Enigma Datapack.
Datapack 10/10
Requirements: Batclaw.
The last Datapack is in Bane’s Field HQ located in the western Park Row. Head down to the main area and into the office on your right. Use your Batclaw to pull down the vent on the roof to reveal the data files. Use the Batclaw again to acquire it.
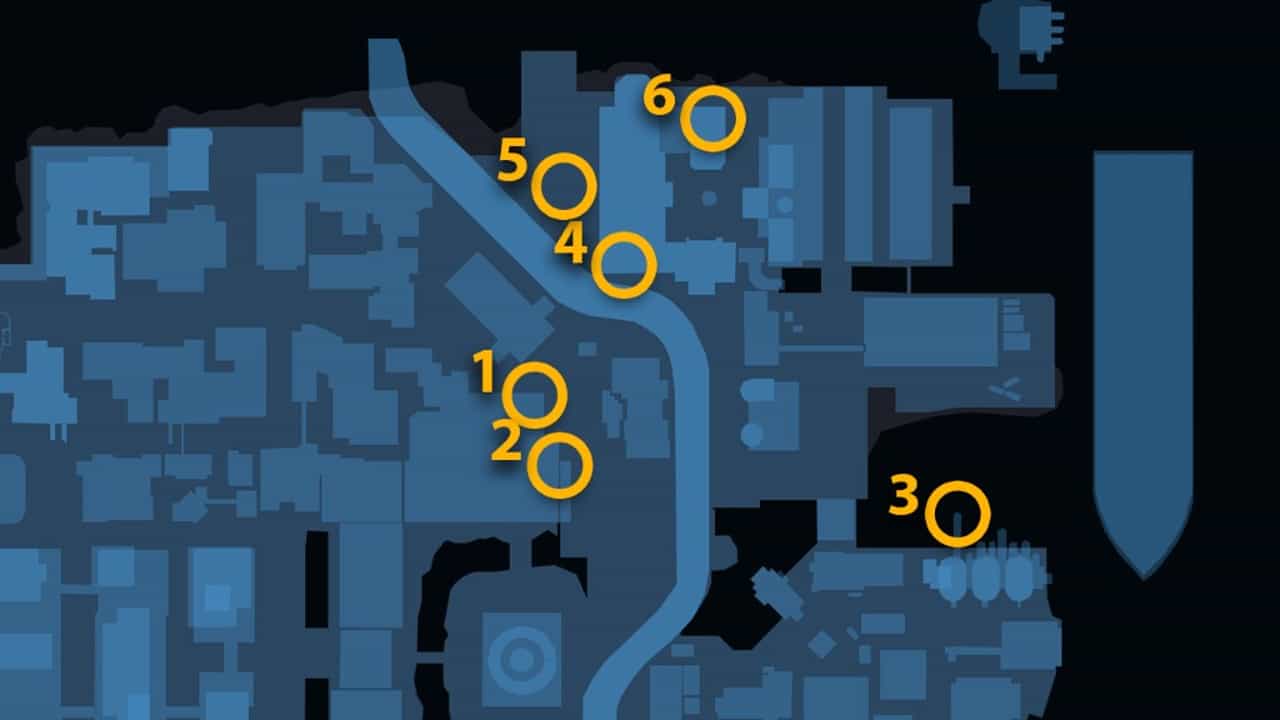
Extortion File 3 locations – The Bowery
Datapack 1/10
Requirements: Cryptographic Sequencer.
The first Datapack for Extortion File 3 is found behind Carmine Hotel in the northwest area of The Bowery. Use your Cryptographic Sequencer to hack into the lock to retrieve the Datapack. The correct password is “CHRONICLES”.
Datapack 2/10
Requirements: Shock Gloves and Batclaw.
Southwest of the Comms Tower, head down to the lower section of The Bowery which is surrounded by fences and metal pipes.
Use your Shock Gloves to power the generator and then turn the handle of the metal pipe behind you using the Batclaw. It will open the fenced area and remove the steam so you can safely grab the Datapack.
Datapack 3/10
Requirements: Shock Gloves.
In western Bowery, you will find this Enigma Datapack behind a white building with white graffiti. Use your Shock Gloves to power the generator and press the pressure tabs mimicking the pattern light shines on the wall.
Datapack 4/10
Requirements: None.
This Enigma Datapack is on top of the GCR Tower and it being the highest building in the area makes it tricky to get to. You will need to jump from the southwest building which is the second-highest in the area.
Dive till you are close to the rooftops of the buildings below and then open your wings to glide seamlessly up to the tower to snatch the Datapack for yourself in Batman: Arkham Origins.
Datapack 5/10
Requirements: None.
You need to get on top of the Soda Cola building for this Datapack. Head to the rooftop of the building to its left and grapple from the gargoyle to boost yourself in the air. Turn around and glide up and down to sustain yourself till you reach the small ledge next to the neon sign for the Datapack.
Datapack 6/10
Requirements: Remote Control Batarang, Batarang/Multi-Target Batarang, and Batclaw.
To acquire this Enigma Datapack, you need to pass the target practice trial. Head to the bridge west of the Hotel in the center of The Bowery and shoot a Remote Control Batarang towards the Hotel sign. There is a green switch you need to hit just across the corner, next to the telephone booth.
You will have 6 seconds to hit the next few targets so be very quick and precise with your throws. There is one to your right, on the pillar behind the Restaurant sign board. The next three will appear in the middle of the Hotel building which you can quickly fire or use Multi-target Batarang to hit.
Use your Batclaw to grab the Databank under the Hotel sign.
Datapack 7/10
Requirements: None.
From the top of the Ace Chemicals building, jump down from the eastern edge and land in the cage below. Just grab the Datapack in the middle to acquire it. Note that the fence is not climbable so you have to jump in from the top for the Datapack.
Datapack 8/10
Requirements: Shock Gloves and Batclaw.
In the northeast corner of The Bowery, there is a generator on the wall with graffiti of half a face just next to the Wonder Expo building. Shock it using your Shock Gloves and then retrieve the Datapack above using Batclaw.
Datapack 9/10
Requirements: Batclaw.
Head inside The Mad Hatter’s shop and next to the counter you will find a vent on the wall. Use your Batclaw to pull it down and crawl inside to find the Datapack. It will be at the very end of the path and be careful not to get spotted by enemies in the sewers.
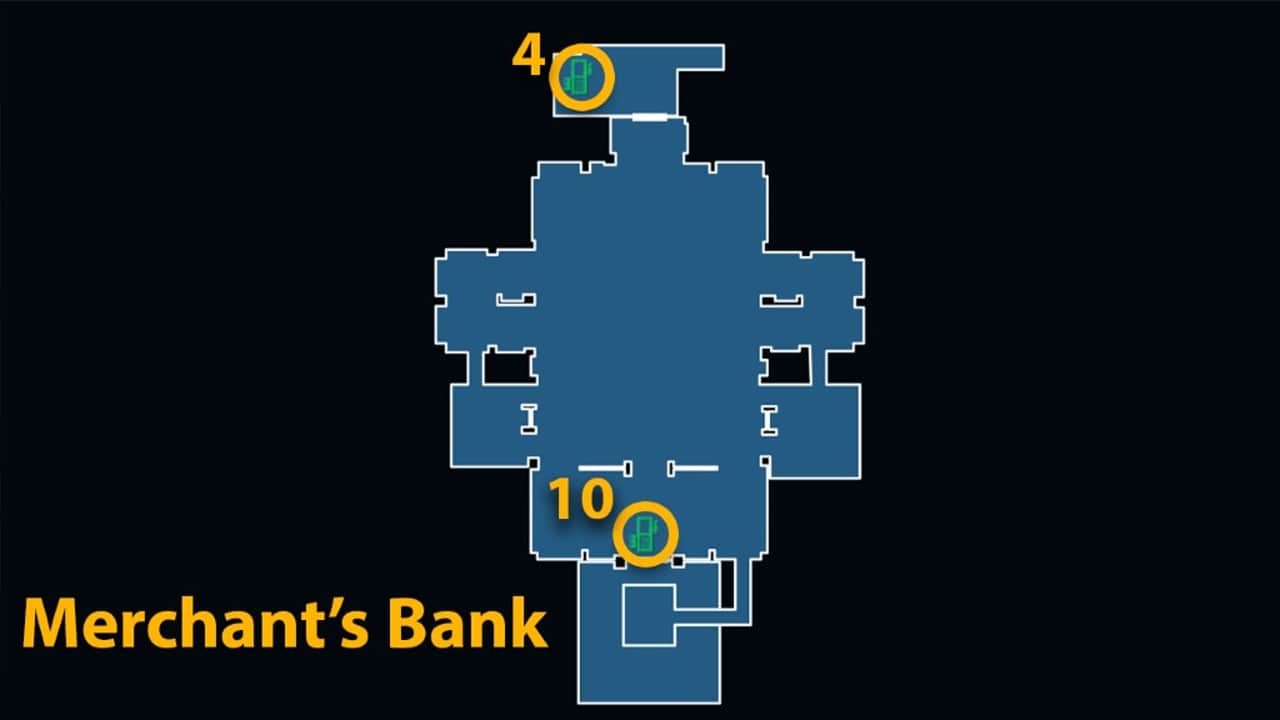
Datapack 10/10
Requirements: Batclaw.
Use the roof entrance to get inside the Gotham Merchant’s Bank. The Datapack is on the spinning gear in front of the clock. Just use your Batclaw.
Extortion File 4 locations – The Bowery
Datapack 1/10
Requirements: Shock Gloves.
On the rooftop of the building facing the front of Ace Chemicals, there is a generator and pressure pads. Use the Shock Gloves to start up the generator and activate the pressure pads.
The goal is to make all the green lights on the wall light up the middle row using the pressure pads to unlock the Datapack in Batman: Arkham Origins. From left to right, press the pressure pads in this order, 12313 to solve the puzzle.
Datapack 2/10
Requirements: Remote Control Batarang.
In the alley west of Gotham’s Merchant Back entrance, you will find a pressure pad. Step on it to open the cage door and throw your Remote Control Batarang through it to hit the green switch on the back wall. Just slide under it to grab the Enigma Datapack for yourself.
Datapack 3/10
Requirements: Explosive Gel and Batclaw.
There is a cage located south of the Horse statue on ground level. Climb inside to use the explosive gel on the lights and then stand on the pressure pad outside to detonate it. This will unlock the Datapack box on your right and you can use your Batclaw to retrieve it.
Datapack 4/10
Requirements: Remote Claw.
On the rooftop of the building west of the Merchant’s Bank, there are a bunch of red pressure pads beyond which is the Datapack. If you step any one of them, it will close the gate at the end, locking you out of the loot.
To bypass them, use your Remote Claw on the anchor point and climb across to take the Datapack.
Datapack 5/10
Requirements: Batarang.
Head up to the rooftop on the east side of the Light & Power building in The Bowery. Step on the pressure pad to light the green switch on the left building. Use your Batarang to hit it to unlock the Enigma Datapack.
Datapack 6/10
Requirements: None.
This Datapack is on the balcony of the building across from Gotham’s Light & Power building. Just jump down the rooftop to reach it and take another Datapack in Batman: Arkham Origins.
Datapack 7/10
Requirements: Explosive Gel.
In the southwest corner of The Bowery, on the lower level, there is a dead end with lamps and shops in the area. There is a weak wall in the left corner that you need to blast through using Explosive Gel. The Datapack is on the other side lying on the floor, awaiting retrieval.
Datapack 8/10
Requirements: Cryptographic Sequencer.
On the left side of the building across the street from Gotham’s Light & Power building, there is a security panel blocking you from the data file. This building is characterized by the large stone statue at its entrance.
Hack it using the Cryptographic Sequence, the right sequence is “SHELLGAME”. Head to the opposite side of the door to get the Datapack.
Datapack 9/10
Requirements: Explosive Gel.
Jump down the back of Merchant’s Bank to find the shack on your right, holding your Datapack. Use the Explosive Gel on the destructible wall to acquire the Enigma Datapack in Batman: Arkham Origins.
Datapack 10/10
Requirements: None.
Head through the roof entrance of the Merchant’s Bank and go deeper using the Bank Access door. Glide down to the very back and head down the grate in the middle of the staircases. The Enigma Datapack is in the vents, just a few steps ahead.
If you have not unlocked the roof access yet, you can take the long route using other entrances as well to reach the lobby.
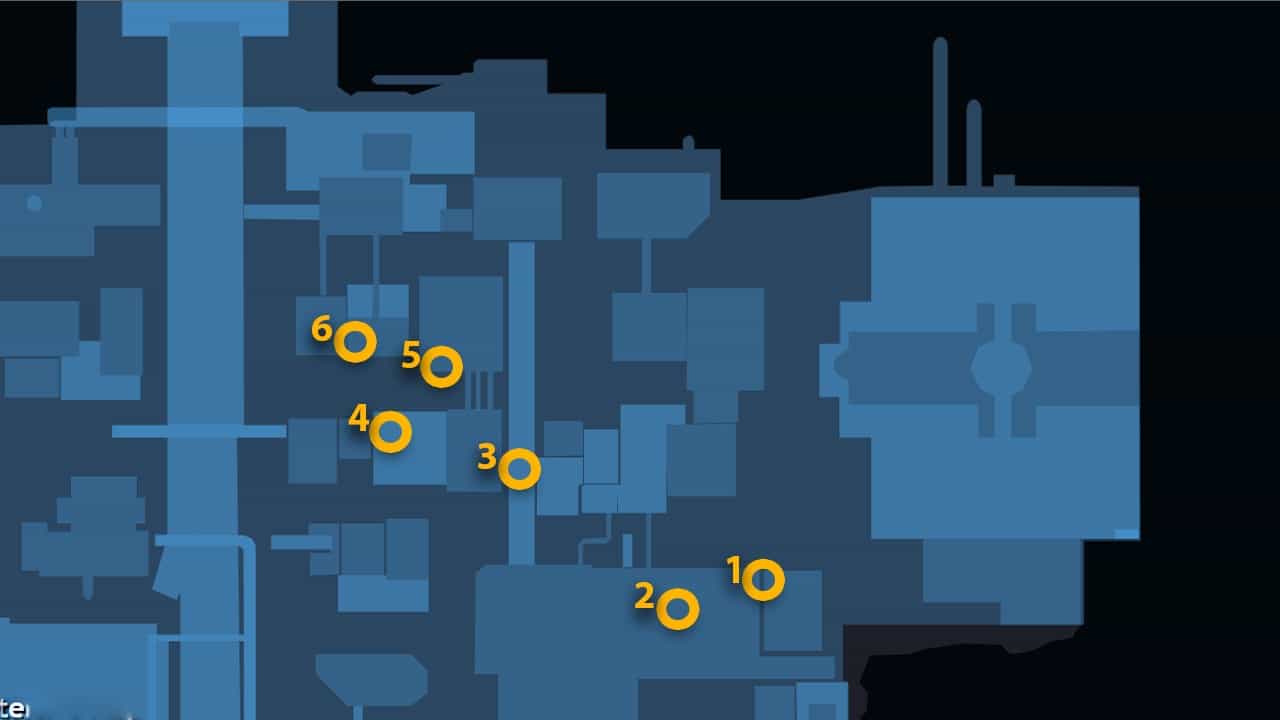
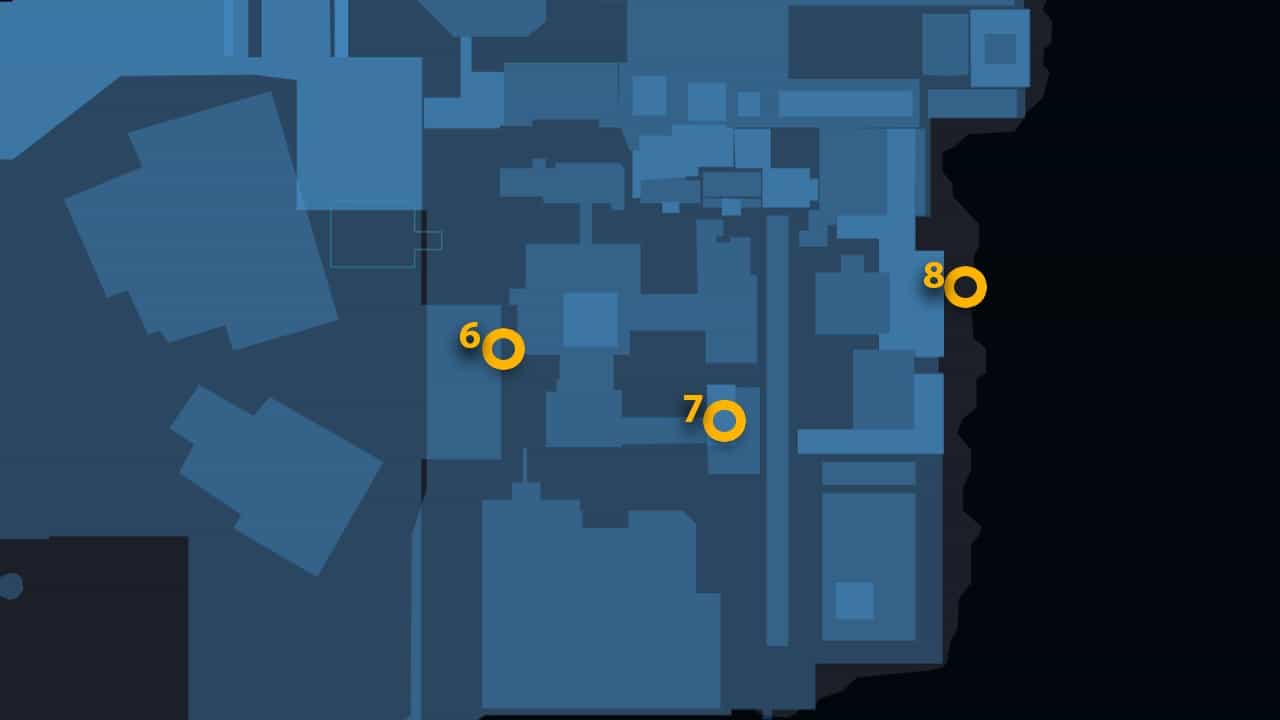
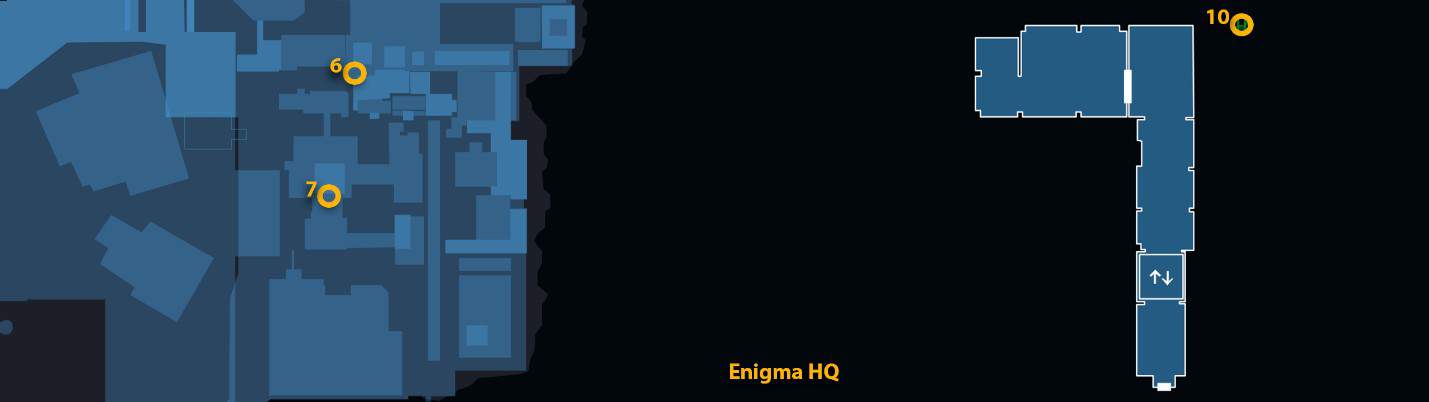
Extortion File 5 locations – Amusement Mile
Datapack 1/10
Requirements: Shock Gloves and Batclaw.
This is a time trial challenge where you need to get the Datapack within 6 seconds of activating power. Head to the rooftop of the building behind the Church, east of the Power & Light building. Use your Shock Gloves to power up the generator and then grab the Datapack on your left using Batclaw.
Datapack 2/10
Requirements: None.
On the ground level of the same building where you found the first Datapack, head to the parking and jump the fence of the building across. There is a Datapack locked in a case next to the stairs which you need to unlock. Just quickly run over the pressure pads on the ground starting with the one closest to the staircase.
Datapack 3/10
Requirements: None.
Near the shore on the Southwestern corner of Amusement Mile, you will find a shipping container suspended above freezing waters with a crane. Glide from the nearest building into the container to gain the Datapack.
Datapack 4/10
Requirements: Glue Grenade.
On top of Gotham Casinos, right under the sign, there is an overheating pipe. Use your Glue Grenade to temporarily close it and quickly duck into the vents to grab the Datapack.
Datapack 5/10
Requirements: Explosive Gel.
Head behind the Gotham Casinos, towards the building with large pillars. You can also drop down west if you are on top of the Casinos. There is a destructible wall on the right corner which you can break through using Explosive Gel.
Datapack 6/10
Requirements: Batarang and Explosive Gel.
Head to the rooftop of the building northeast of the Casino, it is the one behind it. There are two switches you need to alternate between to open the path through the vents leading to the Datapack.
Put Explosive Gel on the right light and then hit the left one with your Batarang to open the vent access. Crawl through them till you reach the gate and can stand up. Now detonate the Gel to lift the inner gate and get to the Datapack.
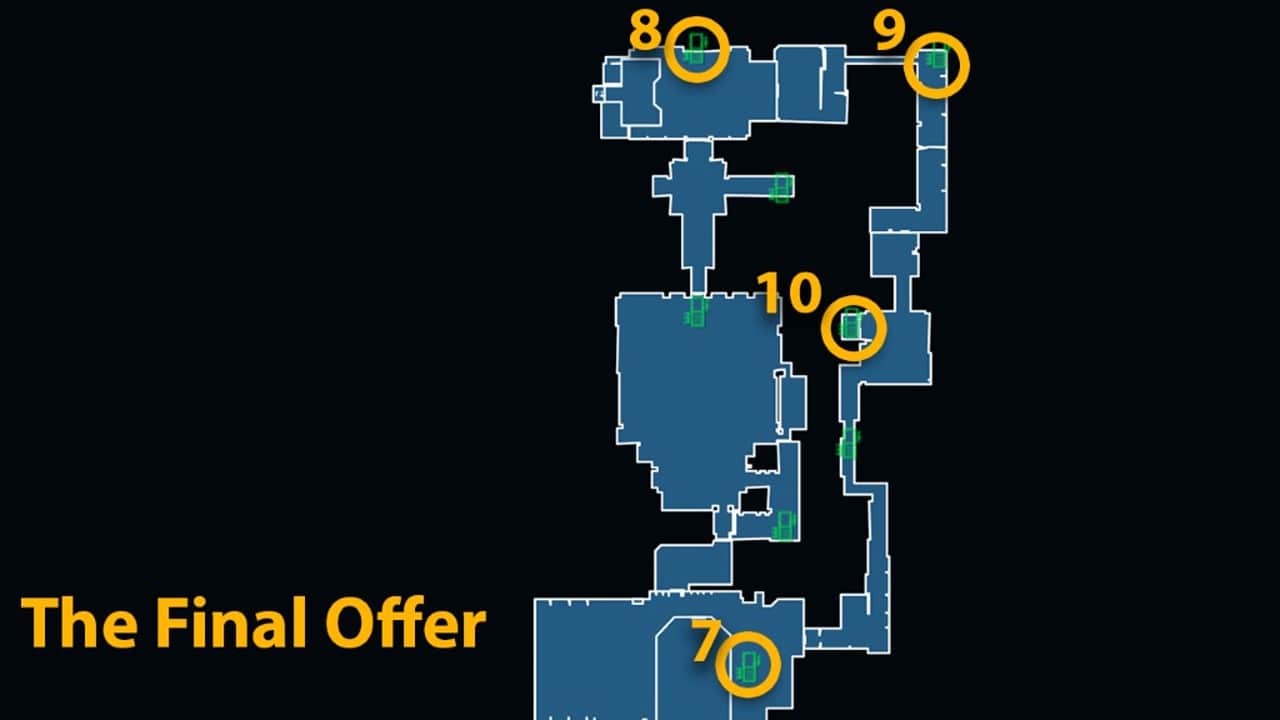
Datapack 7/10
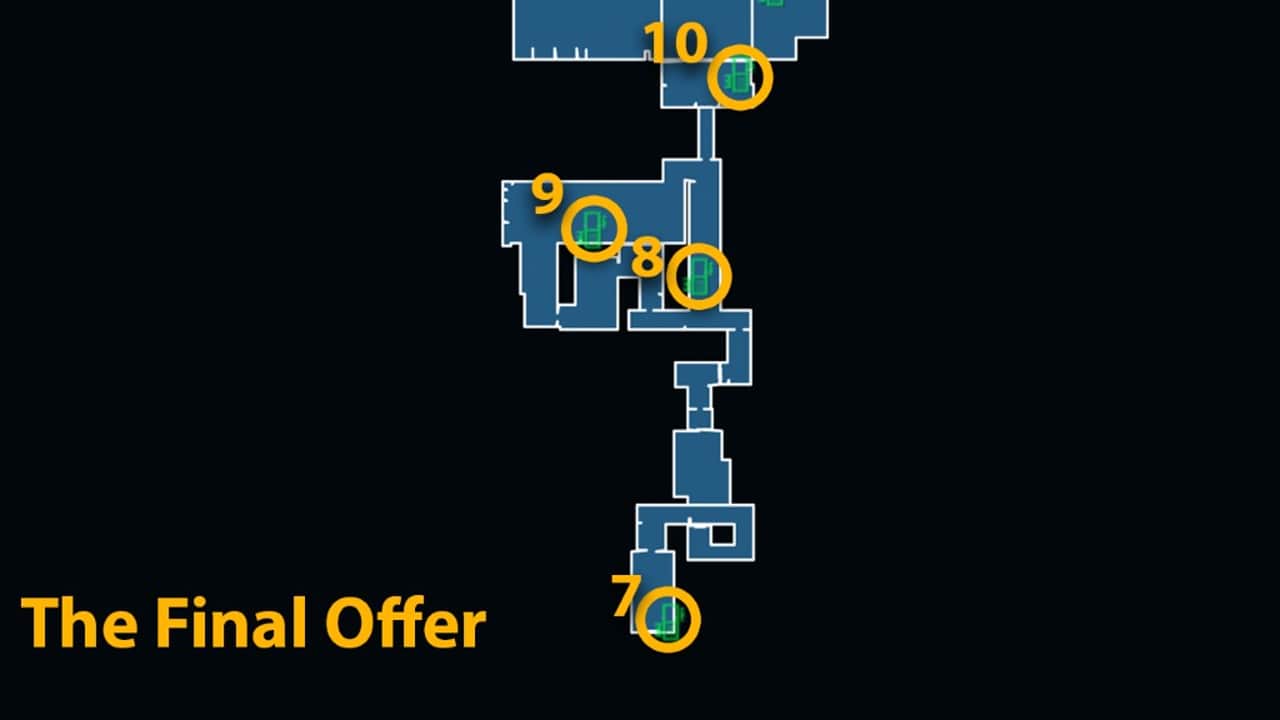
Requirements: Batclaw.
Head inside The Final Offer vessel docked at the western shore of Amusement Mile. Just above the entrance, there is a valve cover on your right that you can force open with your Batclaw. You will find the Enigma Datapack inside.
Datapack 8/10
Requirements: Glue Grenade.
On Deck 1 of The Final Offer vessel, just a little further from the entrance you will find a Datapack floating in the water on your right. Use a Glue Grenade to create a platform near the Datapack to land on and just scoop it up to retrieve it.
Datapack 9/10
Requirements: Batclaw.
While on Deck 1 of The Final Offer, there is a large room with flooded waters and a raft. The ceiling of the room has a hook attached to a destructible wall that you need to pull using your Batclaw.
Grapple up and turn the corner, the Datapack is at the end of the sleeping quarters’ room in Batman: Arkham Origins.
Datapack 10/10
Requirements: Glue Grenade.
In the boiler room of The Final Offer vessel, there are two steam pipes on the bottom floor. Close them up using Glue Grenades and grapple up the ledges on the right to reach the upper level.
You need to cross the bridge guarded by the steam pipes that you can Glue shut if running past is a bit difficult. Turn at the end and use the grapple once again. The Datapack is behind the metal bars that you can get to by gluing the steam pipes near the busted to crawl through.
Extortion File 6 locations – Amusement Mile
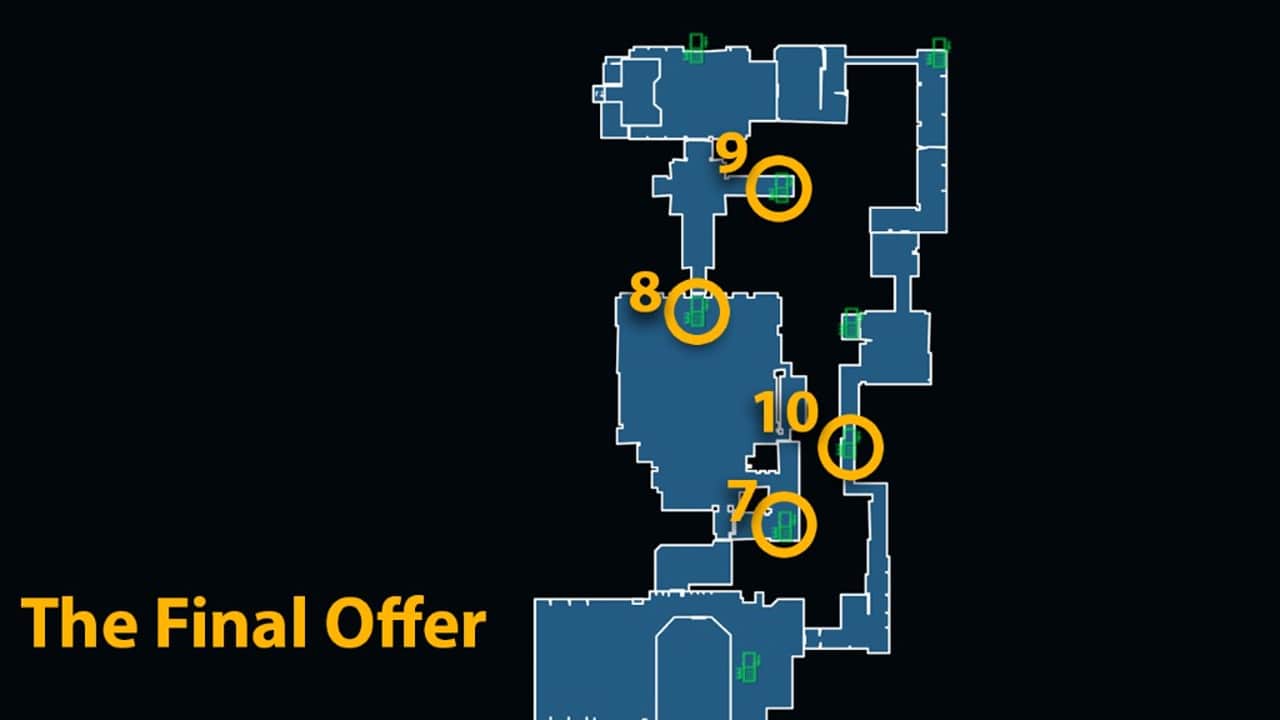
Datapack 1/10
Requirements: Shock Gloves and Batclaw.
There is a generator on the rooftop of the building across the Dixon Docks building, the one facing its front. Power it with your Shock Gloves and simply grab the data file above it using your Batclaw.
Datapack 2/10
Requirements: Remote Claw.
Climb up to the Dickson Docks sign, face west, and use your Remote Claw on the anchor point on the building across. Zipline to build momentum and burst through the weakened wall on the other end to get the Datapack.
Datapack 3/10
Requirements: Cryptographic Sequencer.
Southeast from the rooftop of Gotham City Train Station, there is a security panel through the metal gates. Enter the password “CLEVER SCHEME” using your Sequencer to unlock the door to the Datapack.
Datapack 4/10
Requirements: Remote Control Batarang.
East of Gotham City’s Train Station, there is a pressure pad with the locked Datapack on a trailer at ground level, under the glass roofs.
Step on the pressure pad to open the door to the container behind you. Throw your Remote Control Batarang towards the opening, get to the back of the container, and then take a U-turn to enter the one below it. Hit the switch at the end to unlock the Datapack.
Datapack 5/10
Requirements: Explosive Gel.
This Datapack is in a shack with a destructible wall you need to break through using Explosive Gel. You will find it on the rooftop directly east of the Train Station.
Datapack 6/10
Requirements: None.
Get to the rooftop nearest to the northeastern corner of Amusement Mile, towards the edge closest to the Comms Tower. Glide down to the lower level of the Tower and just slide under the fence on your left to get the Datapack in Batman: Arkham Origins.
Datapack 7/10
Requirements: None.
There is a fence you can crawl under on the far left side of the Theater room in The Final Offer vessel. Take a right from the Exit and there is your Enigma Datapack on the table.
Datapack 8/10
Requirements: None.
Enter through the grates right of the staircase in the Theater room of The Final Offer. Just crawl through the vents and it will lead you to the Datapack on the other side.
Datapack 9/10
Requirements: Explosive Gel.
Head up the stairs from the Theater Room of The Final Offer and take the first right. There is a weak wall with the Datapack on the other side. Like always, apply the Explosive Gel, detonate it, and grab the Datapack.
Datapack 10/10
Requirements: Batclaw.
On Deck 2 of The Final Offer, there is an opening you can drop down in the Deck Access Corridor. Slide under the gate with the large 3 on it and use the Batclaw to grab the Datapack from the pipe in the ceiling.
Extortion File 7 locations – Amusement Mile
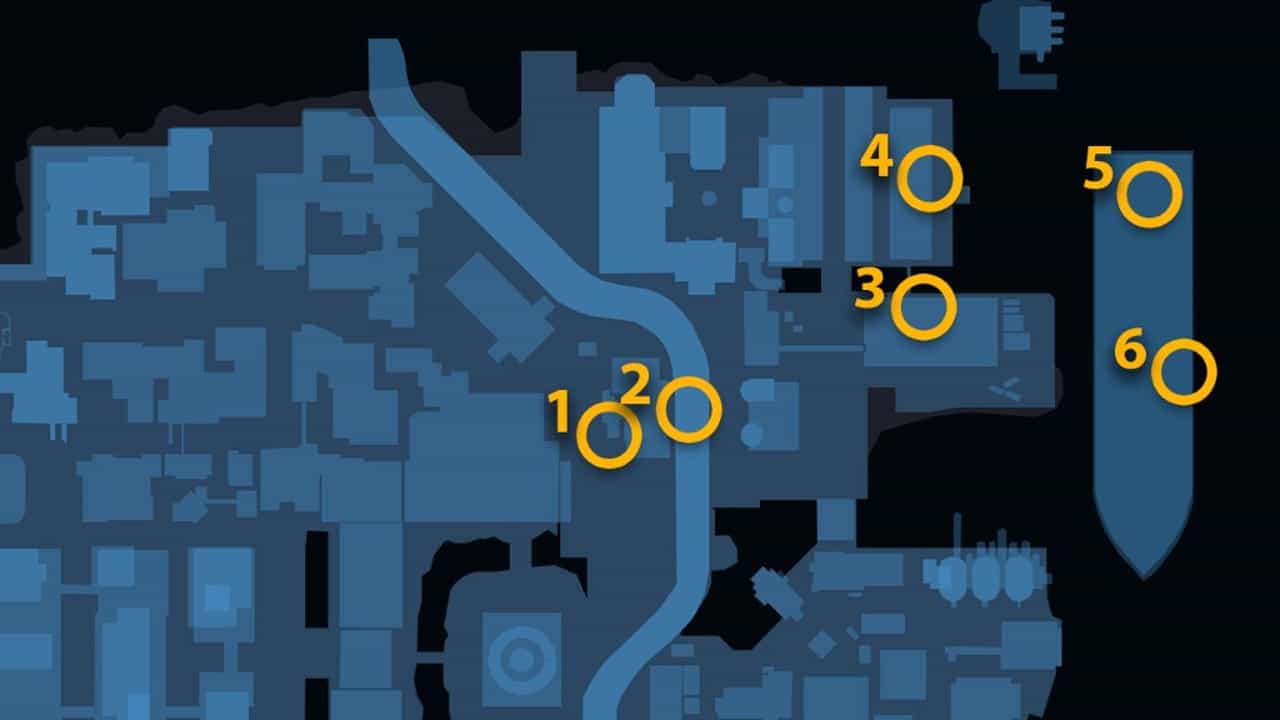
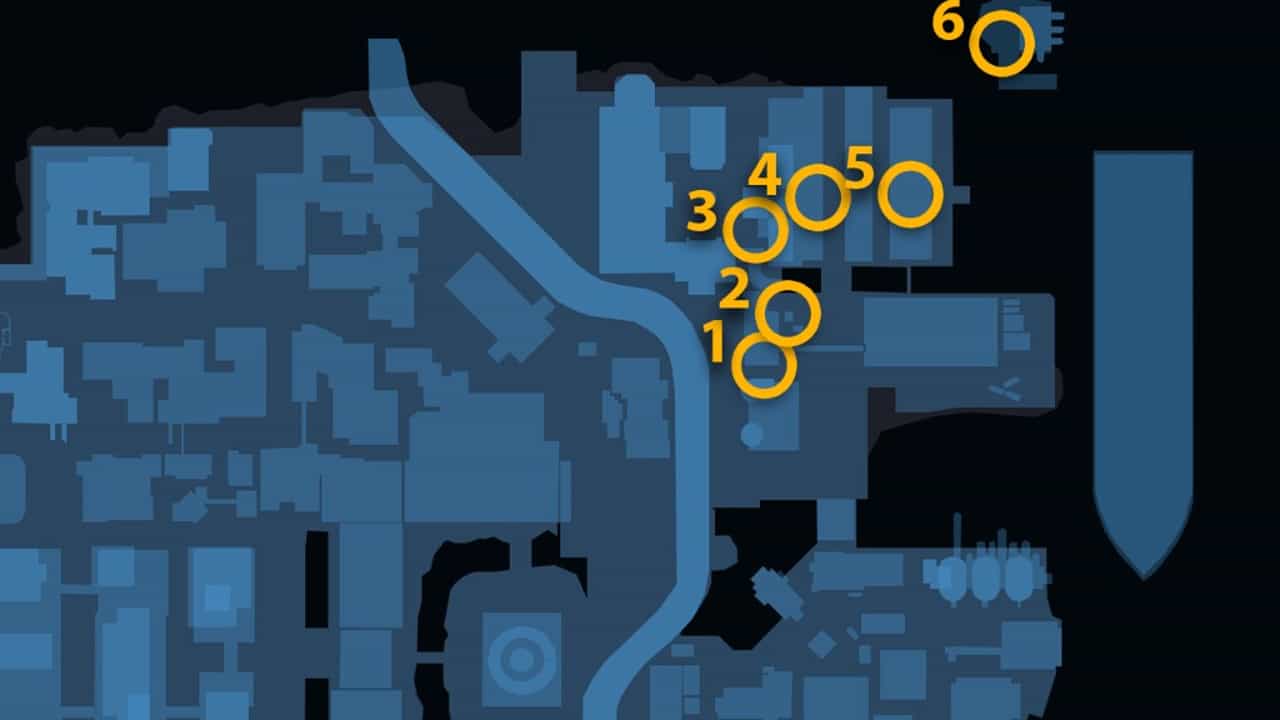
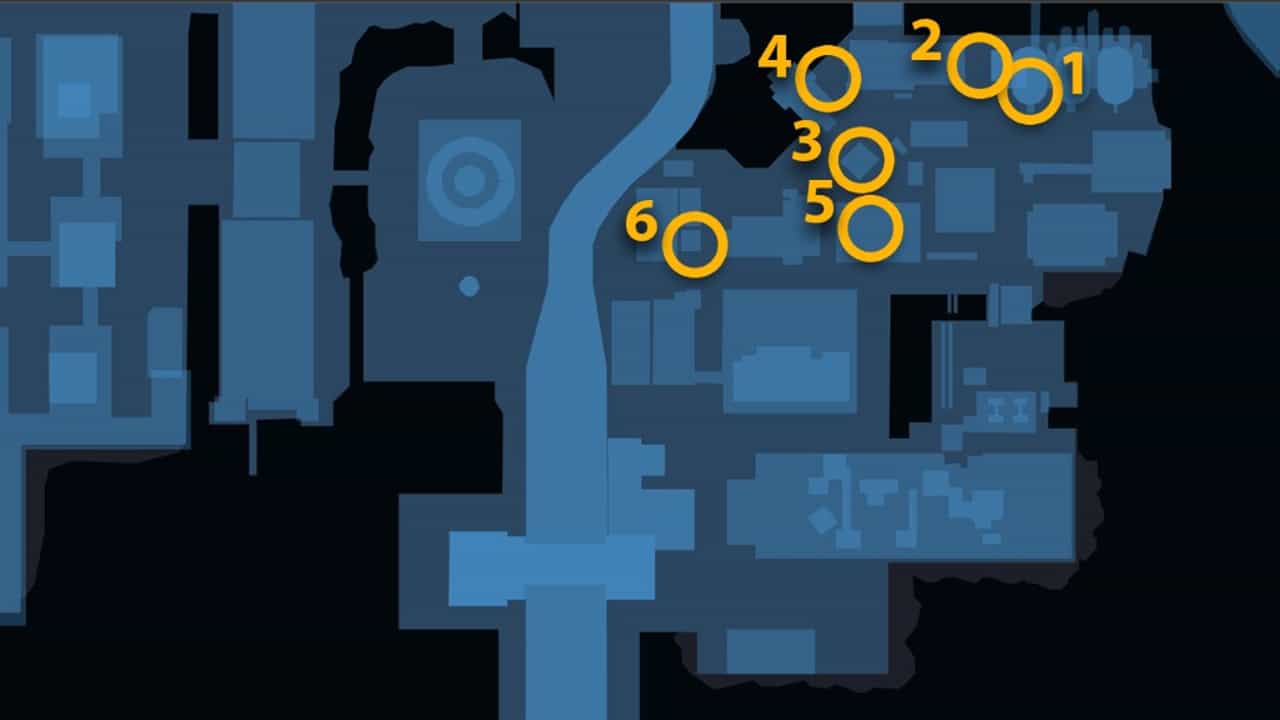
Datapack 1/10
Requirements: Explosive Gel.
There is a Par-King area at the base of the building behind the Church. Southeast of it is the fire escape, next to which is a ledge you can grapple up to.
Next to the graffiti, there is a weakened wall that you need to use Explosive Gel on. It will explode the entrance, revealing the Enigma Datapack behind it.
Datapack 2/10
Requirements: None.
This data file is on top of the metal framework on the highway, east of The Church. It is the one directly in front of the Gotham Sea Pier welcome gate. Grapple up to the bars and you will find the Datapack on the middle one.
Datapack 3/10
Requirements: Remote Control Batarang.
There is a ventilation shaft on the rooftop of the building west of The Final Offer. Chuck your Remote Control Batarang inside and hit the switch at the end of the duct. Vault over the fence on your right and the Datapack is on the wall, right under the metal pipes in Batman: Arkham Origins.
Datapack 4/10
Requirements: None.
Get on top of the building in the northeast corner of Amusement Mile and you will find 2 cranes near the edge. There is a small opening directly under the left crane housing the Datapack that you can reach by gliding.
We recommend climbing up to the top of the left crane and then gliding back to its base for easier access.
Datapack 5/10
Requirements: Shock Gloves.
On the surface of The Final Offer vessel, in the area where tanks and cars are parked, there are a few pressure pads. Near the red car, next to one of the pressure pads, there is a generator you need to power using your Shock Gloves.
It will start a 40-second timer during which you need to press three pressure pads without touching the ground once. To accomplish this you can grapple up to the air using the edges of mass in the center and then glide back down to land on the pads.
Once you have activated all of them, you can grab the Datapack from the now-unlocked box next to the generator.
Datapack 6/10
Requirements: None.
Drop down the east side of The Final Offer onto the deck below. The Datapack will be lying to your left in plain sight in Batman: Arkham Origins.
Datapack 7/10
Requirements: Remote Claw.
There is an anchor point next to the large pipe on the east wall of the Boiler room inside The Final Offer. It is a little higher, opposite the 1B wall. Use your Remote Claw and then grapple up to grab your Datapack from the central platform.
Datapack 8/10
Requirements: Batarang and Batclaw.
Head over to the Grand Prize booth in the Casino of The Final Offer vessel. Use your Batarangs to hit all three dollar signs ($) under the counter at once. It will lower the metal bars so you can use your Batclaw to snatch the Datapack for yourself.
Datapack 9/10
Requirements: Remote Control Batarang and Batclaw.
In the northeast corner of the upper deck at The Final Offer, there is a locked data file next to the gated Restaurant entrance.
Throw the Remote Control Batarang through the hole in the floor behind you and pass it through the electricity on top of the gate. Bring the now electric-infused Batarang back and hit the fuse box next to the Datapack to short-circuit it.
The Datapack box will unlock and you can take it using the Batclaw.
Datapack 10/10
Requirements: Cryptographic Sequencer.
This Datapack is behind Pump Room 2 on the Deck 2 of The Final Offer. Use your Cryptographic Sequencer to enter the passcode “TONNAGE” to unlock it. The Datapack will be on your right.
Extortion File 8 locations – Industrial District
Datapack 1/10
Requirements: Explosive Gel.
There is a shack with an explodable wall on the rooftop of the building directly west of the Amertek neon blue sign. Burst through using Explosive Gel and grab the Enigma Datapack for yourself in Batman: Arkham Origins.
Datapack 2/10
Requirements: Explosive Gel and Remote Control Batarang.
On the side of the building west of Amertek, there is a pressure pad puzzle you need to solve to get access to the Datapack locked behind the fence.
Use your Explosive Gel on the switch left of the Datapack and step on the pressure pad before detonating it. Throw your Remote Control Batarang and aim for the switch on the right to unlock the Datapack.
Datapack 3/10
Requirements: Cryptographic Sequencer.
There is a security panel on top of the tower between the two billboards northwest of the Comms Tower. It is the third tallest smoke stack northeast of the two bigger ones.
For this panel, you need to enter three different codes to successfully hack it and get the Datapack. The correct answers are “COMPLICATE”, “ENTANGLE” and “PERPLEXITY”
Datapack 4/10
Requirements: Batclaw.
In the northwestern corner of the Industrial District, there is a small cubby with a pressure plate linked to the Datapack box at ground level. It is on the wall of Gotham Hardware shop. Step on the plate and nab the Datapack with the Batclaw for yourself.
Datapack 5/10
Requirements: Glue Grenade.
Get on top of the Gotham Rail building, east of the GCR Tower in the western area of the Industrial District.
The Datapack is in a glass cage on one of the lower rooftops with three steam pipes. Use the Glue Grenades to seal the pipes and retrieve the Datapack.
Datapack 6/10
Requirements: Explosive Gel.
West of the large smoke towers, there is a smaller tower with a destructible wall inside that you need to glide to. It is west of the purple Eafort billboard with a red metal frame connecting to it from the left side. Glide from a nearby building, use the Explosive Gel, and burst through to get the Datapack.
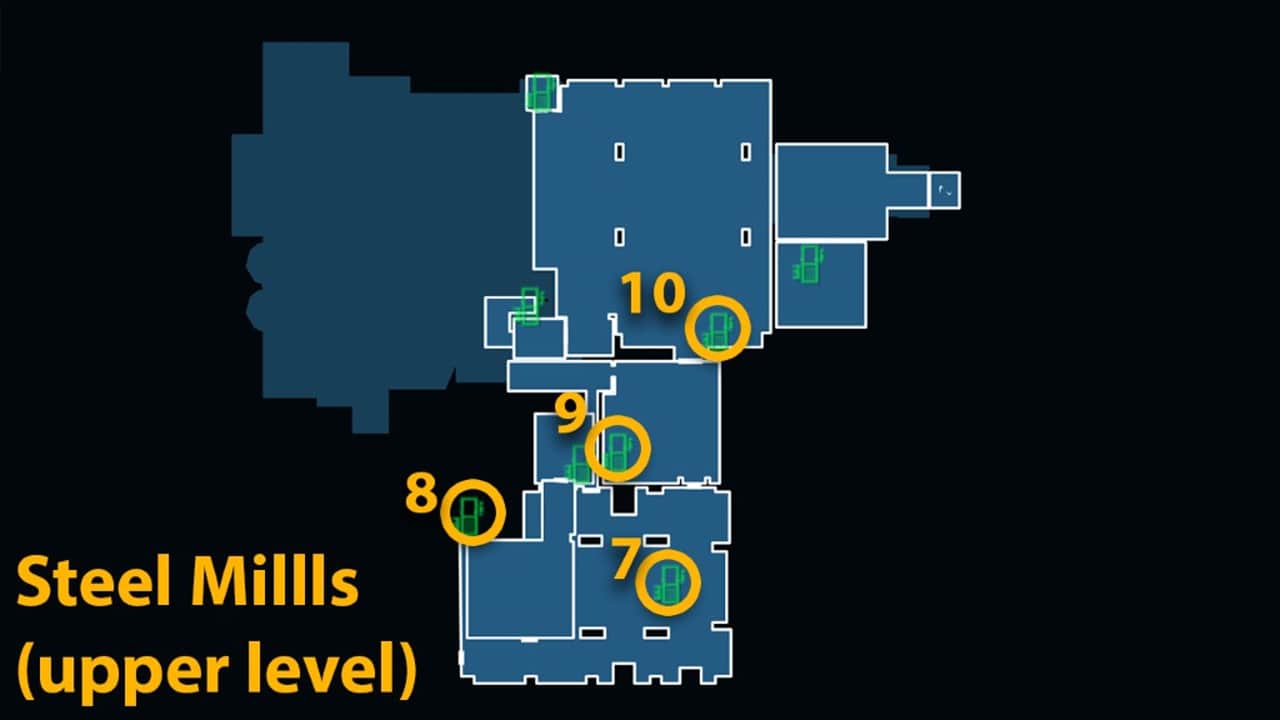
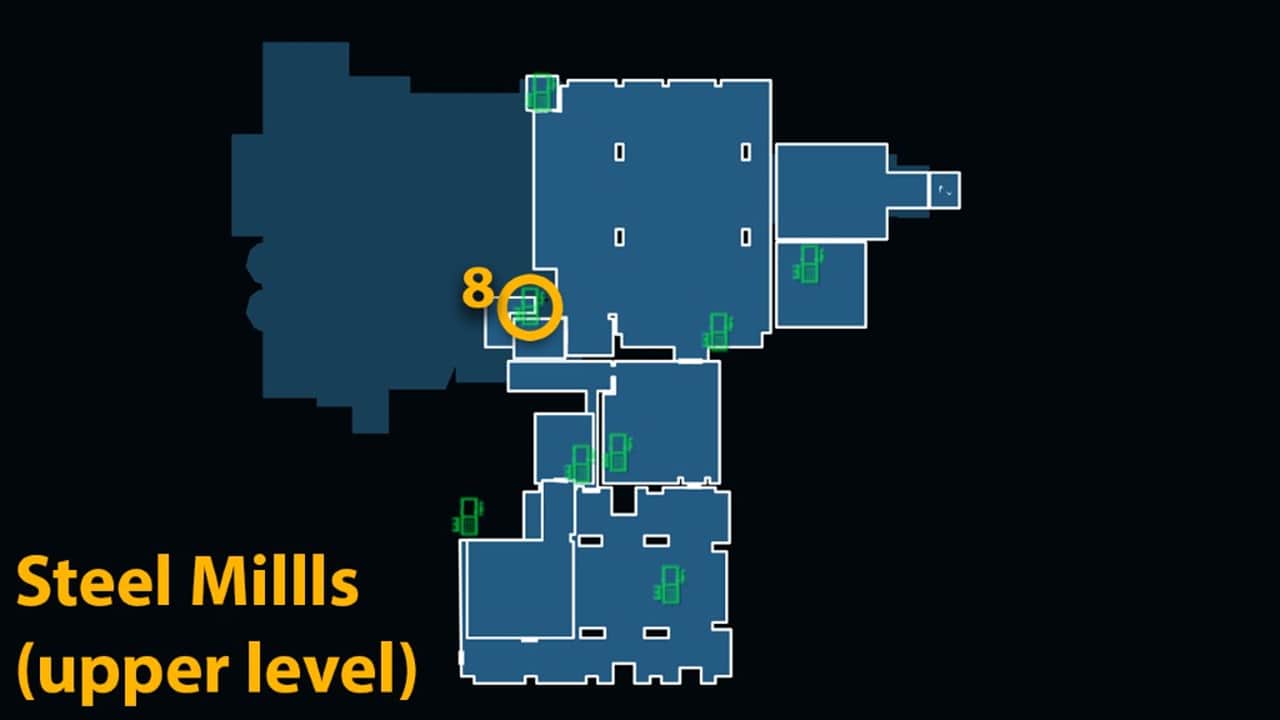
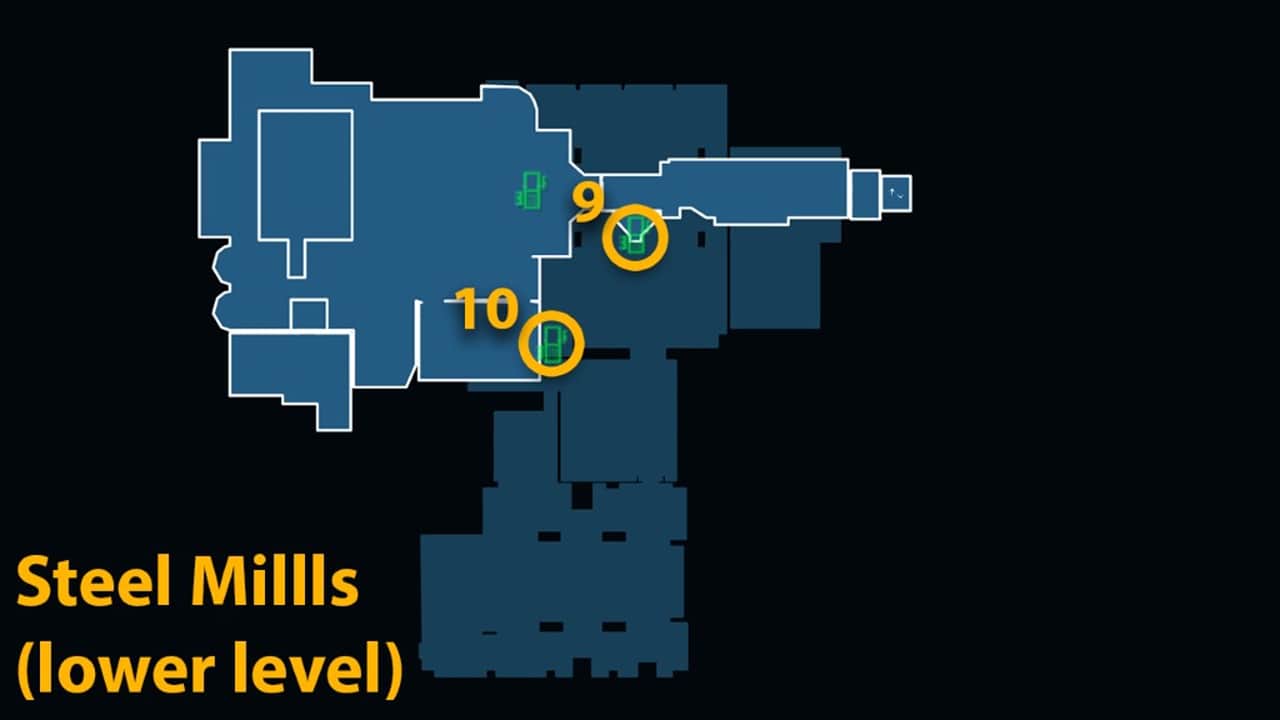
Datapack 7/10
Requirements: Batclaw.
The Loading Bay is the first room you encounter after entering the Steel Mills. There is a Enigma Datapack on top of the arch in the middle of the room that you can snatch using Batclaw.
Datapack 8/10
Requirements: Explosive Gel.
This Datapack is behind a destructible wall in the Sionis Office inside the Steel Mills. Use the Explosive Gel on the wall right of the Christmas tree and grab the data file in Batman: Arkham Origins
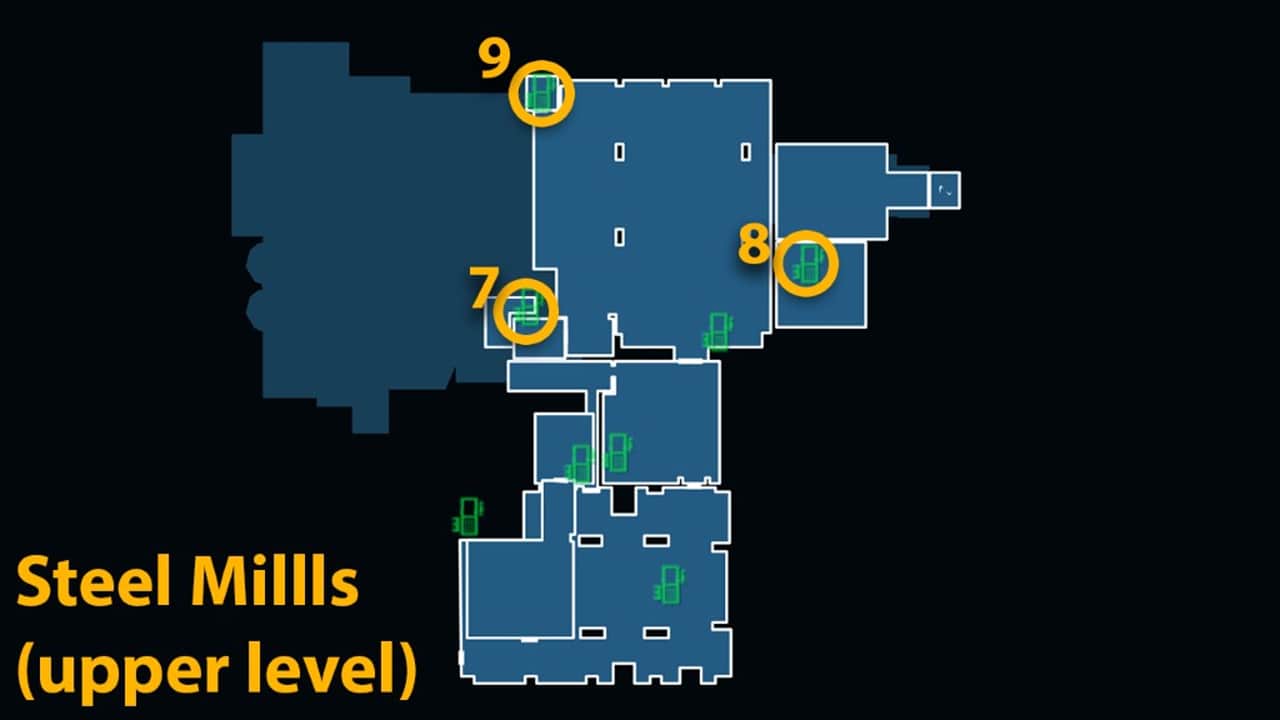
Datapack 9/10
Requirements: Explosive Gel.
For this Datapack, go to the Loading Bay Depot inside the Steel Mills which is in the northeast area of the upper level. Instead of going up the stairs, head up the sand and there is going to be a destructible wall on your right. Use the Explosive Gel to blast through.
Datapack 10/10
Requirements: None.
From the entrance of the Warehouse inside the Steel Mills, drop down the right side of the stairs in front of the forklift. The Datapack will be on the floor behind you.
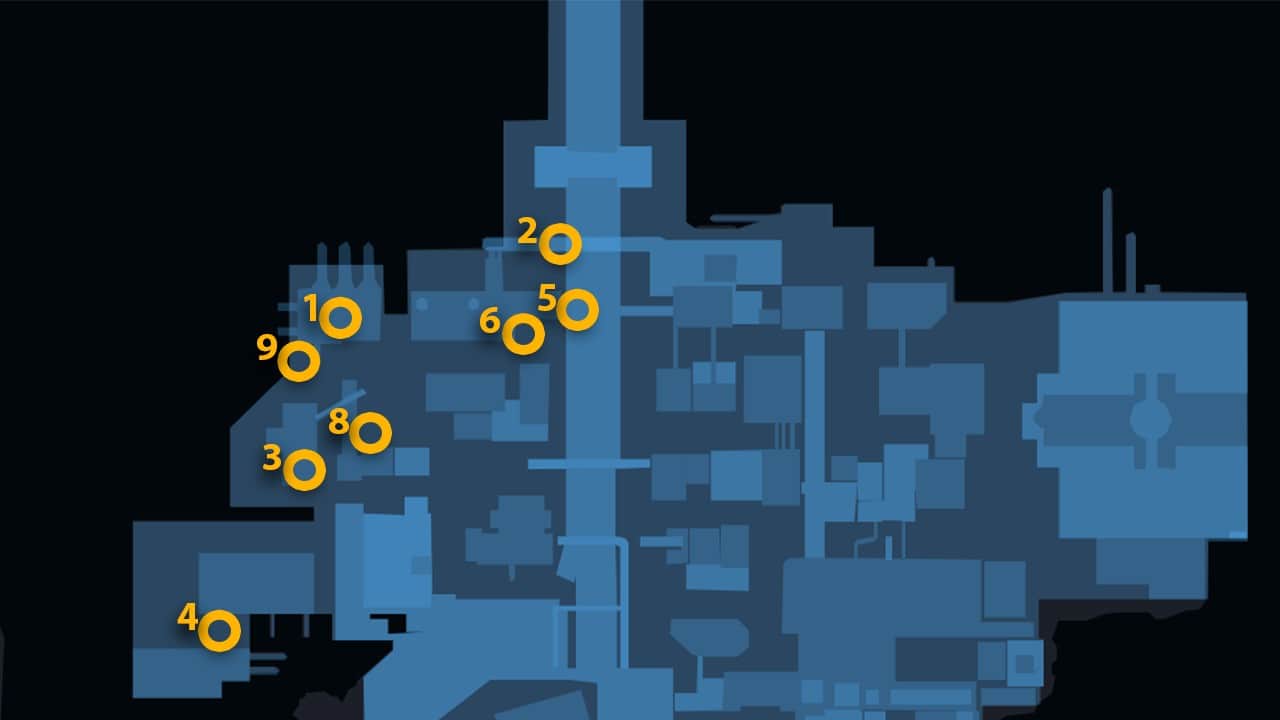
Extortion File 9 locations – Industrial District
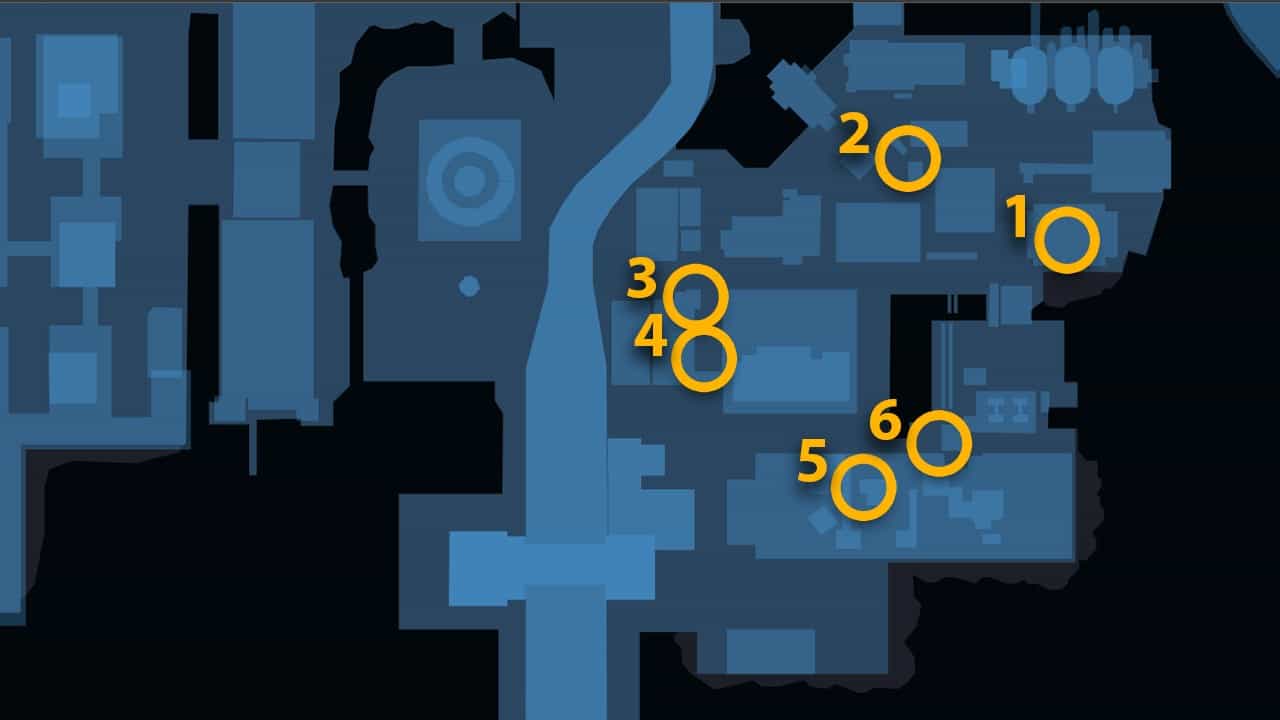
Datapack 1/10
Requirements: None.
There is a data file on top of the GCR Comms Tower building that you need to glide to. Grapple onto the east tower of Amertek building, right next to the Comms Tower, to launch yourself in the air. The data file is behind the GCR neon sign.
Datapack 2/10
Requirements: Shock Gloves.
There are 4 pressure pads in the alleyway northwest of the Comms Tower. The generator you need to charge using your Shock Gloves is just around the corner.
Run across the pressure pads to open the fence gate ahead and slide under it to acquire the Datapack.
Datapack 3/10
Requirements: Cryptographic Sequencer.
On the east side of the Hells Gate Disposal building, there is a security panel on the ledge next to the large ventilation shaft going down the building.
For reference, it is north of Sionis Industries Steel Mill and west of the highway. Enter the password “UNTRUE” to unlock the panel and get the Datapack in Batman: Arkham Origins.
Datapack 4/10
Requirements: Explosive Gel.
There is a breakable wall at the base of the Gotham Works building that you can blow up using Explosive Gel. It will be towards the right, next to the barrier with the green truck. Blow it up and grab your Datapack.
Datapack 5/10
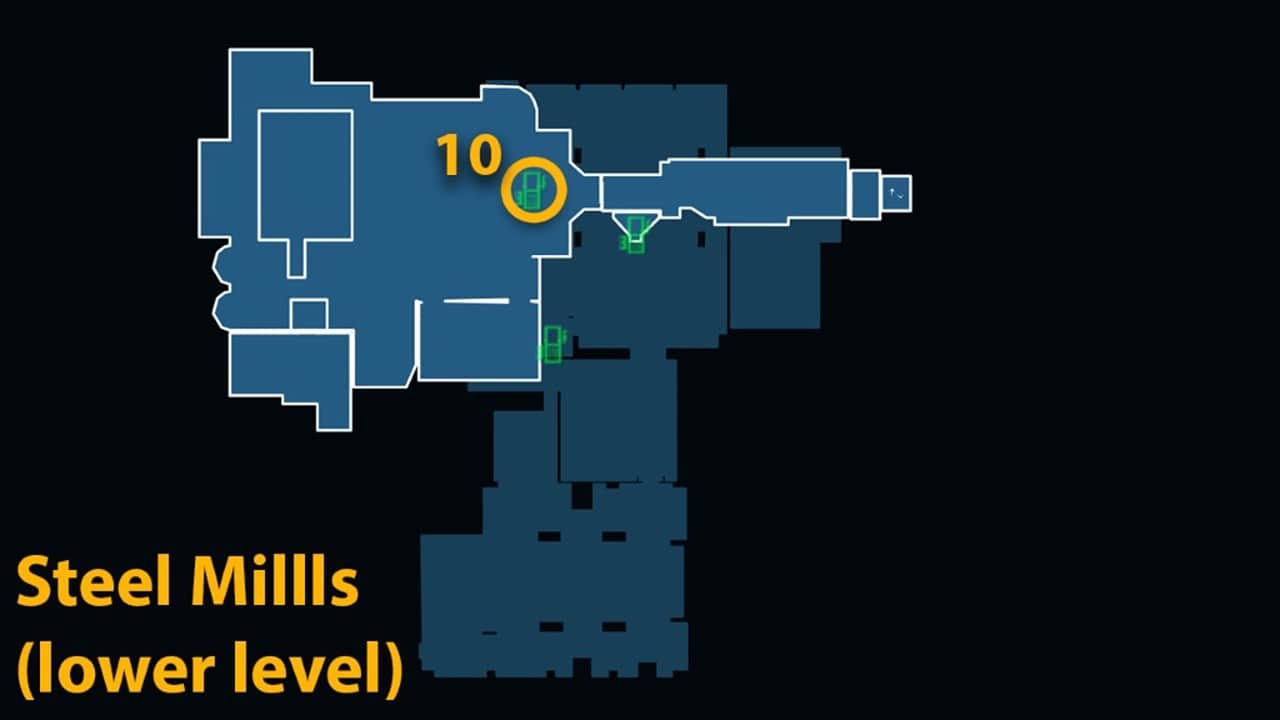
Requirements: Shock Gloves and Batclaw.
In the middle of the rooftop of the Sionis Industries Steel Mills, there is a Datapack on the western catwalks. Use the Shock Gloves to power the generator beneath it and use the Batclaw to acquire it.
Datapack 6/10
Requirements: None.
This Datapack is on a rooftop just east of the Sionis Industries neon orange sign. Grapple up to the stairs and it will be right there out in the open.
Datapack 7/10
Requirements: Cryptographic Sequencer and Glue Grenade.
There is a security panel you need to hack using the Cryptographic Sequencer in the southwest corner of the Warehouse in the Steel Mills. The correct password is “COMPOUND”.
Drop down the Sewer Access and block the steam pipes on your right with the Glue Grenade. The Datapack will be a little ahead on your right.
Datapack 8/10
Requirements: Remote Control Batarang.
You will punch a hole in the east wall of the Warehouse while playing through the storyline. Throw your Remote Control Batarang through it, thread the slit on top of the green door, go to the back, and then turn around to hit the switch behind the door.
This will lift the door enough for you to slide through. Just grapple through the hole in the wall and collect the Datapack on the other side.
Datapack 9/10
Requirements: Remote Claw.
There is a weakened wall in the back of the Warehouse towards the west with the Datapack behind it. Use your Remote Claw on the anchor point left of the hole in the wall and grapple onto it. Just zipline to build momentum and burst through the wall to get the Datapack.
Datapack 10/10
Requirements: Shock Gloves and Batclaw.
Head right from the staircase in the Drug Lab of the Steel Mills. Power the generator on your left and grab the Datapack on the conveyor belt next to it using Batclaw.
Extortion File 10 locations – Industrial District
Datapack 1/10
Requirements: Batarang and Batclaw.
In front of the Wonder Expo front entrance, there is a pressure pad on the ground. Standing on the pressure pad will start a timer during which you need to hit the switch right above the Welcome sign with your Batarang. Walk up to the stairs and grab the Datapack using Batclaw.
Datapack 2/10
Requirements: Glue Grenade.
Through the west exit of Sheldon Park, there is a steam pipe on your right just after the hallway. Use Glue Grenades to seal the pipes and crawl through the small space to get the data file.
Datapack 3/10
Requirements: Shock Gloves.
This Enigma Datapack is on top of the building west of Sheldon Park, the one directly south of the Power & Line building. There is a small ledge you can grapple up to reach the Datapack. Use the Shock Gloves to charge the generator next to it to unlock the data file.
Datapack 4/10
Requirements: Batclaw.
There is a boat under the suspended wooden platform in the freezing waters south of the Wonder Tower building. Glide to the back of the boat to press the pressure pad which will unlock the Datapack case for 9 seconds. Quickly grapple up to the wooden platform and use the Batclaw to snatch the Datapack for yourself.
Datapack 5/10
Requirements: None.
In the southeast area of Sheldon Park, there is a fenced cage in the corner. Slide under the small opening and get the Datapack inside.
Datapack 6/10
Requirements: Batarang.
Get on top of the Steel Mill buildings and look down South from the southwestern edge. At the base of the building, you will find a three-switch puzzle. Hit all three within 10 seconds using your Batarang. The timer will start after hitting the first switch. After you are done, collect the Datapack from the case on your right.
Datapack 7/10
Requirements: None.
South of the Hell’s Gate Disposals building, in the northwest corner of the Steel Mills, there is a Datapack on the roof. Just slide under the fence to collect it.
Datapack 8/10
Requirements: None.
From the entrance of the Loading Bay Depot in the Steel Mills, head inside the room left of the stairs. Pull the vent cover on your left and crawl through the shaft to get the Datapack on the other side.
Datapack 9/10
Requirements: Cryptographic Sequencer.
Head to the Laboratory on the lower level of the Steel Mills using the Elevator Access in the Warehouse. Grapple into the busted pipe on the ceiling and drop down the hatch at the end.
Use the Cryptographic Sequencer to hack into the security panel on the wall to get the Datapack. The right passcode is “COMPLICATE”.
Datapack 10/10
Requirements: Shock Gloves and Batclaw.
Go down left from the stairs of the Drug Lab and head inside the first room on your left. Power the generator in the very back of the room which will make the wheel behind it spin to reveal the Datapack. Use the Batclaw to collect it.
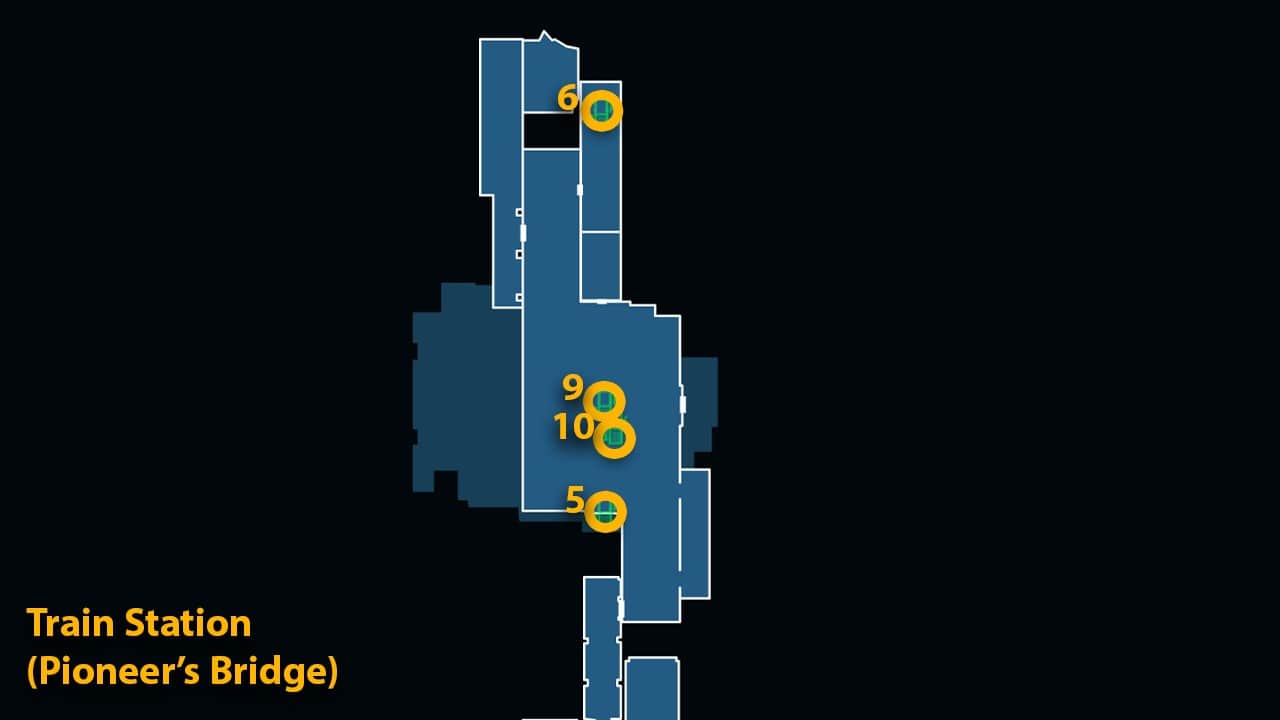
Extortion File 11 locations – Pioneer’s Bridge
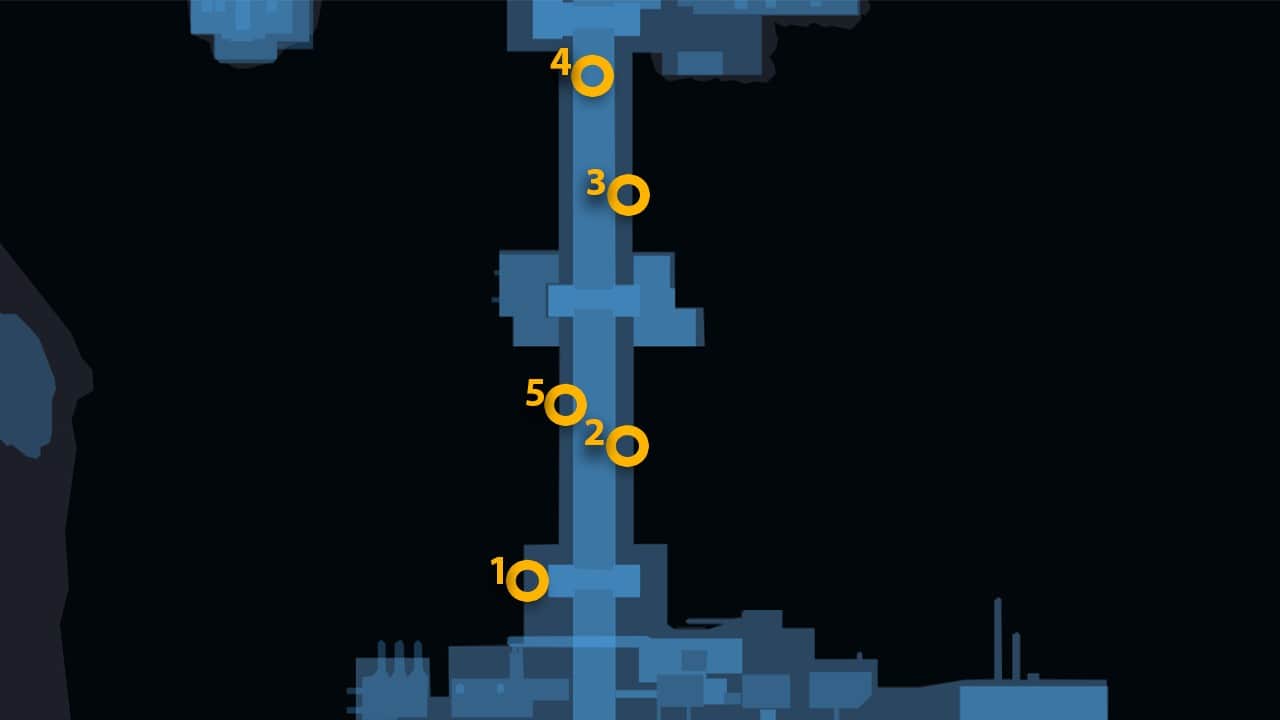
Datapack 1/10
Requirements: Batarang.
The first Datapack on the Pioneer’s Bridge is located at the southwestern end of the Gotham Pioneer’s Bridge. It’s locked inside a cage that’s controlled by four different switches.
Three of these are on the ground level, while the fourth one is located a little above them. We would recommend heading up to the railing first for the fourth switch.
To activate the switch, quickfire the Batarang at it from the top. Then, quickly jump back to the ground level and repeat the same process with the other three switches.
You have to be fast with activating the four switches or the cage won’t open. If you get the timing right and succeed, the cage will open, revealing the first Pioneer’s Bridge Datapack in Batman: Arkham Origins.
Datapack 2/10
Requirements: Remote Controlled Batarang.
The second Pioneer’s Bridge Datapack is located somewhere in the middle of the southern half of the bridge. At the eastern end of it, there is a small walkway extending from the bridge.
This walkway has a cage holding the Datapack in it. To unlock the cage, stand beside it, look to the opposite end toward the switch. You must then activate the switch by tossing a Remote Controlled Batarang at it.
Datapack 3/10
Requirements: None.
Getting the third Pioneer’s Bridge Datapack is quite tricky. This is located somewhere along the midline of the northern half of the bridge – to the east. You will see a large crane sitting on a boat.
Make your way over to it and you will see two switches. The trick to activating them is to hit them both whilst you are in the air (if you touch the ground, they are reset).
To do that, reach the top of the switch on the cabin first to activate it, then grapple towards the second switch. Whilst grappling, cancel it when you are directly above the other switch to land on top of it.
If done correctly, you will unlock the cage holding the Datapack in Batman: Arkham Origins.
Datapack 4/10
Requirements: Batclaw.
The fourth Pioneer’s Bridge data file is fairly easy to acquire. It’s located under the bridge at the northern end of it. When there, find a metal cross beam closest to it. When you see the Datapack, grab it with the help of your Batclaw.
Datapack 5/10
Requirements: None.
This Datapack is located beneath the southern end of the Pioneer’s Bridge. You must unlock this one by standing on three pressure plates/switches. Each of these will be on three separate walkways/platforms.
The catch is that you have to activate all three of these switches in a 24-second window – which starts upon activating the first switch.
Datapack 6/10
Requirements: None.
This Datapack is located inside the Maintenance Room of the Pioneer’s Bridge. Right as you enter it and head down the stairs, make your way to the stairs’ right and crouch to pass through the gap.
As you make your way ahead, you’ll see a wall that can be slid through. You’ll need a slight run-up to slide though. The Datapack is sitting right across this wall.
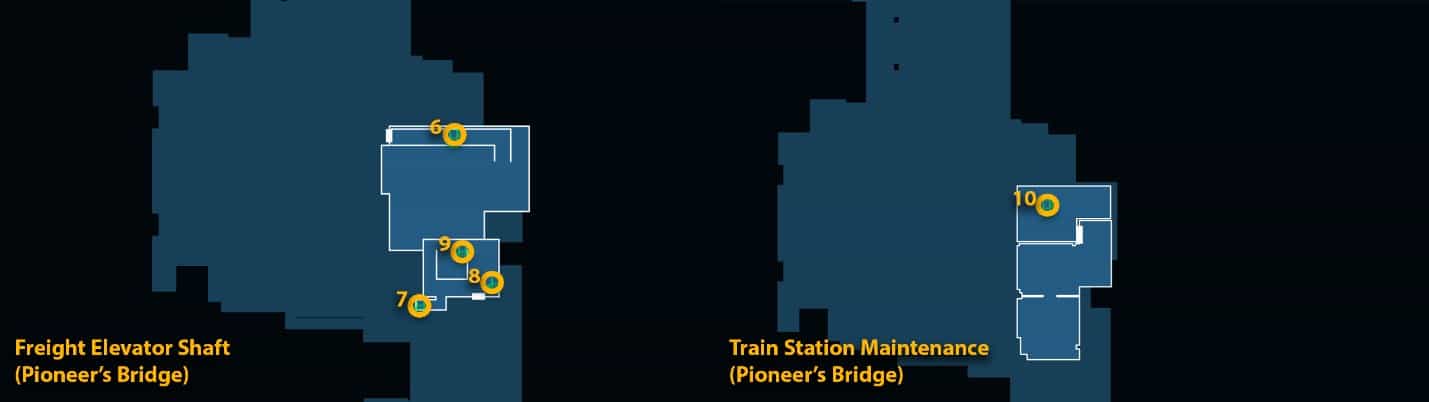
Datapack 7/10
Requirements: Glue Grenade.
To get this Datapack, you first have to head towards the Freight Elevator Shaft of the Gotham Pioneer’s Bridge. When you come across the door of the Boiler Room, turn around.
You should see a high ledge in front of you – grapple onto it. Then, move across the left path until you reach a pip with steam coming out of it. Block the pipe using a glue grenade and enter the vent below. The Datapack should be to your right in Batman: Arkham Origins.
Datapack 8/10
Requirements: Remote Controlled Batarang and Batclaw.
As you are going up from the Freight Elevator Shaft, there will be a point mid-way where you’ll see the Datapack. However, it is locked behind some bars.
The switch to open these bars is to your left. Toss your Remote Controlled Batarang and bend it around the corner to hit the switch. When that’s done, the bars will slide open, and you’ll be able to grab the Datapack with the Batclaw.
Datapack 9/10
Requirements: Batclaw.
When you’re at the bottom of the Freight Elevator Shaft, grapple up to the ledge on the western wall. From there, you must face the wall at the opposite end of the latter and then look to its left.
The Datapack should be just above you in this direction. When you see it, grab it using your Batclaw.
Datapack 10/10
Requirements: Remote Controlled Batarang and Batclaw.
The last Datapack on the Pioneer’s Bridge is in the Train Station Maintenance area. Find the ladder on the right which leads to a vent. Use your Batclaw to pull the cover open and toss your Remote Controlled Batarang into it.
Inside the vent, turn the Batarang to the left and hit the switch with it. When that’s done, the gate to the Datapack room – the Storage Room – will open. Slide through the opening and grab the Enigma Datapack in Batman: Arkham Origins.
Extortion File 12 locations – Pioneer’s Bridge
Datapack 1/10
Requirements: Batarang and Batclaw.
The first Datapack is located at the top of the middle tower of the Pioneer’s Bridge. This is about halfway through the bridge. Once there, stand on the green pressure plate to activate the lights at the bottom.
These lights serve as switches and glow up in order – starting from the bottom left and moving clockwise. You can then use a Batarang or a Remote Controlled Batarang to hit the lights in the order that they light up.
Once that’s done, the Datapack container above you will open up and you will need to use the Batclaw to grab it.
Datapack 2/10
Requirements: Shock Gloves.
To get this Datapack, find the generator on the walkway that is in the northern end of the Pioneer’s Bridge. Use your Shock Gloves to charge up the generator and it will unlock the Datapack at the opposite end of it.
Datapack 3/10
Requirements: Disruptor and Cryptographic Sequencer.
To get this Datapack, first make your way to the northern end of the bridge and then jump down to the bottom to your left. You will find the Datapack to the left of the stairs, but it will need to be unlocked first.
There is a Scrambler and a Keypad next to it. Use your Disruptor to take down the scrambler and then pull out your Cryptographic Sequencer. Enter the password “ZEROTRUST” to unlock the Datapack in Batman: Arkham Origins.
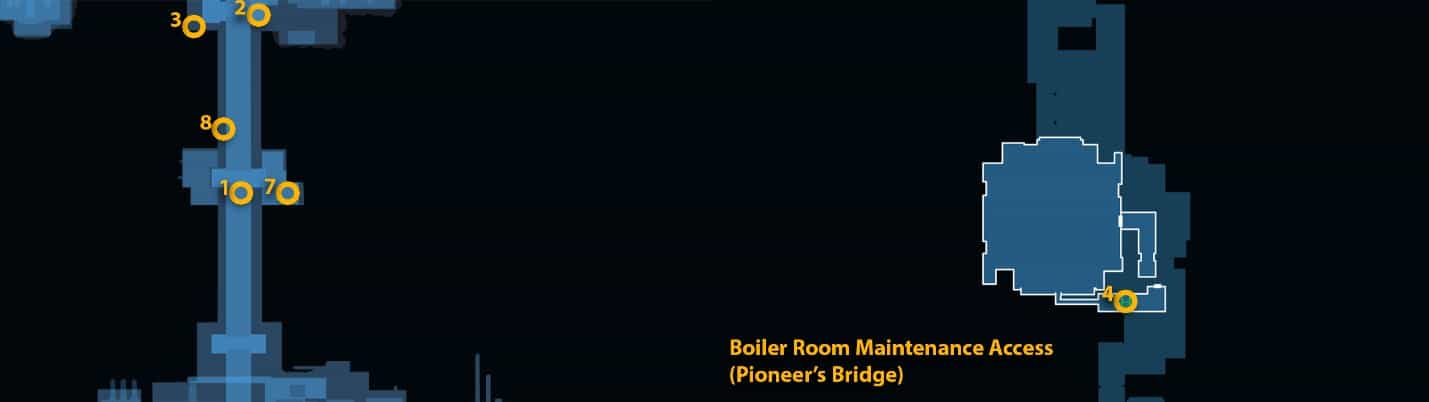
Datapack 4/10
Requirements: Cryptographic Sequencer (with ranged upgrade).
To get this Datapack, first make your way to the Boiler Room Maintenance Corridor. On the left of the room is a keypad you need to hack. Pull out your Cryptographic Sequencer and enter the password “GALVI NIZED” to unlock the blocked door behind you.
Datapack 5/10
Requirements: Batclaw.
This Datapack is located on top of a high beam inside the Train Station. All you need to do is grab it with your Batclaw.
Datapack 6/10
Requirements: Shock Gloves, Remote Controlled Batarang, Explosive Gel.
This Datapack is located inside the Train Depot. First, use your Shock Gloves on the generator in this room. Next, look to the right of the train and toss your Remote Controlled Batarang through the gap.
You should see an electric field on the posterior side of the train. Pass the Batarang through it and then turn it back around. Aim the Batarang at the Fusebox near your initiation point and hit it.
Now, grapple to the top of the train and use the Explosive Gel to punch a hole through the roof. Drop down and collect the Datapack within.
Datapack 7/10
Requirements: Cryptographic Sequencer.
Thisdata file is located on a small platform at the eastern end of the Pioneer’s Bridge, below the eastern tower. There is a keypad here that you need to hack.
Pull out your Cryptographic Sequencer and enter the passwords: “CHEATING”, “TRUTHCOMESOUT”, and “INFORMATION” to unlock the Datapack in Batman: Arkham Origins.
Datapack 8/10
Requirements: Explosive Gel.
This Datapack becomes available after Firefly has destroyed the Pioneer’s Bridge. Go to the middle and then drop down to the west of the bridge.
There is a hidden corridor here beyond which lies a wall that can be broken down. Use your detective vision to spot it and destroy the wall using Explosive Gel to grab the Datapack inside.
Datapack 9/10
Requirements: None.
To collect this Datapack, you must disarm the third bomb as you are making your way to the train in the Train Station from the south pillar. The train cart in question where the Datapack is located is where the hostages were held.
Datapack 10/10
Requirements: None.
The last Pioneer’s Bridge Datapack is located in a vent in the Train Station.
Extortion File 13 locations – Coventry
Datapack 1/10
Requirements: Batclaw.
This Datapack is located right next to the Mendo Soap Co. building which is in the north of Coventry. Move to the east of the building at the ground level and you will see the Datapack inside a container.
You must use the Batclaw to grab the container because it closes shut when you get too close to it.
Datapack 2/10
Requirements: None.
The Datapack can be found on top of a pipe stretching through the Pioneer’s Bridge in Batman: Arkham Origins. This will be near the northern border of Coventry which connects to the Pioneer’s Bridge.
Datapack 3/10
Requirements: Explosive Gel.
This Datapack is located inside a small shack next to the Comms Tower in Coventry. This will be to the south of it, but you must bust open the wall with Explosive Gel.
Datapack 4/10
Requirements: Explosive Gel.
The Datapack is located in the southwestern corner of the Coventry District beside a brewery. This is a destructible wall to the north of it which can be busted open with Explosive Gel. Beyond this wall is the Datapack.
Datapack 5/10
Requirements: Batarang and Batclaw.
The fifth Datapack is located on the western border of the Coventry District that connects to the Diamond District – beside the “My Alibi” nightclub. Find the tunnel that leads below the highway and enter it.
Once there, reach the diesel truck and face up to find three switches/green lights. You can use your Batarang and quickfire to hit the three lights to unlock the cage and collect the Datapack from within using your Batclaw.
Datapack 6/10
Requirements: Remote-Controlled Batarang.
The next Enigma Datapack is located on top of the My Alibi nightclub. While it is located on the rooftop, the switch to open its cage is located inside a vent to the side of the building. You must throw a Remote-Controlled Batarang into the air duct to activate the switch.
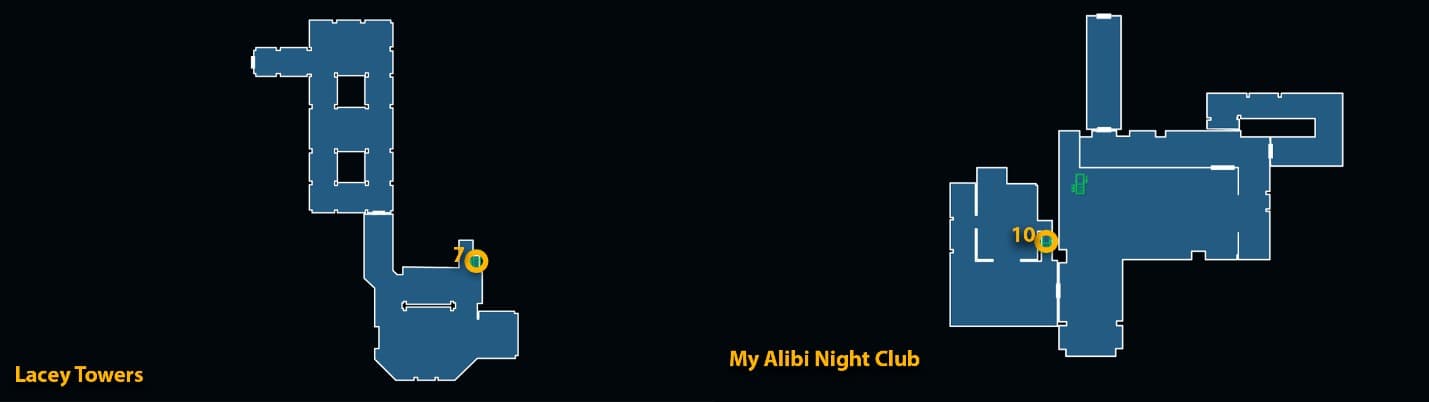
Datapack 7/10
Requirements: None.
The Datapack is located inside the room of Lacey Towers which is across the hall. Inside, head to your left and you will find the Datapack suspended from the wall next to the stairs in Batman: Arkham Origins.
Datapack 8/10
Requirements: None.
The eighth Datapack is located on top of a raised portion of the road in the northern parts of Coventry. This will be just above the drop-off point into the Coventry. You can see it in the portion of the area that passes through a building.
Datapack 9/10
Requirements: Glue Grenades.
To get this Datapack, head to the northwestern portion of the Coventry next to the Mendo Soap Co. building. Move around the building until you see the caged area.
Then, plug the two steaming points to the left of the cage using Glue Grenades and grab the Datapack once they are sealed.
Datapack 10/10
Requirements: Batclaw.
The last Data of the 13th Data File is located inside the My Alibi nightclub’s Private Room. There is a vent in one of the walls in this room. You can pull the cover open using your Batclaw and grab the Datapack from within.
Extortion File 14 locations – Coventry
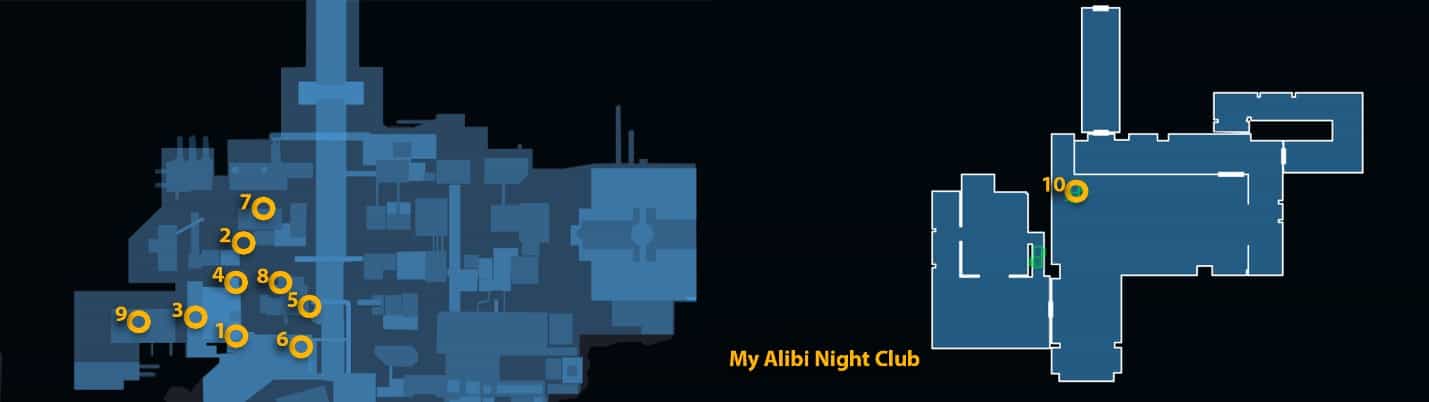
Datapack 1/10
Requirements: Batclaw.
This Datapack can be found near the railroad, which is just southeast of the Comms Tower. Next, go to the west of the railroad and you will see the Datapack beside a ledge across the railroad. You can glide to it and grab the Datapack with your Batclaw.
Datapack 2/10
Requirements: None.
This Datapack can be found on a wall in the corner of the building right beside the Batwing Dropoff point.
Datapack 3/10
Requirements: Batclaw.
This Datapack is located on the western wall of the southernmost building of Coventry. It is located high up on the wall, so you need to grab it with your Batclaw.
Datapack 4/10
Requirements: Batclaw and Batarang.
This one is located high on the wall between the two central buildings of the Coventry, to the south of the Batwing drop-off point. There is a switch above the data file and two more below it.
You must hit the switches with your Batarang to unlock the Datapack, then grab it with your Batclaw in Batman: Arkham Origins.
Datapack 5/10
Requirements: None.
This Datapack is located high up on the southern wall of the first building to the southwest of the Batwing drop-off point. You must go to the area beneath the gargoyles and you will find the pack there.
Datapack 6/10
Requirements: None.
This Datapack is located in the south of the Coventry. You must climb onto the gargoyles on the Lacey Tower and then face south to the building in front of you.
There is a destructible wall here you can find with your Detective Vision. Glide through to this wall and Batman will destroy it upon contact. You can find the Datapack in this new area.
Datapack 7/10
Requirements: Shock Gloves.
From the building ahead of the Batwing drop-off point, you must go to the roof on the northern side. If you pull out your map, this will be just beneath where the word Coventry ends.
There is a terminal here you can charge with your Shock Gloves, thereby unlocking the Datapack to be collected.
Datapack 8/10
Requirements: Batclaw and Cryptographic Sequencer.
Go to the west of the Lacey Towers building and get up on the first walkway you see. At the end of this walkway is a keypad that must be hacked. Pull out your cryptographic sequencer and enter the password: “PUZZLEMENT” to unlock the Datapack. You will need your Batclaw to get this Datapack.
Datapack 9/10
Requirements: Remote Claw.
Head to the rooftop of the Koul-Brau Brewery and you will see three pressure pads. You must use your Remote Claw to create a zipline between the two smokestacks.
Then, you must zipline and drop down onto the second, third, and first zipline respectively, consecutively without touching the ground to unlock the Datapack nearby in Batman: Arkham Origins.
Datapack 10/10
Requirements: None.
There is a walkway on the roof of the My Alibi nightclub you must climb. This is where you fight Bird. The Datapack is located on this walkway and is already unlocked.
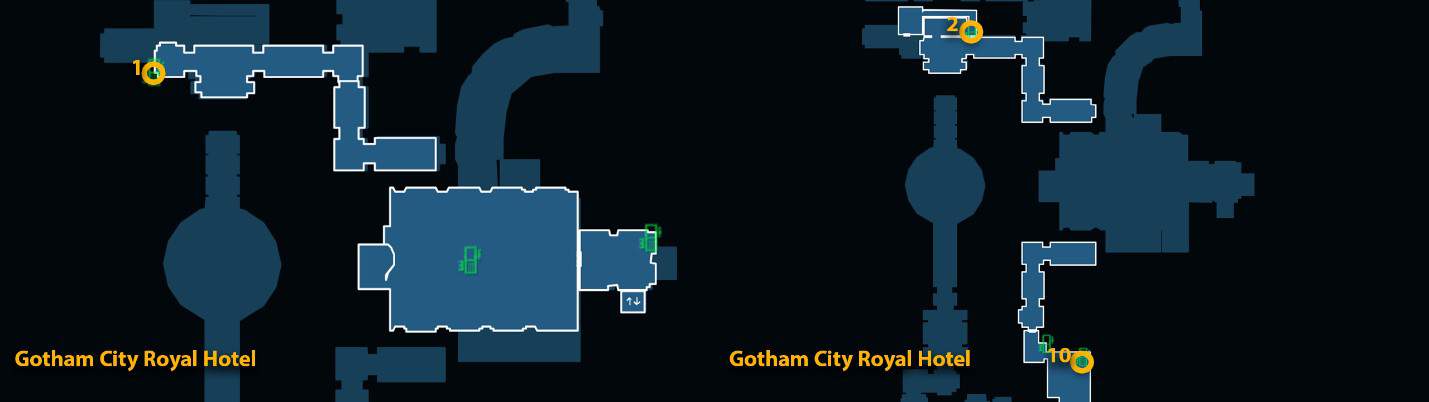
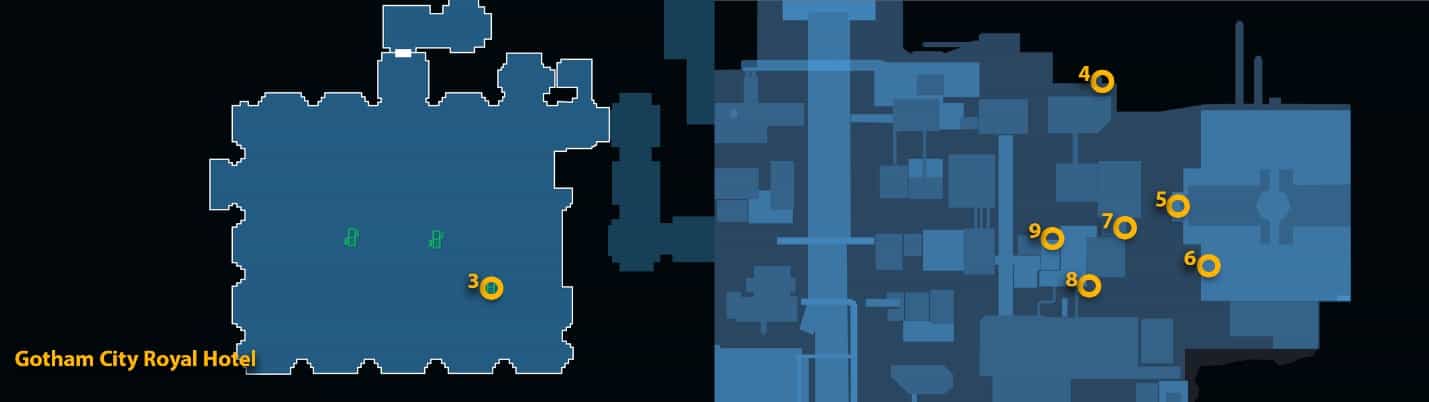
Extortion File 15 locations – Diamond District
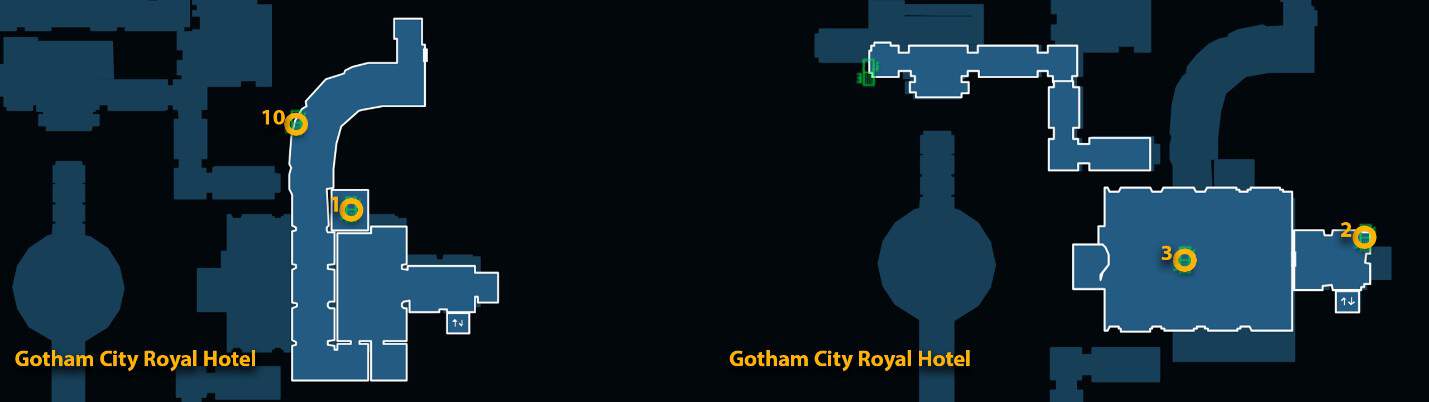
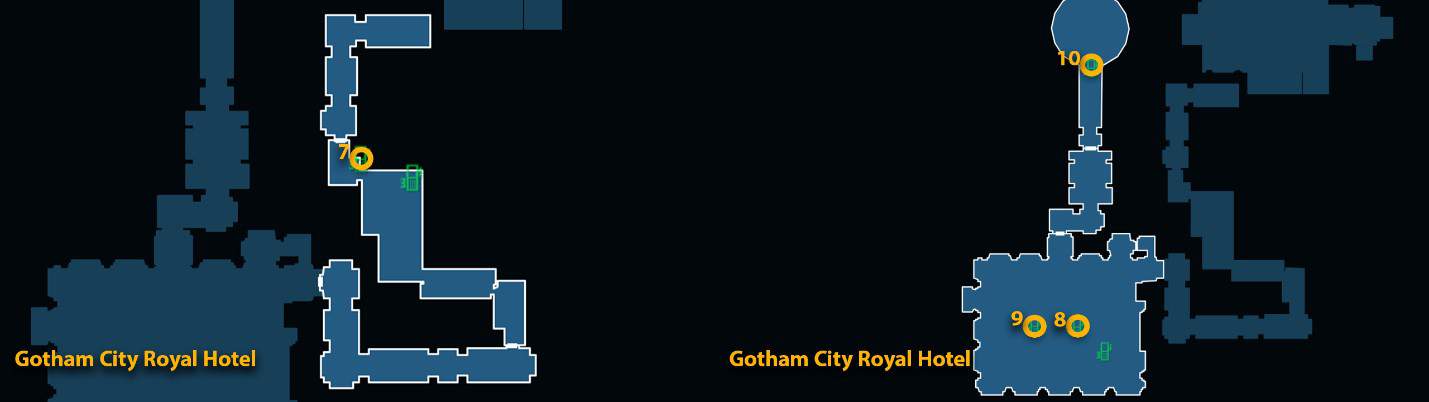
Datapack 1/10
Requirements: Cryptographic Sequencer and Batclaw.
From the Gotham City Royal Hotel’s parking lot, make your below until you reach a door on your left. Beside this door is a vent, and you must tear down its cover with your Batclaw.
Then, jump into the vent to land in the room on the other side and find the keypad. Pull out your cryptographic sequencer and enter the password: “CARC RASH” to unlock the Datapack.
Datapack 2/10
Requirements: Batclaw.
The Datapack is located behind the balloons inside the main entrance of the Gotham City Royal Hotel – Diamond District. You will need your Batclaw to grab the Datapack.
Datapack 3/10
Requirements: Batclaw.
The Datapack is located inside the vent next to the staircase in the Gotham City Royal Hotel’s main lobby. You will need to break off the vent cover with your Batclaw.
Datapack 4/10
Requirements: Explosive Gel.
Make your way to the highway running south from the Soder Cola building. There is a tunnel on your north if you are standing next to the building. This will be covered by three breakable walls.
You need to break all three walls with Explosive Gel and the Enigma Datapack will be revealed beyond them. We recommend that you use the Detective Vision if you are having trouble finding the breakable walls.
Datapack 5/10
Requirements: Glue Grenades.
In the central, northmost building of the Diamond District, find the caged area. There are pipes here that are releasing steam which must be blocked with your Glue Grenades.
Datapack 6/10
Requirements: None.
There is a seemingly inaccessible section in the Comms Tower building. You must first reach a point that is higher than this one and then glide towards it from there, entering it from the top.
The Datapack is found unlocked already in this area.
Datapack 7/10
Requirements: Batclaw.
Reach the western end of the building to the right of the Diamond District drop-off point and you will see the Datapack stuck on the ceiling next to an alcove. You can grab the Datapack with your Batclaw.
Datapack 8/10
Requirements: Cryptographic Sequencer.
Make your way to the north of the Diamond District and find the entrance of the Soder Cola building. There is a keypad next to it which must be hacked. Use your cryptographic sequencer and enter the passwords: “MALFEASANSES”, “MISBEHAVIOUR”, and “BLACKBOOK” to unlock the Datapack.
Datapack 9/10
Requirements: Disruptor and Cryptographic Sequencer.
Get to the roof of the same building as the former and move to the south. First, you must use your Disruptor to eliminate the scramblers, and then use your cryptographic sequencer to enter the password: “ILLICITSECRET” to unlock the Datapack next to it.
Datapack 10/10
Requirements: Glue Grenade.
On the road leading to the parking lot from the Gotham City Royal Hotel, you will find a vent that is emitting steam. You must block the steam using your Glue Grenade to access the Datapack behind it.
Extortion File 16 locations – Diamond District
Datapack 1/10
Requirements: Shock Gloves.
This data file can be found behind a fence on the 10th floor of the Gotham City Royal Hotel – Diamond District. There is a generator nearby you can charge with your Shock Gloves to unlock the fence.
Datapack 2/10
Requirements: Remote Claw and Shock Gloves.
This Datapack is inside the elevator shaft on the 19th floor of the Gotham City Royal Hotel – Diamond District. You can use your Remote Claw to form a rope and walk across the shaft to grab the Datapack.
If the elevator is in the way, you can charge up the generator below to make it move up. For that, you will need Shock Gloves.
Datapack 3/10
Requirements: Cryptographic Sequencer.
There is a keypad on a beam inside the Royal Hotel. This will be right next to the West Tower Ballroom. You will need your cryptographic sequencer to hack the keypad by entering the password: “SURP RISE”. This will unlock the Datapack, which is nearby.
Datapack 4/10
Requirements: Remote Claw.
In the center, northmost point of the Diamond District, locate the fence overlooking the frozen lake. There is a cage with the Datapack inside next to it, and an anchor point beside it.
Use your Remote Claw on the anchor point and drop down onto the ledge on top of the cage. You can then grab the Datapack from there.
Datapack 5/10
Requirements: Shock Gloves.
Charge the generator you see on the balcony out front of the Royal Hotel. This will be the most extended portion on the west side of the building. You will need your Shock Gloves to charge the generator and unlock the Datapack.
Datapack 6/10
Requirements: Batarang.
A little to the south of the former location, on the ground level next to the Royal Hotel’s entrance, you will find a pressure plate. Step on this pressure plate and look around you to find a green light.
Use your Batarang to hit this green light to unlock the datapack below it.
Datapack 7/10
Requirements: None.
Find the building that’s in between the Comms Tower and the Royal Hotel and make your way to its northern end. Find a walkway above you with the green Datapack holder.
You must step on the pressure plate below it whilst it is lit to unlock the Datapack.
Datapack 8/10
Requirements: Batclaw.
Get on top of the roof of the building that’s to the east of the Gotham City News building and south of the Comms Tower. Then, drop down from the southern edge of the building until you see a fenced area.
You will find a vent here. You must use the Batclaw to bust open its cover and enter it. Crawl to the end and you will find the Datapack.
Datapack 9/10
Requirements: Explosive Gel.
Reach the northern end of the Gotham City News Building behind the Comms Tower and you will see a small shack above you. You must use the Explosive Gel on its entrance to blow it up. When done, enter and grab the Datapack inside.
Datapack 10/10
Requirements: None.
Inside the Gotham City Royal Hotel, reach the ventilation shaft. There is an area to the side that you can access by crawling through. Once inside, look for the fan blades and a ledge next to them.
Grapple onto that ledge and you will see the Datapack on your right.
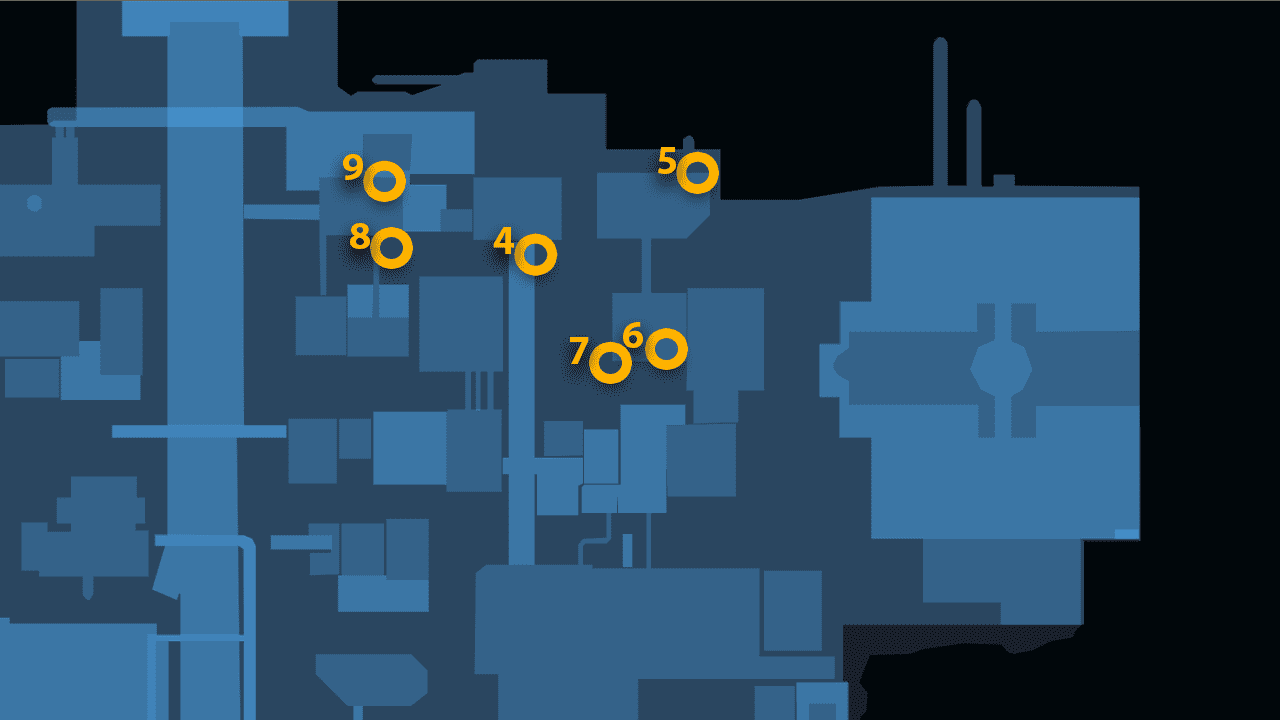
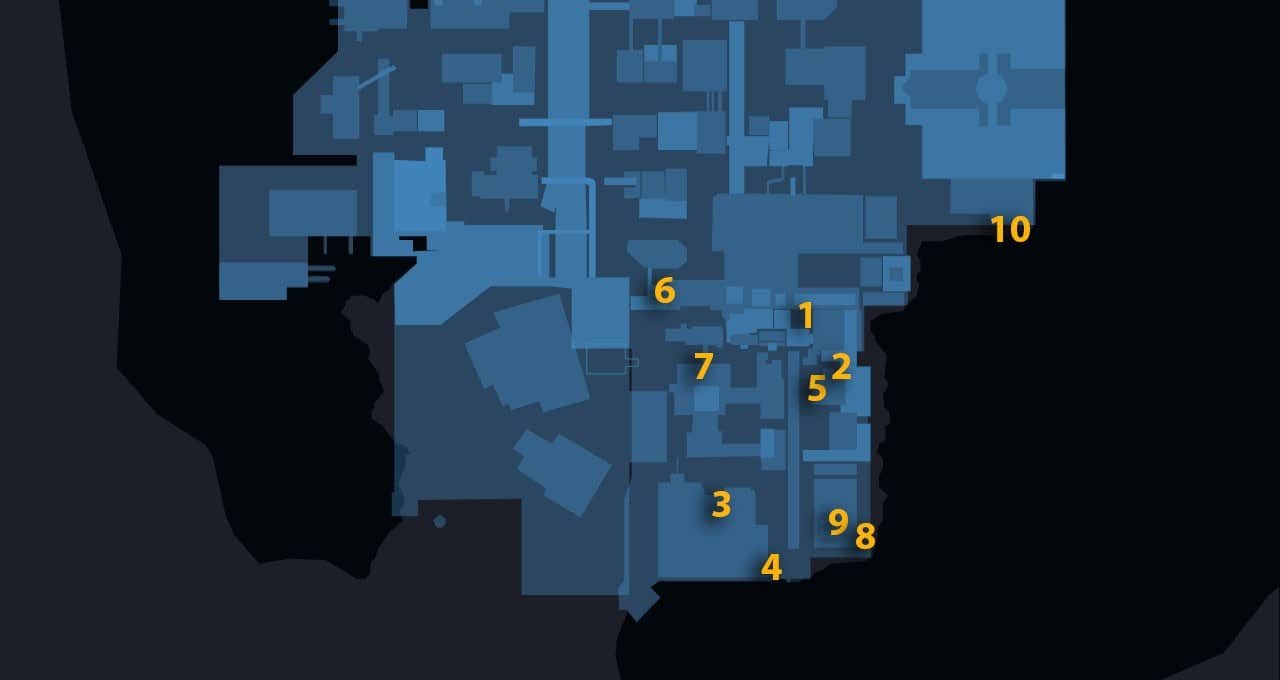
Extortion File 17 locations – Diamond District
Datapack 1/10
Requirements: Disruptor and Cryptographic Sequencer.
This Enigma Datapack is located on the northern wall of the southernmost building of the Diamond District – the Hampton Hill building. Move to the right of it until you see a truck and the Datapack will be right next to it.
You will first need to use your Disrupter to make the keypad hackable and then use your cryptographic sequencer to put in the password: “SECRETKNOWLEDGE” to unlock the Datapack.
Datapack 2/10
Requirements: Batclaw, Cryptographic Sequencer, and Explosive Gel.
The second Datapack is located on the rooftop of the same building as the former. To get this one, you will first have to put some Explosive Gel on the three green switches on the wall.
Then, get back and stand on the green pressure plate. As soon as you do that, detonate the Explosive Gel and immediately quickfire your Batarangs at them. If done correctly, the Datapack holder will unlock, and you will be able to grab it with your Batclaw.
Datapack 3/10
Requirements: Batclaw.
This Datapack is located on the eastern wall of the building southwest of the Comms Tower. If you open the map, this will be just before the word District.
There are two pressure pads on the walls adjacent to the Datapack. You must glide into the first pressure pad from another building, then jump off the wall, landing on the other pressure pad to unlock the Datapack.
You can then grab the Datapack with your Batclaw.
Datapack 4/10
Requirements: Batclaw and Remote Control Batarang.
This Datapack is located on the building east of the former one – in the northwestern corner of the Diamond District. Find the eastern alley between the two buildings and there is a vent there with the locked Datapack attached to it.
You must first use your Batclaw to open the vent cover and then step onto the green pressure plate beside it. Now, you must throw your Remote Control Batarang, pass it through the electric field, and into the vent to switch within.
Datapack 5/10
Requirements: Remote Controlled Batarang.
On the southwestern edge of the building directly west of the drop-off point, you will see the Datapack attached to a pillar. Below you, you should see a green switch through the floor.
To hit it, make your way to the opposite end of the walkway. Then throw your Remote Controlled Batarang through the opening below to hit the switch.
Datapack 6/10
Requirements: Batarang.
The Datapack is located on the roof of the small building to the west of the former one – west of the Comms Tower. At the western end of the rooftop should be a Furniture Company sign and three switches next to it.
Stand on the green pressure pad and quickfire the Batarangs at the three switches. Then, step off the pad and hit the three new switches that appear to unlock the data file nearby.
Datapack 7/10
Requirements: Glue Grenade.
This Datapack is located in the Ventilation Shaft of the Royal Hotel. Halfway above this area is a pipe that is emitting steam. You must use Glue Grenades to block the pipes and then get the Datapack that is revealed.
Datapack 8/10
Requirements: Cryptographic Sequencer and Batclaw.
Head into the West Tower Ballroom of the Royal Hotel and step onto the central, wooden platform. Find the keypad and use your Cryptographic Sequencer to enter the password: “WHYTHEL ONGFACE”. You can then use your Batclaw to grab the Datapack from the Clown’s nose.
Datapack 9/10
Requirements: None.
This Datapack can be easily found by sliding through a track in the Royal Hotel Ballroom.
Datapack 10/10
Requirements: None.
This Datapack is inside a vent in the Overview Bar on the top floor of the Royal Hotel.
Extortion File 18 locations – Burnley
Datapack 1/10
Requirements: Explosive Gel.
Break open the entrance of the small shack on top of the building northeastern corner of the Burnley district with Explosive Gel.
Datapack 2/10
Requirements: Cryptographic Sequencer.
On the building to the east of the Burnley District – north of the Comms Tower – there is a small balcony that holds the Datapack, but it is protected by a keypad.
Pull out your Cryptographic Sequencer and enter the passwords: “PUZZLEBOX”, “SHAKEDOWN”, and “CORECION” to unlock the Datapack in Batman: Arkham Origins.
Datapack 3/10
Requirements: Batclaw.
The Datapack is located on the rooftop of the building at the southern end of the Burnley District. This will be in the northern section of the roof. All you need to do is get the Datapack with your Batclaw.
Datapack 4/10
Requirements: Cryptographic Sequencer.
On the ground level of the same building as the former Datapack. This will be on the wall of the southeastern corner of said building. Pull out your Cryptographic Sequencer next to the keypad and enter the password: “FINALANALYSIS” to hack it and collect the Datapack beside it.
Datapack 5/10
Requirements: Remote Control Batarang.
On a balcony along the western edge of the Comms Tower – slightly north of the tower icon on the map. The Enigma Datapack is next to the railing and there is a fusebox right next to it.
You must toss a Remote Control Batarang down into the street and pass it through an electric field there, then bring it back up to hit a fusebox. This will unlock the Datapack.
Datapack 6/10
Requirements: Explosive Gel.
In the building in the northwestern corner of Burnley District, there is a small shack halfway up to it. Its entrance is blocked by a wall which must be blasted open with Explosive Gel before you can get to the Datapack inside.
Datapack 7/10
Requirements: Batarang.
Head to the building beside Enigma’s HQ next to the bridge. This will be to the west of the drop-off point. Stand on the green pressure pad on the ground and look up at the underside of the bridge.
There are five green lights here in total, and you must hit all of them with your Batarang within 2 seconds whilst standing on the plate to unlock the Datapack right next to it.
Datapack 8/10
Requirements: Batclaw.
The Datapack is on the balcony of the building in the southeastern corner of Burnley District. The balcony itself is on the southeastern corner of the building. Use the Batclaw to grab the Datapack.
Datapack 9/10
Requirements: Remote Control Batarang.
This Datapack is located on the roof of the same building as the preceding Datapack. At the southern end of the roof, you will find some switches next to the Datapack.
First, stand on the green pressure pad on the ground to open the cage in front of your and toss a Remote Control Batarang at the switch inside it. This will open another switch on the roof which you need to hit in the same fashion.
Datapack 10/10
Requirements: None.
This Datapack is located next to the shore at the northeastern corner of the Burnley District in Batman: Arkham Origins, just south of the Royal Hotel. Glide to the wall from a nearby building to hit the switch on it, then drop down to quickly collect the data file.
Extortion File 19 locations – Burnley
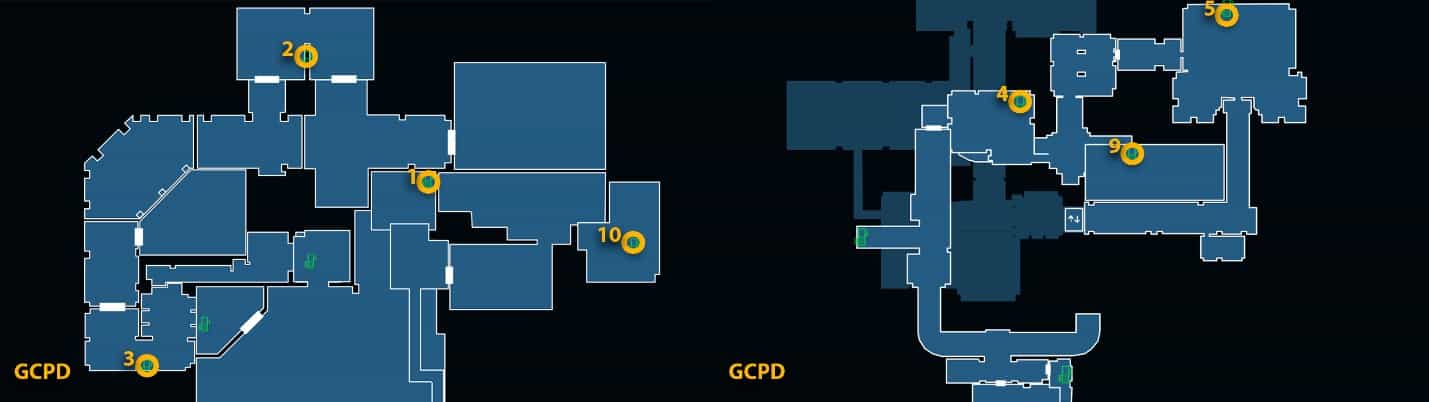
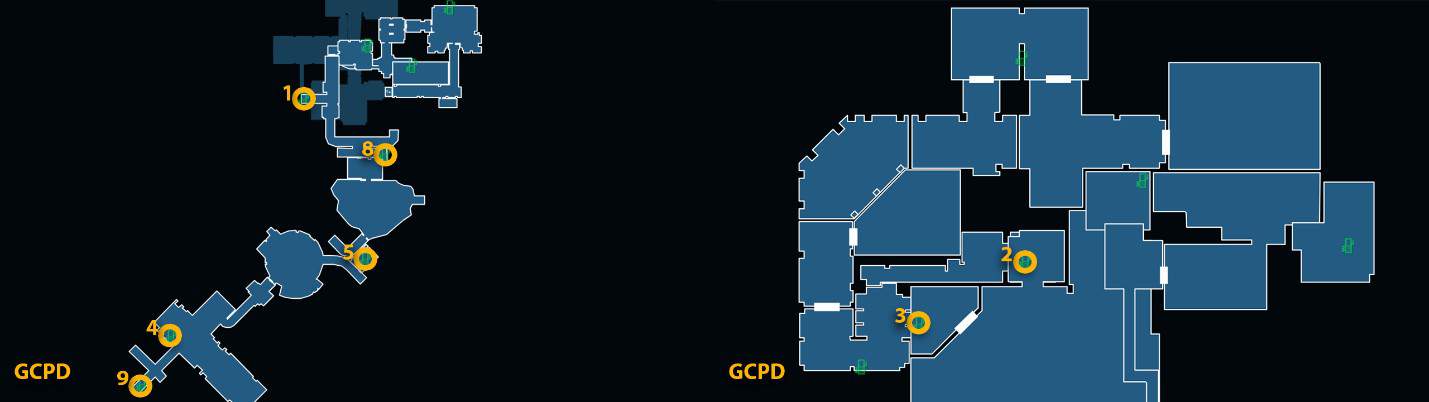
Datapack 1/10
Requirements: None.
The Datapack is in a room within the Swat section of the GCPD. You can access it by sprinting through the window and breaking it.
Datapack 2/10
Requirements: Batarang and Batclaw/Remote Control Batclaw.
This Datapack is located in a small room within the GCPD’s interrogation room. You must first use a Batarang to hit the switch nearby, then jump through the window into the other room and grab the Datapack with your Batclaw.
You can also hit the switch with the Remote Control Batarang to dispense the need of the Batclaw.
Datapack 3/10
Requirements: Batclaw.
This Datapack is inside one of the lockers in the GCPD’s locker room. You can find out which one it is with your Detective Vision. You will need to use your Batclaw to open the locker though.
Datapack 4/10
Requirements: Remote Control Batarang.
This Datapack is located inside a locked cell in the GCPD’s Evidence Locker. To open the cell, you will first have to use your Remote Control Batarang and toss it into the vent next to it to electrify it. Then, turn it around and hit the fusebox with it to unlock the cell and collect the Datapack in Batman: Arkham Origins.
Datapack 5/10
Requirements: None.
You can only collect this Datapack after the great battle at the GCPD. By then, the window in the room on the top floor will have broken. This new area has the Datapack inside, but you must grapple up to it.
Datapack 6/10
Requirements: Glue Grenades.
On the roof of the building in the west of Burnley – just past Enigma’s HQ – there is a pressure pad. You must stand on this pressure pad and then block the steam-emitting pipes with Glue Grenades to reveal an area with the Datapack inside.
Datapack 7/10
Requirements: Shock Gloves.
Get onto the roof of the building to the west of the Comms Tower. This will be to the south of the drop-off point. There is a generator on this roof that you must charge with your Shock Gloves. You can then grab the Datapack next to it.
Datapack 8/10
Requirements: Shock Gloves and Batclaw.
On the eastern edge of the Burnley District, next to the Comms Tower, there is a platform made of ice that you can step on. In this area, there is a Generator and a Datapack next to it.
Use your Shock Gloves to charge the Generator and then grab the Datapack with your Batclaw.
Datapack 9/10
Requirements: Explosive Gel.
In the Morgue within the GCPD, use your Explosive Gel to bust open the floor next to the corpse. The Datapack is located within this hidden area in Batman: Arkham Origins. We suggest using your Detective Vision if you cannot find the section of the floor that can be destroyed.
Datapack 10/10
Requirements: Shock Gloves.
There is a Generator in the Swat Manager’s Office within the GCPD you can power up to unlock the locker room. The last Datapack to complete the 19th Extortion File is located within this locker room.
Extortion File 20 locations – Burnley
Datapack 1/10
Requirements: Batclaw.
This Datapack is floating on the water section which is on the right side inside Enigma’s HQ. Grab it with your Batclaw.
Datapack 2/10
Requirements: Cryptographic Sequencer.
This Datapack is located inside a cell that you can find from the vent whilst on the way to the GCPD bullpen. To unlock the cell, use your Cryptographic Sequencer and enter the password: “CONVICTION” to unlock the Enigma Datapack.
Datapack 3/10
Requirements: Cryptographic Sequencer.
This Datapack is located behind a locked door in the GCPD Bullpen. To unlock the door, you need to use the Cryptographic Sequencer and enter the password: “PROUDTOSERVE”.
Datapack 4/10
Requirements: Remote Claw.
This Datapack can be found in the West Burnley Sewers of the Burnley District. You will need your Remote Claw to create a line across the water with anchor points. When that’s done, you can grab the Datapack from the pipe on the left.
Datapack 5/10
Requirements: Batclaw.
To find this Datapack in Batman: Arkham Origins, first make your way to the room that connects the GCPD Telecom Room to the Water Treatment section. Find the small pip in this room which has the Datapack inside it, glowing green. You can grab it with your Batclaw.
Datapack 6/10
Requirements: None.
On the roof of the building at the northwestern corner of Burnley, there is a vent which holds this Datapack inside.
Datapack 7/10
Requirements: Shock Gloves.
To get this Enigma Datapack, make your way to the roof of the building southwest of the drop-off point. This will be directly north of the GCPD. Charge the Generator here with your Shock Gloves to activate two switches. Then, first step on the switch to the right and then on the left to release the data file.
Datapack 8/10
Requirements: Cryptographic Sequencer and Shock Gloves.
In the sewer section inside the GCPD next to the Telecom Room. Here you will find a Generator you must charge with your Shock Gloves to activate the keypad on the gate beside you.
Next, quickly pull out your Cryptographic Sequencer and enter the password: “PROFITEERING” to unlock the Datapack.
Datapack 9/10
Requirements: Glue Grenade.
In the southern section of the Burnley Sewers area, there is a small vent that you must block with a Glue Grenade and grab the Datapack in Batman: Arkham Origins.
Datapack 10/10
Requirements: Batclaw and Glue Grenade.
Reach the flooded tunnel in the northern part of the Burnley Sewers. When there, use your Glue Grenade again to make a raft on the water. Get on it and use your Batclaw to make your way forward toward the Datapack.