
In this detailed guide, we’ll be looking into the mysterious Forgotten Tower dungeon in Diablo Immortal, its location, boss fights, and how to complete the dungeon.
Diablo Immortal Forgotten Tower Location
The Forgotten Tower once was a flourishing castle where the Countess was buried alive because of her evil deeds. Soon after that, the castle fell and turned into ruins, but the only thing that remained standing was its tower.
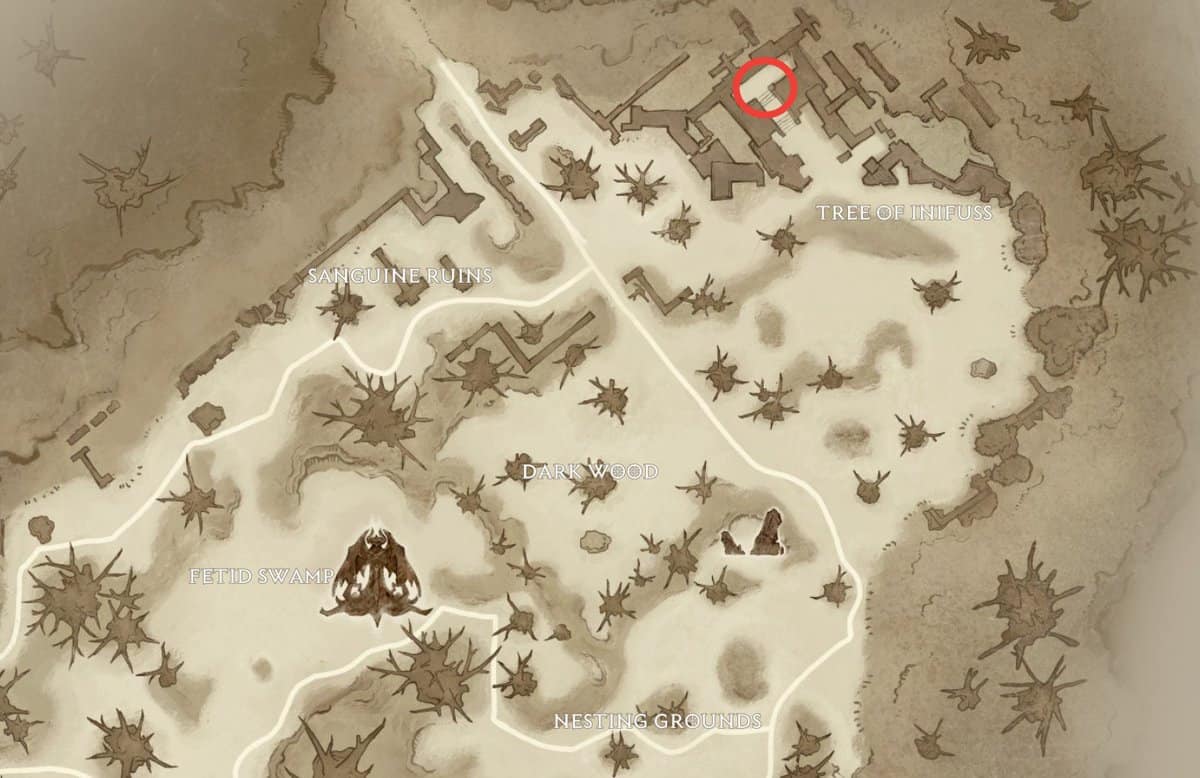
Players will be able to unlock this dungeon once they have reached level 20 and have ended the Dark Wood zone’s story. The tower is located in the Dark Wood just before the area where it transitions to the Shassar Sea.
Completing the Dark Wood zone story will make players aware that The Countess holds the third shard of the Worldstone and can dominate the world of Sanctuary with its powers. So it’s on them to stop Countess by visiting the Forgotten Tower and saving the future of Dark Wood and the Sisterhood of the Sightless Eye.
Forgotten Tower Set Items
Every dungeon in the Diablo Immortal comes with Set items that only drop at Hell difficulty. Each dungeon has its own unique Set Items that drop as loot and rewards after killing different foes and bosses.
Unfortunately, not every time every single of these items is guaranteed to drop; you will have to farm some of them by looking around at different dungeon levels. In Forgotten Tower, you’ll find the following items;
- Wisdom’s Edge Amulet (Hell II +)
- The Prisoner Ring (Hell IV +)
- Shepherd and Father Ring (Hell IV +)
- Issatar’s Open Hand (Hell II +)
- Storm-Tack of Shal’baas Belt (Hell I +)
- Mountebank’s Slyness Boots (Hell I +)
Forgotten Tower Bosses
Now that you have an overview of the dungeon’s history and what rewards it holds for you, let’s jump into the bosses you’ll be encountering here.
After entering the dungeon and getting rid of Shaman and his Blood Clan Warriors, the first main boss players will encounter will be the Blood Priestess Innaloth. Blood Priestess Innaloth is one of the Bloodsworn who deceived the Sisterhood of the Sightless Eye.
Once that’s out of the way, you’ll meet with The Countess when you reach the final level. While fighting with the Countess, you’ll also be dealing with Bloodsworn Archer, Bloodsworn Oppressor, and Bloodsworn Spearwoman simultaneously.
Forgotten Tower Walkthrough
If you’ve taken a look at the Dungeon details for the Forgotten Tower, you might already know it’s designed for 4 player parties. However, if you follow our instructions and play carefully, you should be able to solo the dungeon as well, at least on Normal difficulty.
Forgotten Tower has a straightforward single level. It is one of the smallest dungeons in the game, and you’ll meet the Countess in the Chamber room.
Dungeon Entrance
As soon as you reach the dungeon entrance, you’ll be greeted by a mob of enemies. It will be a mix of Dark Creeper, Quill Rats, Direwolf, Corrupted Mauler, Bloodsworn Spearwoman, Bloodsworn Oppresso, and Hungry Torso.
These are easier to deal with, and you can quickly swing your weapons and produce AoE attacks at them to get rid of them. Of course, you can run through them and directly break the vine barrier, but we recommend killing some rare foes to collect good XP.
Once the way is clear, break the barrier and go downstairs to the dungeon to meet your next set of enemies.
Once you’ve reached downstairs, you’ll meet another set of enemies. It will be the Shaman and the Blood Clan. Clearing them is also easy through AoE attacks, so kill as you go and make your way through the hallway to meet your first boss. Make sure you get rid of them to keep the arena free of chaos during the first boss fight.
How to Defeat Bloodsworn Priestess Innaloth in Diablo Immortal
As you make your way through the hall, you’ll meet with Bloodsworn Priestess Innaloth with a group of enemies acting as a front-line protective barrier for her. Luckily, she doesn’t possess any special attacks; she just summons a lot of fighters for her. So blast her and her minions with some of your best AoE attacks like before as well.
However, she can unleash a wall to trap you with a Bloodsworn Oppressor (Shieldbearer) that can provide you intense damage. So be on the lookout for that and try killing her as soon as possible.
Once she and her army are dead, go towards the Dying Villager and inspect him. Once that’s done, open the left gate.
Bloodsworn Army Fight
As soon as you open the gate, you’ll be instructed to kill the followers of the Countess within a time limit. This will be a minion event that you can get through by using your best-class skills and attacks. You’ll get about five bonus chests at the end.
You’ll have this event happen about five times repeatedly, giving you a total of 80 seconds to complete it. You’ll have a mix of 100 enemies that should be dead by 80 seconds. Look out for the swinging blade because it’ll give you massive damage if you come in contact with it.
Try killing 35 enemies in the first two stages, followed by 40 in the third and fourth stages and 30 by the last stage. Once you kill all of the hundred enemies, it’s time to drag the Countess to her death.
How to Defeat The Countess in Diablo Immortal
Make your way to the chamber room to finally encounter The Countess. As compared to the enemies you’ve faced till now, Countess, without a doubt, is the toughest one so far.
The Countess will emerge from the center of the chamber room and will start swinging her sword as soon as she sees you. Go towards her back and start attacking her to avoid contact with the blade.
Whenever she marks a red circle on the ground, run away from it instantly as she’ll execute a big AoE damage attack there. Keep attacking her with your best class attacks from the back till she loses the first portion of her health.
Once that happens, the Countess will summon nine Bloodsworn. Kill them all and simultaneously stay away from where the boss is facing as she will cast another AoE attack.
Moreover, the boss will also put a red line on the ground; if you step on it, you will deal massive damage until you get away from it. So be on the constant lookout for that line as it won’t fade until she dies.
Towards the second phase, the Countess will jump into the sky and land back at the center of the room, prompting a storm of blood bats. This is an awfully deadly attack so stay at a distance from the red line while killing the blood bats one by one.
Keep advancing attacks on Countess to bring her health pool down and ultimately kill her. When she’s dead, all Bonus Treasure Chests will spawn in the middle of the room, and there are chances she drops some set items as well.