If you are looking to clear all of the Riddle Challenges (grids) in Batman: Arkham Knight, you need to find all of the breakable objects. This can be tedious because like in the previous games, these objects tend to blend into the environment. You can easily walk right past them, which is why we have marked the locations of all of the breakable objects on the maps for your convenience.
There are a total of 90 breakable objects for you to find and destroy to complete the Riddler’s Revenge side mission. They are split into four types: Militia Shields, Spider Drones, Insect Crates, and Jack-in-the-Boxes. Some of them are exclusive to certain locations and may require you to have a specific Batman Gadget.
Hence, we recommend completing the main story before hunting down all of the destructible objects in Batman: Arkham Knight.
Bleake Island
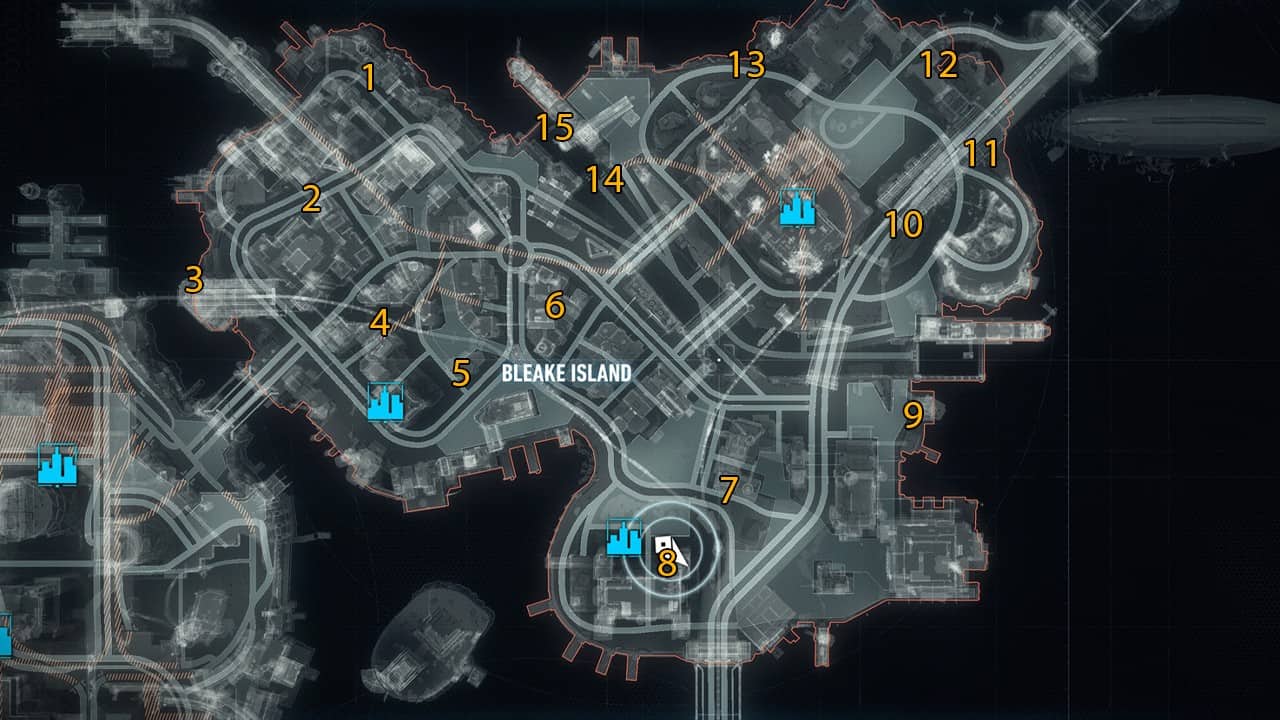
Breakable Object #1
Coordinates: 1562,2188
Make your way to the northwestern corner of the map to spot the Militia Shield hug to the wall adjacent to the overhead bridge next to the Royal Flush Gang sign. Use the firearms from the Batmobile to break the shield.
Breakable Object #2
Coordinates: 1799,2118
Just Northeast of the Bank of Gotham in Chinatown, you’ll be able to spot this breakable object on top of the Happy Halloween billboard playing a clip of the Riddler in Batman: Arkham Knight.
Breakable Object #3
Coordinates: 1907,1927
Visit the Urbrial Station in the western corner of Bleake Island to find the Militia Shiled hung on top of the northern building of the station.
Breakable Object #4
Coordinates: 1562,2188
This breakable object can be spotted on the tall building in Chinatown. Make your way to the marked location on the map to find the shield hung on the building smudged between the Sushi shop and the tattoo parlor.
Breakable Object #5
Coordinates: 2062,2342
On the building facing the northern side of Oracle’s Clock Tower. Use the Vylcan Canon to destroy the breakable object.
Breakable Object #6
Coordinates: 1922,2506
From the last location, simply travel north towards the Mckenzie’s Gem sign to locate the Militia Shield. The breakable object will be on the top of the alleyway behind the gems shop.
Breakable Object #7
Coordinates: 2242,2759
The Militia Shield is on the western wall of the construction building on the east part of the map, northeast of the GCPD building in Bleake Island.
Breakable Object #8
Coordinates: 2397,2694
This breakable object is quite easy to find in Batman: Arkham Knight. Simply drive the Batmobile towards the eastern wall of the GCPD HQ to find the Militia Shield below the rooftop of the building.
Breakable Object #9
Coordinates: 2130,3076
On the backside of the Sionis Industries Compound, you’ll be able to locate the Militia Shield on one of the supporting cranes as shown in the map image above.
Breakable Object #10
Coordinates: 1798,3034
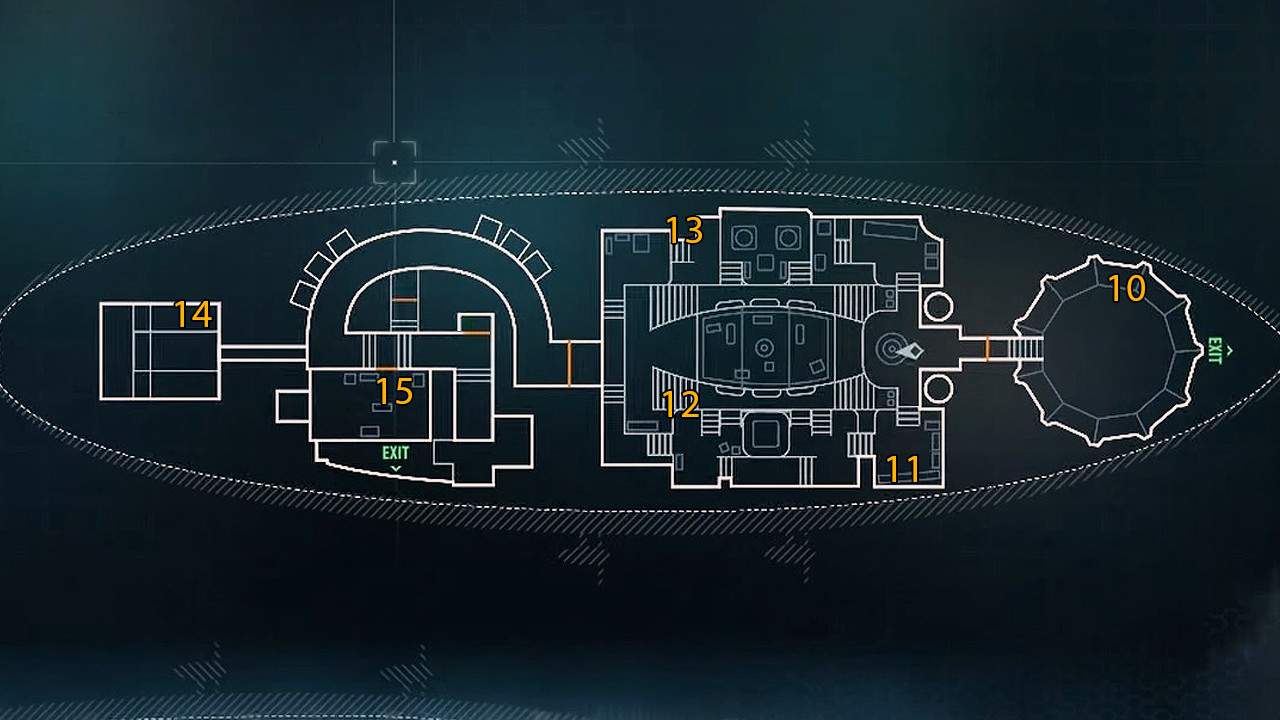
Drive inside the Monorail Station with the Batmobile to find the breakable object hung on the raised walkway that leads to the Panessa Studios.
Breakable Object #11
Coordinates: 1713,3190
Head to the eastern corner of the map to find the shield on the raised wooden crate on the western side of the bridge that leads to the Lighthouse.
Breakable Object #12
Coordinates: 1563,3083
On the northeastern side of the entrance gate of the Panessa Studios car park, look up to find the breakable object smudged between the pillars.
Breakable Object #13
Coordinates: 1539,2815
Travel to the road beneath the radio tower that leads to the Panessa Studio to find the Militia Shield hung on the corner building of the map as shown in the image above.
Breakable Object #14
Coordinates: 1744,2565
This breakable object can be found right above the entrance to the sewers in the northern corner of Bleake Island.
Breakable Object #15
Coordinates: 1667,2513
On the southwest wall of the Dixon Dock West building, you’ll find the Militia shield. Since the building is located right above the water, make your way across the water and equip the Vulcan Cannon to shoot the shield.
Miagani Island

Breakable Object #1
Coordinates: 2725,2793
Head to the Eastern side of the Mercy Bridge to spot the Militia Shield above the bridge’s pillar. Use the Batmobile firearms to destroy the breakable object.
Breakable Object #2
Coordinates: 2844,2588
The Militia shield can be found right above the building with the ‘Koul Brau’ sign opposite the Gotham Tailor shop in the northern section of the map.
Breakable Object #3
Coordinates: 2878,2368
Make your way to the marked location on the map above to find the Militia shield above the raised walking staircase sandwiched between two buildings with a neon pumpkin sign in Batman: Arkham Knight.
Breakable Object #4
Coordinates: 2992,2574
Make your way to the Parking Garage and face the building east of the parking space. The Militia Shield will be on top of the building. Create a perfect angel to fire an explosive round at the breakable object using the Batmobile.
Breakable Object #5
Coordinates: 2993,2730
Face the western side of the Westernmost Tower next to the Bank of Gotham to spot the breakable object.
Breakable Object #6
Coordinates: 2961,2932
Make your way to the marked location on the image above to spot the militia shield on the small building next to the colorful neon dolphin sign in Batman: Arkham Knight.
Breakable Object #7
Coordinates: 3130,2797
Head to the marked location to locate the Militia Shield at the entrance of the tunnel on the western side of Miagani Island.
Breakable Object #8
Coordinates: 3248,2922
Head to the tunnel on the western corner of the map to locate the breakable object above the entrance door.
Breakable Object #9
Coordinates: 3327,2814
Face the eastern wall of the building facing the Grand Avenue Station in Miagani Island to spot the Militia Shield hung above the balcony.
Breakable Object #10
Coordinates: 3598,2673
This breakable object can be found on the Western walls of the Wayne building area above the posters of Bruce Wayne.
Breakable Object #11
Coordinates: 3412,2430
Face the building right across the ‘Gotham Tonight’ building to find the breakable object huge above the stone pillar.
Breakable Object #12
Coordinates: 3339,2358
After finding the latter breakable object, simply drive towards the northern side of the ‘Gotham Tonight’ building to spot this Militia Shield.
Breakable Object #13
Coordinates: 3449,2168
Face the Western walls of the Newton Fairground’s building situated next to the Ferris Wheel to locate the Militia Shield.
Breakable Object #14
Coordinates: 3203,1850
This breakable object can be found on the northern wall of the Pinkney Orphanage Building in Batman: Arkham Knight
Breakable Object #15
Coordinates: 3021,2022
Travel to the marked location on the image above to find the last Militia Shield for Miagani Island on top of the orange building with a motel neon sign.
Founders’ Island
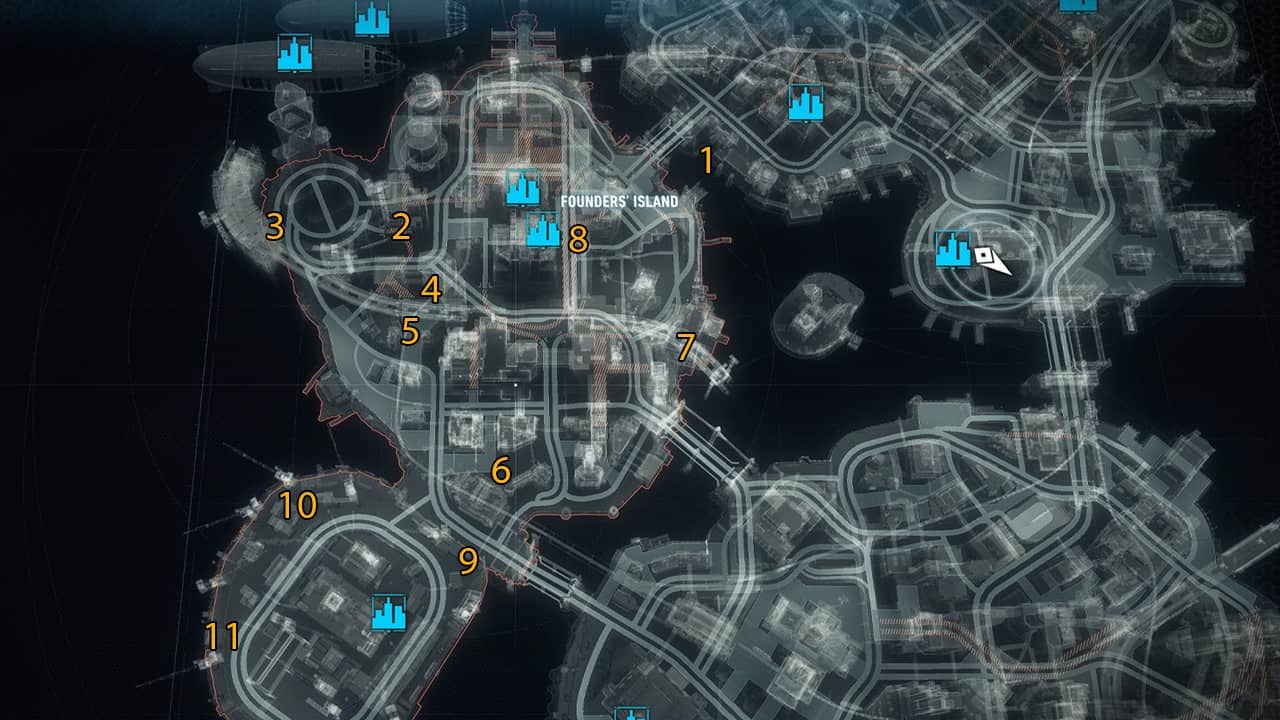
Breakable Object #1
Coordinates: 2054,1751
Make your way to the eastern walls of the City Vision Construction building to find the first breakable object for Founder’s Island.
Breakable Object #2
Coordinates: 2316,1401
This is one of the easiest breakable objects to find in Batman: Arkham Knight. Head to the entrance of the Lex Corp building from the eastern side to spot the Militia Shield.
Breakable Object #3
Coordinates: 2358,1193
Head to the second floor of the car park as marked on the map image above to spot the breakable object glued to the ceiling.
Breakable Object #4
Coordinates: 2470,1512
Travel to the main entrance for the Stock Stock Exchange building to find the Militia Shield above the main entrance door.
Breakable Object #5
Coordinates: 2586,1477
Next to the Gotham Corp building, you’ll find a small grey building holding the Militia Shield below the rooftop.
Breakable Object #6
Coordinates: 2797,1640
Venture to the southern section of the Founder’s Island to spot the Militia Statue between an angel statue facing the courtyard.
Breakable Object #7
Coordinates: 2563,1952
Follow the marker on the image above to reach a broken bridge facing the southern section of the Church. The breakable object can be found on the right side of the ramp at the beginning.
Breakable Object #8
Coordinates: 2607,1595
Use the coordinates to reach the underside of the walking bridge above the road. Zoom in on the center of the bridge to spot the Militia Shield.
Breakable Object #9
Coordinates: 3014,1580
Just across the entrance to Port Adams, you can spot the breakable object on one of the Sionis Industries shipping containers in Batman: Arkham Knight.
Breakable Object #10
Coordinates: 2911,1220
After finding the last breakable object, head to the southwest corner of Port Adams to locate this breakable object on a broken crane.
Breakable Object #11
Coordinates: 3194,1125
Head to the northwest corner of the Port to find the Militia Shield stuffed between two shipping crates.
Subway
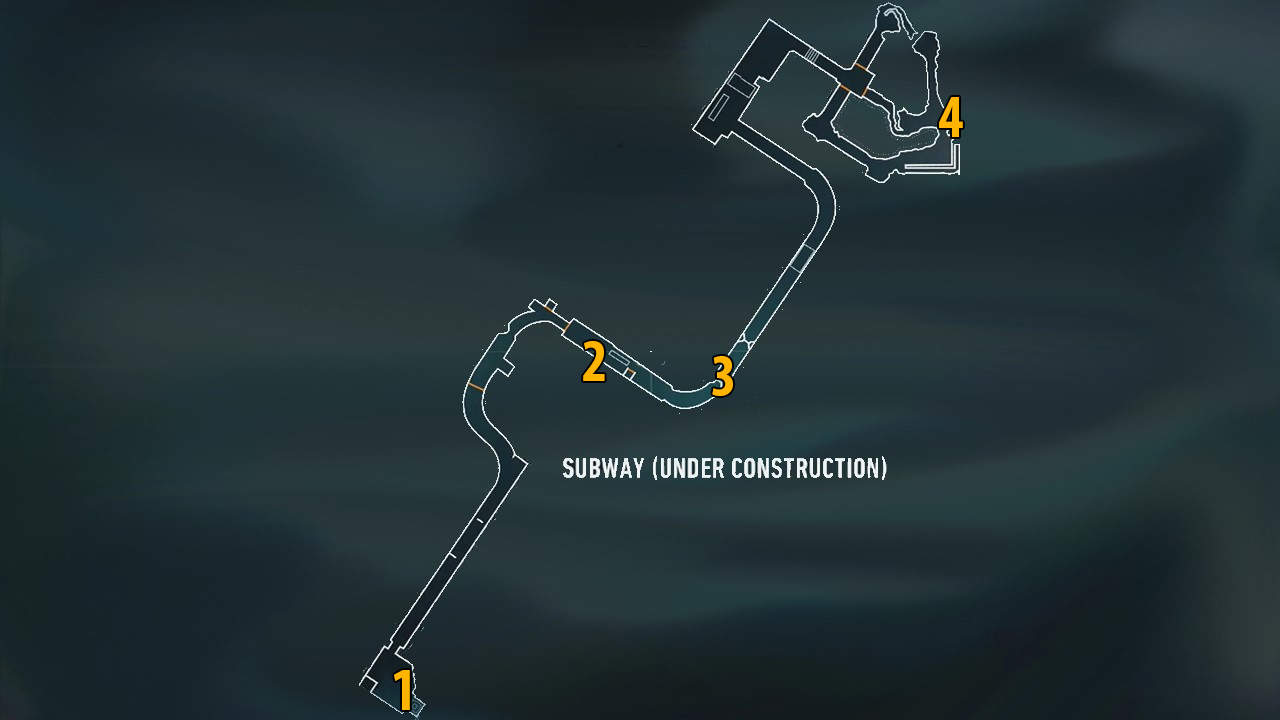
Breakable Object #1
After exiting the elevator that takes you down into Port Adams, simply face right and look up to spot the first breakable object for the underground construction area.
Breakable Object #2
Before jumping off the first ramp, look towards your left to spot the breakable object mounted above the curved doorway.
Breakable Object #3
This breakable object is quite easy to find in the game. After jumping off the first ramp, you’ll come across an area with obstacles blocking you from exploring the construction area. Face the blocked path and move 180 degrees to spot the Militia shield mounted above the entrance door.
Breakable Object #4
Drive towards the northern ends of the underground tunnel to reach the blocked subway station. Burst through the wooden door at the corner end to reach an unnamed location with a huge rock in the middle. Across the rock, you’ll find the Militia Shield on the top of the wall.
Stagg Airship (Alpha)

Breakable Object #1
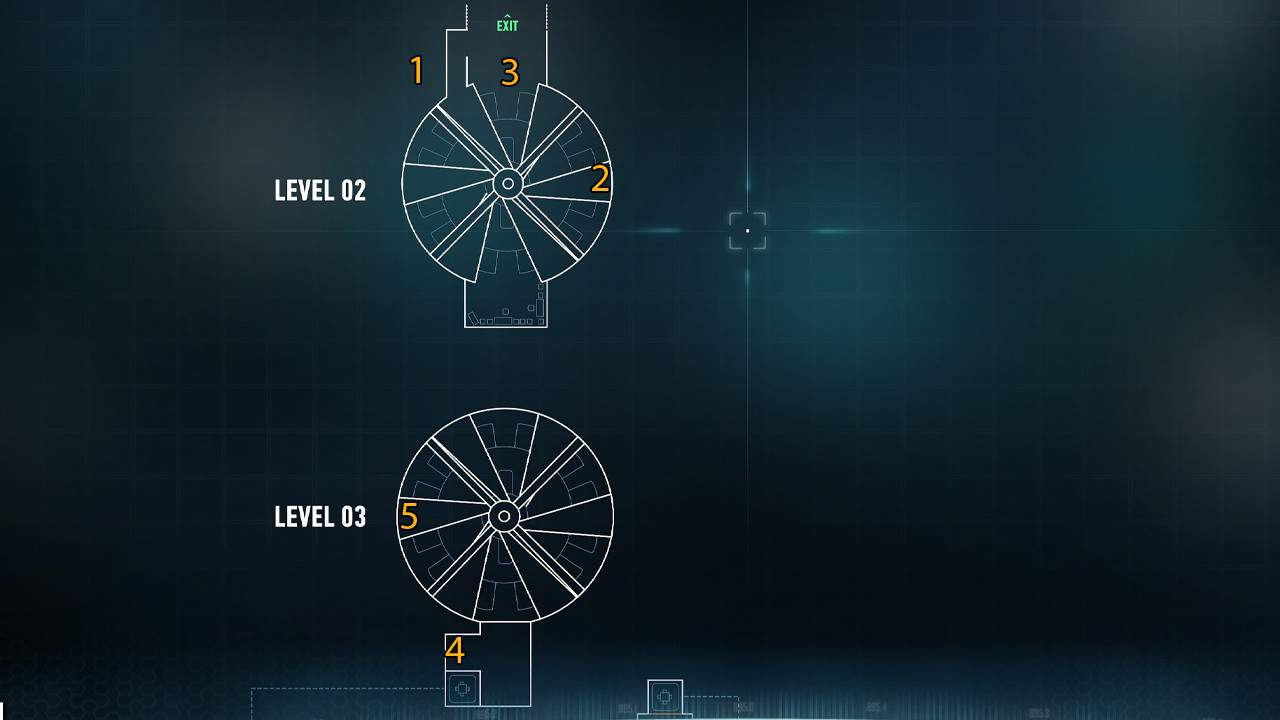
After gaining entry into the Stagg Airship Alpha, simply drop down to the hall. At the opposite section of the hall, you’ll find the first insect crate. Approach the crate and press square to perform a strike and break the crate.
Breakable Object #2
Requirement: Batclaw
Use the ladder at the entrance of the hall to drop down to the main section. Across the ladder, you’ll find the next breakable object in the right-hand corner.
Breakable Object #3
Requirement: Batclaw
Follow along the path that leads you into the main room of the airship. The insect crate will be on the corner of the door that leads to Airship beta.
Breakable Object #4
After finding Insect Carte 4, move along the main room towards the opposite of the entrance. Grapple up to the platform to find the breakable object.
Breakable Object #5
Requirement: Batclaw
Drop down to the main room after finding breakable object 4 and look up at the ceiling to spot a narrow pathway. Grapple to the pathway and turn right to find the insect crate sitting in the opposite direction. Shoot the Batclaw at the red handle of the crate to break it.
Breakable Object #6
Enter the Stability Control Unit of the Stagg Airship to find this breakable object in the eastern corner.
Breakable Object #7
Requirement: Batclaw
Enter the Research Lab in the Stagg Airship Alpha and immediately turn towards the right corner to find the breakable object sandwiched between other crates. Equip the Batclaw and break free of the insects.
Breakable Object #8
Requirement: Batclaw
Head to the far-left corner of the Research Lab in the Stagg Airship to find this Insect Crate mounted on a shelf. Use the Batclaw to break it open.
Breakable Object #9
Travel to the far northeastern corner of the Research Lab and grapple on top of the platform to spot the insect crate.
Stagg Airship (Beta)
Breakable Object #10
Requirement: Batclaw
Make your way to the western opening of the Cloudburst Chamber on Airship beta to find the breakable object on the shelf above the chemical tubes.
Breakable Object #11
Requirement: Batclaw
Drop down to the eastern corner of the Biological Engineering Room. The insect crate will be above the panels. Use the Batclaw to pull the crate.
Breakable Object #12
Requirement: Batclaw
Right below the northeastern staircase in the Biological Engineering Room, you’ll find the breakable object trapped from both sides. Use the Batclaw to pull the red handle and break off the glass.
Breakable Object #13
Requirement: Batclaw
Grapple on top of the main hall and face the northwestern corner of the Biological Engineering room to spot the breakable object sitting on a small vent. Get to a close enough distance for the Batclaw to attach to the crate’s red ring and pull it to acquire the collectible.
Breakable Object #14
Travel to the southwestern corner of the Quarantine Labs area as shown in the map image above to find the insect crate on the eastern corner of the small seculated area.
Breakable Object #15
Requirement: Batclaw
Travel through the circular doorway in the Subject Testing lab to find the last breakable object for the Stagg Airships sitting on top of the right-hand corner shelf. Use the Batclaw to break the insect crate in Batman: Arkham Knight.
Panessa Studios
Breakable Object #1
Requirement: Batarang
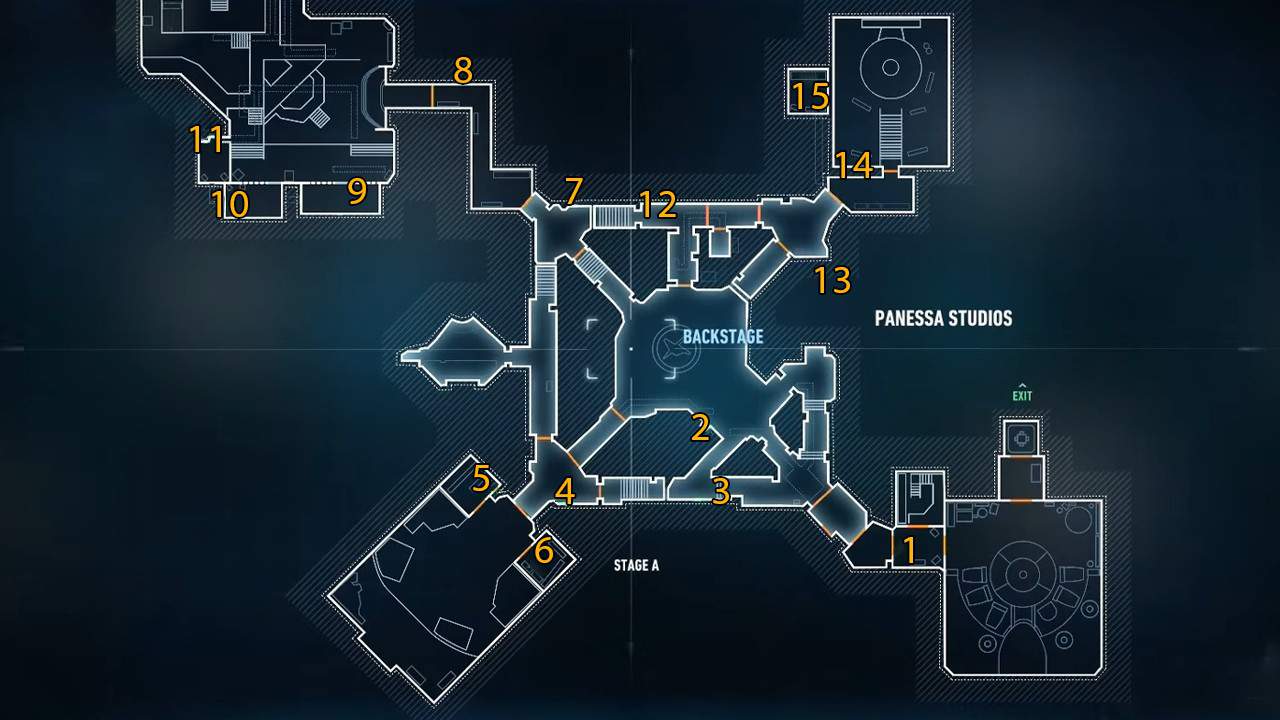
After exiting the elevator inside the Panessa Studios, simply turn right and walk straight into the backstage areas to find the breakable object. Use the Batarang to destroy the Jack-in-the-Box.
Breakable Object #2
Requirement: Batarang
Walk straight through Main Stage A to find the breakable object sitting next to a figure. Use the Batarang to destroy the jack-in-the-box and move on to the next one.
Breakable Object #3
Requirement: Batarang
At the entrance of the Main Stage 2 is where you’ll find the breakable object sitting at the top of the staircase.
Breakable Object #4
Requirement: Batarang
Travel across the Main Stage A area to spot the jack-in-the-box below a cactus plant prop in the Sound Stage area.
Breakable Object #5
Requirement: Batarang
The breakable object is next to the desk in the changing room to the right of the entrance for Stage A.
Breakable Object #6
Requirement: Batarang
In the control room opposite the changing room in Stage A is where the jack-in-the-box is in Batman: Arkham Knight.
Breakable Object #7
Requirement: Batarang
Travel to the marked location on the map to find the breakable object sitting on the ground next to the entrance for Main Stage B.
Breakable Object #8
Requirement: Batarang
The jack-in-the-box can be spotted in the prop room in the Sound Stage B area of the Panessa Studio. This is also the same location where Batman fought the minigunner in the main story mission.
Breakable Object #9
Requirement: Batarang
Opposite the Haunted House in Main Stage B is a film room which can only be accessed through the vent. Go through the vent to find the breakable object between the reel shelves.
Breakable Object #10
Requirement: Batarang
After finding Jack-in-the-box 9, go through the small vent in the corner of the film room to reach an abandoned area with yellow tapes stuck on the wall. The breakable object will be in the corner of the room next to the small vent. Use the Batarang to destroy it and move on to the next one.
Breakable Object #11
Requirement: Batarang
Use the vent where you found breakable object 10 to reach a hidden room in Main Stage B. The jack-in-the-box will be above the cardboard boxes next to the Riddler’s Riddle.
Breakable Object #12
Requirement: Batarang
Walk through the entrance for Stage C and turn left to spot the breakable object on the ground in the corner of the room.
Breakable Object #13
Requirement: Batarang
Use Explosive Gel to break the weak panel on the eastern corner of Stage C to discover a passage with the breakable object inside.
Breakable Object #14
Requirement: Batarang
Travel to the marked location on the map to find the jack-in-the-box sitting on the couch in the hallway of room in Stage C.
Breakable Object #15
Requirement: Batarang
Go through the small vent found next to the entrance door of the hallway where you found breakable object 14. Enter the vent to reach an obscured area with the last jack-in-the-box for Batman: Arkham Knight on the corner.
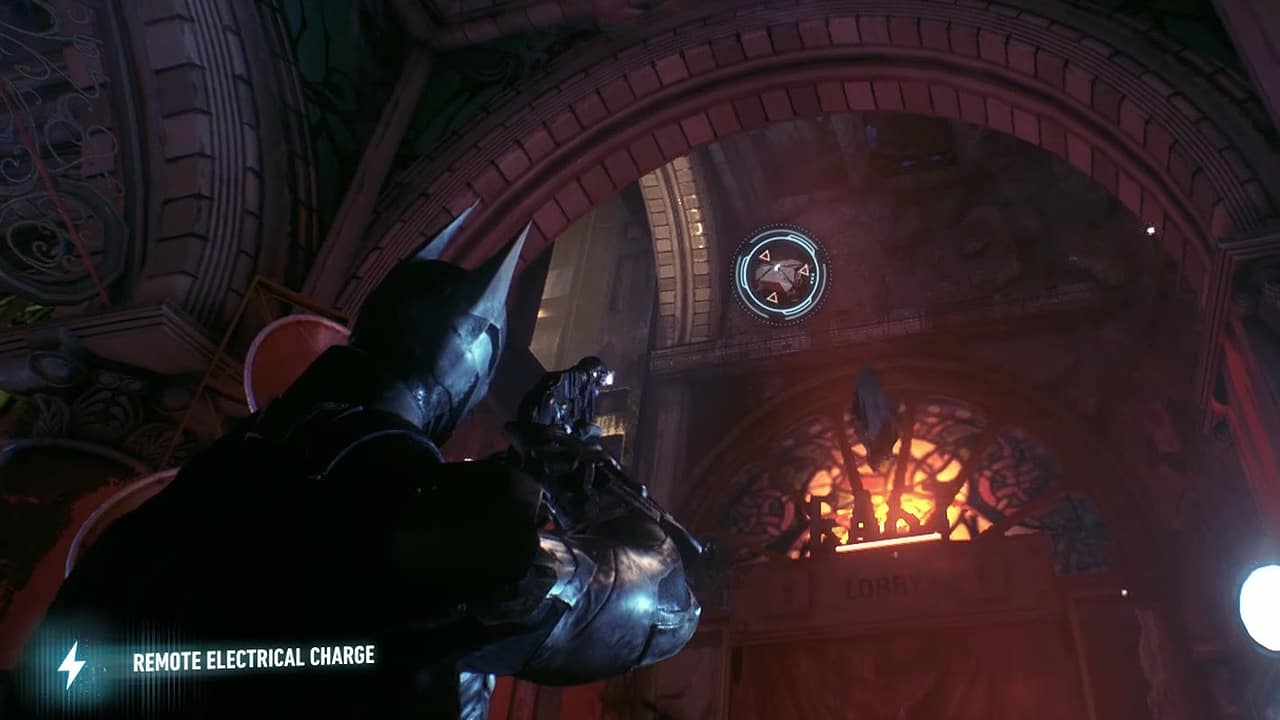
Arkham Knight HQ
Breakable Object #1
Requirement: Remote Electrical Charge
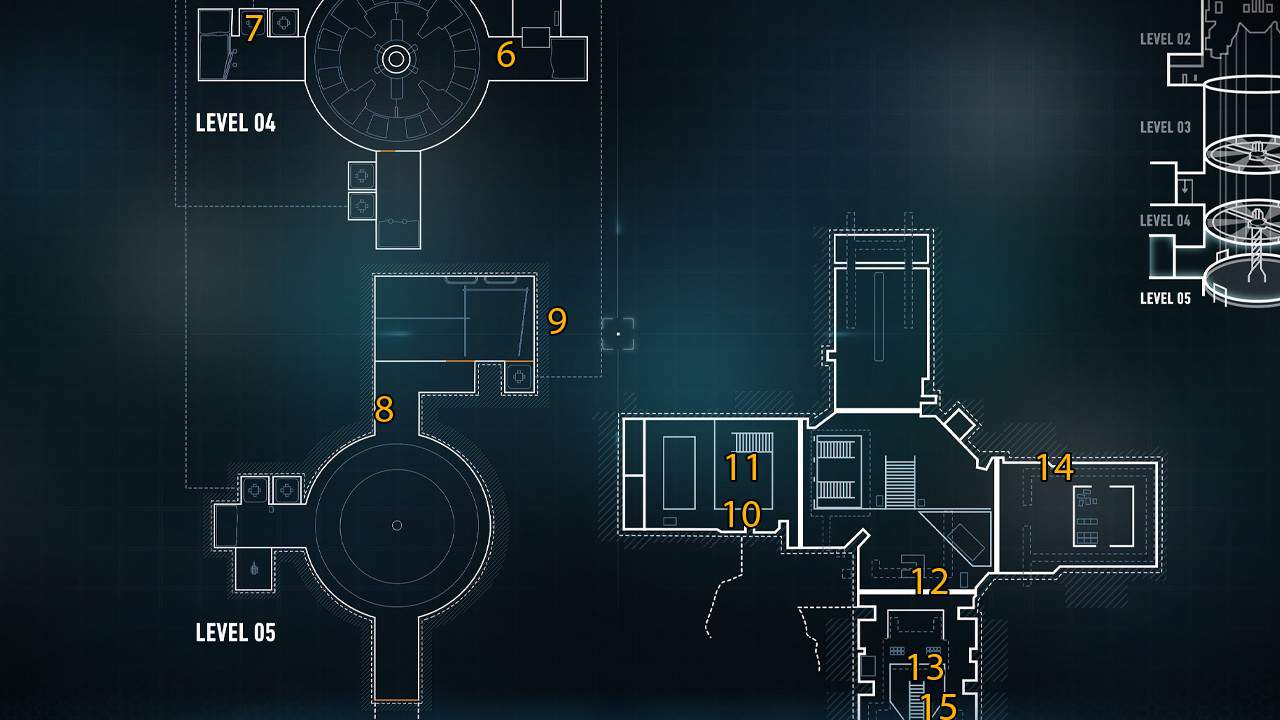
Just before entering Arkham Knight HQ, face the wall on the right to find the first Spider Drone stuck to the wall. Equip the Remote Electrical Charge and fire at the drone to break it.
Breakable Object #2
Requirement: Remote Electrical Charge
Just after entering Arkham Knight HQ, look below the Ventilation Shaft to find the breakable object mounted on top of the City Vision banner on the corner right side.
Breakable Object #3
Requirement: Remote Electrical Charge
Grapple to the small railing above the entrance door of the Ventilation Shaft and turn 180 degrees. You’ll spot the Spider Drone on the wall with the ‘02’ sign.
Breakable Object #4
Requirement: Remote Electrical Charge
Drop down to the fan below the Ventilation Shaft. The breakable object will be in the small opening between the two fans. Simply glide to the ledge and turn right to find the Spider Drone attached to the wall.
Breakable Object #5
Requirement: Remote Electrical Charge
After finding the Spider Drone 4, face the entrance and look towards the second City Vision banner to spot the breakable object Equip the Remote Electrical Charge and shoot to acquire the collectible.
Breakable Object #6
Requirement: Remote Electrical Charge
Glide down the Ventilation Shaft to reach the Maintenance Sector of the Arkham Knight HQ. The Spider Drone will be on the wall to the left of the entrance.
Breakable Object #7
Requirement: Remote Electrical Charge
Grapple to the elevator shaft on the ground floor of the Maintenance Sector to spot the Spider drone stuck to the ceiling. Blast away the breakable object using the Remote Electrical Charge and move on to the next one.
Breakable Object #8
Requirement: Remote Electrical Charge
From the ground of the Ventilation Shaft, grapple onto the small opening for the Construction Access area. Upon entering, you’ll find the breakable object on the wall to your right in Batman; Arkham Knight
Breakable Object #9
Requirement: Remote Electrical Charge
Travel along the path in the Construction Access area to reach the Briefing Room. Look above the broken wooden frame to spot the Spider-Drone.
Breakable Object #10
Requirement: Remote Electrical Charge
After entering Arkham Knight HQ through the rooftop elevator, simply turn right to find the breakable object mounted above the ceiling in the arcade.
Breakable Object #11
Requirement: Remote Electrical Charge
Use the Eastern staircase to get to the second floor of the Arkham Knight HQ. Equip the Remote Electrical Charge and aim at the red flag to spot the spider drone. Shoot the drone and collect this breakable object in Batman: Arkham Knight.
Breakable Object #12
Requirement: Remote Electrical Charge
Drop down to the covered sitting area in the south of the Arkham Knight HQ to spot the breakable object mounted to the ceiling.
Breakable Object #13
Requirement: Remote Electrical Charge
Use the staircase to reach the southern section of the Arkham Knight HQ. The breakable object will be mounted on a ramp-like statue on the corner wall.
Breakable Object #14
Requirement: Remote Electrical Charge
Travel to the eastern corner of Arkham HQ to find the Spider Drone attached to the left wall of the covered section next to the Dark Knight flags.
Breakable Object #15
Requirement: Remote Electrical Charge
The last breakable object for Batman: Arkham Knight can be found sitting above the vending machine below the southern staircase of the Arkham Knight HQ.