Stranger missions are special side missions in RDR2. In them, you meet interesting individuals and perform certain tasks for/with them. These characters bring further life to the game’s world; some even unlock special characters and side stories.
Strangers populate Red Dead 2’s map as you progress through the main story, so some of them may not be available immediately. Additionally, all Stranger Missions we’ve listed below can be played as both John and Arthur (except for The American Inferno, Burnt Out, which can only be played by John)
In this guide, we’ll explore all 29 Stranger Missions in Red Dead Redemption 2 that are required for 100% game completion and the Best in the West Trophy/Achievement.
A Better World, A New Friend
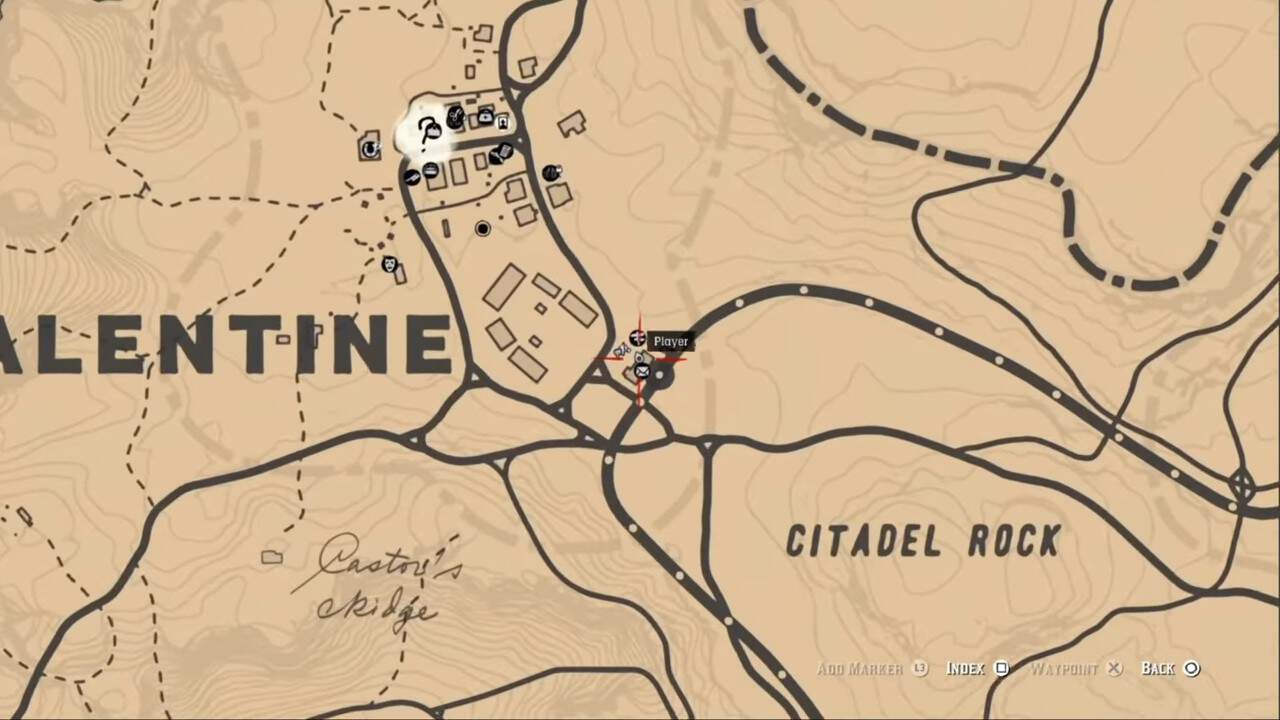
The first Stranger Mission on our list can be started by picking up a poster found at the western exit of the Valentine Post Office. It is underneath a mounted skull. Once you pick up the poster, you’ll be prompted to hunt and deliver a series of perfect animal carcasses to Ms. Hobbs’ animal exhibition in Strawberry. There are five tiers to this challenge:
Hunting Request 1
- Squirrel
- Rabbit
Hunting Request 2
- Cardinal
- Rat
- Woodpecker
Hunting Request 3
- Chipmunk
- Oriole
- Robin
- Opossum
Hunting Request 4
- Sparrow
- Songbird
- Toad
- Bullfrog
- Skunk
Hunting Request 5
- Waxwing
- Bat
- Blue Jay
- Crow Beaver
The first four tiers can be completed as Arthur, while the last one can only be completed as John in Epilogue Part 1. To deliver the animals, make sure they’re on your horse, then simply walk up to any post office, talk to the clerk, and select the “Send Mail” option.
Part I
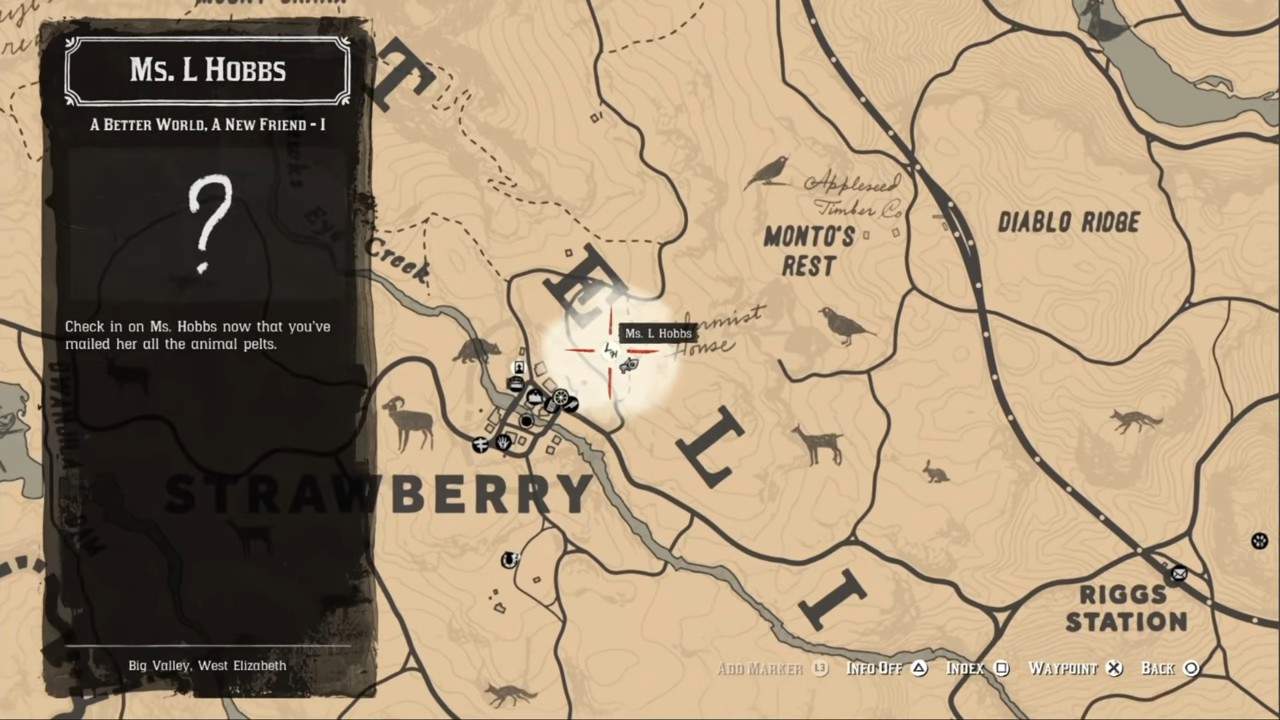
Once you’ve completed all five hunting challenges and mailed the carcasses, you’ll receive a letter from Ms. Hobbs inviting you to her Taxidermy studio in Strawberry. Enter the studio and exhaust the cutscene, where she shows John his handy work. As you’re about to leave, she’ll give you a squirrel statue dressed like John.
Part II
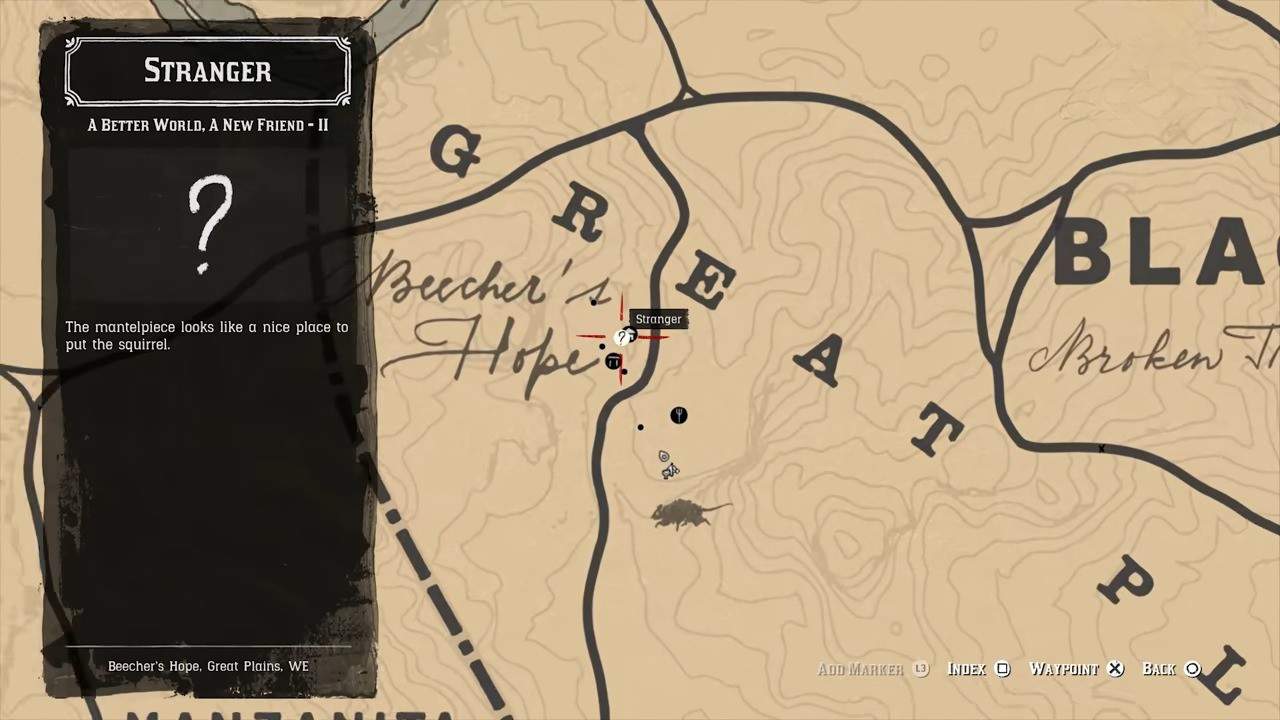
Next, head back to Beecher’s Hope and place the Squirrel statue on the fireplace mantle. When you return, you’ll notice that it is no longer present there. To finish the mission, you’ll need to find the squirrel statue. It can spawn in one of the six following locations:
- Inside the chest in John’s room
- Inside the chest in the upper area of the barn
- Inside the chest in the attic (Uncle’s room)
- In the Fireplace in John’s room
- In the Wheelbarrow inside the Sheep barn
- On top of Mount Shann
A Bright Bouncing Boy
To initiate this Stranger Missions quest chain in RDR2, you must first finish “The Joys of Civilization” main quest in Chapter 4. This stranger mission has a total of three parts and takes place in and around Saint-Denis
Part I
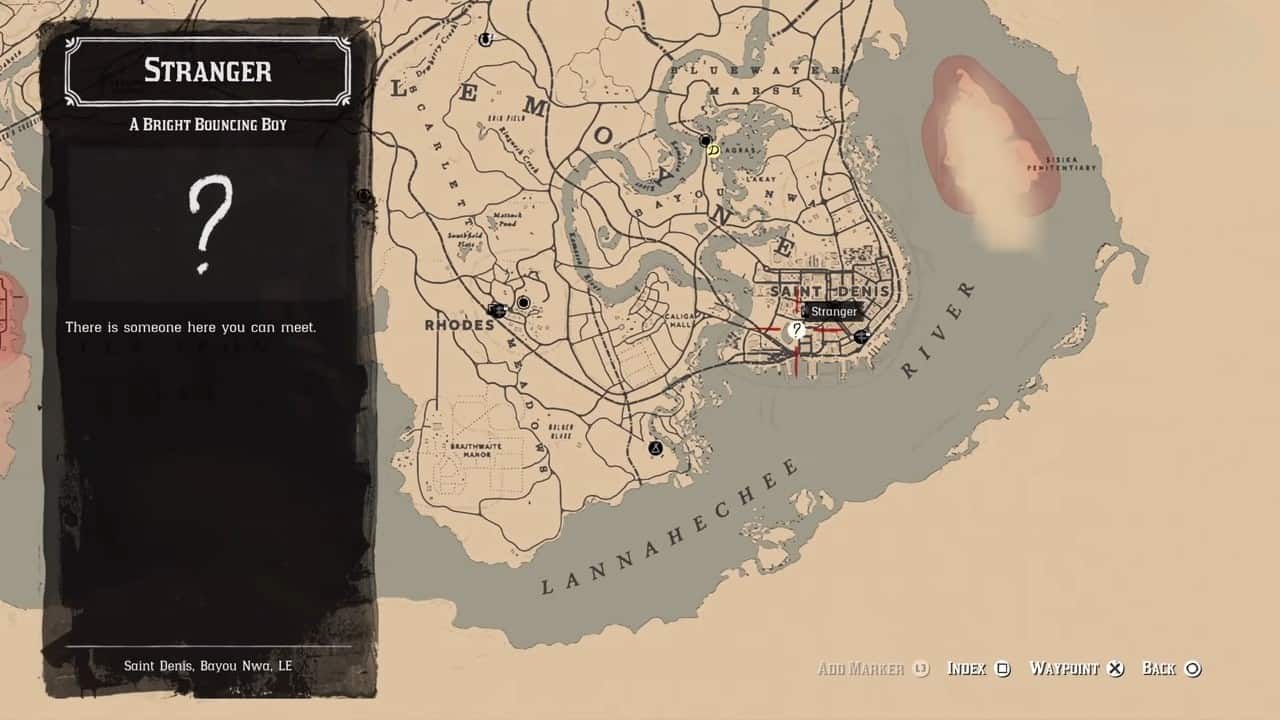
To start the first part, head over to the area on the map above. Here, players will meet Marco Dragic, an eccentric inventor fiddling with his latest invention, a remote-controlled boat. He’ll ask Arthur to control the boat to show off its capabilities to his investors.
Simply pilot the boat and avoid all the mines present in the pond as you destroy the sailboats, successfully destroying all sailboats concludes the first part.
Part II
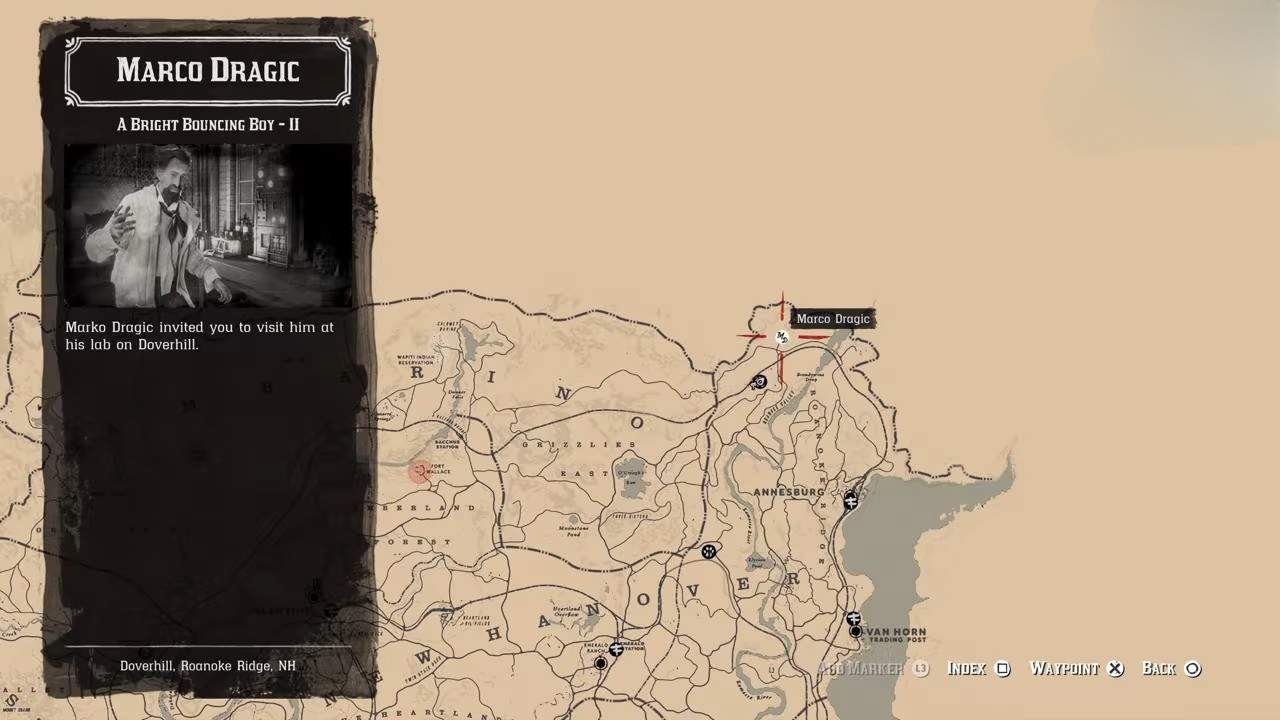
Wait an entire day for Marco to contact you again. When he does, he’ll ask you to join him at his lab in Doverhill, which sits at the northwestern end of New Hanover. This mission can only be started at night and when there is a rainstorm. When you get there Marco will hand you three conductors (and an Electrostatic Detector) that you have to place around his lab. He won’t tell you why you’re doing this just yet.
You can follow the yellow markers on your mini-map to find the right location for each conductor. The filament of the detector will flash when you’re in a suitable area. Once you’ve placed all three conductors make your way back to Marco’s lab. Here, he’ll try to power up the generators to no avail. Next, you’ll be asked to climb the radio tower at the back of his lab to manipulate the levers at the top.
Climb up and manipulate the levers (from left to right) in the following order.
- Lever 1: Down
- Lever 2: Up
- Lever 3: Down
When you get back to his lab, he’ll finally reveal that the electricity conductors were being placed to power his next creation, a robot. Exhaust the cutscene to finish Part II.
Part III
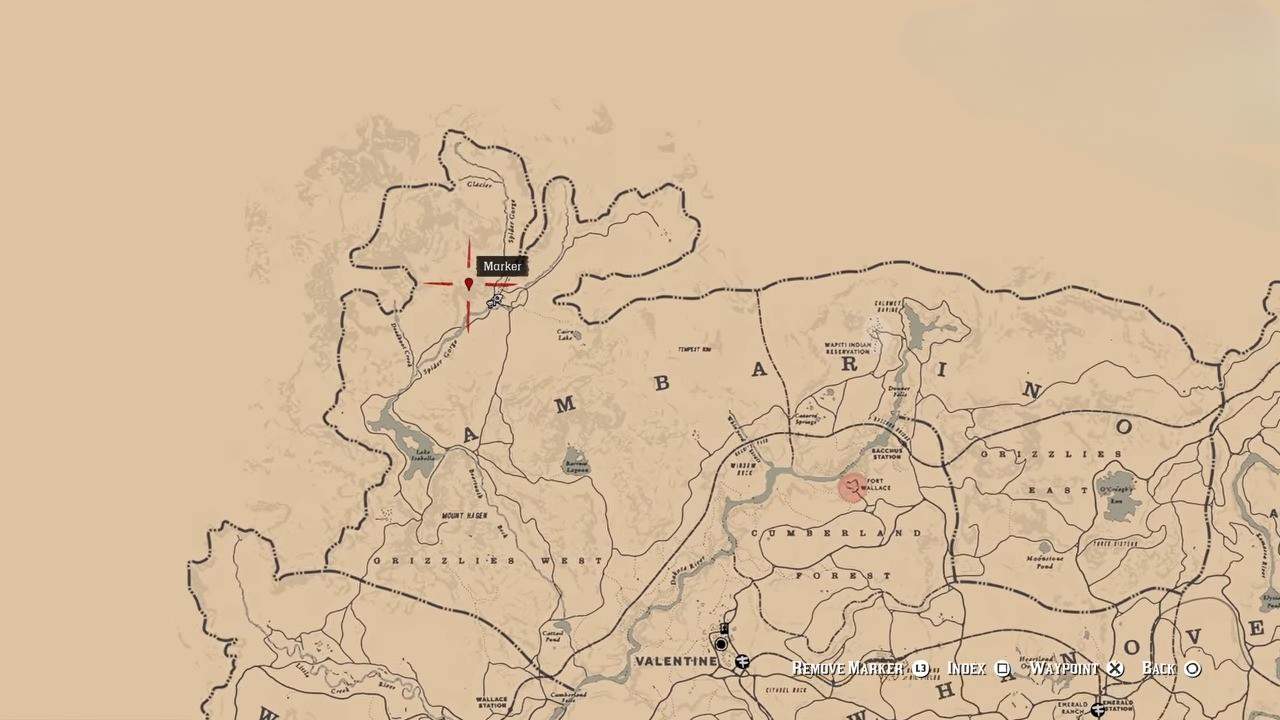
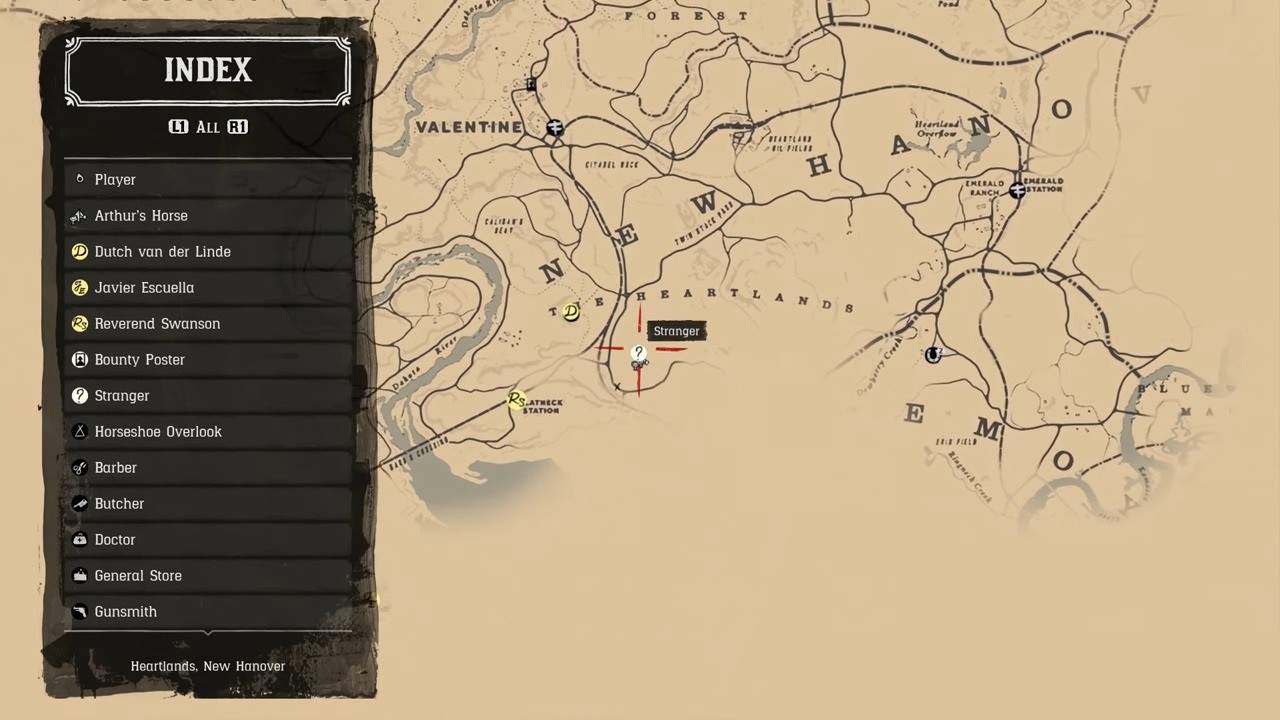
Wait a couple of days and make your way back to his lab. Here you’ll discover that Marco has been killed, with his robot nowhere to be found. This mission concludes the A Bright Bouncing Boy quest line; however, you can still find Marco’s Robot in the mountains to the west of Ambarino.
The map image above shows the exact location of Marco Dragic’s robot.
A Fine Night for it
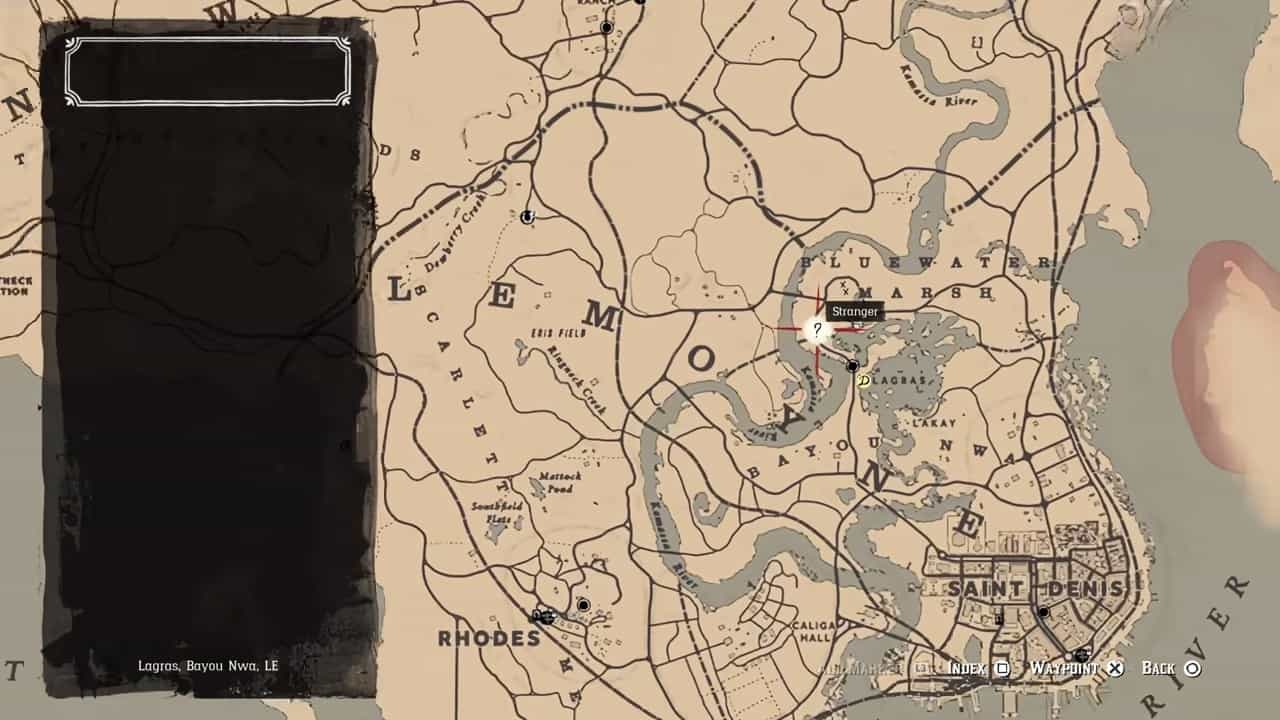
To start this Stranger Mission in RDR2, you must complete at least one random encounter with the Night Folk in Bayou Nwa. These encounters are most easily found during the night, once you do, make your way to the marker on the map image above and talk to the NPC present there. Agree to help him dispel the Night Folk from his property.
Simply follow him until you reach the destination then kill all Night Folk present there. They come in waves so be prepared. Once you do what he asks you to, the mission will conclude.
A Fisher of Fish
This Stranger Mission becomes available after you complete the main quest “A Fisher of Men” in Chapter 2. Like the A Better World, A New World stranger mission, you’ll have to find and hunt several fish and mail them to the NPC who gives you the quest. This quest has two parts. The second part can only be completed in the Epilogue.
Part I
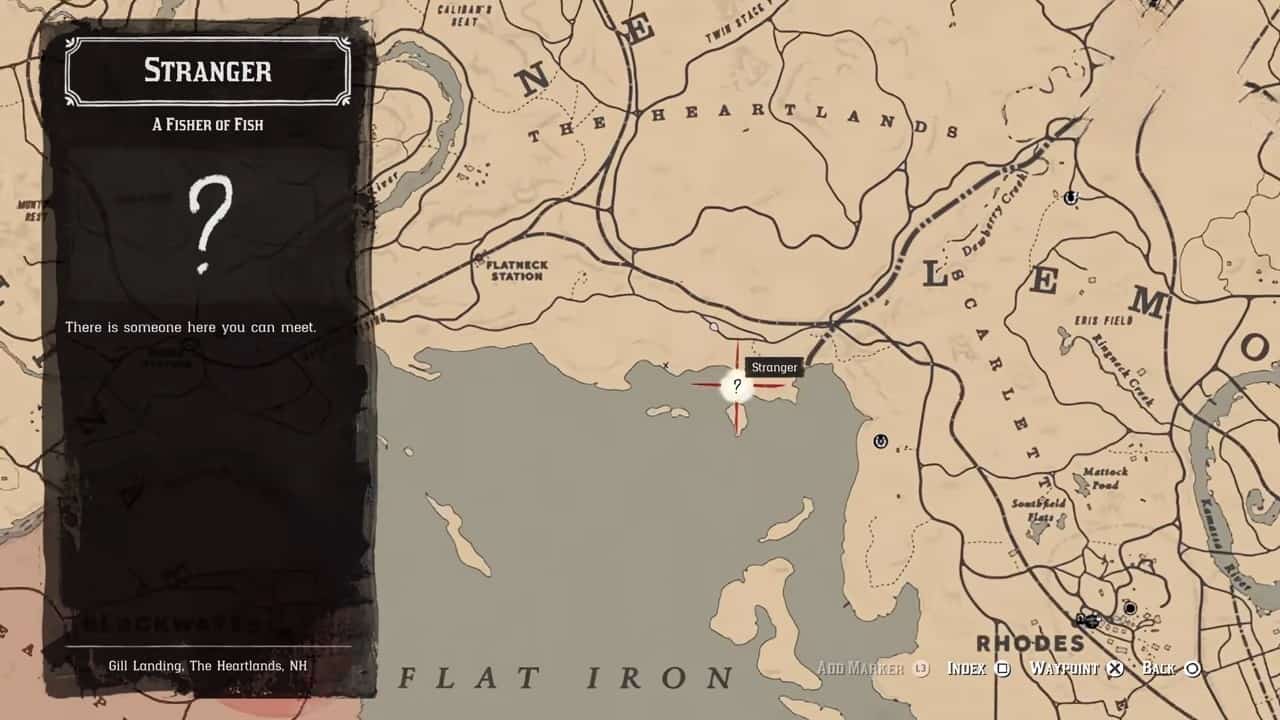
Make your way to the marker on the map image above where you’ll meet Jeremey Gill, he’ll task you with hunting and delivering several legendary fish to him. You need to find a total of thirteen fish. The last three can only be found when playing as John in the Epilogue.
- Bluegill
- Bullhead Catfish
- Chain Pickerel
- Lake Sturgeon
- Longnose Gar
- Muskie
- Perch
- Smallmouth bass
- Sockeye Salmon
- Steelhead Trout
- Largemouth Bass (John only)
- Redfin Pickerel (John only)
- Rock Bass (John only)
Find all thirteen legendary fish and mail them to him to conclude the first part.
Part II
Once you’ve sent him all the fish and completed the mission “Motherhood” in Epilogue 1, Jeremy Gill will invite you back to his place. (The same area where you started Part I) Upon arriving he’ll ask you to help him catch a giant Catfish in the river near Rio Bravo. Follow him and when he asks you to, take a picture of him catching the fish in question.
He’ll soon be pulled into the water, never to be seen again, concluding this Stranger Mission.
A Test of Faith
This Stranger Mission becomes available during Chapter 2. Make your way to the marker on the map image above, where you’ll find Deborah MacGuiness. She’ll ask you to find and recover thirty dinosaur bones for her. The bones are scattered all over the map. Once you find and mail all 30 bones to her, the quest ends.
All That Glitters
This Stranger Missions chain becomes available during Chapter 2 in RDR2. Make your way to the marker above to meet Máximo Cristóbal Valdespino, an explorer looking for the Jack Hall Gang’s treasure. However, due to his imminent departure, he offers to sell you the locations for the treasures for $10. You can bring his price down to $5. Collecting all three treasures concludes this mission.
Treasure 1
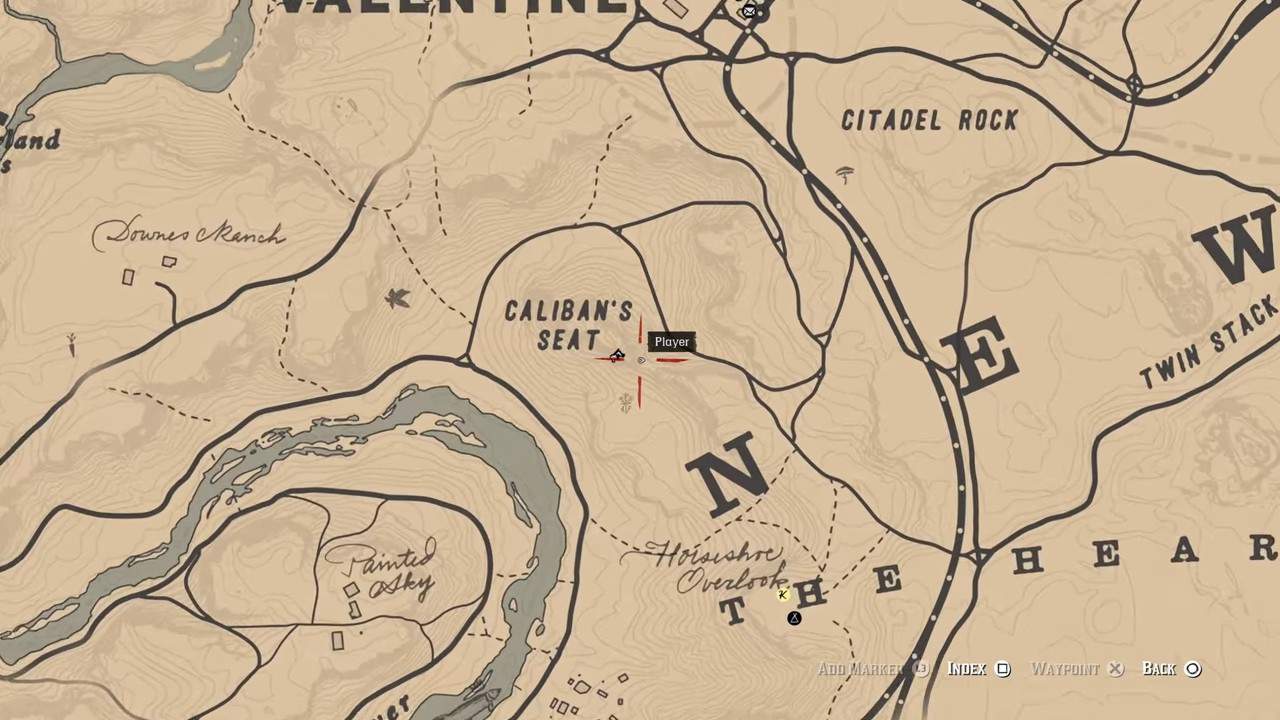
The first Treasure can be found on Caliban’s Seat which is near Horseshoe Overlook. Climb the mountain then look for an indentation towards the north. Go down and move across the ledge. Until you come upon a gap. Jump over it and continue forward until you find a Pearl Necklace, hidden within the rock face.
Treasure 2
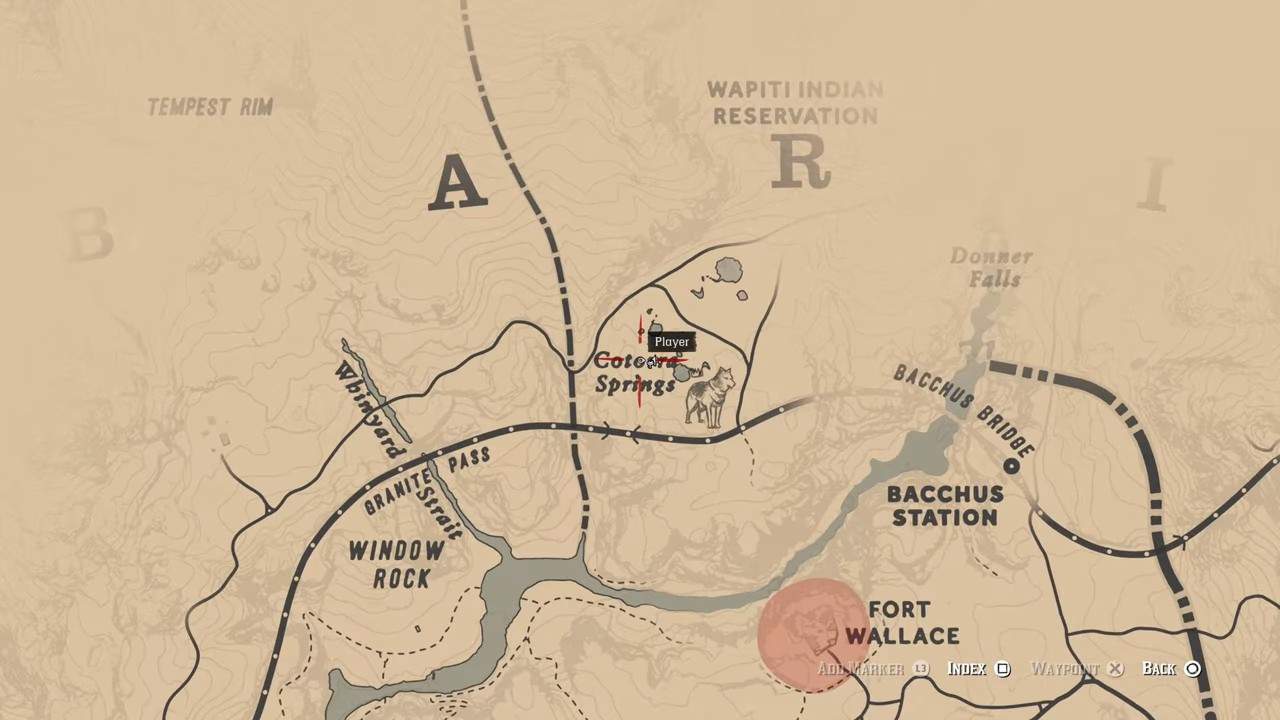
The second treasure is found in Cotorra Springs near Amarino. Look for a stone structure in the large open field.
Treasure 3
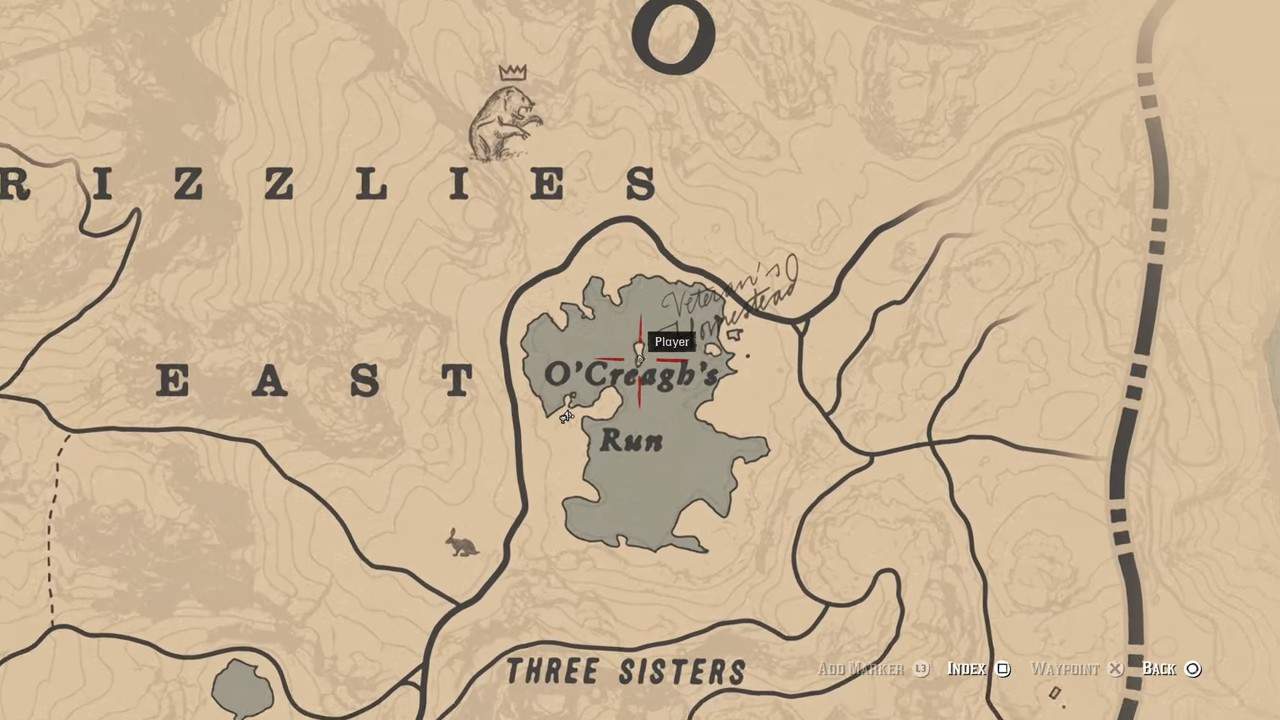
The third and final treasure is found in O’Creagh’s Run near the East Grizzles. Use a boat to make your way to the small island in the middle of the water body. Go the easternmost limit of the island and search near the bank to find the treasure.
American Dreams
In this Stranger Missions chain, the player has to find the location of a gruesome serial killer in RDR2. You can either start this quest by talking to the Sheriff in Valentine or you can simply start looking for the killer’s victims. It is important to note that the bodies of the victims are a random spawn and you may need to visit each area multiple times.
The Evidence for each victim will be found with their head, which is usually right by their corpse.
Victim 1
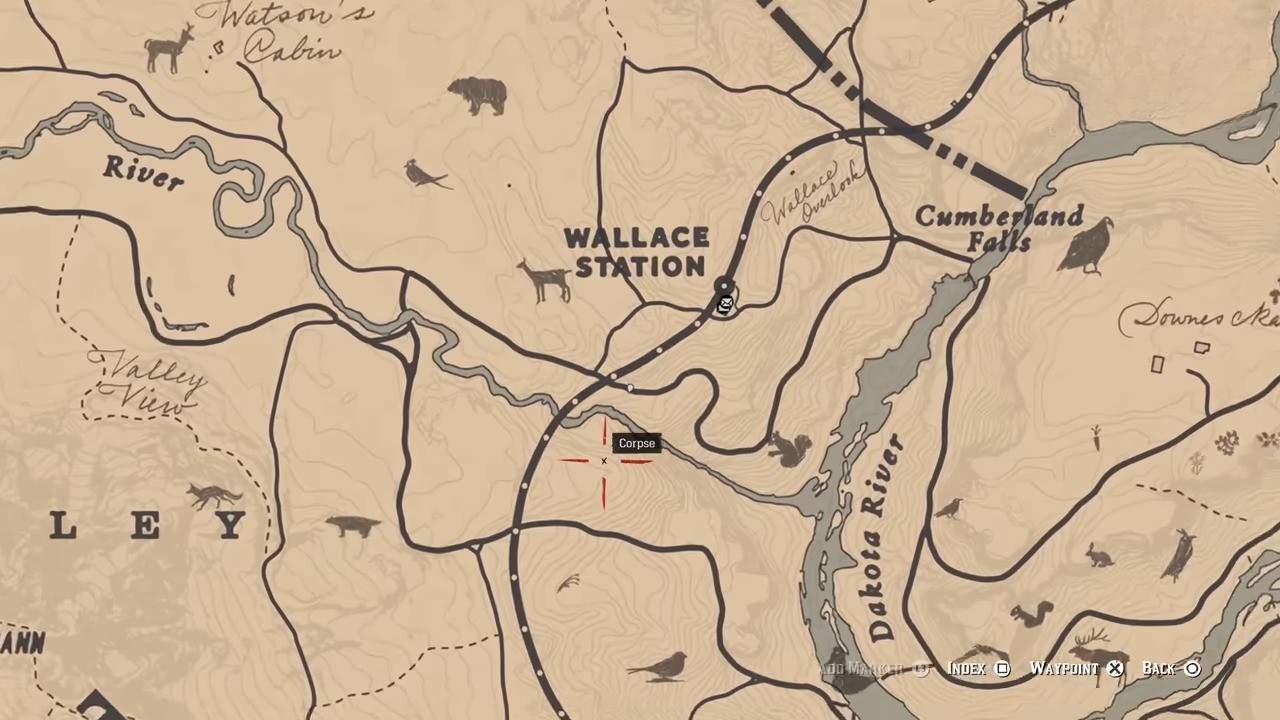
The first victim can be found near Wallace Station in West Elizabeth. Use the map image above to find the exact location. The victim will be strung onto a large boulder and their head will be resting on a smaller boulder to the left.
Victim 2
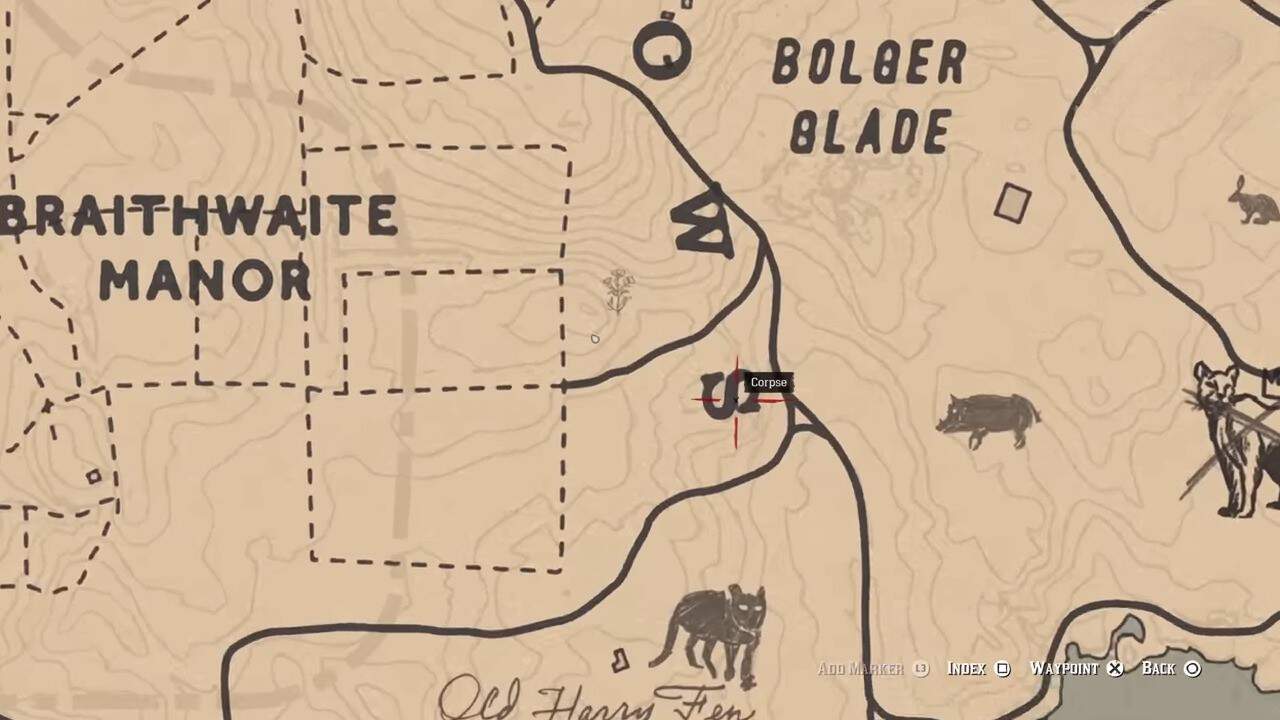
The second victim will be near Braithwaite Manor in Lemoyne. Their corpse will be strung onto a tree and their head will be found underneath the root of the tree towards the back.
Victim 3

The third and final victim is found in Valentine in New Hanover. The corpse will be stung up underneath a bridge and the head will be stuck on the support beam underneath.
Serial Killer Location

Once you have all three pieces of evidence, Arthur will string them together, revealing the exact location of the Serial Killer. Follow the map image above to go to Lucky’s Cabin and look for an opening leading to the basement. Enter it, and investigate the area until the killer is revealed. Now, you can either kill him or spare him, in both cases, you’ll need to take him back to the Sheriff’s station in Valentine. Doing so will complete the mission.
Arcadia for Amateurs
This Stranger Missions chain becomes available during Chapter 2 in RDR2. In this mission, Arthur (or John) helps a photographer called Albert Mason, by lining up the perfect wildlife shots for him. There is a total of five parts in this Mission thread
Part I
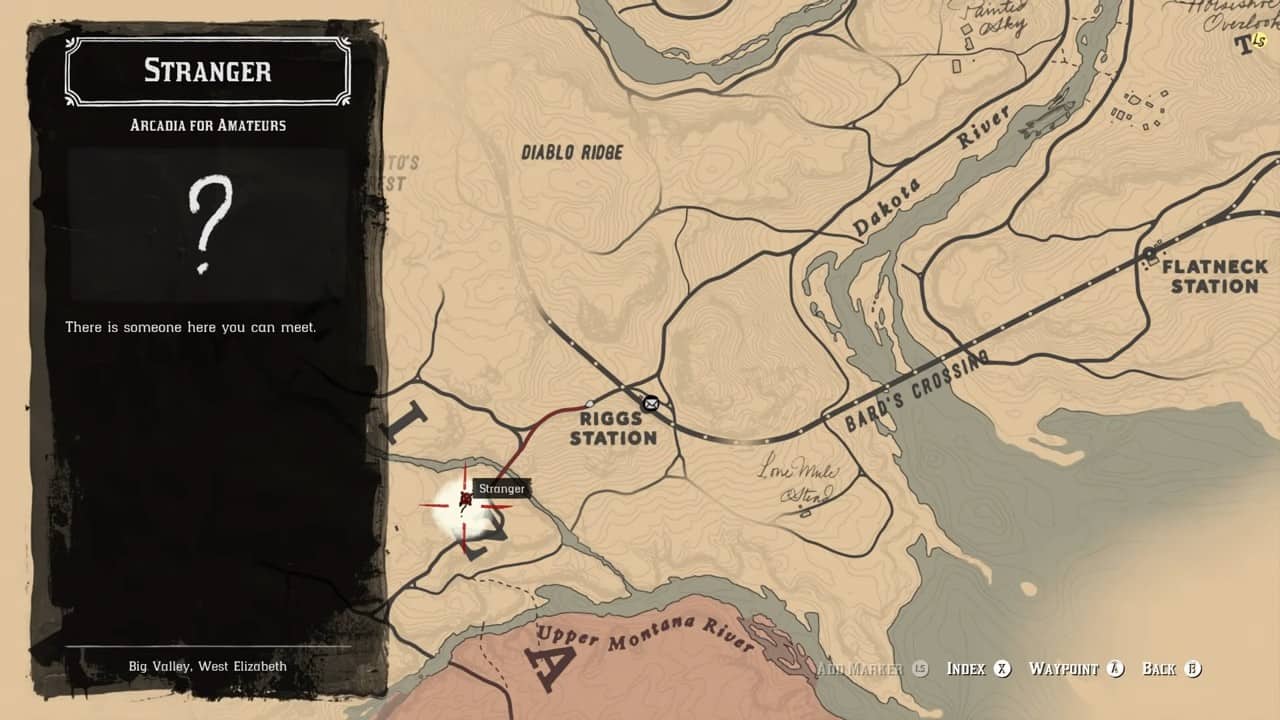
The first encounter with Albert Mason takes place near Strawberry right by Riggs Station. Use the map image above to reach him. When you meet him, he’ll be trying to take a picture of a Cayote. Soon after, the creature runs off with his bag and you have to recover it. Doing so concludes the first part.
Part II
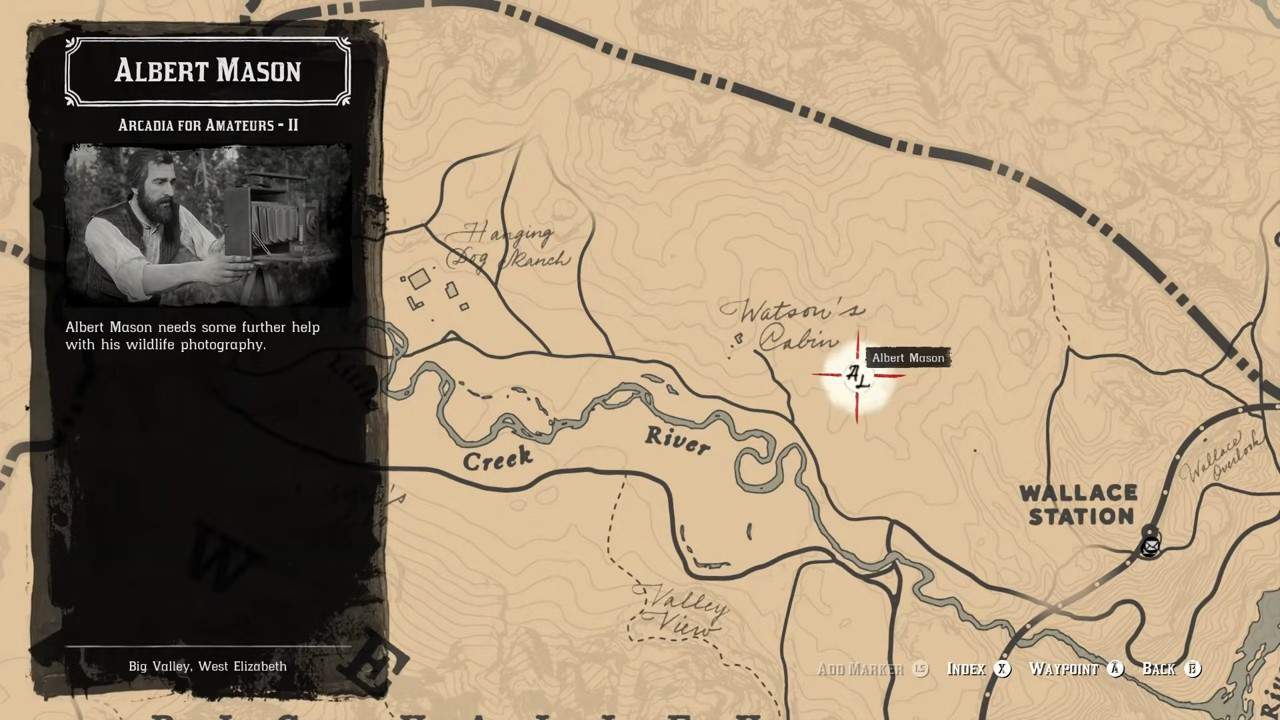
The second part will become available after two days. Albert will now be found near Wallace Station in West Elizabeth. This time he’ll be trying to take pictures of a couple of wolves. Soon, the wolves attack him. You need to kill all wolves to conclude the second part.
Part III
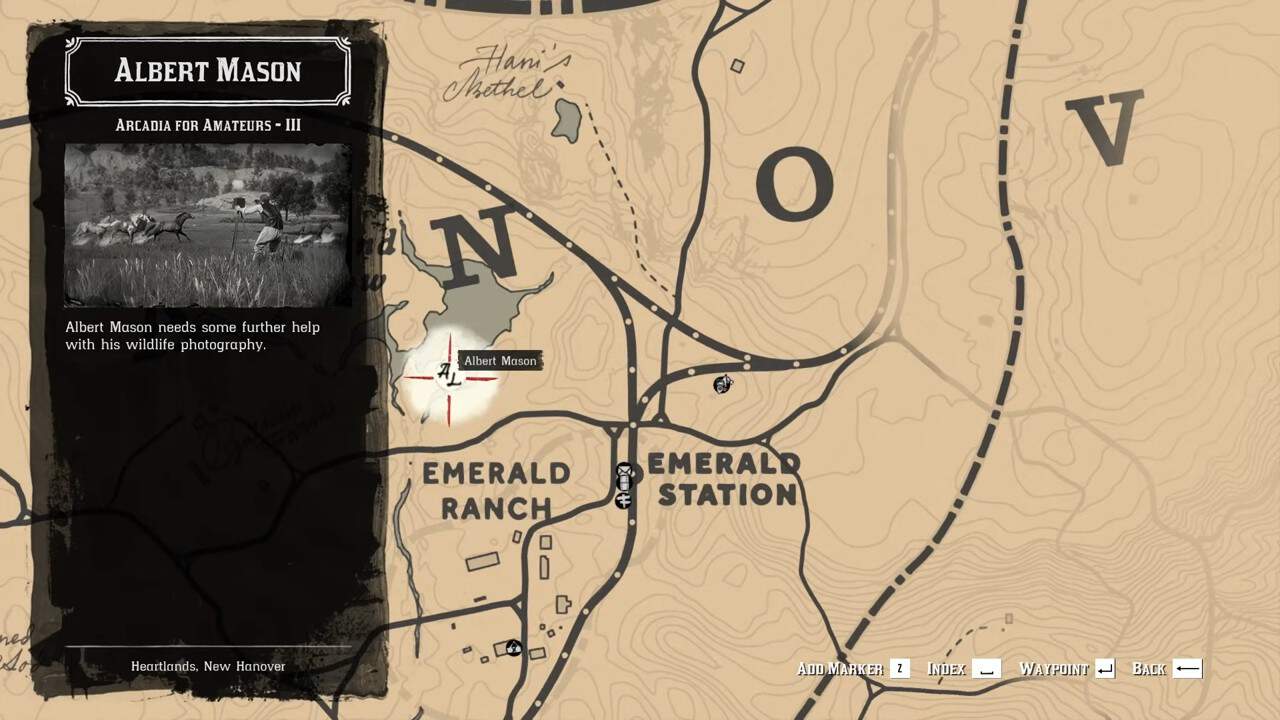
Waiting another two days unlocks the third part of this Stranger Missions chain in RDR2. It takes place in the New Hanover near Emerald Ranch. In this part, you must herd a couple of wild horses so Albert can take the perfect image. Get on your horse and follow the onscreen prompts to bring them near Albert. The mission concludes when he gets his perfect shot
Part IV
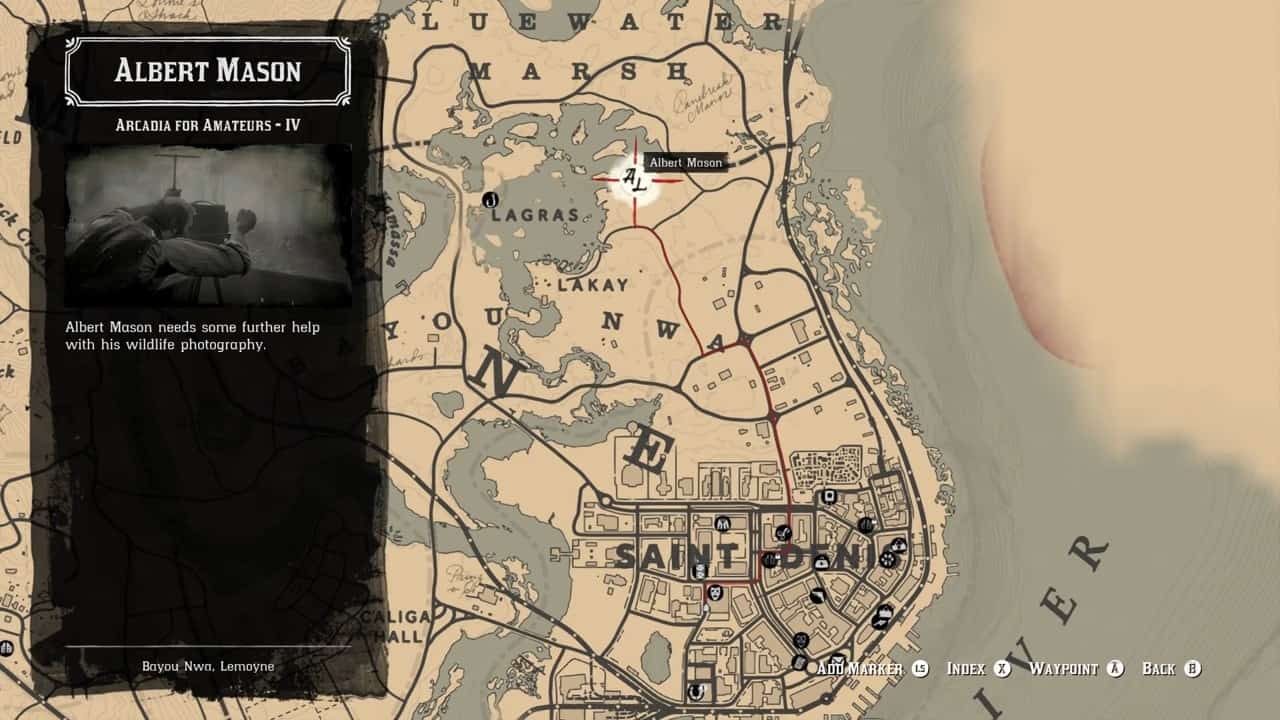
The penultimate mission for Albert Mason takes place in Bayou NWA in Lemoyne. Follow the map image to get to him. In this part, Albert tasks you with piloting a boat so he can get the perfect pictures of some Alligators. You have to row up to three different locations within the pond. For the last one, you’ll have to exit the boat and lure the Alligator so it’s facing the right way. Make sure not to get too close or you will be attacked. Once Albert has the perfect picture, the mission ends.
Part V
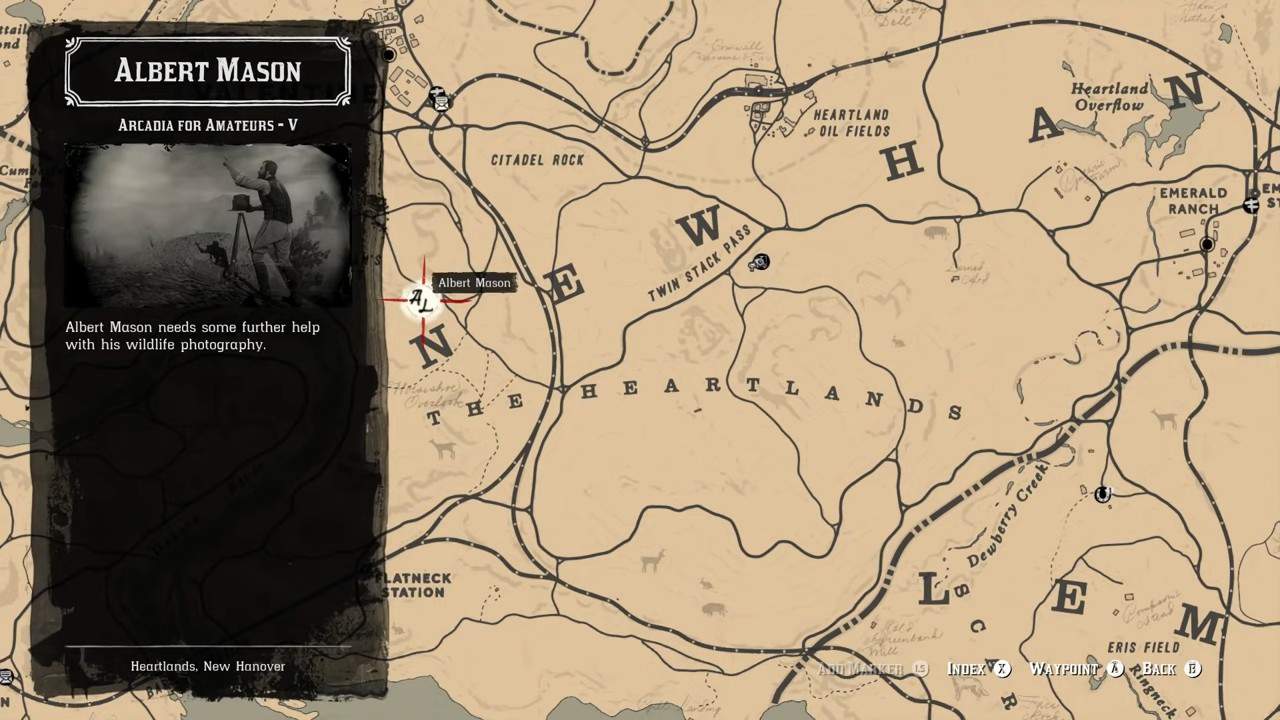
In the last mission, you discover Albert overlooking a cliff in the Heartlands in New Hanover. Simply talk to him and exhaust the cutscene to finish this Stranger Missions chain in RDR2.
Brothers and Sisters, One and All

To start this mission, make your way to the Church in Saint-Denis. Where you’ll meet a couple of Nuns. As you’re conversing with them, a kid will come and steal a cross belonging to one of them. You need to chase after him.
When you catch up to him, he’ll be in the clutches of a man, when you save him, you’ll meet Mrs. Downes, who’ll accuse you of bothering her. This will set the law on you. Evade them by hiding in any of the alleys. Return the cross to the area marked on your mini-map to conclude the quest.
Duchesses and Other Animals
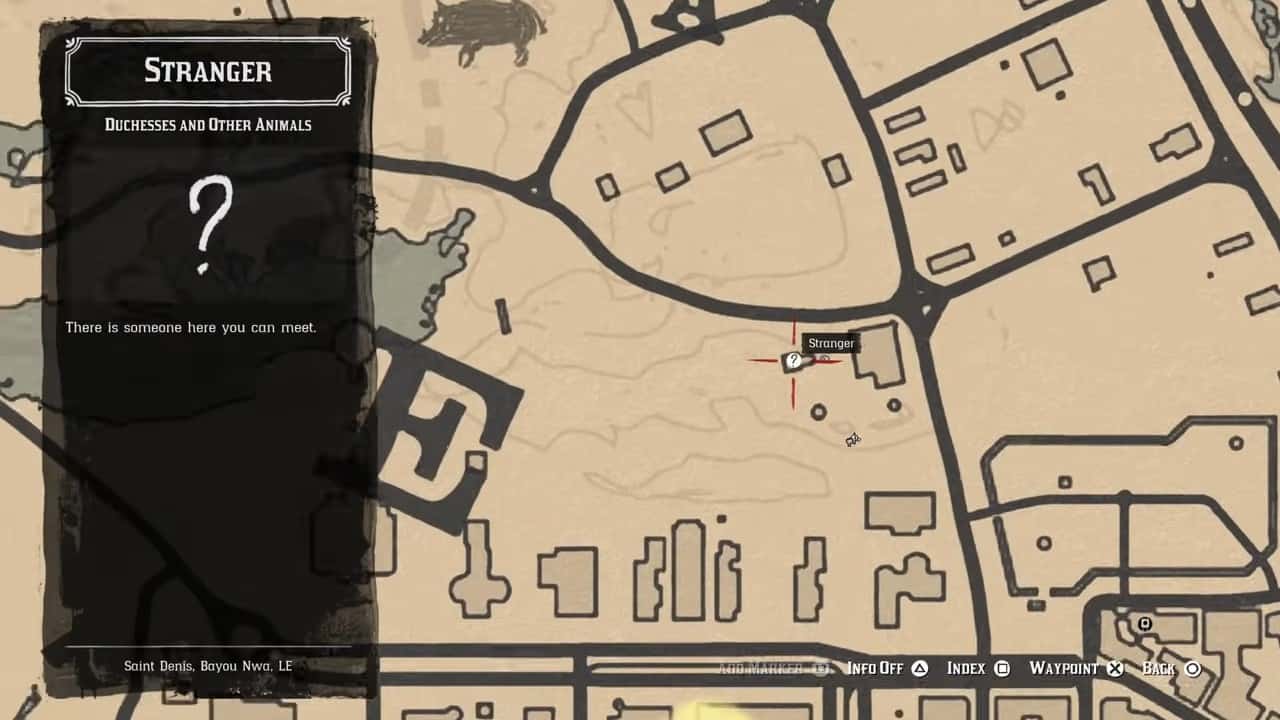
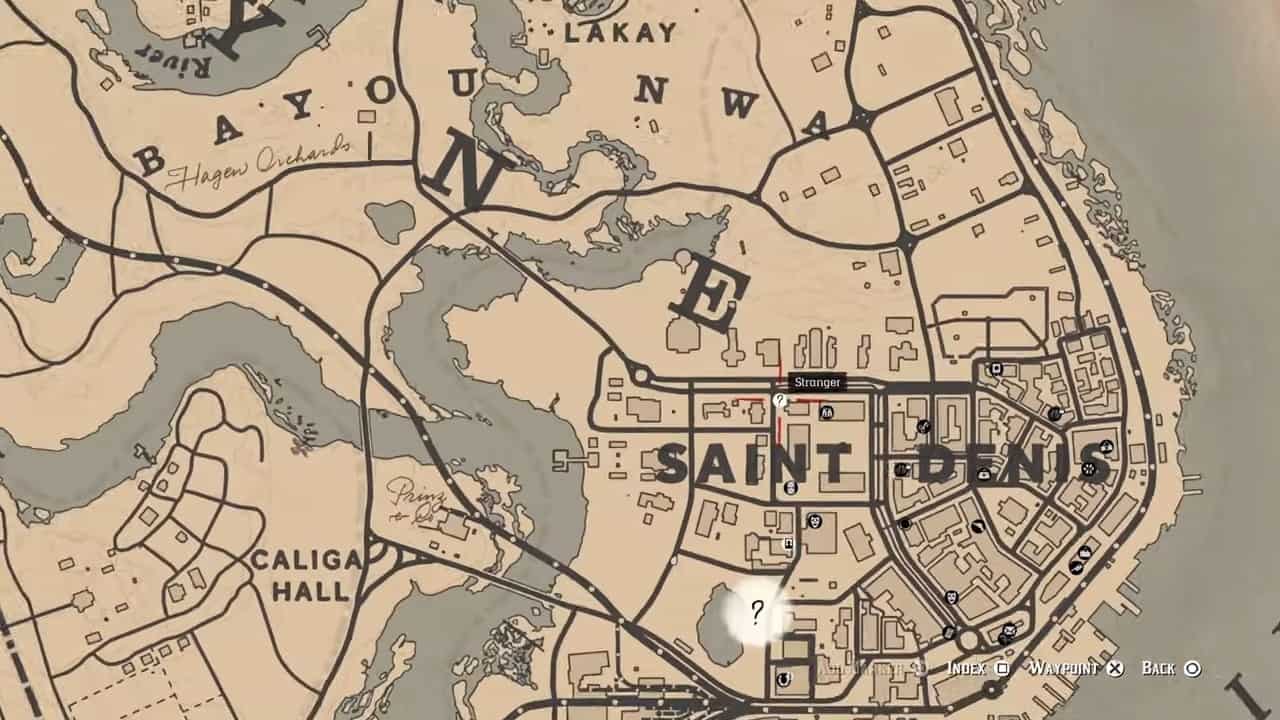
The Stranger Missions chain “Duchess and Other Animals” becomes available after completing the main mission “Gilded Cage” in Chapter 4 in RDR2. In this mission, you have to collect exotic plants littered around the world. You’ll meet Algernon Wasp in Saint-Denis and he’ll give you a total of 5 lists (a new one upon the completion of the previous one) containing the number of items you need to bring him.
Collecting all items on all six lists and bringing them back to him concludes the quest.
List 1
- 5x Little Egret Plumes
- 5x Reddish Egret Plumes
- 5x Snowy Egret Plumes
- 15x Lady of the Night Orchids
List 2
- 20x Heron Plumes
- 7x Lady Slipper Orchid
- 10x Moccasin Orchid
List 3
- 25x Gator Eggs
- 3x Acuna’s Star Orchid
- 7x Cigar Orchid
- 5x Ghost Orchid
List 4
- 30x Spoonbill Plumes
- 10x Rat Tail Orchid
- 5x Spider Orchid
- 5x Night scented Orchid
List 5
- 5x Clam Shell Orchid
- 5x Queen’s Orchid
- 10x Sparrow Egg Orchid
- 5x Dragon’s Mouth Orchid
Fundraiser
This stranger mission is available from Chapters 2-6. In it, a lady will ask you to donate $20 to build a shelter for Saint-Denis’ war veterans. You can either donate $20 or steal from the donation box. The former earns you positive honor while the latter earns you negative and also sets the law on you. Whatever you choose to do, in the Epilogue, the shelter gets built.
Geology for Beginners
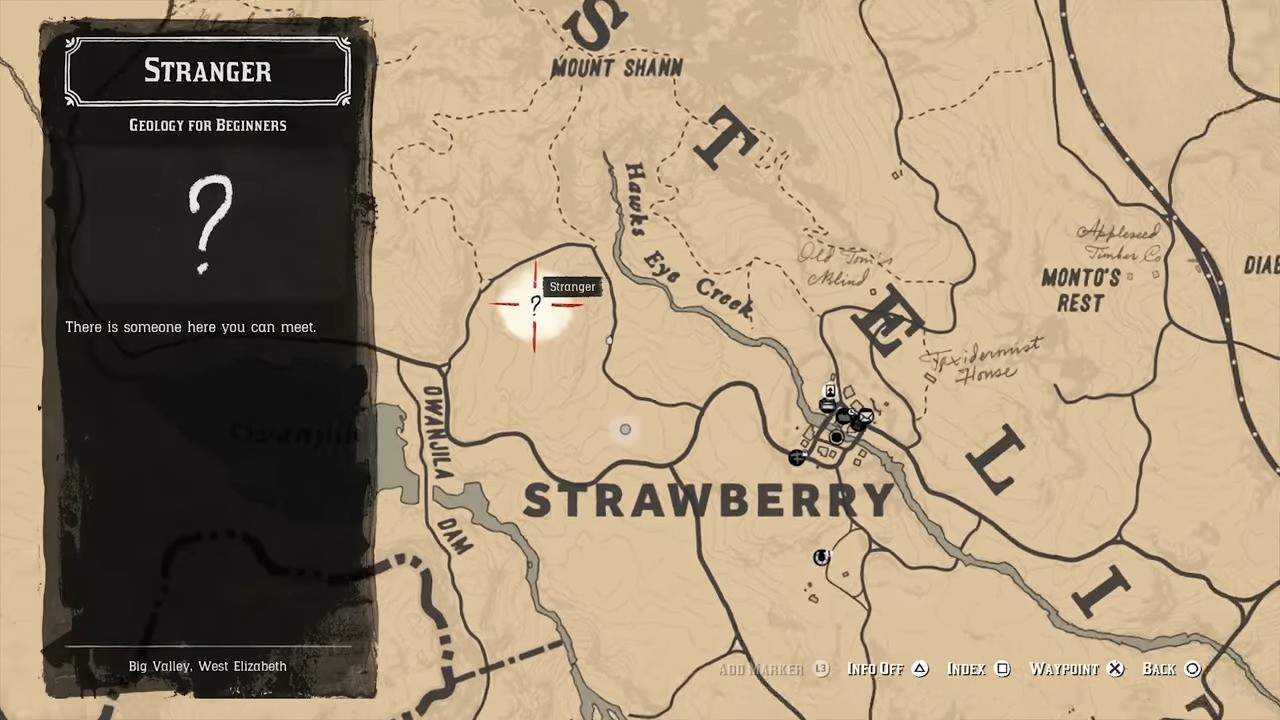
This mission becomes available at the start of Chapter 2. It can be found in Big Valley, West Elizabeth, near Strawberry. Talk to Francis Sinclair who’ll task you with finding 10 rock carvings around the map. Once you successfully find all 10 carvings make your way back to the area marked on the map above. Upon arriving at his house, his wife reveals that her husband Tom has died and that the baby in her arms is Francis. Exiting the house ends this mission.
He’s British, Of Course
This Stranger Missions chain becomes available after finishing the “The New South” mission in Chapter 3 in RDR2. In this mission, Arthur encounters a British circus master, Margaret who’s lost his circus animals. Arthur must recover all of them to conclude this quest.
Part I
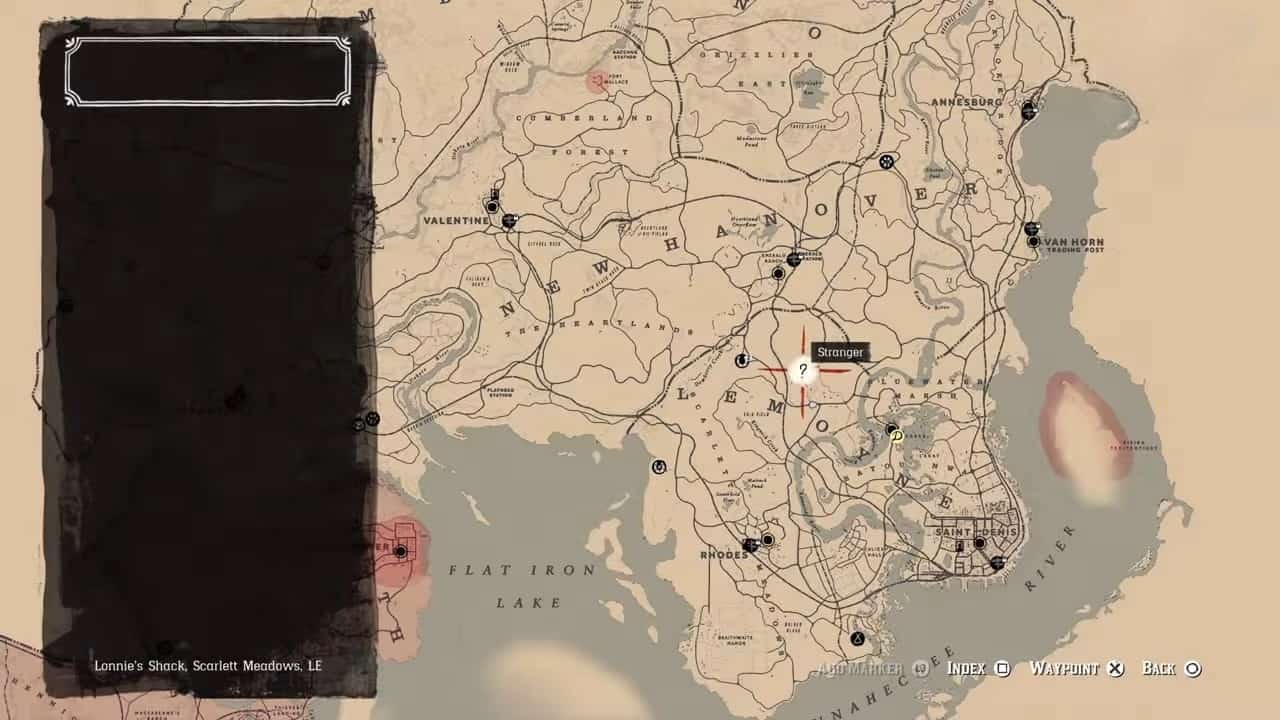
In the first part, you’ll encounter Margaret by his broken-down circus carriage. He can be found in Lemoyne near Lonnie’s Shack. He’ll task you with recovering a zebra, a tiger, and a lion and promises you a handsome reward for doing so.
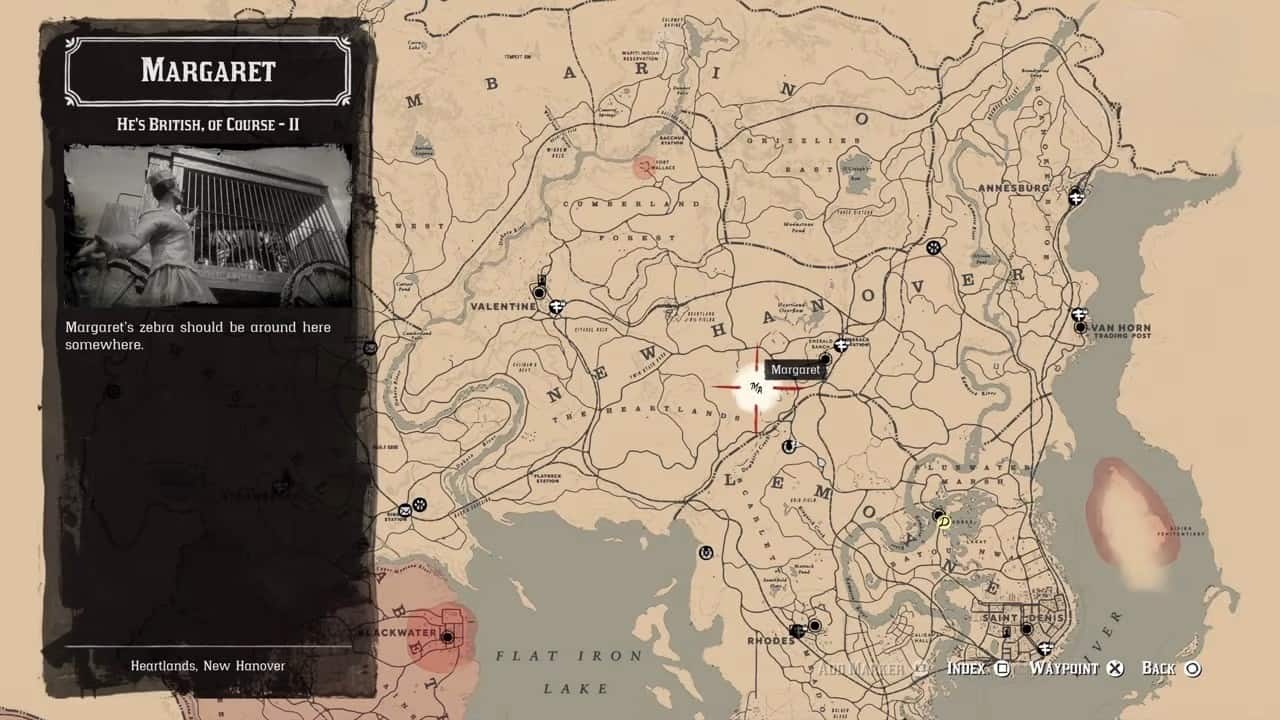
Part II

The “zebra” can be found in the Heartlands within New Hanover. Follow the marker on the map above to locate it. When you reach the zebra, you’ll find out that it’s not a zebra at all, instead, Margaret has simply painted a donkey to look like a Zebra. Get on your horse, lasso the “zebra” and bring it to the location marked on the map.
Part III
Next up you’ll need to recover Margaret’s lion and tiger. They are found in New Hanover, in the Heartlands area. Following the blood trail reveals that the “lion” was killed by Margaret’s “tiger” like in this case of the zebra both animals are actually completely different. The tiger is a cougar painted with black and orange stripes, while the lion is a dog in a lion’s costume.
Next, you’ll have to pick up the “lion” and put it in the circus carriage marked on your map. Then hide and wait for the cougar to finish off its prey. As soon as it enters the cage, sneak up behind it and shut it. This’ll give you Margaret’s tiger.
Part IV
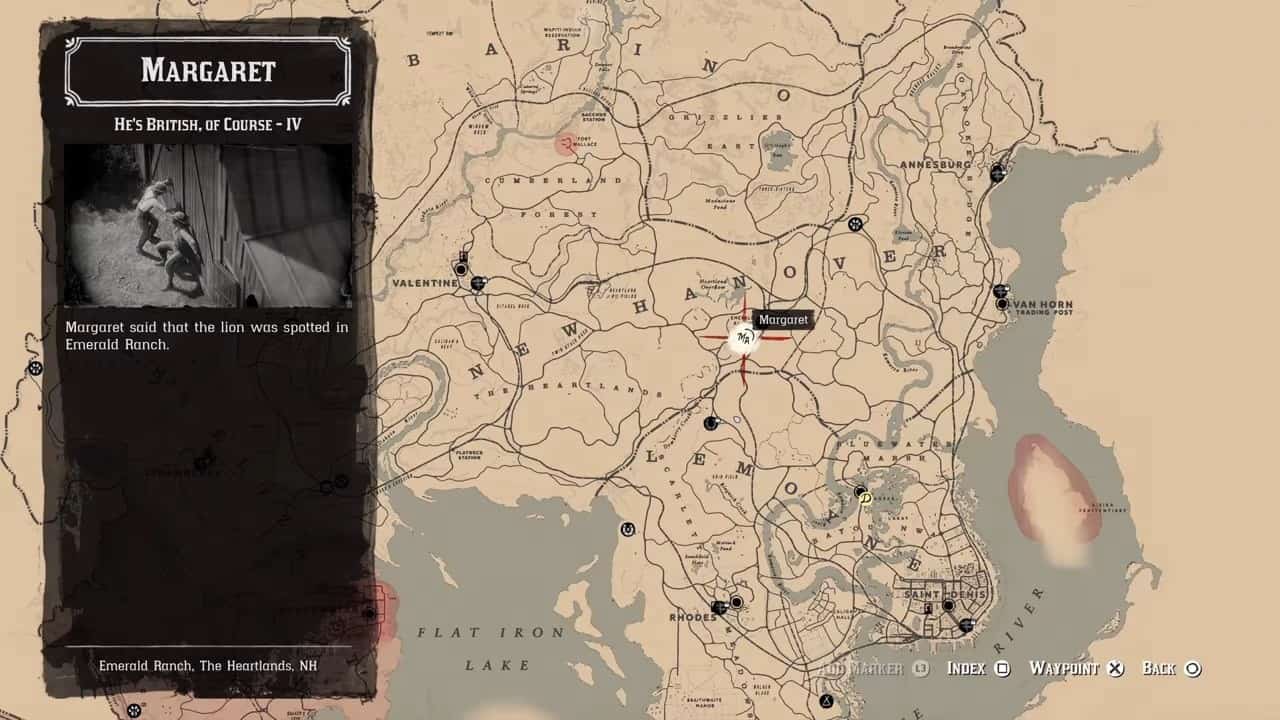
The penultimate mission for Margaret takes place in Emerald Ranch and involves you having to save his other lion. As you arrive it is revealed that, unlike the other three animals, this lion is the real deal. Make your way to the barn and head inside to investigate it. When you emerge, follow the blood trail to the northern part of the ranch, where you’ll find the lion. Kill it using Dead Eye to finish this mission.
Part V
Meet Margaret in the same location where you met him in Part I and deliver the news of his lion’s demise. He’ll then gift you a jewel for your troubles. This ends his Stranger Mission.
Help A Brother Out
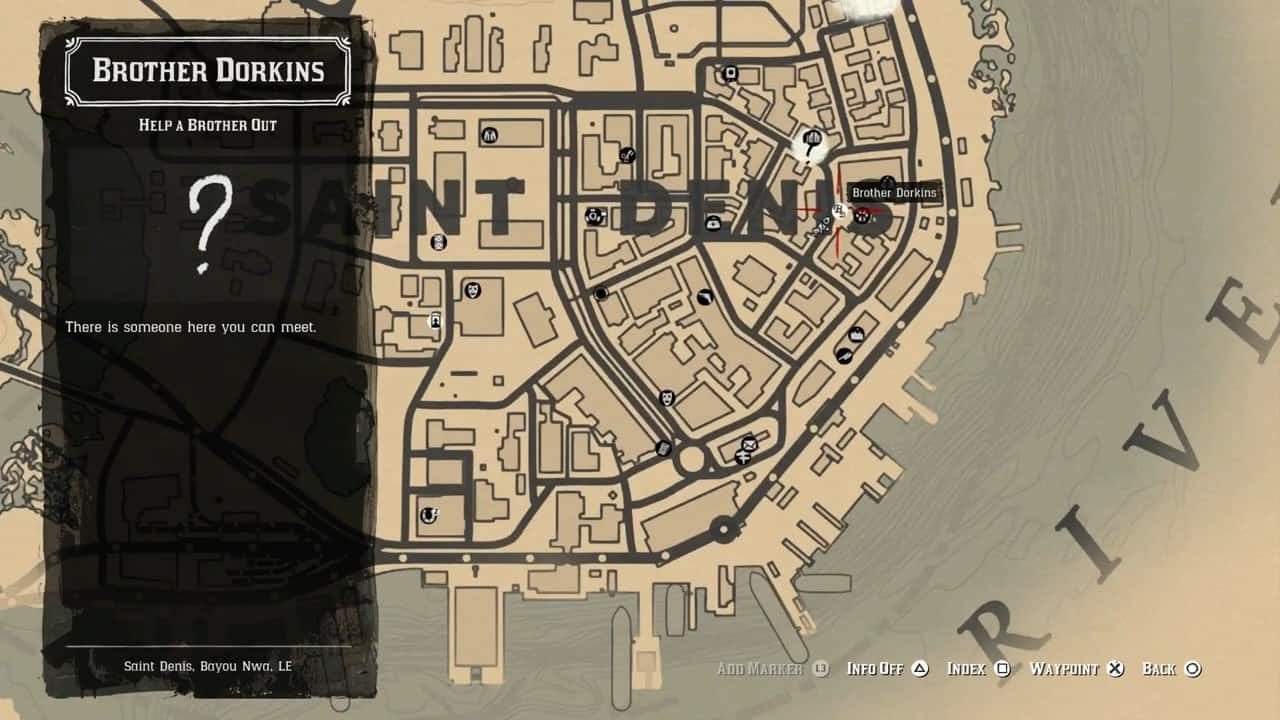
To start this quest, you must first talk to Reverend Swanson in Shady Belle, he’ll tell you about a Monk in Saint-Denis collecting donations. Reach the Monk, Brother Dorkins, using the map image above. When you talk to him, he reveals that a shop near where you’re talking to him “sells more than just trinkets”. You need to investigate this shop.
Investigating the floor beneath the bookshelf in the backroom reveals a passage. Open it to go to the secret basement, where you’ll find two chained-up children. Free them and make your way back to Dorkins to end the mission.
In the end, Dorkins offers the donations he’s collected so far as a reward. Taking them lowers your honor, and leaving them increases it.
Idealism and Pragmatism for Beginners
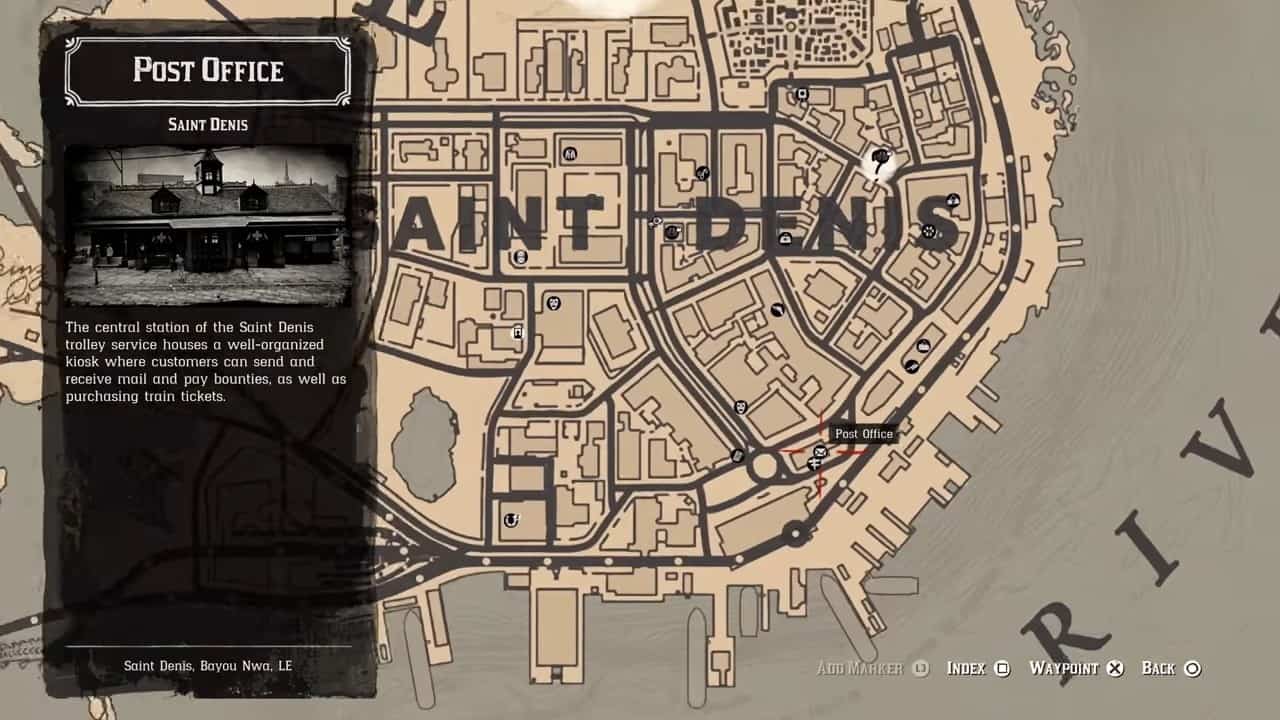
This Stranger Missions chain in RDR2 becomes available after you complete the “Gilded Cage” mission in Chapter 4. Soon after you’ll receive a letter from Mayor Henri Lemieux, which a notification will indicate. Head over to the nearest Post Office to retrieve your letter. Reading it begins Part I.
Part I
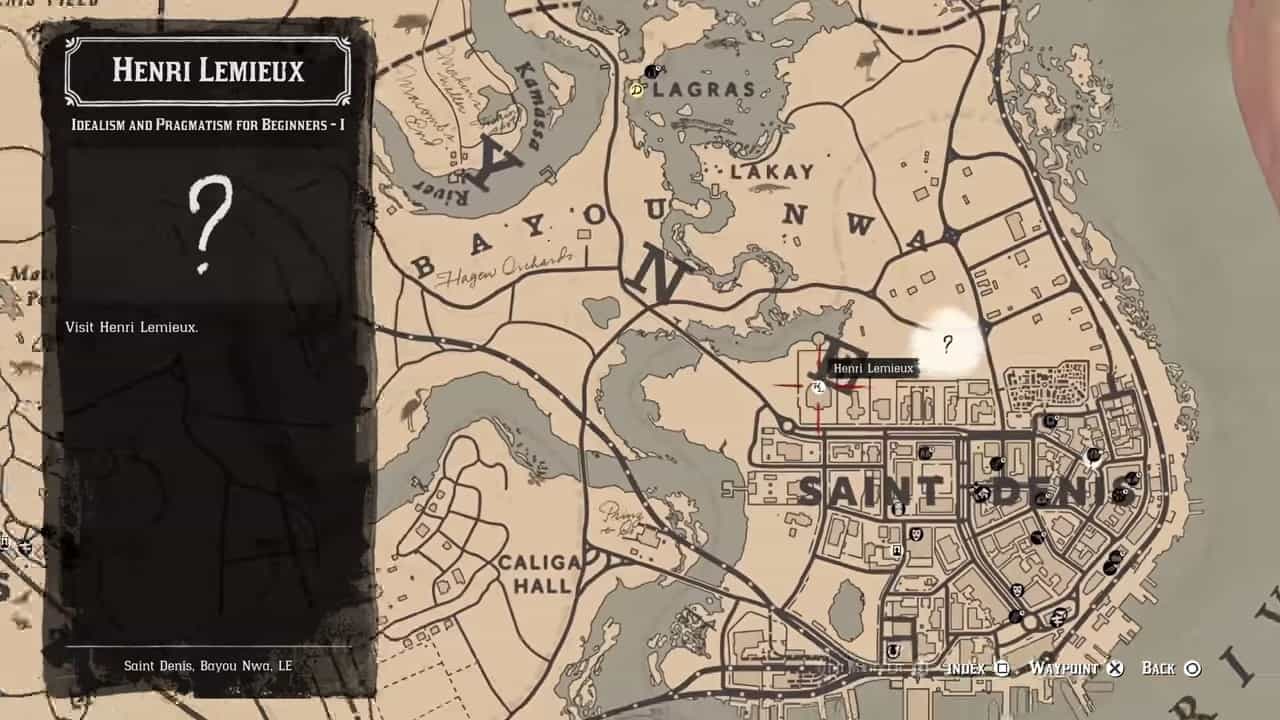
Meet with the Mayor at his house in the location marked on the map above. He’ll tell you about a collection of paintings that he bought that turned out to be fake, according to an appraiser. He asks Arthur to go to the appraiser and get him to change his mind about the authenticity of the paintings. Follow Jean-Marc, the Mayor’s assistant to the carriage and ride it until you reach the end.
Next, go to the alley marked on your mini-map and threaten the appraiser to change his mind about the paintings. Successfully convincing him requires drawing your gun and punching him. Once he agrees to change his mind the mission ends.
Part II
To begin Part II, wait for another letter from Mayor Henri Lemieux and retrieve it from the post office. You’ll have to go to the same location as you did in Part I. In the second part, you have to convince an individual who promised to fund the library in Saint-Denis to stay true to their promise.
Follow the marker to catch up to him and confront him. Like with the previous mission, threaten him until he complies. Successfully convincing him finishes the quest.
Part III
For the third and final part, you’ll have to make your way to the Mayor’s house once again. He’ll tell you that he fears Jean-Marc, his assistant will speak out about the heinous work he and Arthur have done and that he must be dealt with.
Follow the quest marker to reach Jean-Marc. Here you’ll have to knock him out and take him back to the Mayor’s house. Upon bringing him back, you’ll have the option to kill either one of the two men.
Killing Mayor Henri Lemieux
If you kill Mayor Henri Lemieux, you’ll receive positive Honor points. Later on, you’ll learn through a letter that Jean-Marc is the new mayor of Saint-Denis.
Killing Jean-Marc
If you kill Jean-Marc, you’ll receive negative Honor points but you’ll receive a 10% discount at all shops in Sant-Denis for life.
Money Lending and Other Sins (IV to VII)
The first three chapters of Money Lending and Other Sins are part of Red Dead Redemption 2’s main storyline. Chapters IV to VII are Stranger Missions in RDR2. Like the story missions, you have to go to recover money from different NPCs throughout the world. Talk to Leopold Strauss Chapter 3 onwards to start these missions.
Part IV – Gwynn Hughes
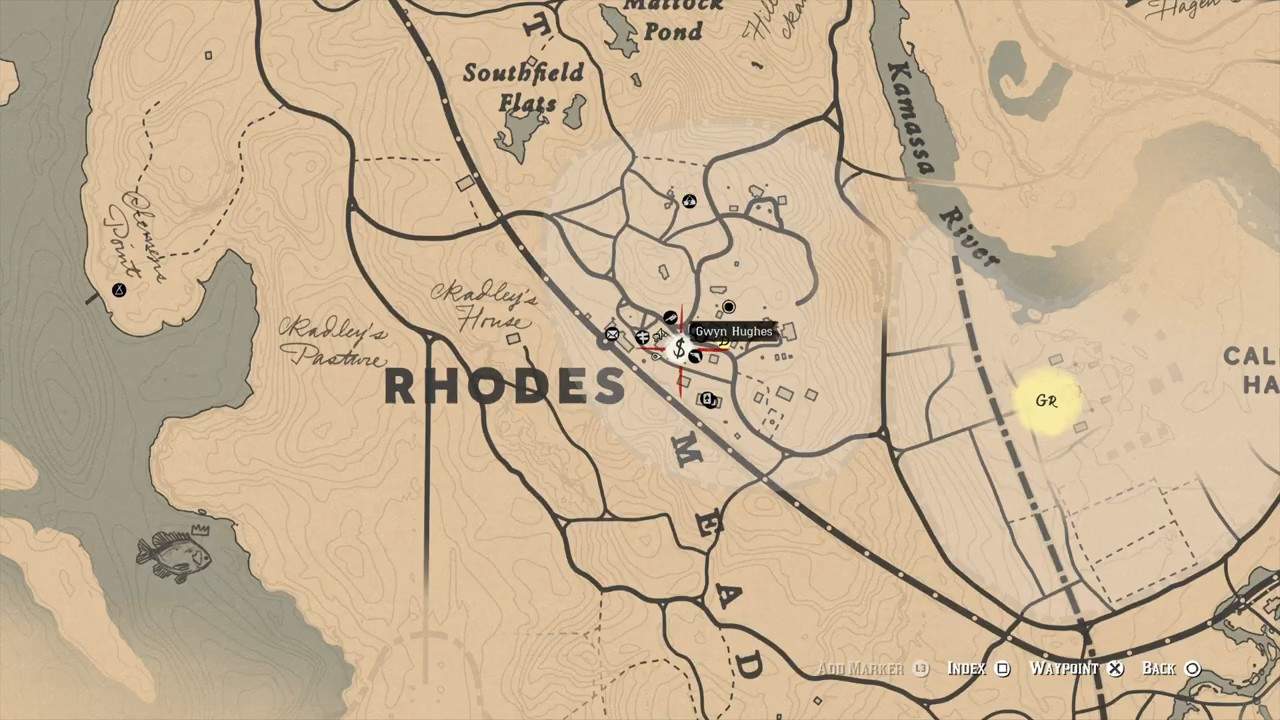
Gwyn Hughes can be found near the church in Rhodes. He won’t have the money straight away and will instead have Arthur empty and guard the church grounds as he digs up a grave to find something that’ll repay his debt. First, shoo away the two lovers by the stairs, then get rid of the lady mourning by a gravestone. Then stand guard. Soon after, two men will enter the churchyard wanting some privacy.
They’ll try to get Arthur to relent which will instead lead to a fistfight. Take them down and return to Gwyn to collect the jewelry he dug up from the grave to finish this mission.
Part IV – Winton Holmes
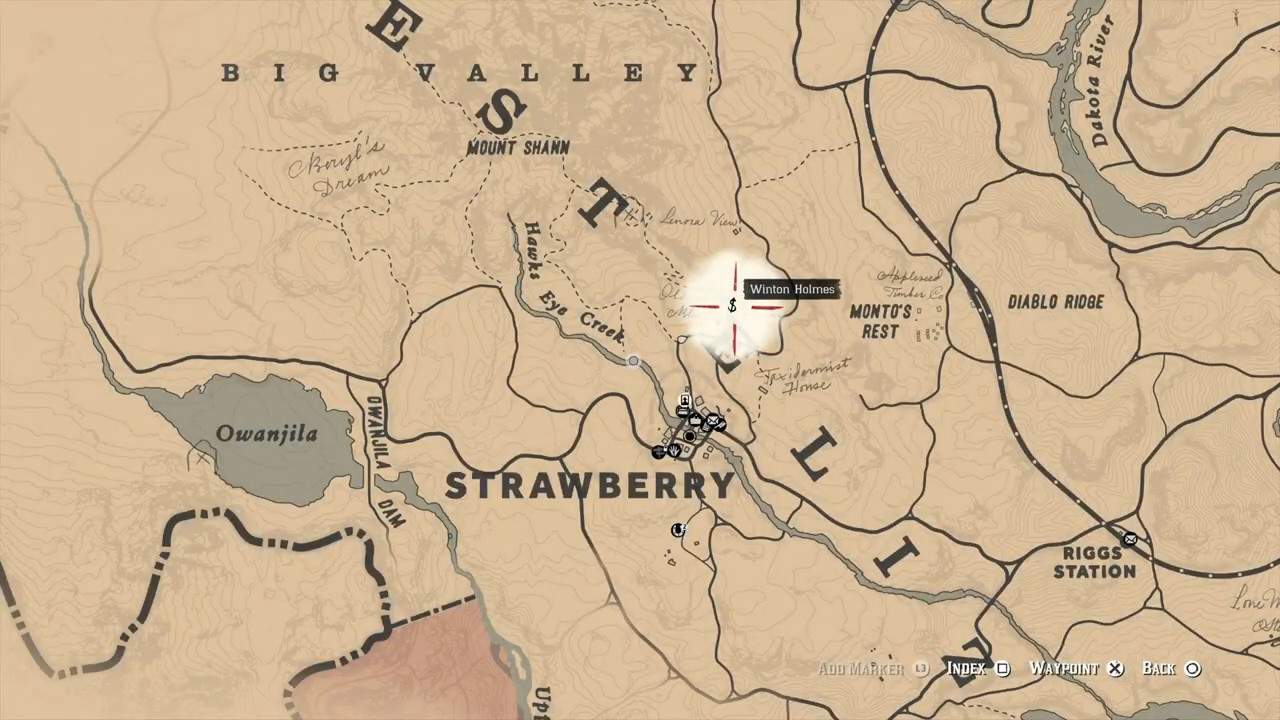
Winston Holmes can be found in the hills by Strawberry. Follow the map image above to reach him. Like Gwyn, he won’t have the money straight away. He’ll instead ask you to hunt a rare cougar for its pelt that is further up the hills. Follow him and enter the caves. The caves are dark and the cougar in question will try to jump you.
Keep your wits about you and use Dead Eye as soon as the cougar tries to attack you. Next, simply skin the creature and sell the pelt to the butcher in Strawberry to collect your debt.
Part V – Algie Davison
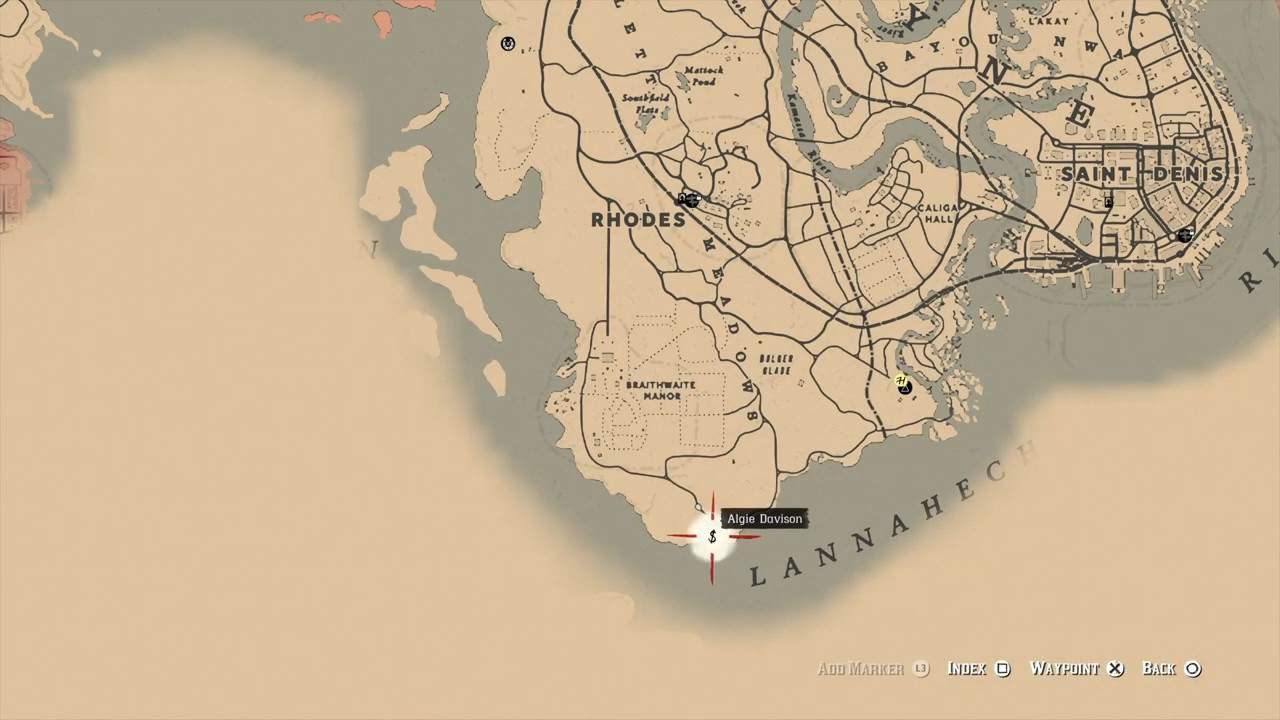
Algie Davison is found in his home, towards the south of Rhodes. He’ll be sitting by the water, talk to him, and then follow him to his house. He will ask his son to fix both you and him a drink and as soon as Arthur goes to grab it, he’ll jump him. Punch him a couple of times to knock him out. Now you’re free to loot the house. The debt money is found in the footlocker of his son’s room.
Chapter VI – J. John Weathers
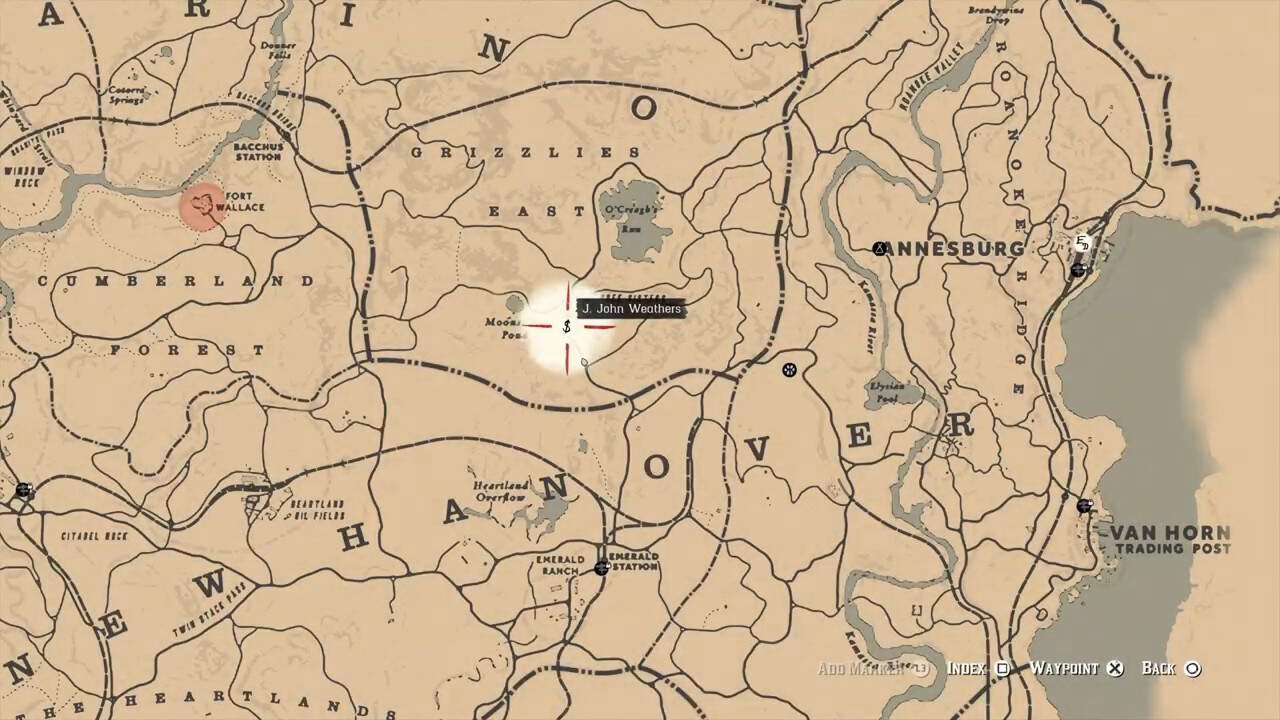
J. John Weathers can be found in New Hanover. In keeping with the trend of the previous debtors he won’t have the money for you straight away. He’ll tell Arthur that he’s down bad and only has a few supplies left for the winter. He’ll also let Arthur know that he’s being chased by some men. These very men will soon attack you.
Killing them results in Weathers’ supplies getting caught on fire. His wife will appear soon after and he’ll offer you a piece of her jewelry as compensation for the debt money. Here, you can choose to absolve the couple of their debt or take the piece of jewelery.
Chapter VI – Arthur Londonderry
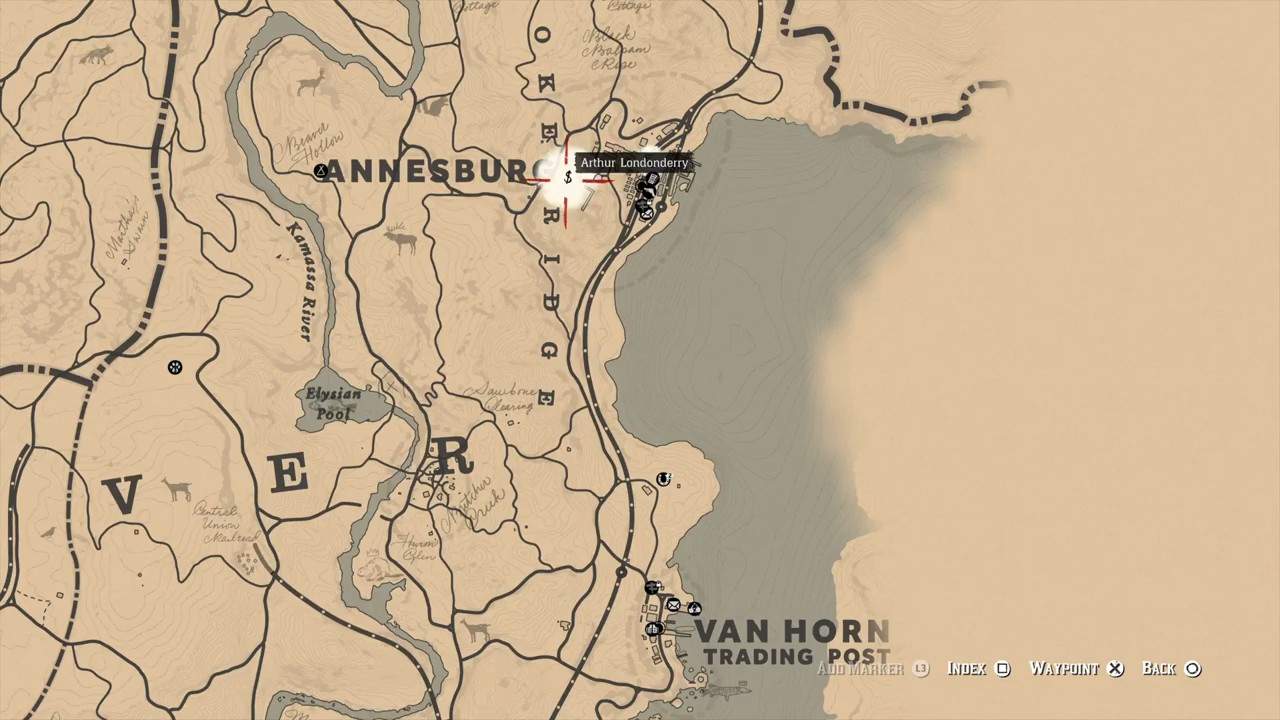
The final debtor, Arthur Londonderry is revealed to be dead when you reach the mine (his place of employment) in Annenberg. You’ll then have to go to his widow, who’s found just south of the mine.
When you confront Mrs. Londonderry, she reveals that Arthur died trying to get the money to pay back the Van Der Linde gang. Here, you have the option to simply absolve Mrs. Londonderry of her debt or you can absolve her debt and give her some extra money.
Chapter VII
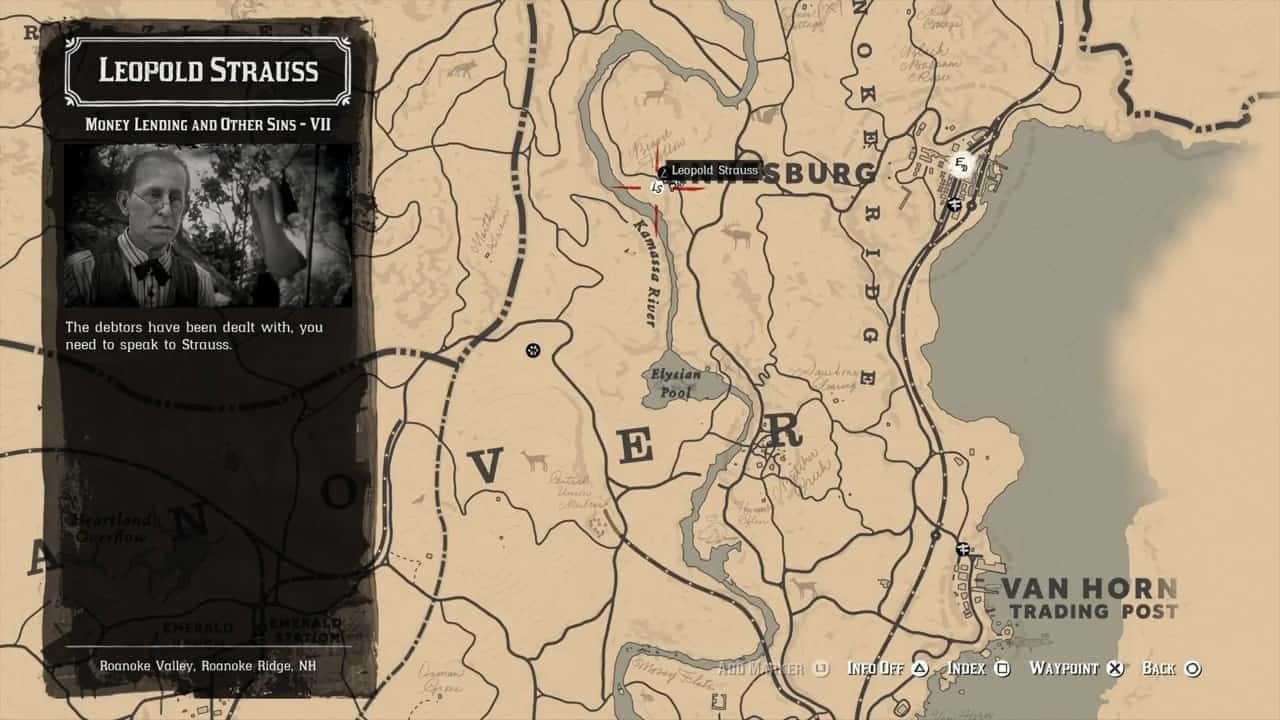
In the final chapter, Arthur confronts Strauss and his money-lending practices. In the end, Strauss is let go from the Van Der Linde gang.
No Good Dead
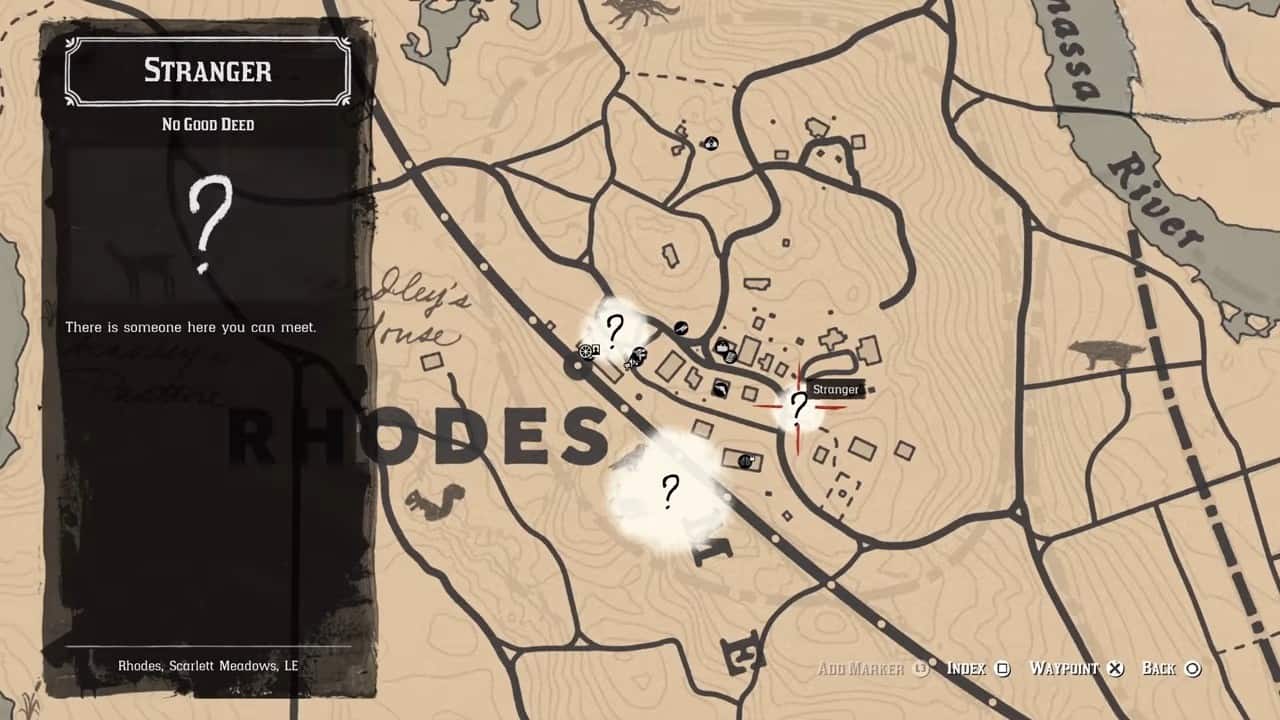
No Good Dead becomes available in Chapter 3. Dr. Alphonse Renaud can be found in Rhodes. Use the map image above to reach his exact location. When you talk to him, he’ll tell you about his stolen medical caravan.
Simply go to the marker on your mini-map (Macomb’s End) take out all the thieves in the area, retrieve the caravan and deliver it back to Dr. Renaud. On the way back you may be chased by a couple of more thugs.
Of Men and Angels
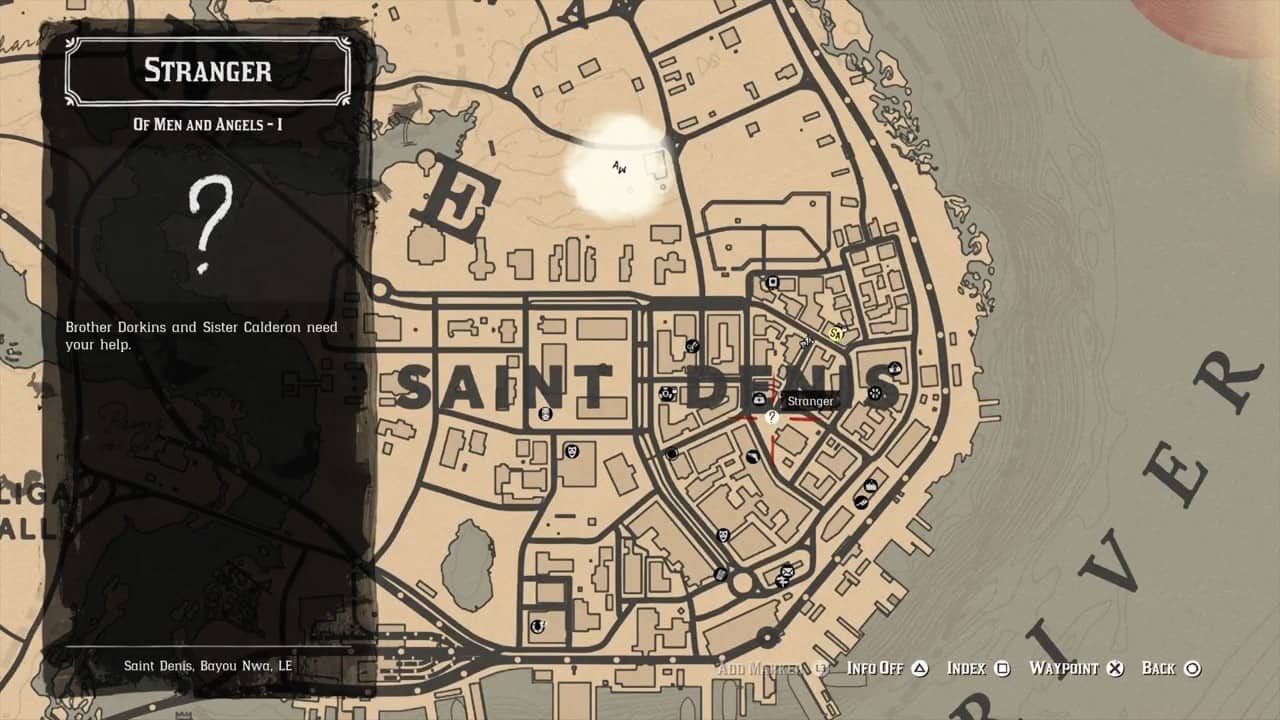
This stranger mission becomes available after you complete Brothers and Sisters, One and All, involving the nuns. Both Part I and Part II take place in succession. Simply head to the location above in Saint-Denis and speak with Sister Calderón. Once the cutscene ends, Part I concludes. To finish Part II, simply donate four cans of food to her in the same location.
You may also steal from her donation box, however, doing so will lower your honor.
Oh, Brother
Oh, Brother becomes available after completing the Battle of Shady Belle in early Chapter 4. It takes place in and around Valentine. This stranger missions chain in RDR2 has a total of three parts.
Part I
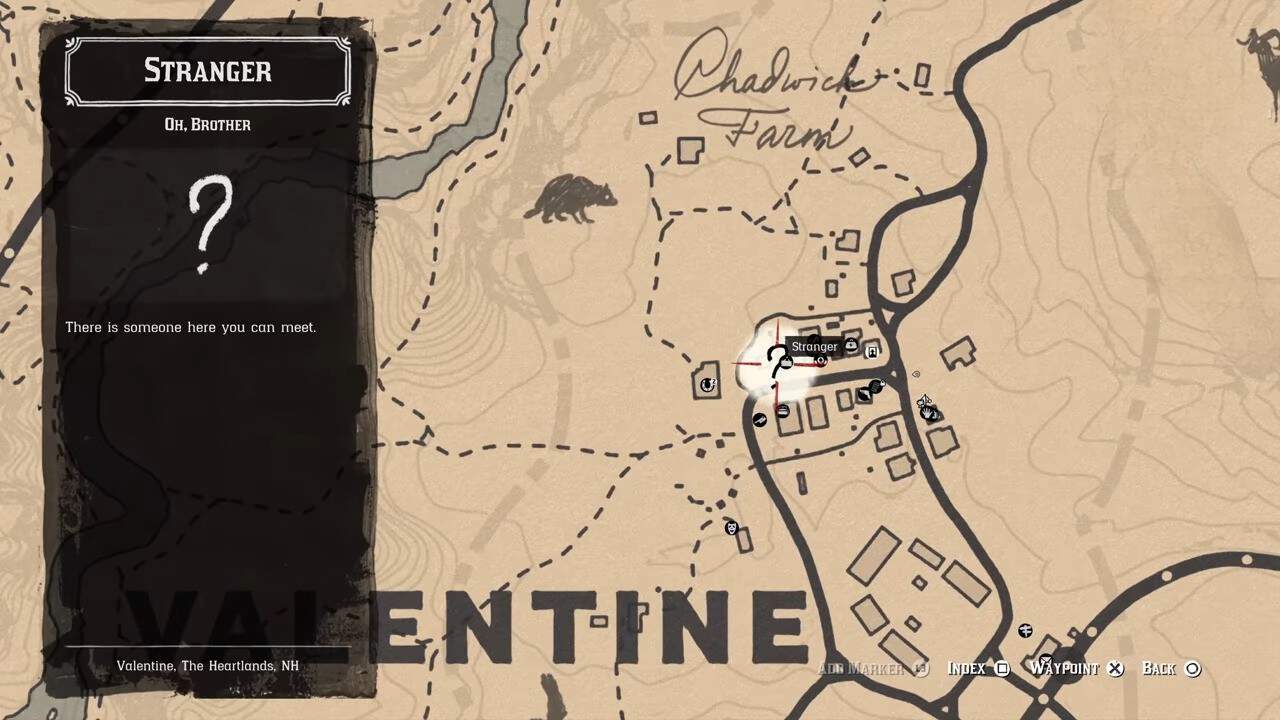
Brothers Proteus and Acrisius will be found sitting on the porch of the general store in Valentine. Approaching them reveals that they are quarreling over the same woman, Helen. To prove their worthiness to her, they’ll engage in a shooting contest, mediated by you.
Simply follow them and shoot the bottles off the heads of both brothers to complete the first part. There are a total of three rounds and misfiring and accidentally killing one of the brothers results in you failing the mission.
Part II
Part II takes place in the same general area. The brothers and Helen will be found in the alley behind the hotel, arguing once more. This time around, you simply have to punch both brothers several times to finish the mission.
Part III

The third and final mission can be started in Cumberland Falls, west of Valentine. In their final show of love for Helen, the brothers decide to go down Cumberland Falls in barrels. When the brothers get into their barrels, push them downstream and then follow the yellow marker on your mini-map to locate them. The questline ends with both brothers finally making up.
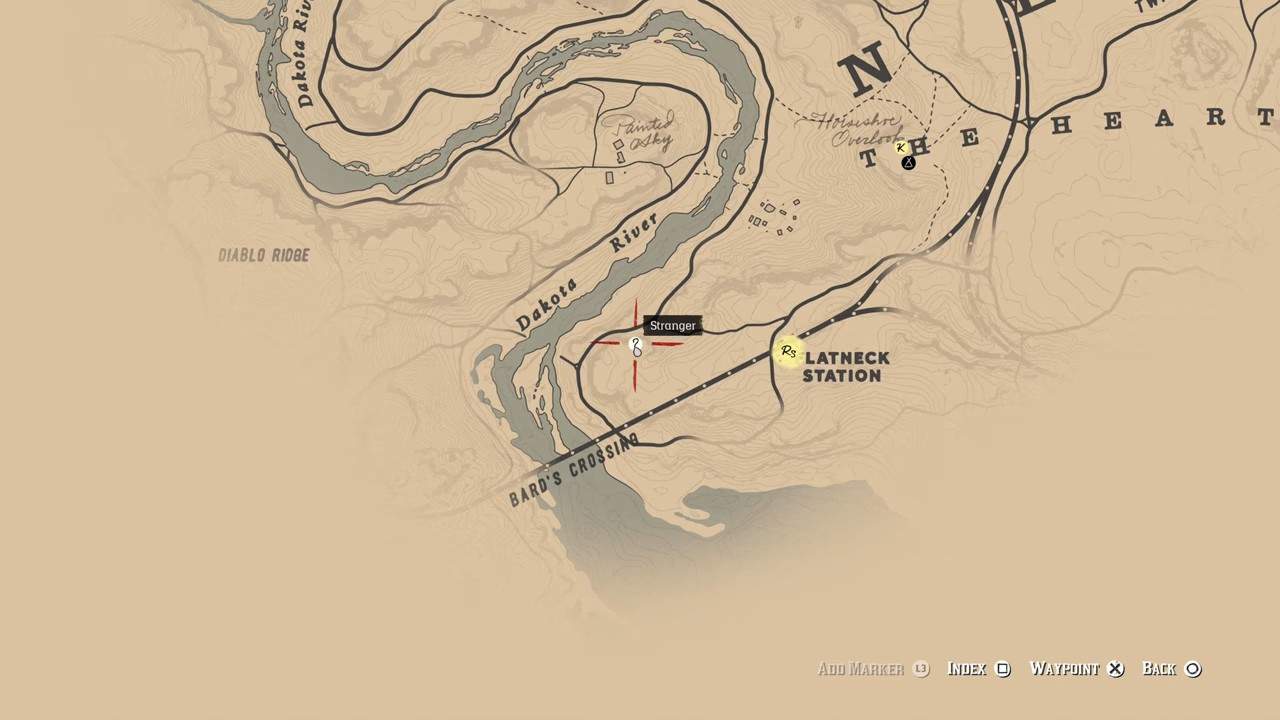
Smoking and Other Hobbies
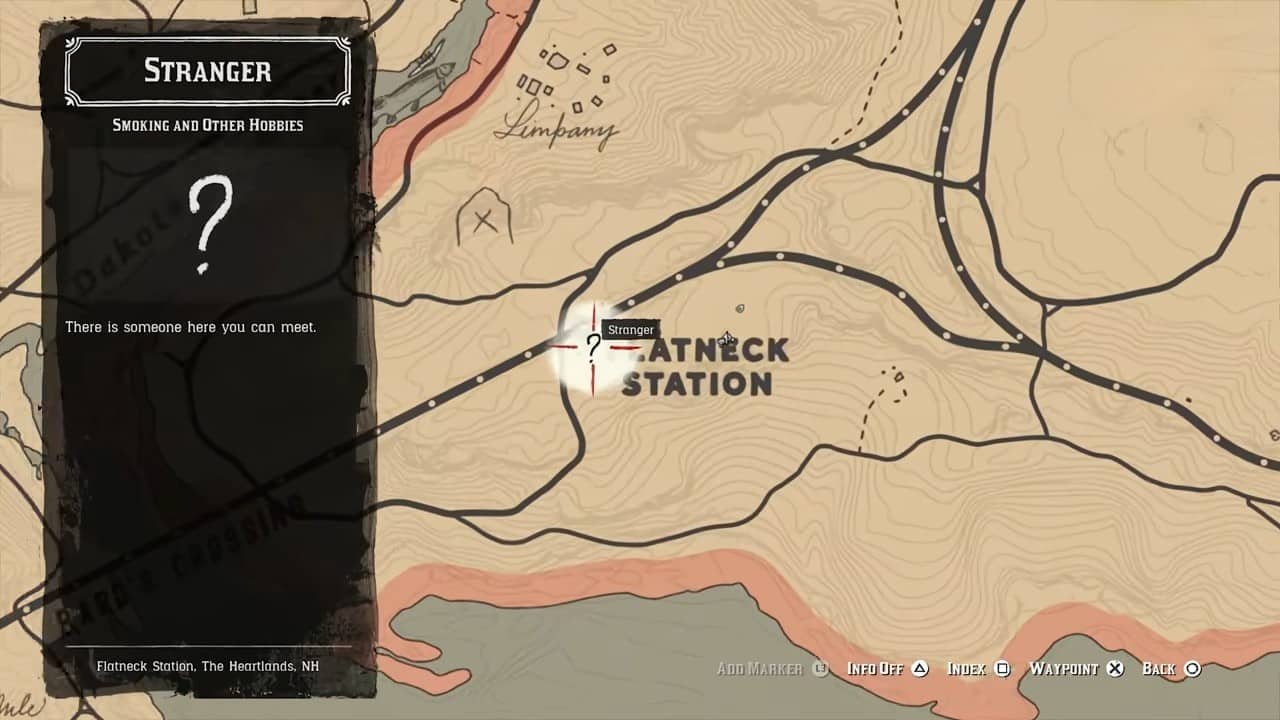
This Stranger Mission is available after you complete Who is Now without Sin in Chapter 2. It can be started in Flatneck Station in New Hanover which lies in the south of Valentine. Speak with Phineas Ramsbottom who’ll ask you to collect 144 cigarette cards across 12 sets. You’ll receive a reward for every set you complete. Completing all 12 sets ends this mission.
The American Inferno, Burnt Out
This Stranger Missions chain becomes available in RDR2 after you complete Epilogue I as John. This is the only Stranger Mission chain that is completely exclusive to John. It has a total of five parts.
Part I
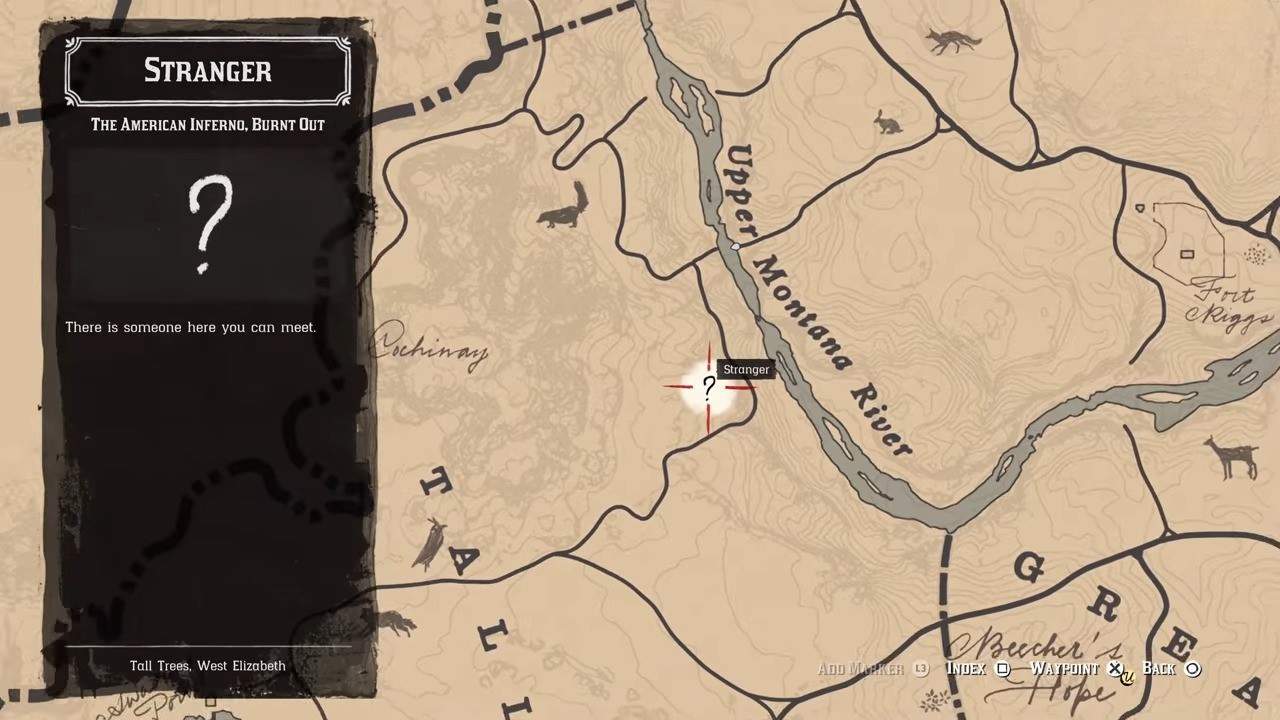
To start this mission head to Tall Trees in West Elizabeth and talk to the man overlooking the Montana River. He’ll reveal himself to be Evelyn Miller, an author that Dutch admired very much. After a little back and forth, he’ll invite you to his cabin.
Part II
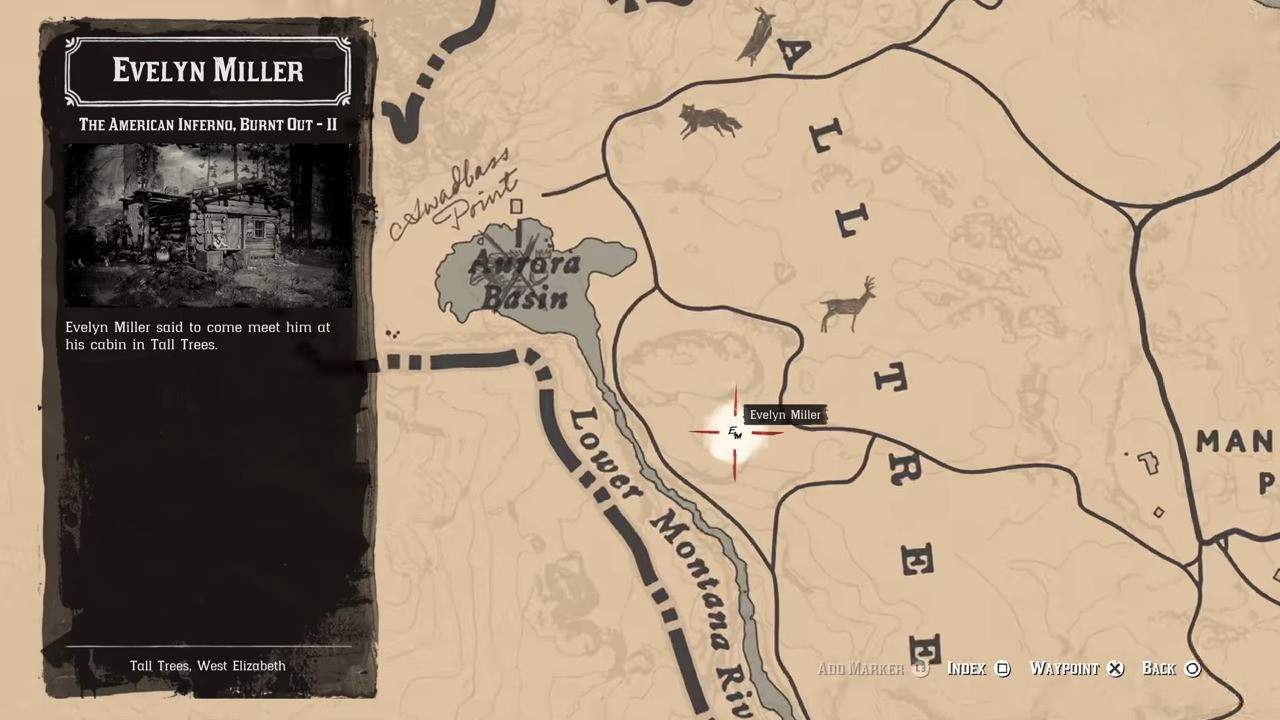
Miller’s cabin can be found just west of where you met him, along the Montana River in West Elizabeth. After exchanging a few pleasantries, he’ll take you to a nearby camp, where several individuals have been disturbing the peace. Upon arrival, Miller gets knocked out quickly and you’re left to deal with the bandits. Take them out to finish this chapter.
Parts III, IV, and V
The next three missions take place at his cabin. Make your way back to Miller’s cabin and talk to him once more. He’ll reveal to you that he won’t be leaving his cabin until he’s done with his book. For all 3 parts, you only have to leave food by the entrance of the cabin.
When you return for the third and final time, you’ll discover that Evelyn Miller has worked himself to death. His final wish is for his body to be burned so he can soar in the air with the eagles. Grab the lantern by the window and use it to set the curtain on fire. Exit the cabin to complete this Stranger Missions chain in RDR2.
The Artists Way
The Artists Way becomes available in Chapter 4 after you complete the mission The Joys of Civilization. This Stranger Missions chain has a total of four parts in RDR2.
Part I
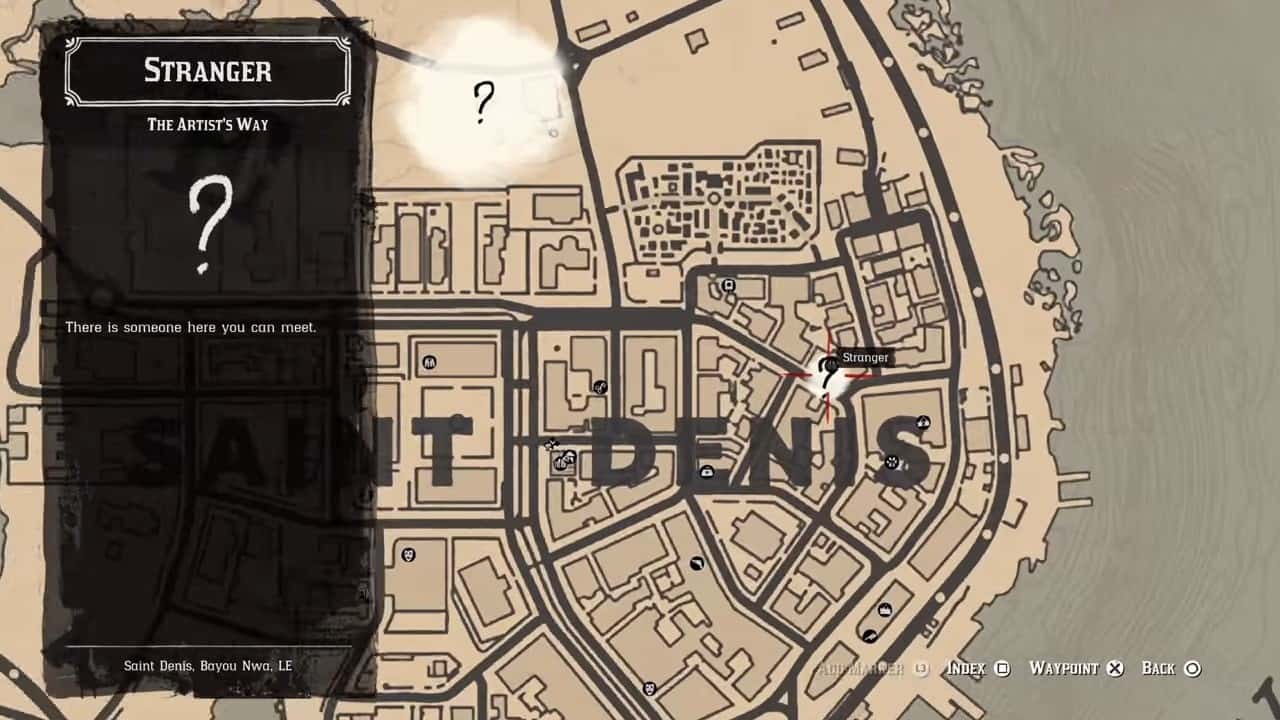
Make your way to the Saloon marked on the map above in Saint-Denis. Here you’ll meet Charles Châtenay a French painter and artist. After you buy him a drink and engage in a little back and forth, he’ll hand you a woman’s portrait. Exit the Saloon to finish the first part.
Part II
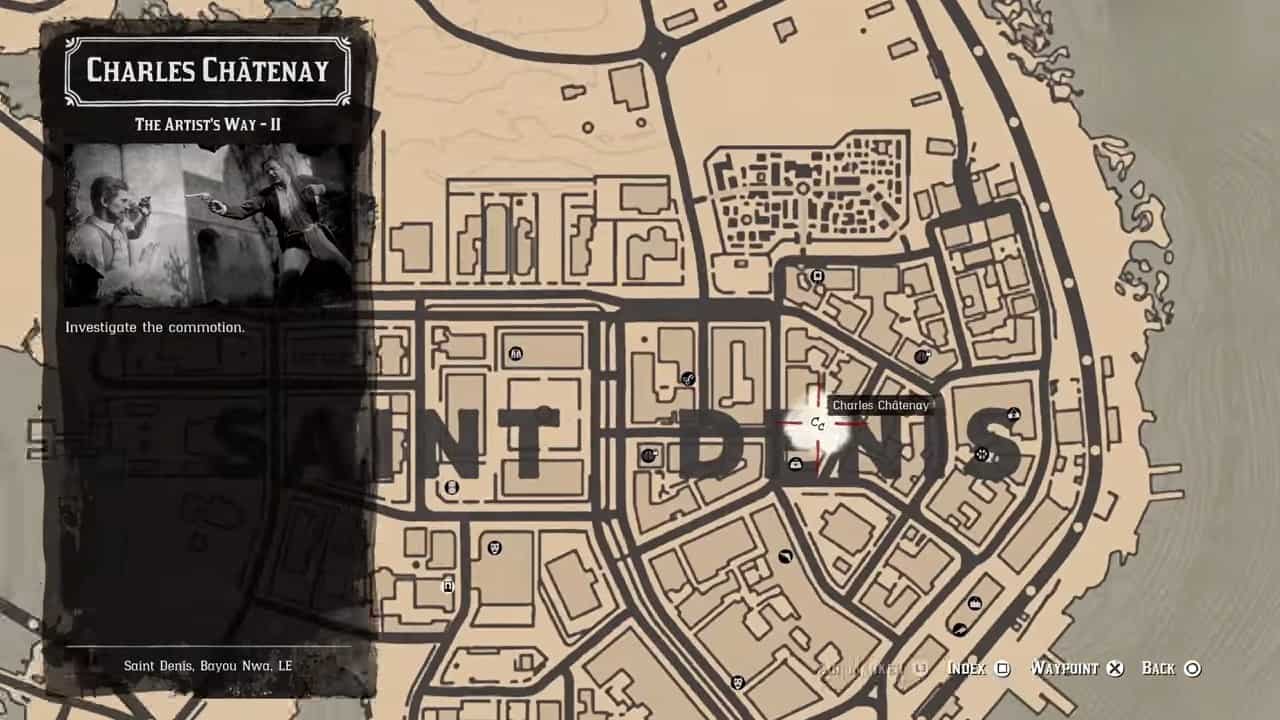
In the second mission, you’ll encounter Charles not far away from where you initially met him. This time around he’ll be embroiled in a scuffle with another man. Once you threaten the man to leave, Charles will invite you to his exhibit at the local art gallery.
Part III
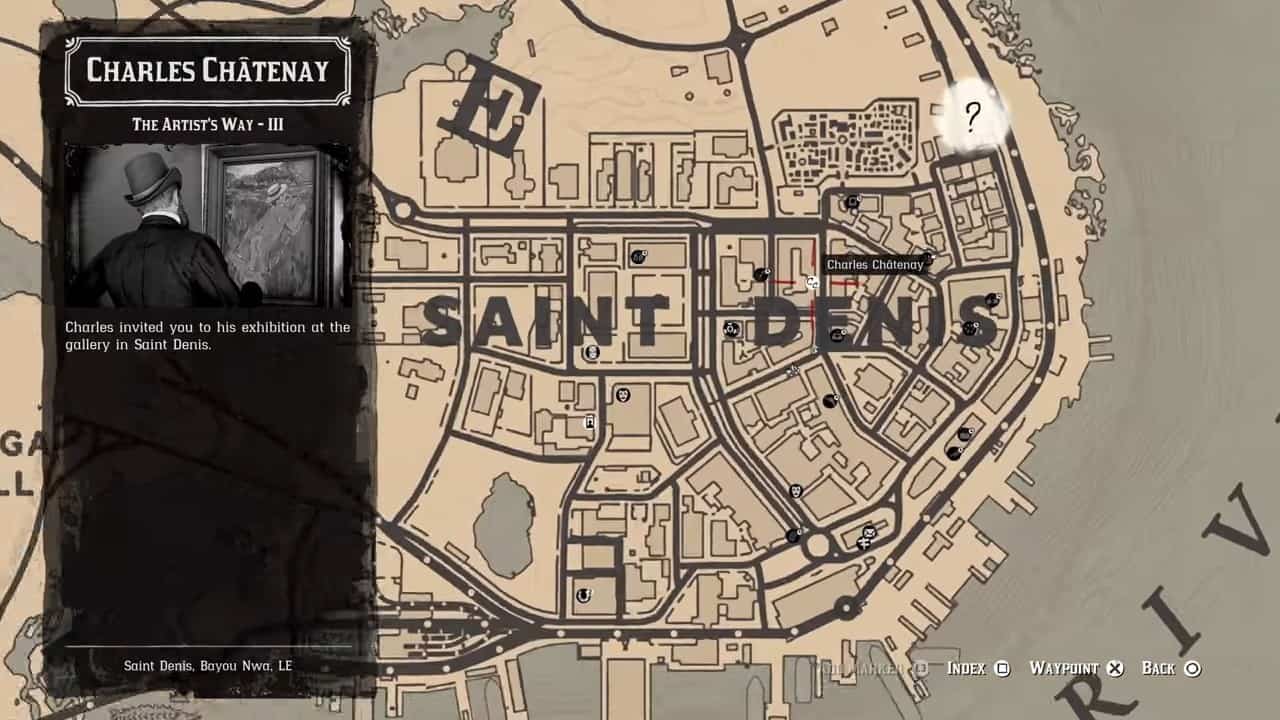
Go to the art gallery in Saint-Denis to look at Charles’ exhibit. When you arrive, you’ll discover the art at the exhibition isn’t to the liking of the patrons as it depicts their family members in a state of undress. Violence will soon break out and you’ll have to knock out everyone present there. Once you’re done, follow Charles and lead him to his safe house where he can lay low.
Part IV
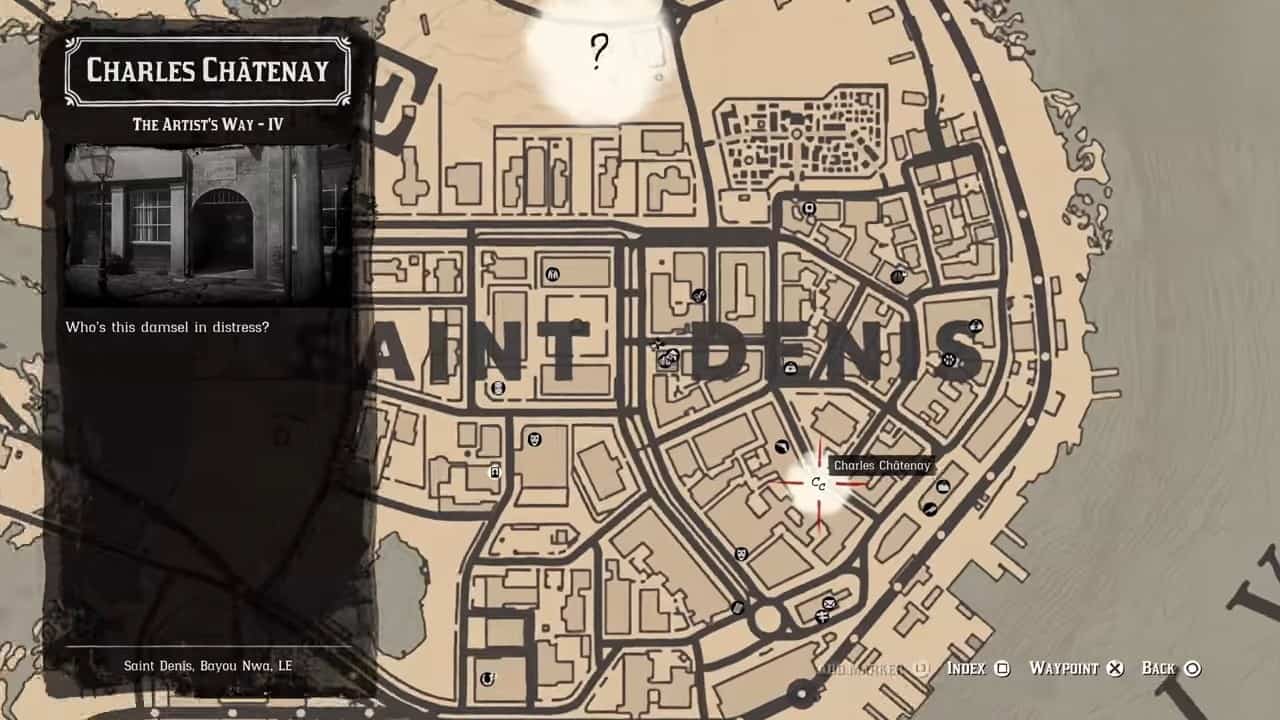
For the last part of this Stranger Mission chain, head to the area marked on the map above. When you get there, you’ll discover Charles dressed as a woman so he can escape Saint-Denis without being caught, following his art display.
You simply need to escort Charles to the nearby ship. If you fail to keep up with him, you’ll fail the mission. Once you reach the ship a couple of men will recognize Charles and try to keep him from escaping. Kill both of them so Charles can get on the boat. Once he does the mission chain ends.
The Iniquities of History
This Stranger Missions chain in RDR2 becomes available after completing “An Honest Mistake” in Chapter 3. It is comprised of two parts.
Part I
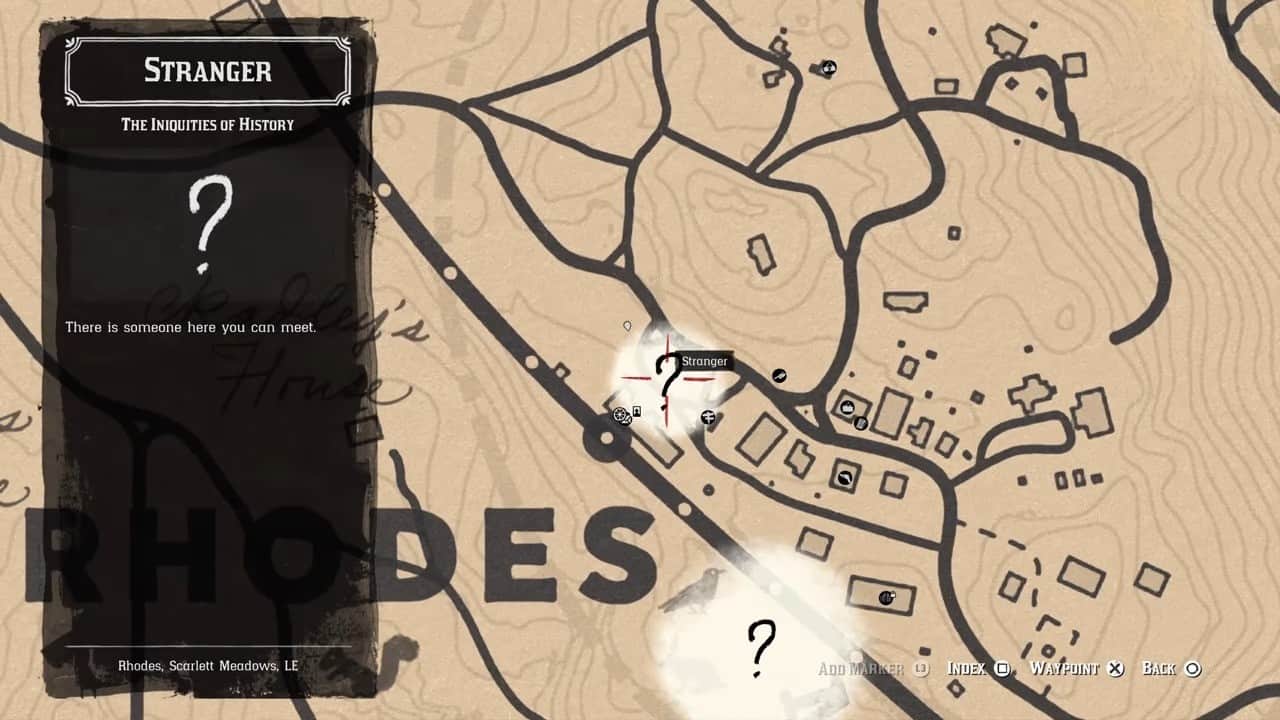
The stranger, Jeremiah Compson can be found lying down on a bench across from the post office in Rhodes. Once you approach him, he’ll tell you that his house has been foreclosed on and that he’s lost everything. He requests Arthur to keep an eye out for three of his most prized possessions, his watch, pistol, and ledger.
Part II
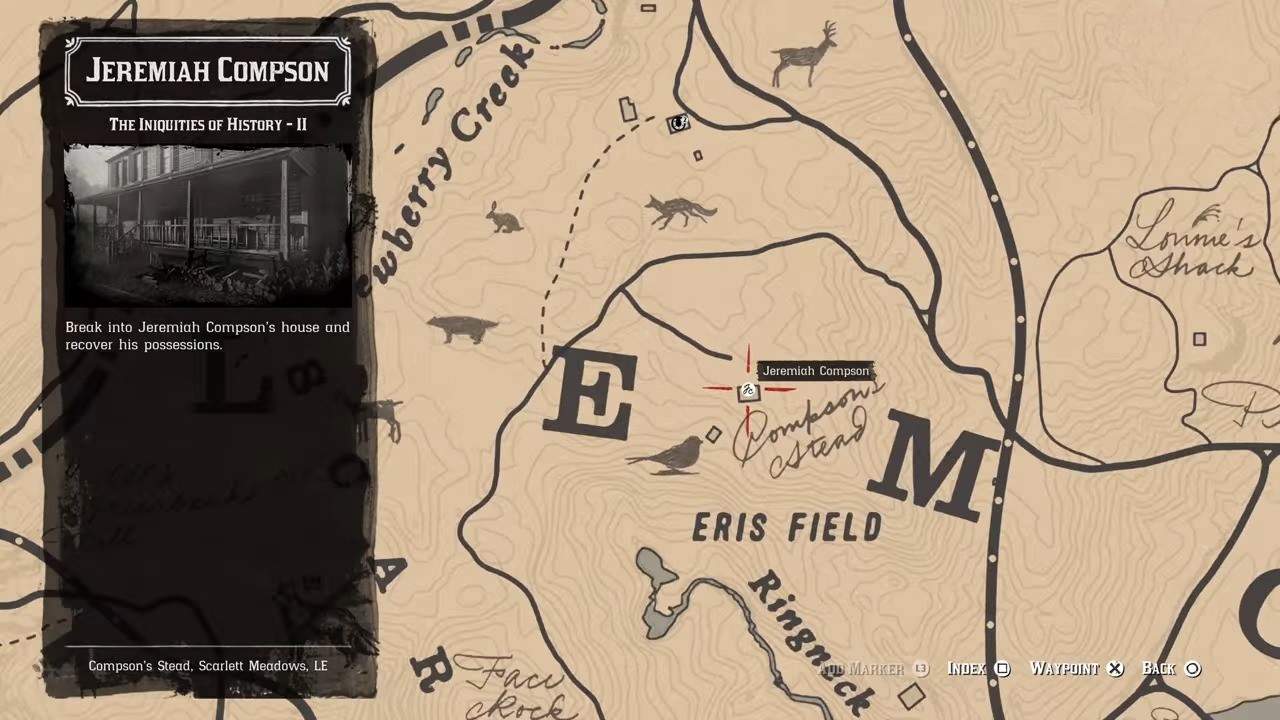
Compson’s house can be found west of Rhodes, use the map image above to reach it. the front door will be barricaded but you’ll be able to enter through the side door, which is to the left of the main door. The watch can be found on the green fireplace, in the room to the left of the kitchen. Explore the main area until a cutscene with two squatters triggers. One of them has Compson’s gun. Kill them both to collect the gun.
In the main room, use your Eagle Eye to find the loose floorboard. Use it to gain access to the basement. The ledger can be found on a crate next to a desk with another ledger. The ledger reveals that Compson was involved in the slave trade. Exit his house and meet him at the yellow marker on your mini-map. Once you confront him the mission ends. Here you can choose to kill him, however, this does not affect mission completion.
The Mercies of Knowledge
The Mercies of Knowledge becomes available once you complete “The Joys of Civilization” in Chapter 4. This stranger missions chain is comprised of seven parts in RDR2.
Part I
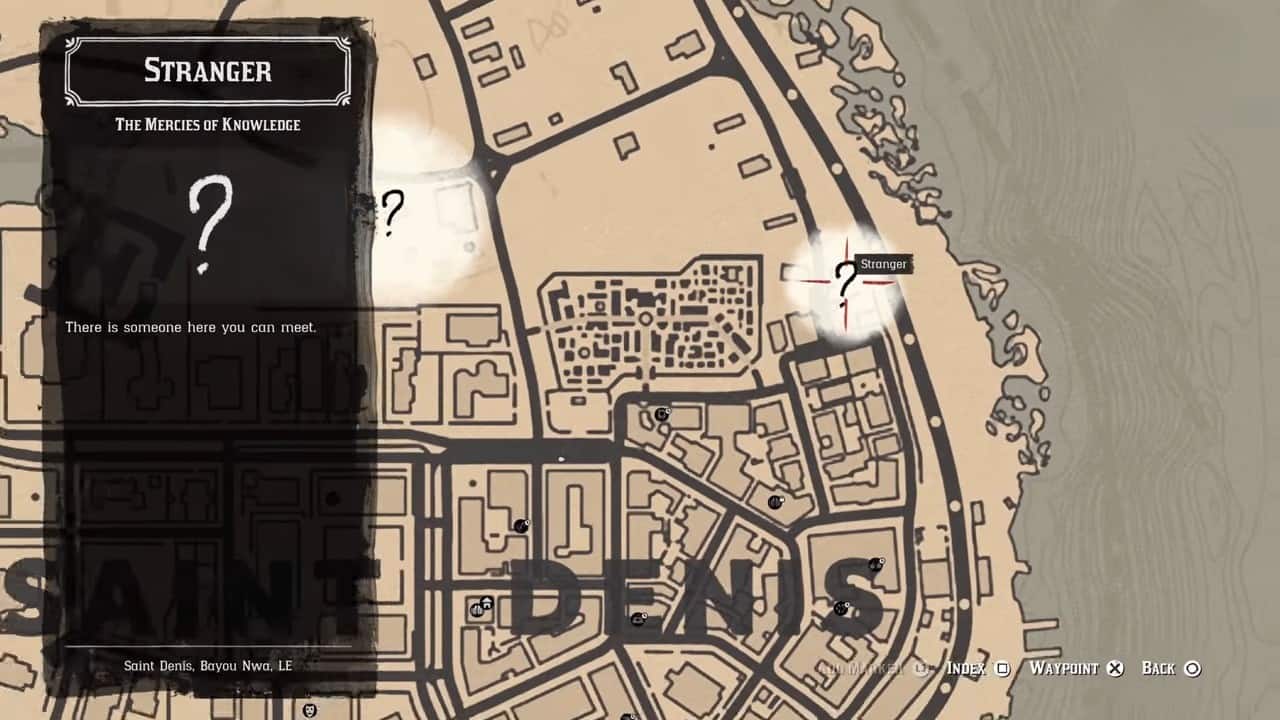
For the first part of this quest, make your way to Saint-Denis and meet with Professor Andrew Bell III who asks Arthur to bring him 100 gallons of Moonshine for a machine that he’s building he promises a handsome reward for the liquor.
Part II
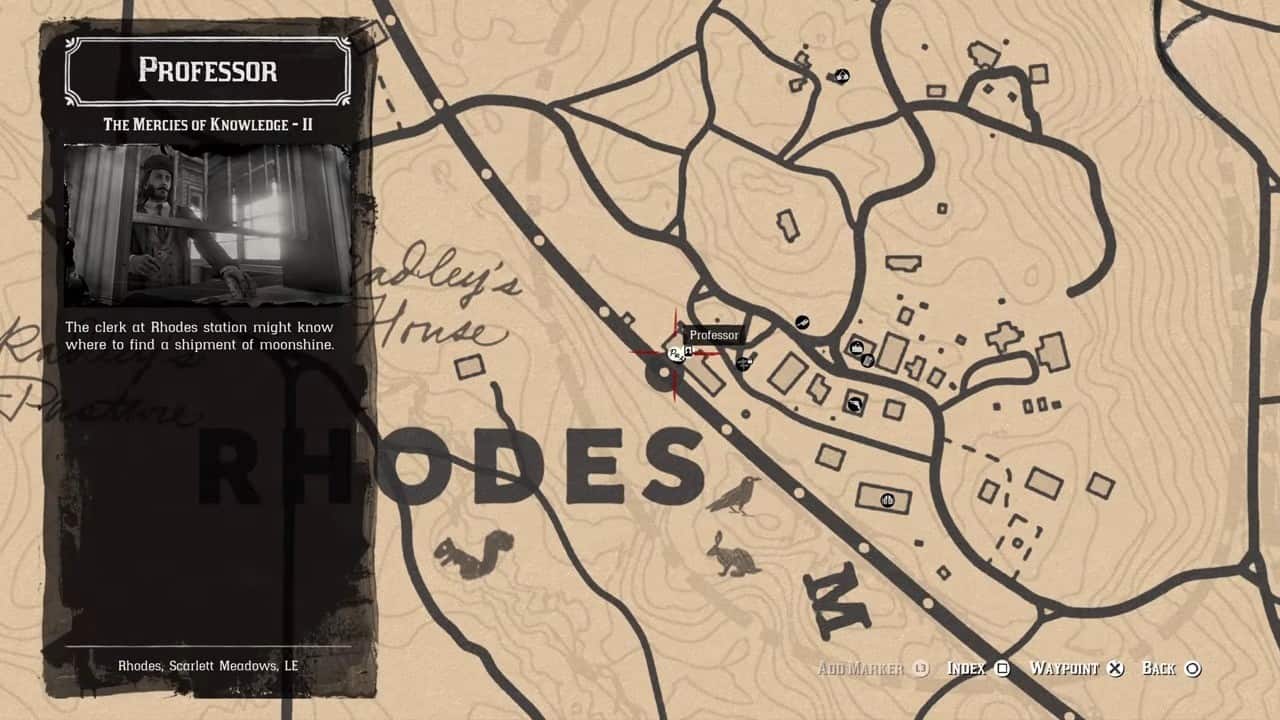
Head to the train station in Rhodes to find out where you can get 100 gallons of Moonshine. The clerk will tell you exactly where to go.
Part III
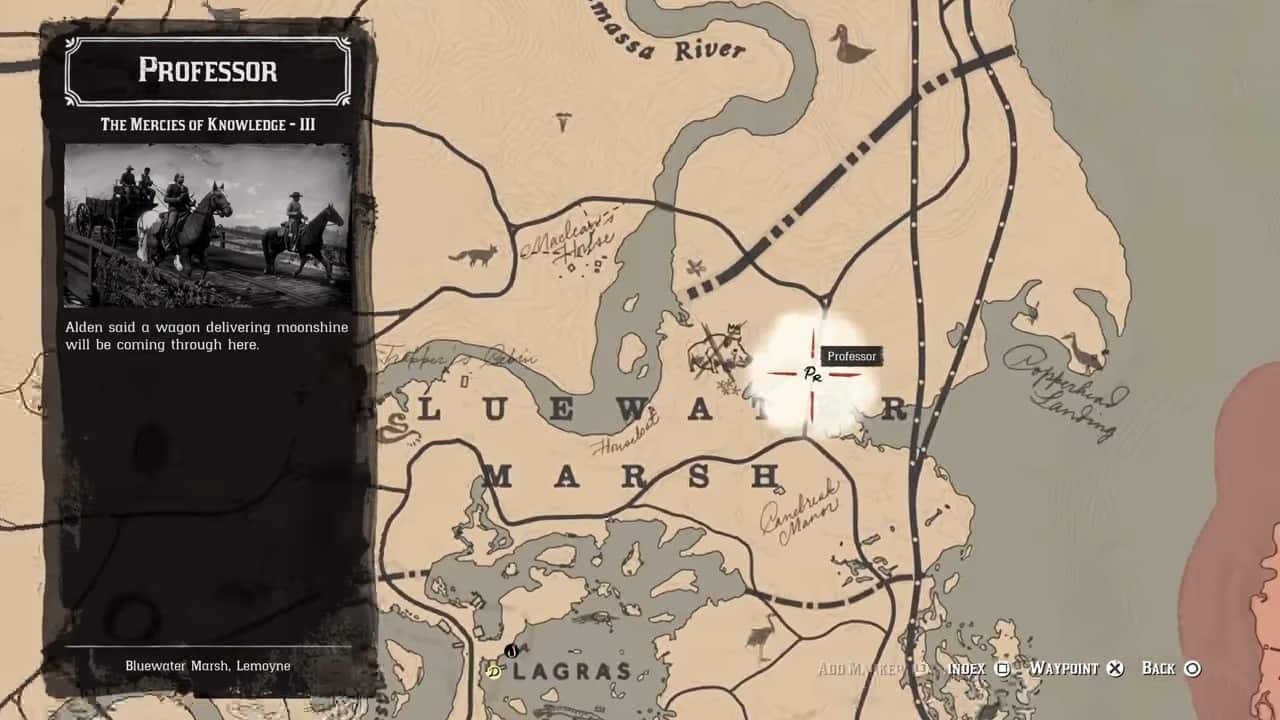
Head to the Bluewater Marsh in Lemoyne to retrieve the moonshine for the Professor. The shipment will be on a cart and will also be flanked on either side by guards. Take them out quickly using Dead Eye to minimize the chances of the moonshine cart getting destroyed. Once the guards and the driver have been dealt with, take control of the cart and bring it back to the professor.
Part IV

For the fourth part, the professor will ask Arthur to convince the Saint-Denis Sheriff to let him execute a convicted criminal in public using his electric death chair (the machine he needed the moonshine for) make your way to the Saint Denis police station marked on your mini-map and talk to the sheriff.
The sheriff will tell Arthur the permit for such an act will cost $100. Depending on how you play the situation you’ll either end up paying $50 or $150. Use the “Ask” prompt and then negotiate to pay $50. If you “Demand” the permit, the Sheriff will not appreciate your tone and you’ll have to pay $150 for the permit. Exit the police station to finish this part.
Part V
For Part V, make your way back to where you initially met the Professor. For the final part of his plan, he’ll ask you to bring a guilty subject who can be electrocuted using his chair. He’ll hand you a poster for Wilson J. McDaniel.
Part VI

McDaniel can be found in the Heartlands in New Hanover. Make your way to the map marker image above. Here you have to make sure you don’t kill him. Use your lasso to tie him up and then put him on your horse. Deliver him to the professor to finish the penultimate part of this Stranger Missions chain in RDR2.
Part VII
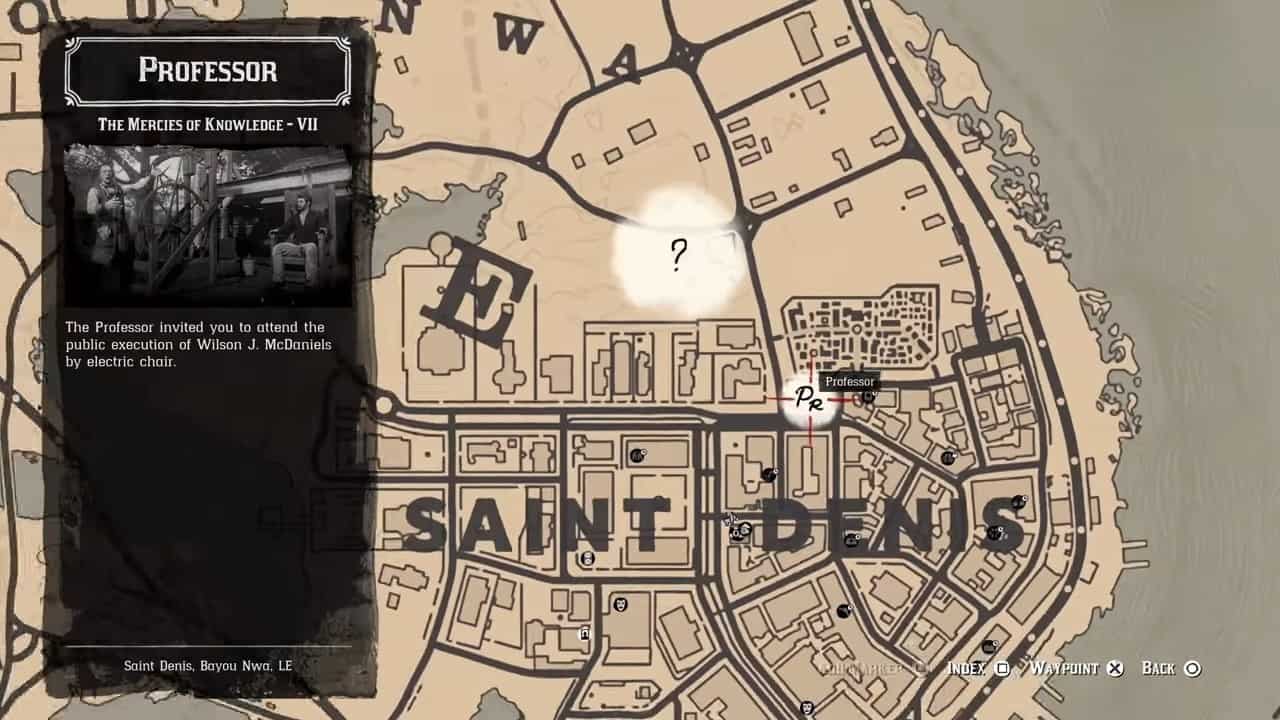
For the final part simply head to the public execution of McDaniel. The electricity will kill both McDaniel and the Professor, ending this Stranger Missions chain in RDR2.
The Noblest of Men, and a Woman
The Noblest of Men, and a Woman involves Arthur meeting different Gunslingers across the map. Part I is available from Chapter 1. Part III onwards becomes available after you complete “A Fine Night of Debauchery” in Chapter 4.
Part I
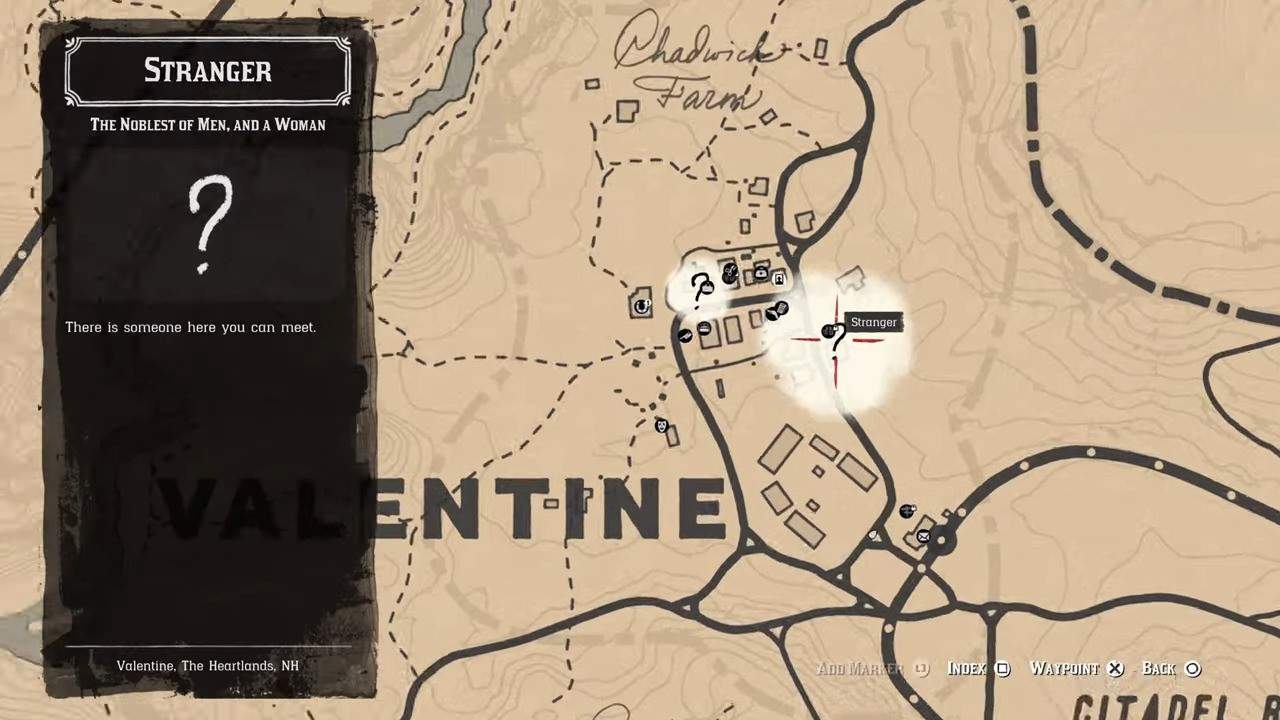
Make your way to the Saloon in Valentine to meet with Theodore Levin. He’ll tell you that he’s in the process of writing a biography for the famous Gunslinger Jim Calloway, who’s passed out drunk right there with him. Due to his drinking problems, he’s been unable to elicit any information from him. Levin will then ask Arthur to meet with the Gunslingers he once ran with, to get a quote about Calloway and maybe even a picture. He’ll then hand you the pictures and whereabouts of four Gunslingers.
Black Belle

Black Belle can be found in the Bluewater March in Lemoyne. When you meet her, you’ll be attacked by a horde of bounty hunters. Take them out, and talk to Belle, where she’ll reveal the information about Calloway. Lastly, follow her and then take a picture of her.
Billy Midnight
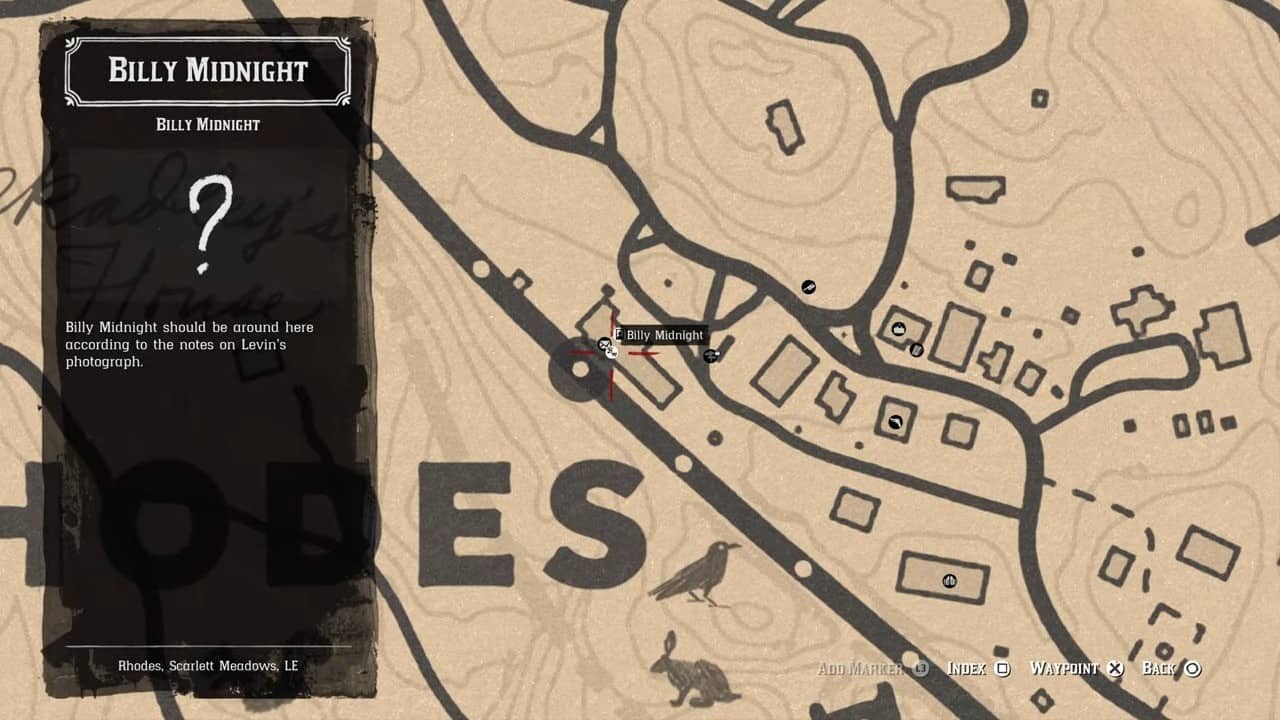
Make your way to the Rhodes train station and ask the clerk about Billy Midnight. He’ll tell you that he’s on the train currently at the station. He’ll be in the bar carriage. When you talk to him, he’ll run away, thinking you’re the law. Follow him to the roof and disarm him.
Here you can choose to kill him yourself or if you wait, he’ll kill himself. Loot his dead body for the “Midnight’s Pistol” unique pistol. Take a picture of his corpse for Levin.
Flaco Hernandez
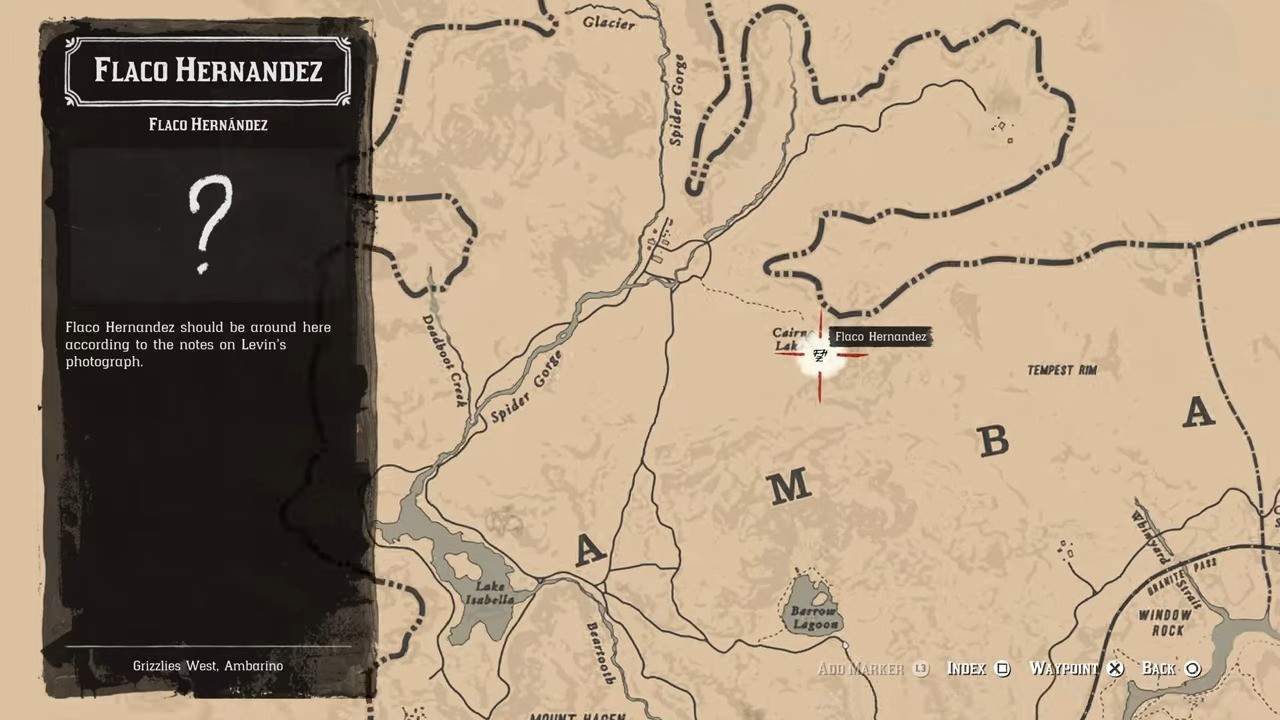
Flaco Hernandez is found in Grizzlies West in Ambarino. Make your way to the marker on the map above. Here, you’ll come across a couple of individuals who’ll point you to his cabin. Upon approaching him and asking him about Calloway. He’ll draw his pistol. Quickly take him out and loot his body for “Flaco’s Revolver” unique weapon. Take a picture of his corpse for Levin.
Emmet Granger
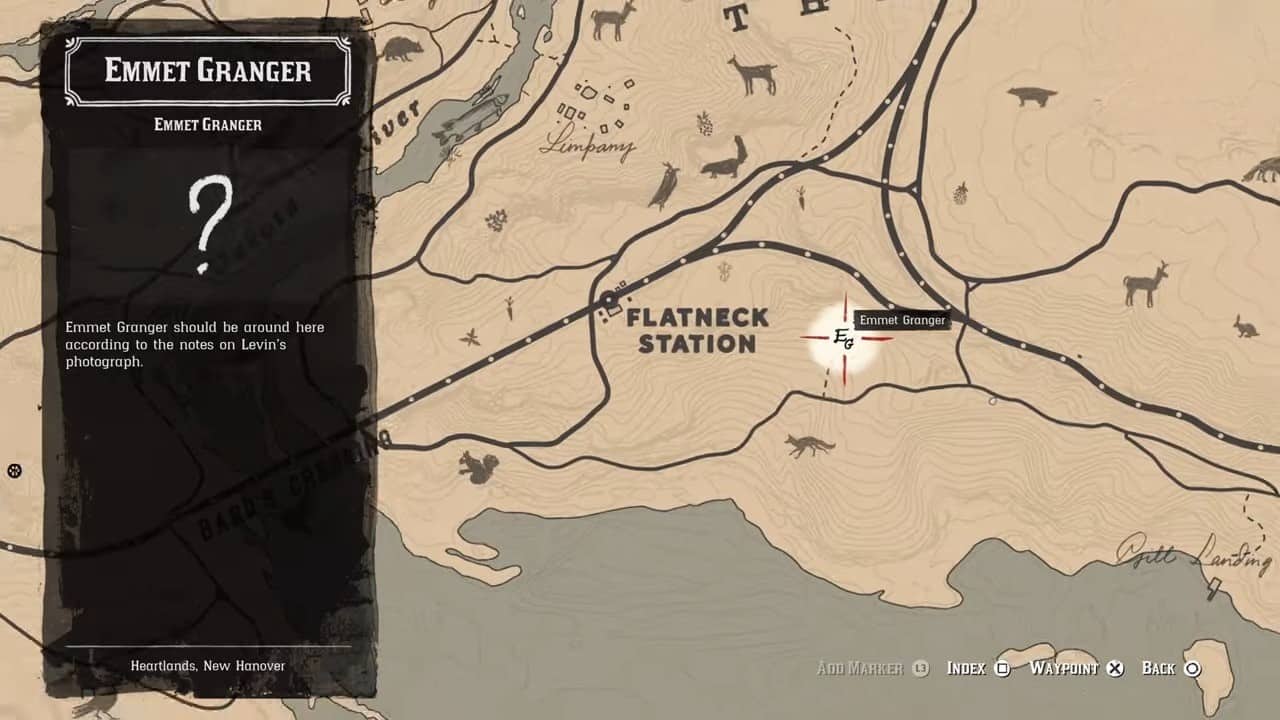
Emmet Granger can be found on his farm near Flatneck Station in New Hanover. He agrees to give you information on Calloway as long as you help him on the farm by shoveling some pig crap. After you help him, he refuses to give you any information.
Next, take a dynamite and place it on the crap you shoveled. This’ll cause both Granger and his farm to be covered in crap, which will result in him attacking you. Kill him to collect his unique weapon; Granger’s Revolver. Take a picture of his corpse for Levin.
Part II
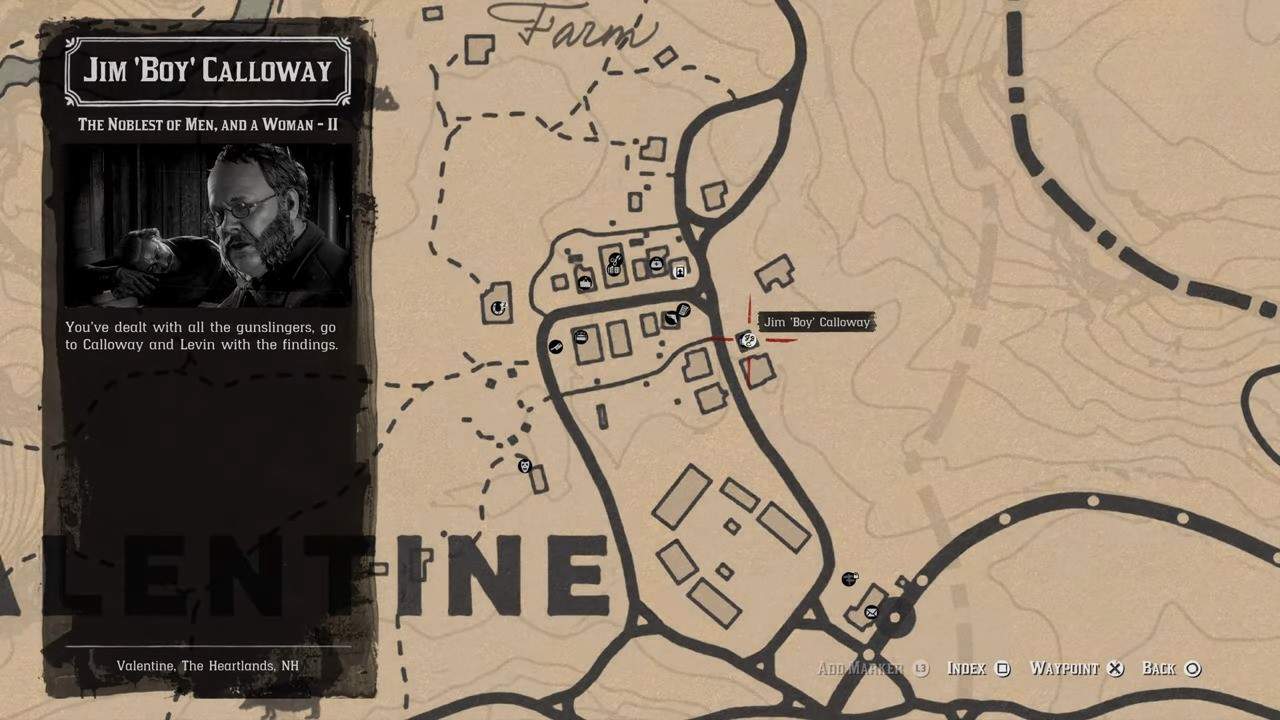
Once you’ve dealt with all four Gunslingers make your way back to the saloon in Valentine. When you get there both men will have left. The barkeeper will tell you that they went to Saint-Denis.
Part III
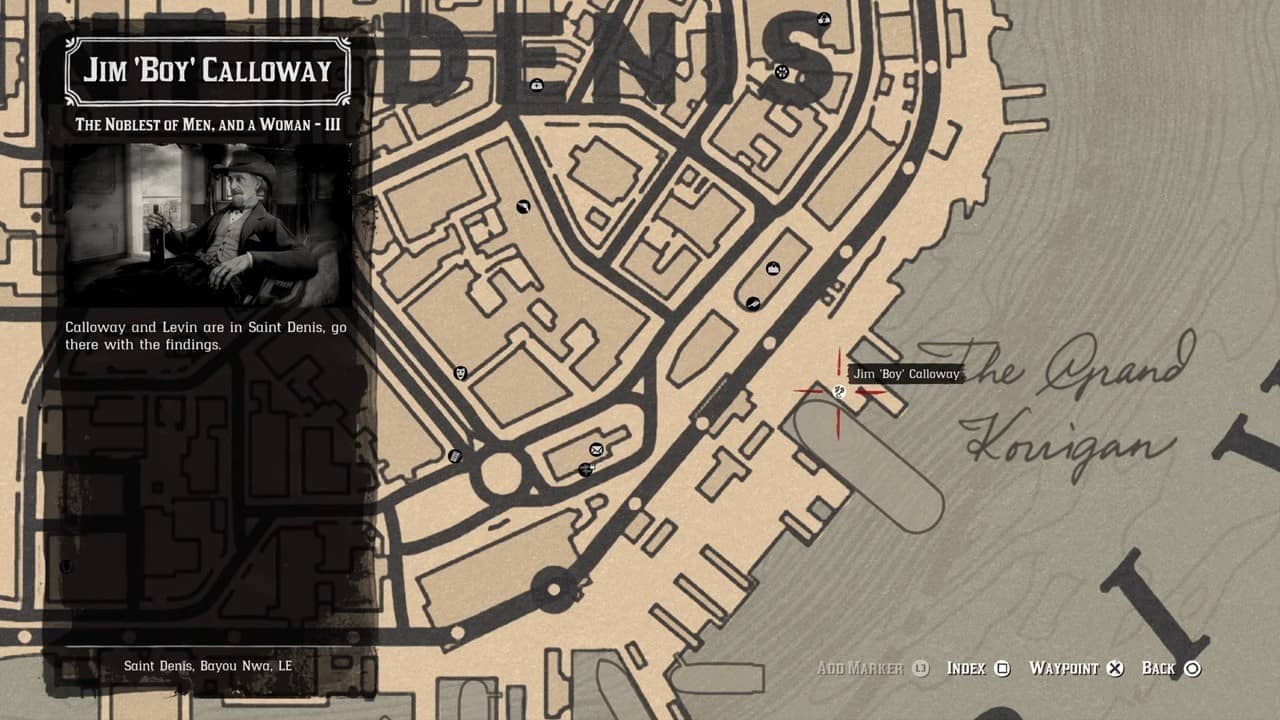
Once you’ve reached chapter 4, make your way to the boat in Sant-Denis to meet with Calloway and Levin. Hearing of Arthur’s murder of the three gunslingers, Levin suggests that the credit for their deaths be given to Calloway. Calloway refuses saying he won’t take credit for anything he didn’t do, instead, he asks Arthur to locate his former rival Slim Grant so he can prove his worth.
Part IV
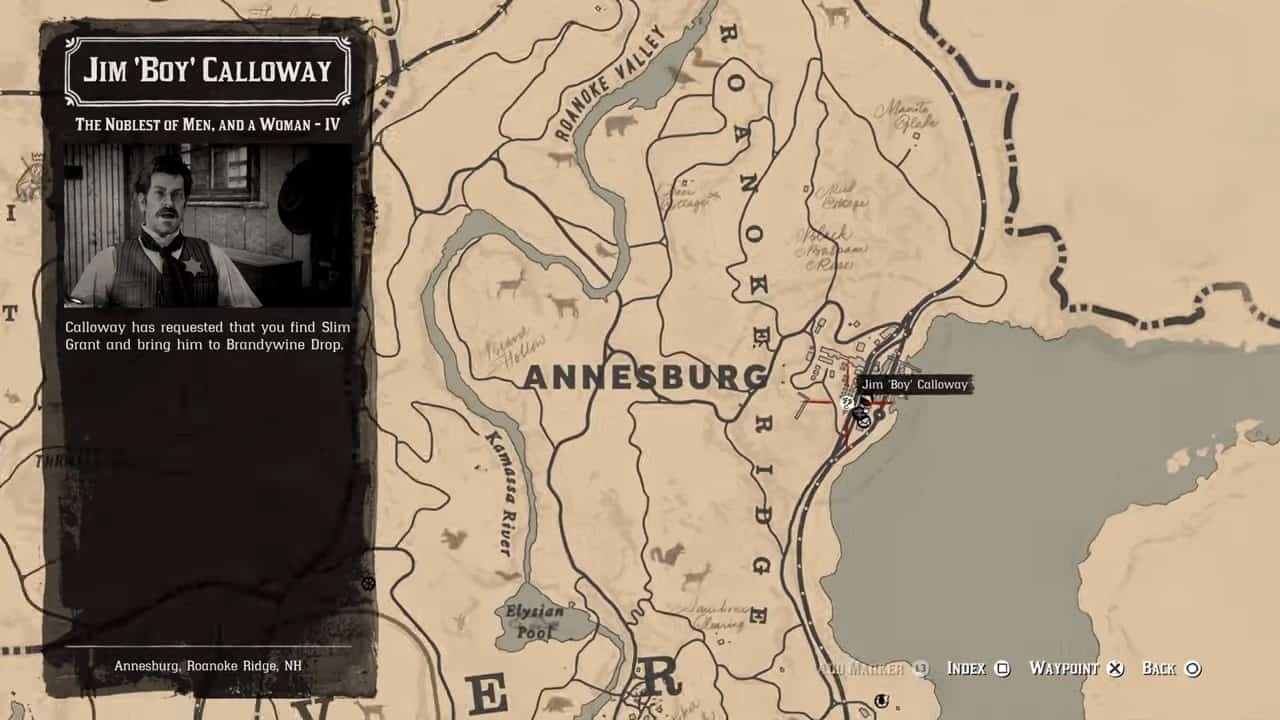
Talk to the deputy in Annesburg to locate Slim Grant. He’ll reveal that Slim Grant, who’s now the Sheriff of Annesburg went out a couple of days ago, hunting some bandits. He asks Arthur to look for him. Go to the location marked on your mini-map, take out all the bandits and free Grant who’ll be tied to a tree.
Next, put him on your horse and take him to the area marked on your mini-map. When Calloway gets there, he challenges him to duel but Grant doesn’t comply. Calloway kills him anyway and then turns on Arthur. Defeat him in the ensuing duel and pick up his weapon to finish this Stranger Missions chain in RDR2.
The Smell of the Grease Paint
The Smell of the Grease Paint does not have any requirements and can be accessed from the get-go. It has two parts.
Part I
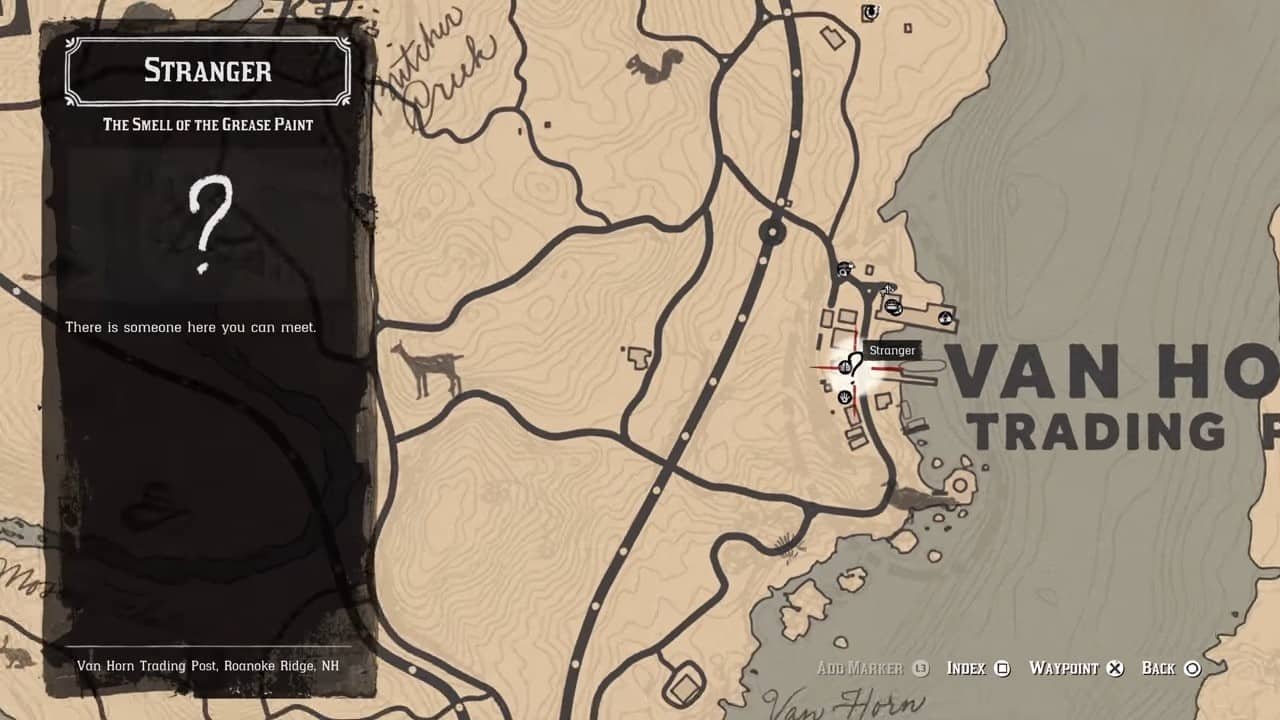
Head over to the saloon at the Van Horn Trading Post to begin this Stranger Missions chain in RDR2. In the Saloon you’ll meet Ms. Marjorie, the head of a freakshow act. One of her Freak’s named Bertram, with half a head soon attacks the barkeeper. You’ll have to punch out Bertram to get him to calm down. Before she leaves Ms. Marjorie will ask you to locate Magnifico the magician who has gone missing.
Part II
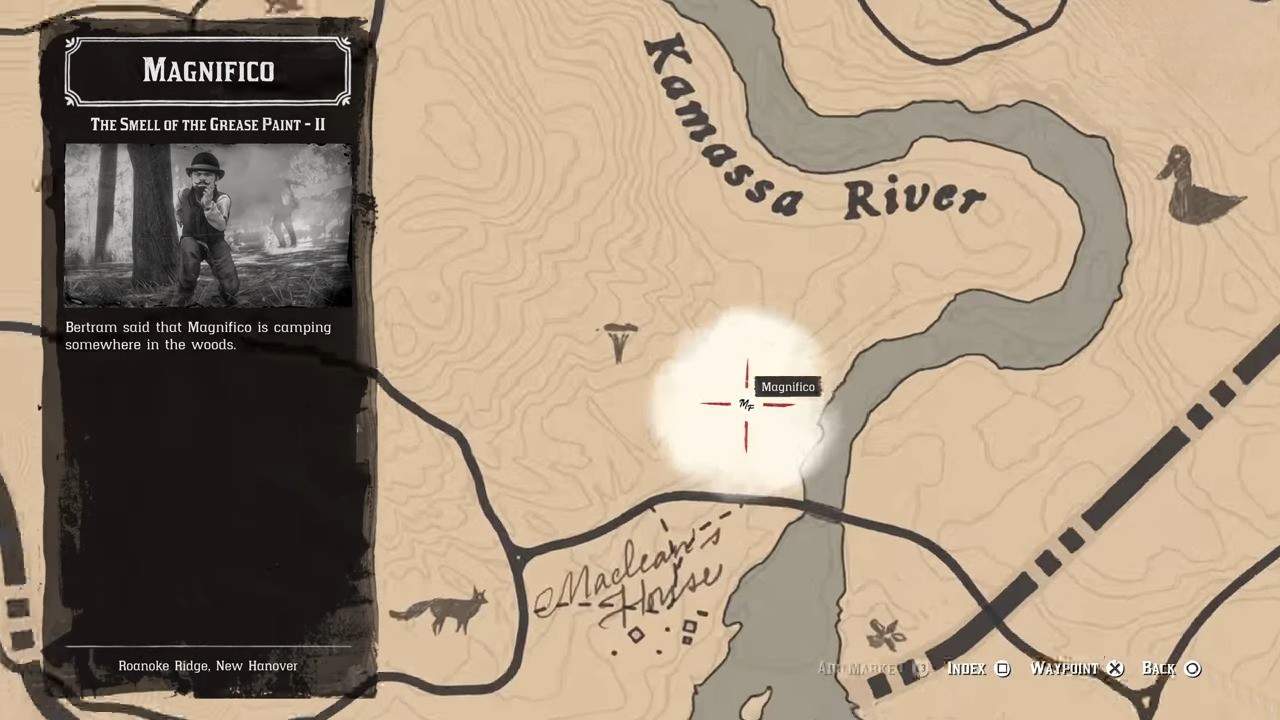
Magnifico can be found in Roanoke Ridge near Kamassa River in New Hanover. Upon approaching him, he’ll tell you that Ms. Marjorie is cruel and that he does not want to go back to her. Soon after he starts using magic tricks to evade you. Follow his trail and make use of Eagle Eye where necessary until Ms. Marjorie appears and takes him away.
The Ties That Bind Us
The Ties That Bind Us becomes available after the completion of the Chapter 4 mission “The Joys of Civilization”. Depending on how you play this Stranger Missions Chain it can have two or five parts in RDR2.
Part I
This mission chain can be started by heading to the big tree by the train tracks in Rhodes. Here you’ll encounter two prison escapees, Mr. White and Mr. Black. They ask you to help them out by taking down their bounty posters that have been plastered all over Rhodes. The posters can be found in the following locations:
| Poster | Location |
|---|---|
| Poster #1 | Sheriff’s notice board, right next to the police station. |
| Poster #2 | Picked up by another bounty hunter, kill him to obtain the poster. |
| Poster #3 | Post Office notice board. |
| Poster #4 | Telephone poll with a mean leaning on it. |
| Poster #5 | On a pole at the end of the main street. |
Once you have all five posters, the mission ends.
Part II
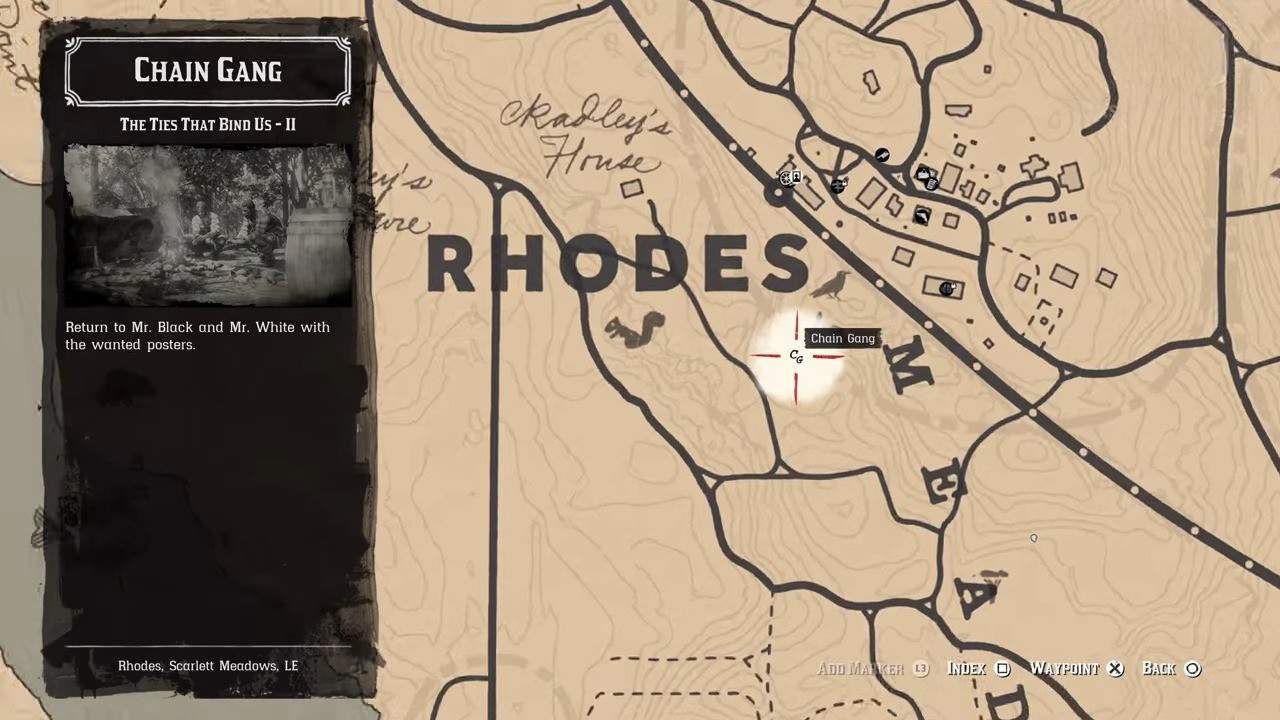
The men will now be found a little farther away from their initial position. Here, you have two choices. You can either burn the posters or capture the fugitives. if you choose the former, you’ll meet both of them again, if you choose the latter, you’ll have to deliver both of them to Rhodes’ Police Station. This option also ends this Stranger Mission here.
Parts III and IV
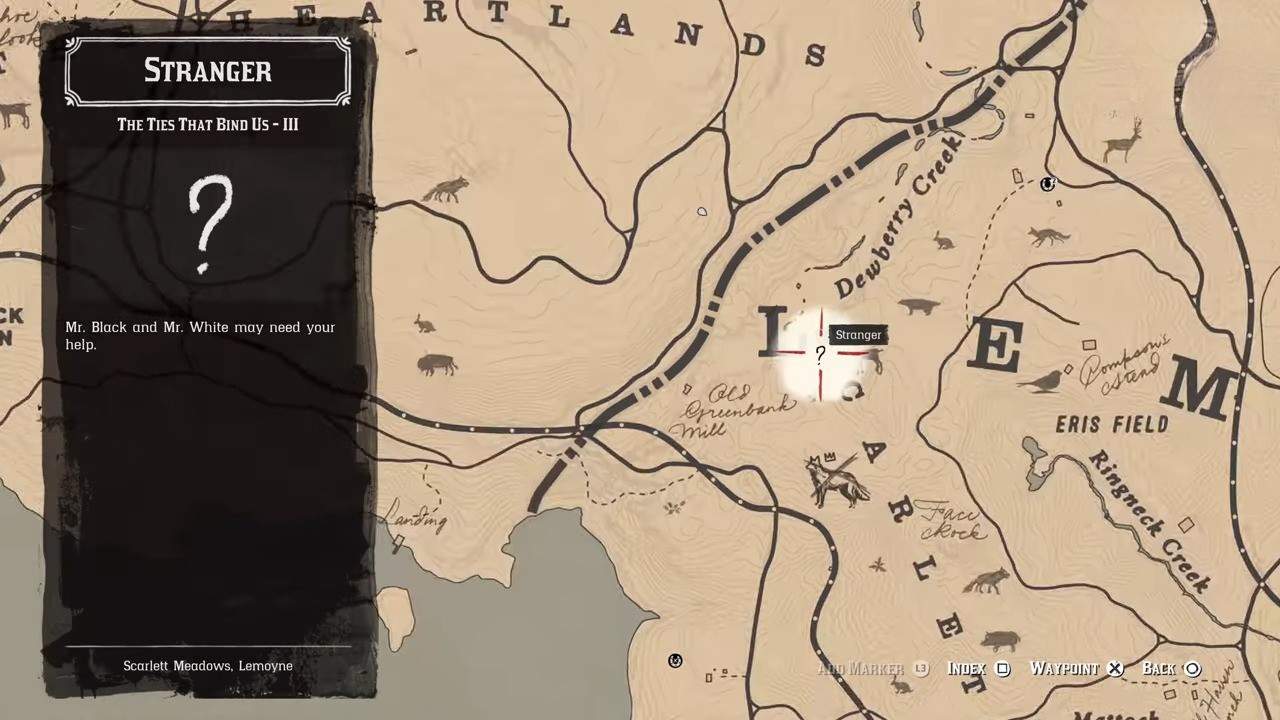
Parts III and IV take place simultaneously. Head to the Scarlet Meadows in Lemoyne to meet with Mr. White and Mr. Black again. When you get there, you’ll discover that both men are extremely sick and need medicine. They’ll then ask you for medicine. This concludes Part III.
If you have the medicine you can give it to them there and then to end Part IV. If not, just go to the nearest General Store or Doctor to buy a health cure.
Part V
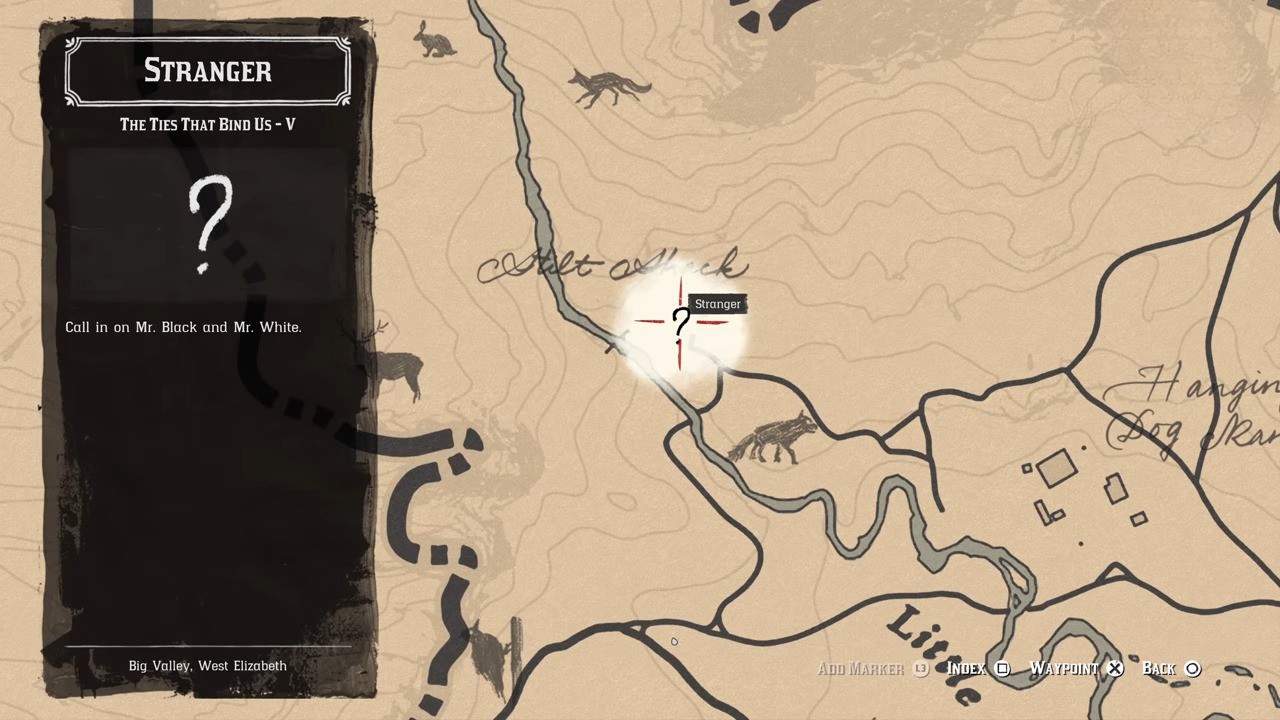
To wrap up this Mission chain head to the area marked on the map above in Big Valley, West Elizabeth. Here you’ll find both men living freely in a small cabin.
The Veteran
The Veteran becomes available right after you finish Chapter 5. It has a total of four parts.
Part I
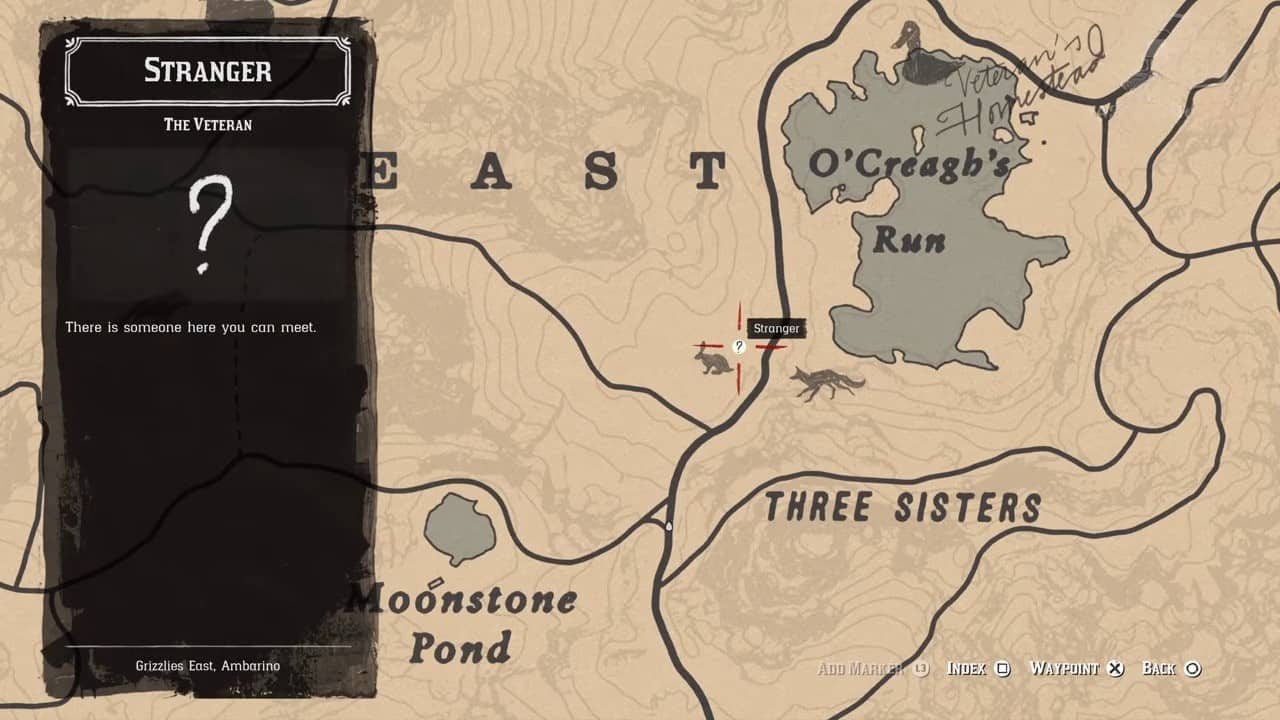
To start the first mission in this chain head to the location marked above on O’Creagh’s Run. Here you’ll find Hamish Sinclair, a war veteran with a prosthetic leg, whose horse threw him off and ran away. He asks Arthur to look for it. Use your Eagle Senses to locate the horse, who’s just by the lake. Calm it down then bring it back to Hamish to finish this mission.
Part II
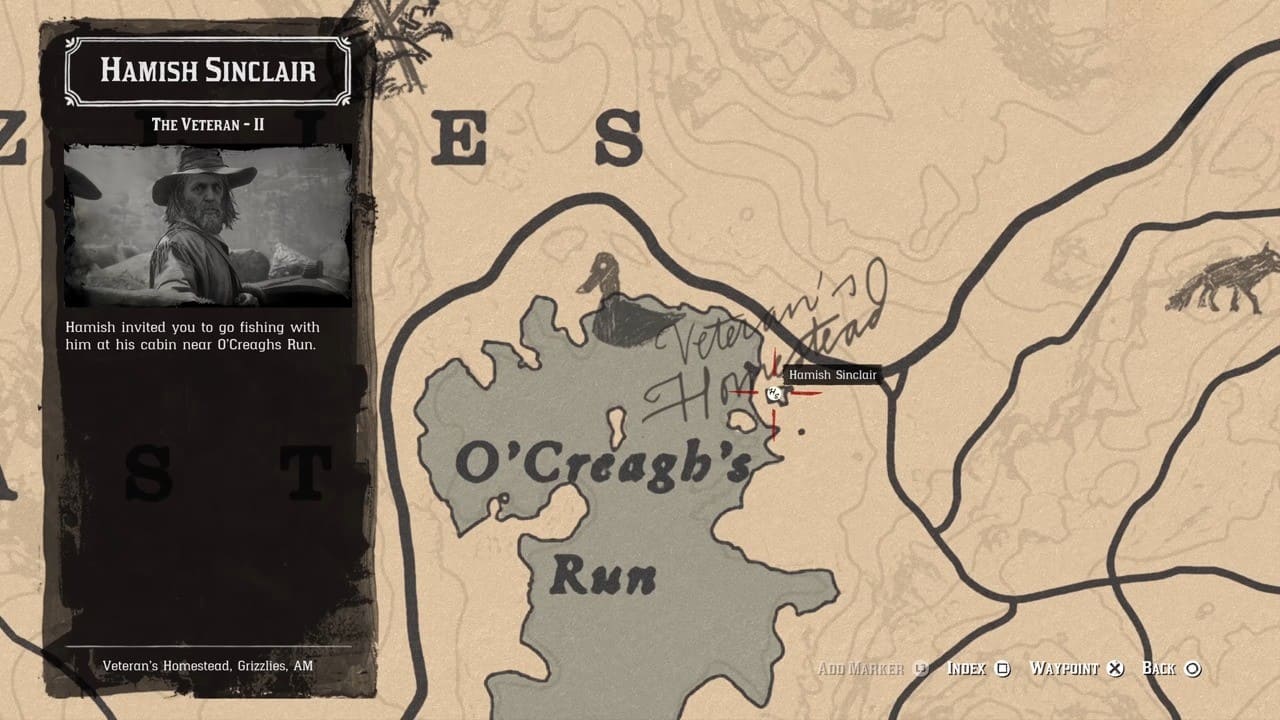
At the end of the first mission, Hamish asks you to join him for fishing. Make your way to his homestead, marked on the map image above to begin the second mission. Get in his boat and row it to the middle of O’Creagh’s Run. Continue fishing until the prompt to move to the next location pops up. The mission ends when Arthur catches a big fish.
Part III
Make your way back to Hamish’s homestead to initiate Part III. This time around, you’ll go hunting with him. Follow Hamish until he takes you to a second location. Use your Eagle Eye to track down the wolves and hunt them using your sniper rifle.
Part IV
For the last part of this quest go back to Hamish’s homestead once more. He’ll tell you of a boar that’s been spotted around his property that needs to be taken down. Run after it and keep on its trail until you reach the yellow marker. Once you do, Hamish will join you with the horses. Get on the horse and follow Hamish until he suggests that you two split up.
Head to your designated location marked on your mini-map and investigate the wolf corpse you discover. As you’re surveying it, you’ll hear gunshots in the distance, when you go to their source, you’ll discover Hamish, bleeding out on the ground, from injuries caused by the boar. The boar will then attack you. Take it out using Dead Eye to finish the mission chain.
The Wisdom of the Elders
The Wisdom of the Elders stranger missions chain in RDR2 becomes available after you complete the Chapter 5 mission “Fleeting Joy”. It has a total of five parts.
Part I
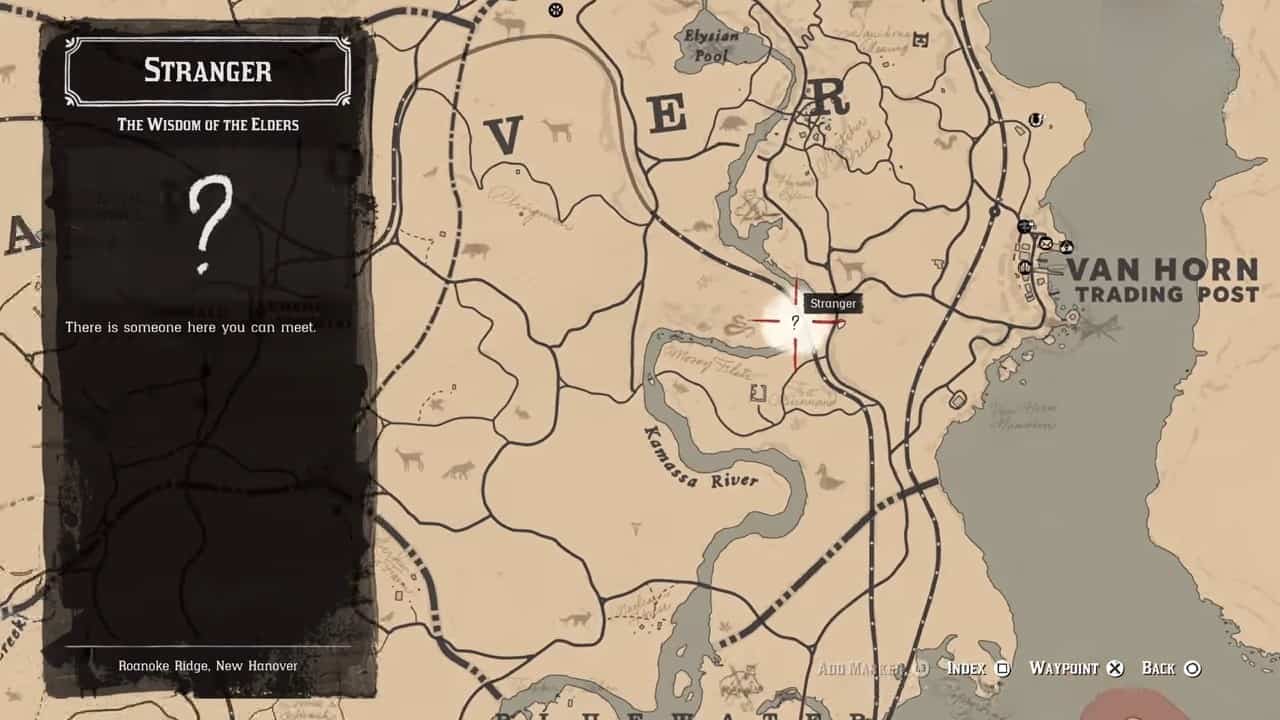
To start the first mission, make your way to the area marked on the map above in New Hanover. Here you’ll meet distressed men who’ll tell you there’s something in him. he’ll also point towards and tell you where to go; Butchers Creek. Saddle him to your horse and make your way to the aforementioned area by following the yellow marker on your mini-map.
When you reach Butchers Creek, place him on the yellow marker, and converse with the man present there, Obediah Hinton. The man you just saved will then try to attack you. Punch him once to pacify him and finish the mission.
Part II
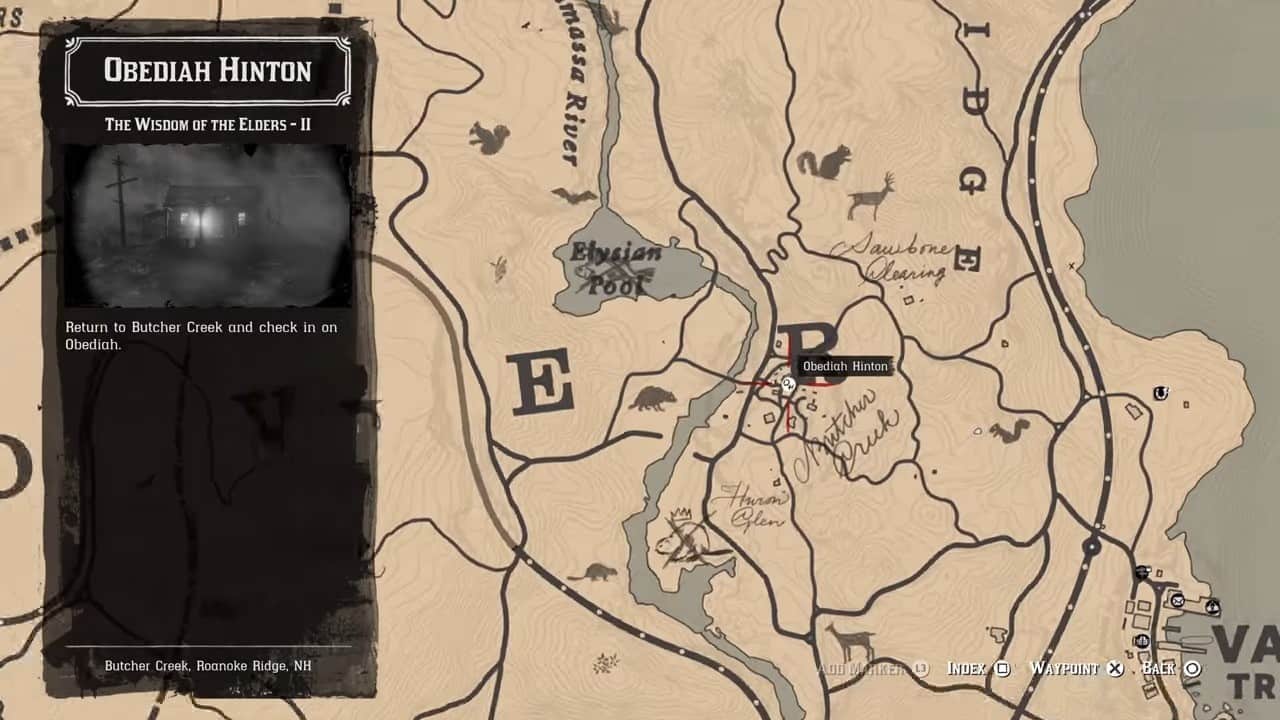
Return to Obediah Hinton to start the next part of this mission chain. When you talk to Obediah he’ll tell you to leave, claiming that there are demons present here. Soon after, a cry can be heard in the distance, investigating it reveals that it’s from a woman whose pigs are being attacked by a pack of rabid dogs. Kill the dogs and return to Obediah.
While Arthur tries to convince the village that the dogs aren’t demons, a Shaman appears claiming a curse has been put on Butchers Creek and the only way to lift it is to destroy 13 cursed charms around the village, he also claims the charms are impossible to destroy. The mission ends following this cutscene
Part III
For the third part of this quest, you have to find and destroy 13 cursed charms around Butchers Creek. They can be found in the trees and require a single shot to be destroyed. These charms are marked with a red icon on your mini-map.
Part IV
For the fourth part, head back to Obediah’s house and tell him that all the charms have been destroyed. The Shaman will then claim that Arthur has set the demons loose and has exacerbated the problem. He then runs off telling the village that he has to convene with the spirits of his ancestors.
Part V
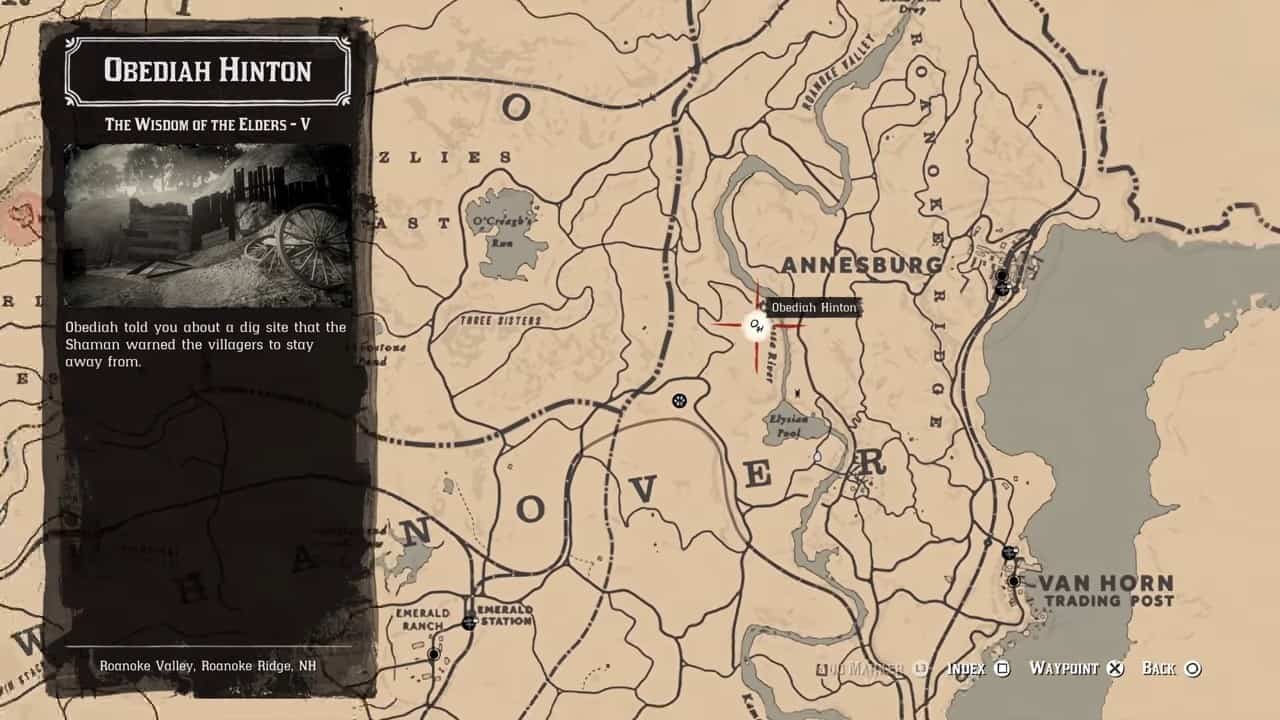
At the end of the previous mission, Obediah tells Arthur about a dig site that the Shaman had forbidden the people of Butchers Creek from. Make your way to the marker to investigate the mine. Follow the path until you come upon a room with a mysterious brown liquid. The liquid turns out to be poison.
Soon after, Arthur hears rustling in the distance, and as soon as he goes to investigate who caused it, they blow up the path forward. There’ll be a small opening in the wall right next to the blocked path. Use it to reach the outside. At this point Arthur will be poisoned so make sure you keep an antidote handy.
Next, make your way back to Butchers Creek and confront the Shaman. Following a cutscene that reveals the Shaman’s true intentions, the mission chain ends.
To the Ends of the Earth
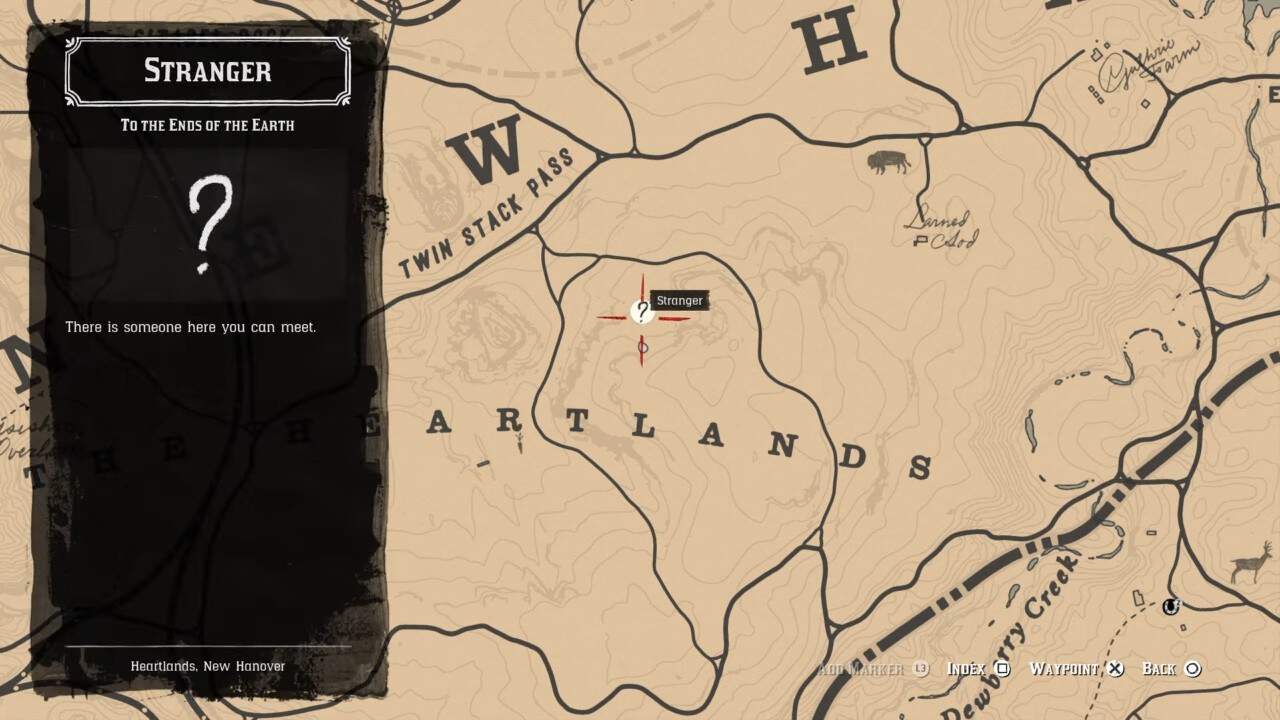
This stranger mission was added through a post-launch update and you can access it from the get-go. The NPC present there will ask you to bring him some Yarrow. When you do, he’ll craft you a healing potion that you can use whenever you please.