If you are reading this, it means that you have been having trouble completing the easter egg steps of the Firebase Z map. Worry not though. This Cold War easter egg is not that complicated compared to the ones from earlier games. You just need to follow the steps given out below and adhere to their instructions, and you will be facing the elderly god Orda in Cold War Zombies in no time.
How to complete the Firebase Z Easter Egg in Cold War
Before venturing out into the dead, there are a few things that players must know. The Easter Egg can be completed solo as well as with friends. You can begin as soon as you spawn in the game but not before equipping yourself with the right set of ammo mods and weapons.
With that out of the way, let’s begin this guide!
Step 1: Speak with Ravaenoff
After spawning, head over to the Pack-a-Pack machine found in the center of the map. Next to the PaP machine, you’ll spot Ravenoff. Interact with him to begin the Easter Egg.
As soon as you interact with Ravenoff, three white markers will be displayed on your HUD. These markers will take you to the three Aethereum reactors that need to be fed zombies. That will turn on the power to the whole map and unlock the Pack-a-Punch machine in Firebase Z.
Once the first step is complete, return to Ravenoff and speak with him once again. After the conversation ends, speak with Dr Peck at the Mission Control area. Interact with him and return to Ravenoff to receive a Keycard to traverse further with the Easter Egg.
Step 2: Collect the Serum
The Keycard that Ravenoff just provided you opens up three lockers around the map. Each locker contains a serum that must be infused together. The first locker can be found in the small room right in front of Ravenoff’s station.
The second locker can be spotted inside the Colonel’s Office on the western section of the spawn area. For the last locker, travel to the small indoor control room section of the spawn area. The locker will be placed in the eastern section.
Once all three serums are acquired, head over to the Field Hospital in Barracks to spot a vacuum cleaner on the corner desk. Approach the vacuum cleaner and insert all three serums to create the Truth Serum!
Once the infusion process is complete, your next objective will be to carry the vacuum cleaner and take it over to the rooftop of the Mission Control building. Place the serum-infused vacuum on the AC vent and wait for a couple of seconds until the serum fully flows through the vents.
This will cause the serum to spread throughout Dr Peck’s workstation making him spill the truth on what’s truly happening in Firebase Z. Pay Dr Peck a visit once again to figure out the next step.
The demented doctor will instruct you to head on over to the Data Center building and start the process of trapping Mimics. The Data Center building is located in the center of the map with a huge antenna on top of it.
Step 3: Trap Mimics
After entering the Data Center building, run alongside the computer on the left-hand side of the wall to trigger a quote from Dr Peck. Upon doing so, a green-colored terminal will power up and provide you with Mimic traps. These Mimic traps will replace your nonlethals and act as Pokeballs.
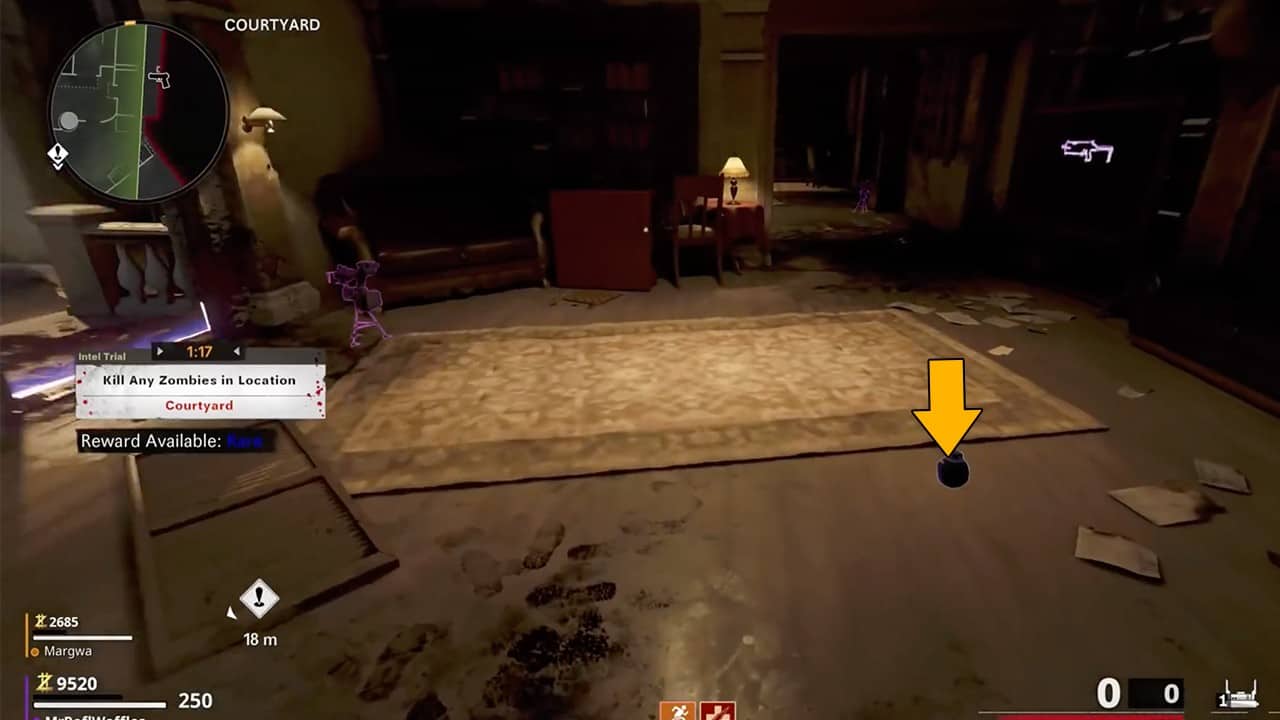
Once the traps are acquired, now all that’s left to do is hunt for a few Mimics and capture them using the Mimic Traps. An important thing to note here is that Mimics tend to spawn randomly on the map of Firebase Z unless players step on a Mimic item.
These items are in the shape of grenades lying around the map as shown in the image below.

Some possible locations for these Mimic items are:
- Village Spawn
- In front of the weapons lab, near the motor pool
- Motor pool office
- Planning offices
- Jug Machine (spread out in this zone)
To capture the Mimic, players must first lower the health of these tentacled zombies to at least 25%. Once a Mimic is in low health, throw the trap at it to capture the horrifying creature. Once the creature is captured, take the trap back to the Data Center and insert it in the green terminal.
If the machine responds with either one of the following names: Sokolov, Brahms, and Zabim, then you’ve got the right Mimic. This means that you must repeat the process two more times until all three named Mimics are captured.
Successfully acquiring all three Mimics will reward a floppy disk that players must use to further progress with the Firebase Z Easter Egg in Cold War Zombies.
Step 4: Take the floppy disk to the Planning Office
Now that you’ve acquired the floppy disk, take it to the Planning Office building. In the office, you’ll spot a machine placed on the left side of the wall. Simply approach the machine and insert the floppy disk.
Upon doing so, you’ll be instructed to head to the Omega Portal Chamber to view a portal forming. Once the portal spawns, return to Dr Peck to have a chat.
Peck will inform you about collecting Aethereum Crystals which are found by digging up Aetherium canisters. He will also provide you with a code that will be used to unlock a locker. Unlocking the locker will provide you with a device that will help you locate the Aetherium canisters.
The locker will be placed right next to his workstation, simply approach the locker and acquire the device. Upon acquiring the device, your objective will be changed to finding three Aethereum Cannisters around the map.
For your ease, we’ve mentioned all three locations of the canisters and how you can get them in Firebase Z.
Aethereum Cannister 1
The first canister can be found in the corner of the map in the Defense area. Simply look for a pile of dirt in the corner of the map. Approach the trail of dirt and listen for a beeping sound. If you’re near the first Aethereum canister, the beeping will increase until a prompt shows up to Dig.
Use a shovel to dig up the canister from the dirt. As soon as the canister comes to surface level, it will create a giant green sphere around it. What you need to do is protect the Aethereum canister from the zombies rushing into the sphere
The lockdown process will last for a minute so try to Pack-A-Punch your weapons before going on with this step. Once the process is complete, you’re free to pick up the canister and begin finding the next one.
Aethereum Canister 2
The second Aethereum canister is placed next to the Planning Office building in the open lot. Follow the same process of listening to the beeping sound and digging it up. Upon digging the canister out, it’ll start spawning multiple clones around the area.
What you need to do is look for the Aethereum canister that is emitting white smoke. Spot the correct one and collect it to acquire the second canister.
Aethereum Canister 3
For the last Aethereum canister, players need to acquire the RAI-K84 wonder weapon. The wonder weapon can be unlocked from the Mystery Boxes, the golden chests for completing the trials, or simply by collecting the parts to build it in Firebase Z.
After the RAI-K84 is acquired, head on over to the staircase for the Data Center building to start hearing the beeping sound. Follow it until the prompt to dig it up appears. As soon as you dig up the canister, it will start to teleport when you come near it.
Maintain a safe distance from the canister and shoot at it with the alternate fire of the RAI-K84. Using the alternate fire will form a small circle above the Aethereum canister and stop it from teleporting. Now you’re free to collect the last Aetherium canister.
Step 5: Insert the canisters into the Aethereum reactors
With all three of the Aethereum canisters, head over to the three Aethereum reactors you visited earlier in Step 1 and deposit one canister in each. This will cause the power to overload and a small cutscene will play.
The next part of this step is to travel over to the OPC building and have another glance at the blue portal. A small dialogue will roll out and you’ll be tasked to visit Dr Peck one last time.
As soon as you go to have a chat with Peck, you’ll find out that he’s closed his workstation. Wait for 30 seconds around the workstation until another dialogue rolls out.
The dialogue will be between you and your members and it will be regarding the linking of satellites which is also the next step of the Easter Egg.
Step 6: Link the satellites
This is the last step for the Firebase Z Easter Egg before the boss battle begins in Call of Duty: Cold War Zombies. To link the satellites, interact with the computer placed on the desk of the Planning Office building.
The computer will begin a mini-game where you’ll be assigned a blue dot. What you need to do is hover over the yellow dot that reveals a question mark instead of a flag of America or Russia. Once the question mark appears, press X to link the satellites.
Once the satellites are linked, Visit the OPC building and interact with the computer terminal to teleport to the final boss fight with Orda in Cold War Zombies. However, before heading on into the fight, it is advised to upgrade your weapons and gear.
Step 7: Defeat Orda
After being teleported back to the spawn area, the boss fight with Orda will begin. Orda is an elderly god that can spawn regular and special zombies such as Mimics and Manglers.
The fight will take place in three phases and each phase will cause Orda to spawn more zombies.
To defeat Orda, the only strategy is to keep a safe distance from her and be on the lookout for the Manglers and Mimics. Use ranged weapons such as assault rifles and LMGs to deal damage to the boss and use the Shotgun to take out her minions.
Another thing to know about the boss fight is that you are free to roam around the Village spawn area. This can be truly useful to defend yourself from Orda’s grand slam which decreases your health drastically.
The boss fight will be fairly easy to navigate and upon defeating Orda, you’ll be rewarded with a cutscene that will mark an end to the Firebase Z Easter Egg in Cold War zombies.
