“Own the Roads” is another Most Wanted mission where you must disable several militia checkpoints to clear the streets in Batman: Arkham Knight. It is similar to the “Occupy Gotham” side mission where you need to neutralize the militia watchtowers controlling the skies of Gotham City.
There are a total of 20 roadblocks that need to be destroyed. Expect each checkpoint to be heavily fortified with armored soldiers, sentry guns, and vehicles. Once the area is cleared, interact with the commander’s body and destroy his checkpoint controller.
Destroying the roadblocks is one of the best ways of farming Upgrade Points. You get one WayneTech Point for clearing out each checkpoint in the game, so we recommend completing Own the Roads as soon as you unlock the mission at the start of Chapter 7. The location maps below will tell you where to go.
Bleake Island Roadblocks
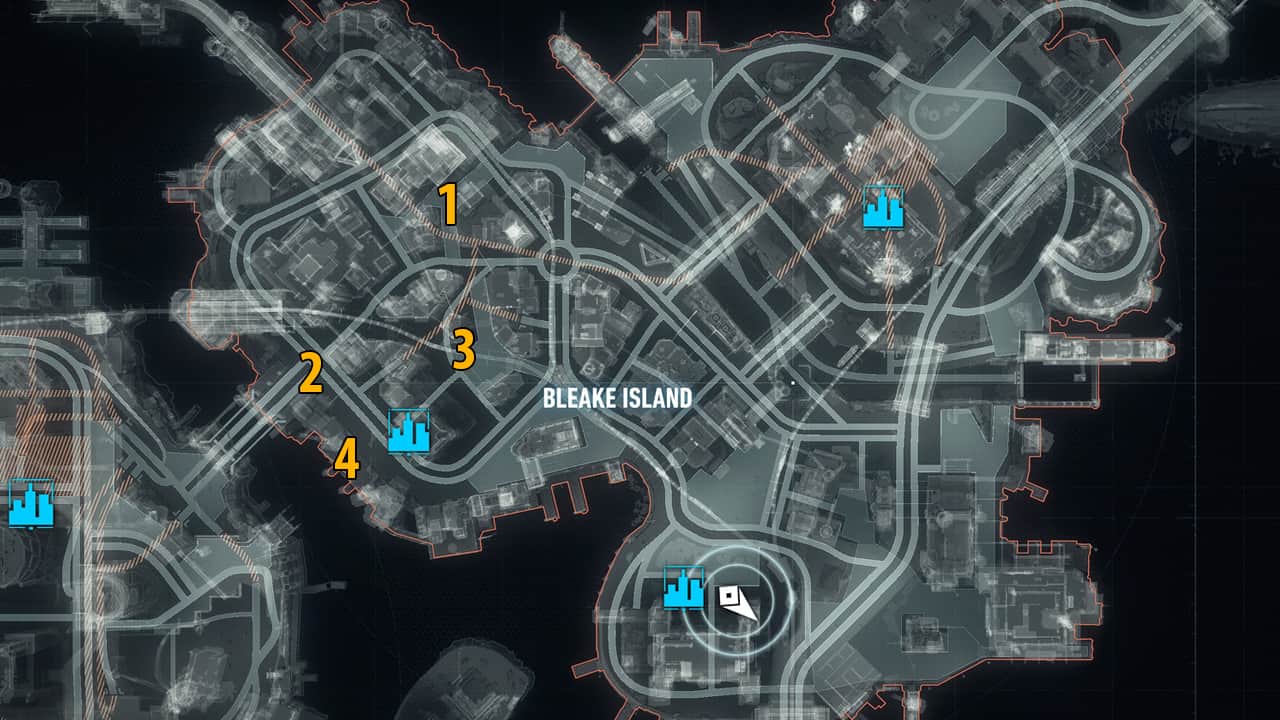
Checkpoint #1
Location: Chinatown, south of Scarecrow’s safe house.
Coordinates: 1759, 2268
3 Sentry Guns protect the checkpoint commander. Use the Remote Hacking Device to blind the one on the outer side and sneak up to the one on the other side to destroy it. lastly, destroy the one in the center. After destroying the last one, a Silent Takedown can be performed on the commander.
Checkpoint #2
Location: Chinatown, next to Perdition Bridge.
Coordinates: 1956, 2322
Start by eliminating the soldiers and a brute posted on the balconies next, use the Remote Hacking Device to turn the security access panel off.
Head inside the newly opened area on the right side of the building and perform a Ledge Takedown on the soldier on the ledge before disposing of the commander inside.
Checkpoint #3
Location: Chinatown, next to Tattoo Parlor.
Coordinates: 2055, 2066
This checkpoint is located on the north of the Clock Tower in Batman: Arkham Knight. It is protected by 2 Sentry Guns along the north wall.
Inside the walls, you will come across 16 thugs including 2 Medics, 2 Brutes, 2 Combat Experts, and 2 armed thugs. You can grapple up to a tightrope directly above the sentry guns. Use the Remote Hacking Device to blind one of the Sentry Guns and take both of them out while remaining in cover.
Now head outside and use Fear Multi-Takedown before knocking down the rest of the enemies and finishing them off one by one – the Medics first and the Brutes last.
Checkpoint #4
Location: Southeast of the Perdition bridge leading to Founders’ Island.
Coordinates: 2150, 2150
Head across the water and grapple up to one of the cranes above the soldiers. The best way to deal with this situation is by using the upgraded, Disruptor to sabotage the Drones.
Next, throw a Batarang near one of the Drones which will cause it to shoot and explode. This will also take down most of the enemies in the area. Now you can deal with the rest however you like.
Miagani Island Roadblocks

Checkpoint #1
Location: Bristol, east of the Penitence Bridge leading to Founders’ Island.
Coordinates: 2778, 2314
This checkpoint is weakly guarded by a single Brute and 5 unarmed thugs. Start with a Multi Fear-Takedown and deal with the rest by any means you find effective
Checkpoint #2
Location: Bristol, west of Mercy Bridge.
Coordinates: 2725, 2648
This checkpoint is protected by 7 unarmed soldiers and a Brute in Batman: Arkham Knight. While staying undetected, perform a Fear Multi-Takedown on the enemies to thin their ranks and finish off the commander.
Checkpoint #3
Location: Kingston, Ranelagh Ferry Terminal.
Coordinates: 2878, 2898
Even though you can approach this roadblock on foot, we recommend you take the Batmobile, drive halfway up the bridge, and take out the drones using the 60mm cannon of the Batmobile.
Then use the Riot Suppressor to deal with the soldiers before taking on the commander. Moreover, remember to check the crates hiding enemies inside.
Checkpoint #4
Location: Bristol, Elliot Memorial Hospital.
Coordinates: 2959, 2179
You should be able to see a small ramp along the road just to the east of this roadblock’s location. You can take the Batmobile up there to get a nice view of the location and make short work of the brutes and soldiers stationed there with the Riot Suppressor rounds.
Checkpoint #5
Location: Bristol, east of the Salvation Bridge.
Coordinates: 3134, 2005
Use the Batmobile and enter the area from either the northeast or southwest edge, but beware of the Shock Mines placed around the area. Deal with the soldiers inside and move to the commander to finish things off.
Checkpoint #6
Location: Kingston, Grand Avenue intersection.
Coordinates: 3166, 2243
This checkpoint is surrounded by 8 armed thugs and 2 drones. To deal with the drones, drive the Batmobile up the northeast bridge and take out the drones using the Heavy Cannon.
Grapple to a high point to deal with 3 armed soldiers using a Fear Multi-Takedown and then finish off the commander.
Checkpoint #7
Location: Bristol, On Grand Central Avenue opposite the Klyce Theatre.
Coordinates: 3175, 2571
This Own the Roads checkpoint is protected by 5 soldiers and 2 Medics. Start the brawl by disposing of the Medics. Or if you have the Disruptor upgrade, Sabotage the Medics and start with a Fear Multi-Takedown on soldiers. Next, locate the Commander using Detective Mode and destroy the communicator.
Checkpoint #8
Location: West of the south bridge between Wayne Tower and the Ferris wheel.
Coordinates: 3488, 2412
This roadblock is guarded by 6 armed soldiers consisting of a Boa Sentry Drone Operator protecting the checkpoint near the west of the south bridge. Use the Remote Hacking Device to sabotage the B
Start the brawl from the south side and use Silent Takedowns to deal with 2 lone soldiers and move to the west side to deal with 4 more; one at a time using Fear Multi-Takedown.
Founders’ Island Roadblocks
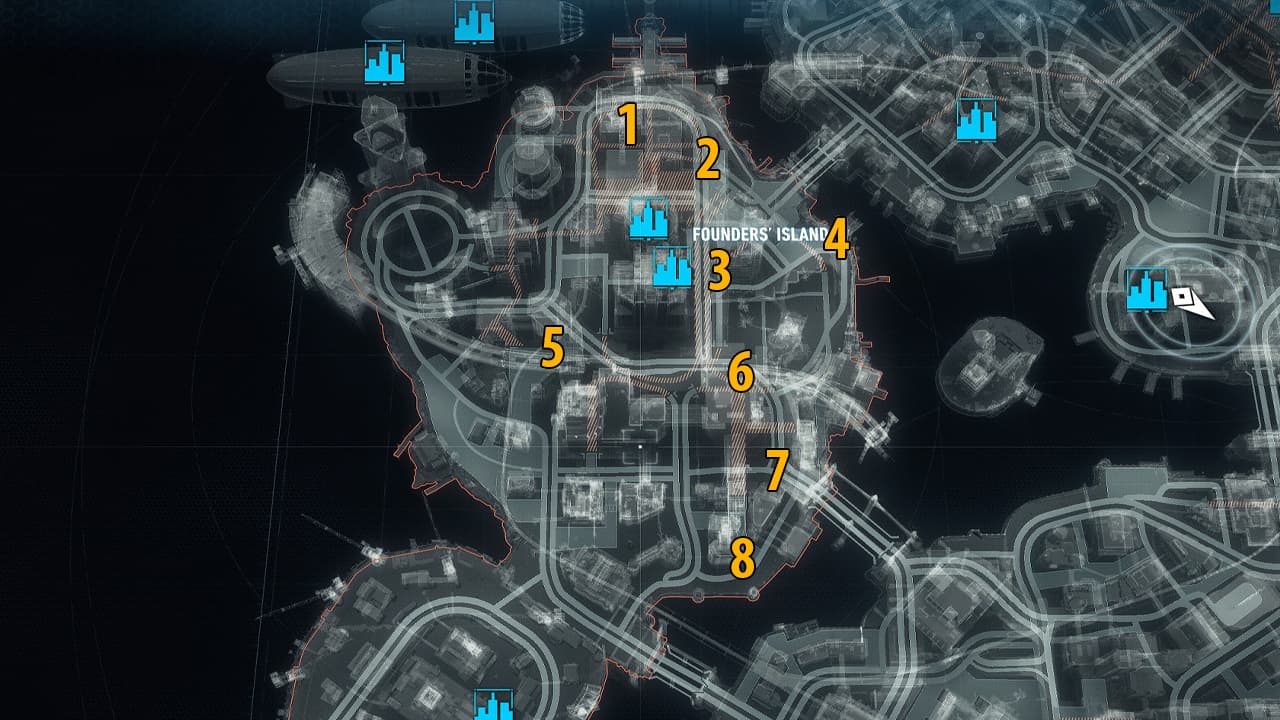
Checkpoint #1
Location: Ryker Heights, the base of the City Vision Construction building.
Coordinates: 2047, 1634
This checkpoint is protected by a Checkpoint Drone and 5 armed thugs in Batman: Arkham Knight. Head over to the north side and grapple to the left side of the wall to find a security access panel that can be used to open the gate and bring the Batmobile in to take care of the Drone. Once this is done, use the Riot Suppressor to deal with the armed soldiers and then look for the commander.
Checkpoint #2
Location: Drescher, east of City Vision Construction.
Coordinates: 2127, 1802
Grapple up to the raised walls of the Roadblock and start with a Fear Multi-Takedown on the soldiers. You will encounter 4 soldiers and 4 Combat Experts inside. Avoid getting hit by the Stun Sticks and use the Remote Electrical Charge to deal with them.
Checkpoint #3
Location: Drescher, below the Perdition Bridge.
Coordinates: 2264, 1850
Head over to the northwest edge and use the Power Winch to destroy a weak wall followed by using the Batmobile to destroy the Sentry Guns and soldiers inside the wall. Once you have taken care of everything, find the commander and dispose of the controller.
Checkpoint #4
Location: Drescher, southeast of Perdition Bridge.
Coordinates: 2259, 2012
Start things off with a Fear Multi-Takedown and begin the brawl with 7 soldiers, 2 Brutes, and 2 armed soldiers. I recommend dealing with the armed men before anything else. Once the regular enemies are down you can perform a beatdown on the brute to finish him off before looking for the commander.
Checkpoint #5
Location: Ryker Heights, south of Wayne International Plaza.
Coordinates: 2543, 1777
This Own the Roads roadblock is protected by 6 Checkpoint Drones and a handful of armed soldiers. To deal with everything, drive the Batmobile to the north wall and grapple onto the overhead power cable.
Use the Remote Hacking Device to toggle the remote switch to open the area for the Batmobile and use your Heavy Cannon to destroy the Checkpoint Drones followed by disposing of the thugs and the commander.
Checkpoint #6
Location: Otisburg, northeast at T-intersection.
Coordinates: 2539, 1774
To start things, use your Fear Multi-Takedown to thin the ranks of 5 armed soldiers near the north side of the area before looking for the commander and destroying the controller.
Checkpoint #7
Location: Otisburg, next to Amertek building.
Coordinates: 2856, 1882
A squad of 9 soldiers and a Brute stand on guard at this Own the Roads checkpoint. Grapple up to the wall of the roadblock and use your Fear Multi-Takedown to thin the enemy ranks and dispose of the soldiers in a smooth Freeflow combat sequence before looking for the commander.
Checkpoint #8
Location: Otisburg, south of Penitence Bridge.
Coordinates: 2516, 1458
This checkpoint is protected by a handful of armed soldiers and a couple of them have the Stun Sticks in Batman: Arkham Knight. Once again you can simply take them out using a Fear Multi-Takedown and deal with one or two remaining at your leisure.