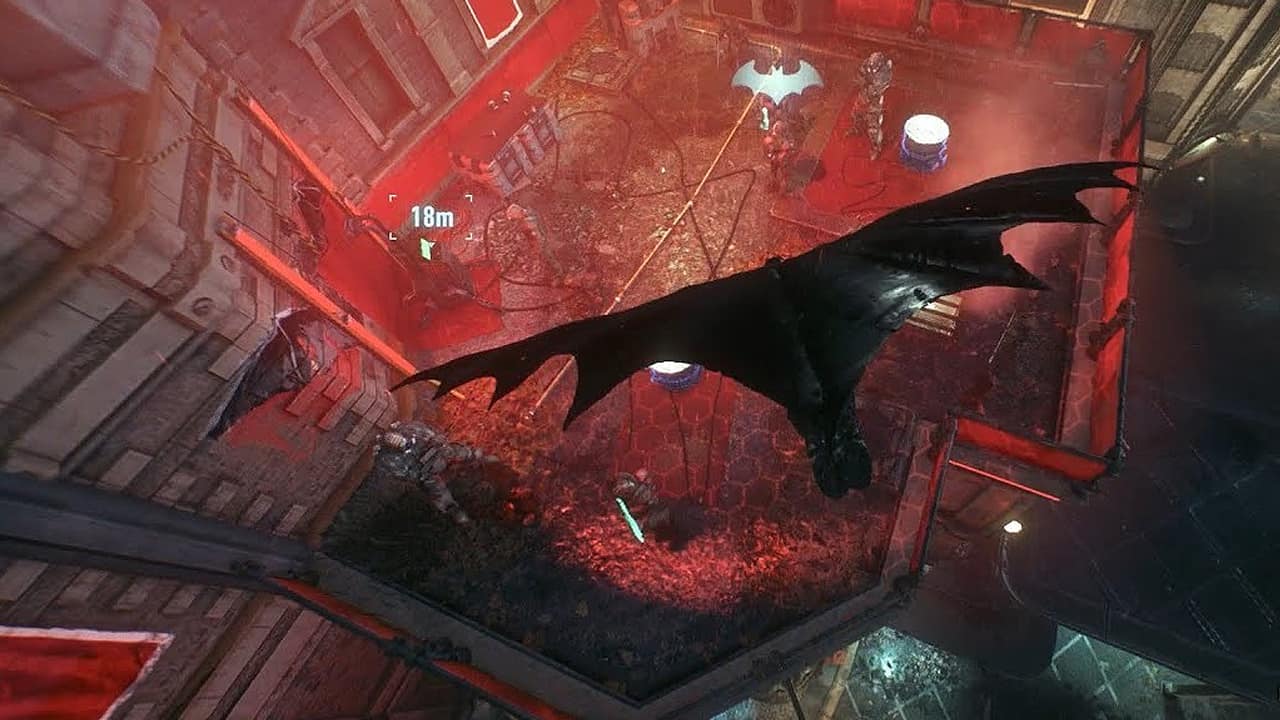
The militia sets up watchtowers near the end of Chapter 3 to control the skies of Gotham City in Batman: Arkham Knight. Your objective as part of the Occupy Gotham side mission will be to clear the fortified camps on the rooftops.
Unlike the checkpoints in the Own the Roads mission, you will have to rely on stealth to clear the watchtowers. Deactivate the drones (if any) to sneak past the soldiers and destroy the central command console using your Explosive Gel to demilitarize the area.
There are a total of 21 watchtowers for Occupy Gotham. Four of them will only become available after you reach the GCPD showdown in the main storyline. We recommend going after them as early as possible because you get free WayneTech Upgrade Points for completing the watchtowers.
Bleake Island
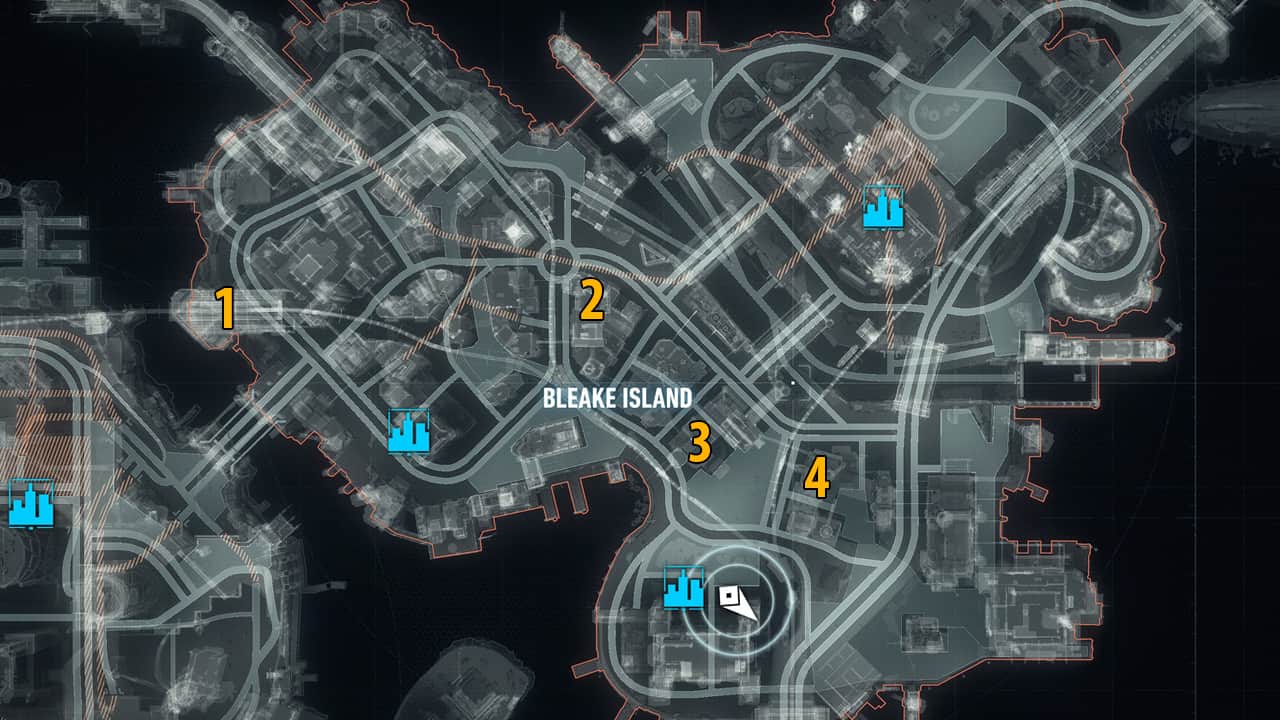
Watchtower #1
Location: Chinatown, west of Urbarail Station.
Coordinates: 1959, 1944
There are a couple of Gun Emplacements stationed outside the building with two unarmed soldiers inside. Glide toward the window and dive-kick the enemy before destroying the central command center.
Watchtower #2
Location: The Cauldron, southwest of the traffic circle.
Coordinates: 1922, 2471
This watchtower is one of the trickier ones you will find around in Batman: Arkham Knight. It is guarded by 7 armed enemies. Grapple to a high point on the south side and use the RHD to Sabotage the Boa drone operator then drop each soldier with a Silent Takedown or Fear Multi-Takedown before diverting your attention to the console. Make sure to take out the medic first so as not to let him revive his teammates.
Watchtower #3
Location: The Cauldron, opposite the police station.
Coordinates: 2130, 2614
Use the Remote Hacking Device to blind the optics on the sentry gun placed atop the watchtower. This gives you 60 seconds to deal with all the enemies present this includes 3 brutes, one with a shock stick. Make use of your Disruptor to disable the shock stick and make the fight a bit easier by dropping a smoke pellet.
Next, drop down to initiate a Fear Multi-Takedown before taking on the brutes. Now, all you need to do is focus on one brute at a time. Do a Cape Stun followed by a Beatdown while countering the attacks from other enemies. Do this for all the remaining enemies and you should be able to make it just before the Sentry gun comes back online.
Watchtower #4
Location: The Cauldron, roof of Sionis Industries.
Coordinates: 2198, 2779
This watchtower can be a pain to deal with given the tricky lineup of enemies, especially the minigunner. Use the RHD to Sabotage the Boa drone operator before anything else. Use the Disruptor to sabotage the guns of the armed enemies including the minigunner and Silent Takedowns to pick them up one by one and remember that 2 enemies have Optical Camo and won’t be detected by your Detective Mode.
Miagani Island
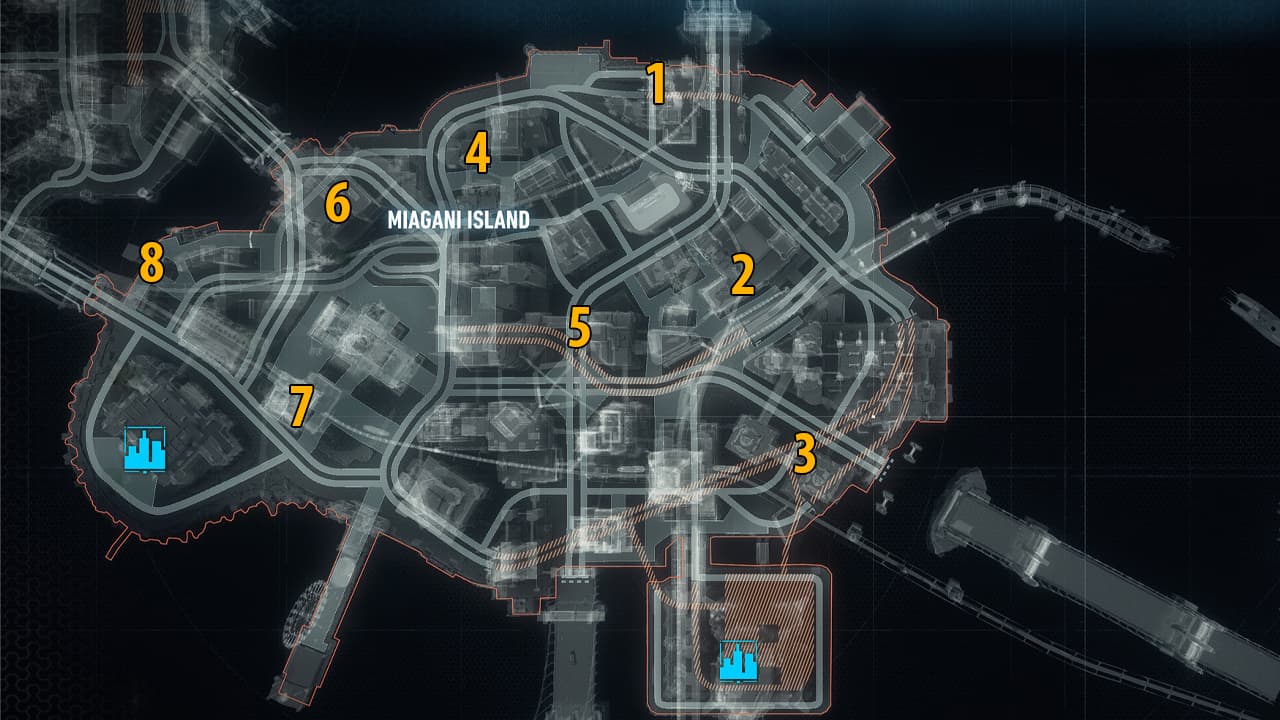
Watchtower #1
Location: Kingston, west of Mercy Bridge.
Coordinates: 2738, 2656
This ‘Occupy Gotham’ watchtower is best dealt with using a predator approach. Make sure to sabotage the guns of the minigunner and armed enemies.
Isolate enemies and use Silent Takedowns to eliminate them. Avoid being seen by the minigunner before taking out the rest of the enemies, then you can finish him off using a series of strikes by getting up close.
Watchtower #2
Location: Bristol, On the rooftop of the Bank of Gotham building.
Coordinates: 3034, 2824
There are two Gun Emplacements on the northeast edge in addition to 8 soldiers, 2 combat experts, a medic, and a brute as well as 3 Weapon Crates near the outskirts of the rooftop. Use the Disruptor to sabotage the weapon crates and medics then deal with the armed soldier before focusing on other enemies.
Watchtower #3
Location: Kingston, north of Wayne Tower.
Coordinates: 3315, 2870
Head north of the Wayne Tower and you will find this Watchtower on the east side of the Grand Avenue Station in Batman: Arkham Knight.
The tower is overlooked by 4 sentry guns. Although the soldiers are unarmed, you should consider shutting down one of the 2 turrets using the RHD before focusing on the enemies. Once all the enemies have been defeated, use Explosive Gel to take out the command console.
Watchtower #4
Location: Kingston, apartment building east of the hospital.
Coordinates: 2846, 2395
This watchtower is littered with several mines. Make sure to either avoid the mines or disarm them using your Disruptor. Blind the sentry guns using RHD and take out the enemies undetected with silent takedowns. Destroy the sentry gun before approaching the console.
Watchtower #5
Location: Kingston, north of Grand Avenue intersection.
Coordinates: 3120, 2528
This watchtower is located on a bridge near the north side of the Grand Avenue intersection. Blind the Sentry gun mounted on the tower while avoiding the ones on the ground. Once you have cleared the area proceed to the command console to shut it down before the sentry guns come back online.
Watchtower #6
Location: Bristol, roof of hospital.
Coordinates: 2941, 2158
Head to the northern area of Bristol near the Penitence Bridge. You will find this watchtower on the roof of Elliot Memorial Hospital protected by 2 turrets and has 2 command consoles.
Take out the less crowded console first to disable the turrets. Now, you can start the brawl with a Fear Multi-Takedown and Environmental Takedowns and save the brutes for the last.
Watchtower #7
Location: Bristol, Botanical Gardens.
Coordinates: 3252, 2571
For this watchtower in Batman: Arkham Knight, sabotage the Boa Sentry Operator before moving to other enemies. Take down the militia using Silent Takedowns and environmental knockouts using RHD or Explosive Gel.
Watchtower #8
Location: Bristol, east of Salvation Bridge.
Coordinates: 3005, 1865
Start with a Fear Multi-Takedown on the 5 regular soldiers, throw a freeze grenade at the Brute to temporarily immobilize him before finishing off the rest of the guards. Then take down the Brute with a Beatdown.
Founders’ Island
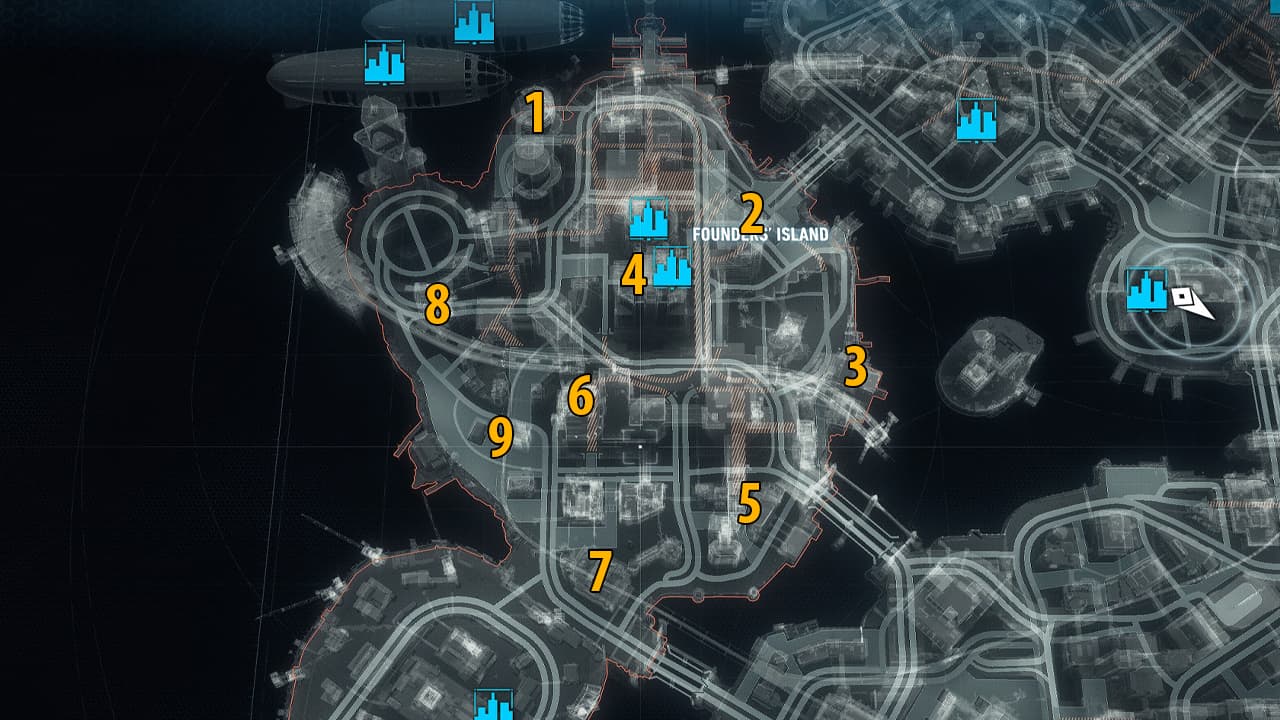
Watchtower #1
Location: Ryker Heights, next to Stagg’s Airship Alpha.
Coordinates: 2099, 1472
You are likely to have already come across this one as it is required to gain access to Stagg’s airships and triggers the Occupy Gotham Most Wanted mission. You can begin by taking out the guy with the tracker to allow easy usage of Detective Mode. Next, sabotage the Boa Drone and its operator and use Silent Takedowns on the other enemies.
Watchtower #2
Location: Drescher, next to Perdition Bridge.
Coordinates: 2267, 1903
It is better to enter the fray from the south side as the north side is protected by a Sentry Gun. The central console is protected by 6 thugs who do not put up much of a fight and can be dealt with a Fear Multi Takedown followed by a Beatdown.
Watchtower #3
Location: Drescher, docks north of Penitence Bridge.
Coordinates: 2520, 2070
Use the Remote Hacking Device to sabotage the Boa Drone and its operator, this will let you deal with all three enemies at once. Otherwise, you can also a Fear Multi-Takedown to achieve the same result. Like always, it is recommended to deal with the medics before anyone else.
Watchtower #4
Location: Ryker Heights, roof of Cale Anderson building.
Coordinates: 2409, 1650
A head-on approach for this watchtower will simply result in a quick death as it is guarded by 4 minigunners. Sabotage the guns and isolate the enemies before using a series of counters on the Minigunners followed by a Beat Down, but do not hesitate to leave the area if things go south.
Watchtower #5
Location: Otisburg, south of Penitence Bridge.
Coordinates: 2787, 1858
This militia watchtower can be swiftly dealt with using a Fear Multi-Takedown on the four Soldiers and two Combat Experts. Prioritize the Combat Experts as the targets of your multi-takedown. Once you have dealt with all 6 unarmed soldiers, destroying the console should not be difficult at all!
Watchtower #6
Location: Otisburg, roof of GothCorp.
Coordinates: 2615, 1584
Identify and eliminate the medic first leaving 6 armed militiamen guarding this watchtower. Now this becomes a simple predator sequence. Use Silent Takedowns on individual enemies and thin out their numbers one by one. You can also set up traps by spraying Explosive gel on the weak walls in the area and using the Voice Synthesizer to lure the enemies near the traps.
Watchtower #7
Location: Otisburg, east of Port Adams.
Coordinates: 2875, 1599
You will come across 2 Gun Emplacements on the northeast edge of the area in addition to 3 armed soldiers including a Boa Sentry Operator. Deal with the Boa Sentry Operator before the rest of the thugs to make things a tad easier.
Watchtower #8
Location: Ryker Heights, south of Wayne International Plaza.
Coordinates: 2452, 1335
Take out the 7 soldiers while avoiding the brute. We recommend using the crane above to examine the area and formulate your strategy before jumping into the brawl. Also note that there are Gun Emplacements on the east and west sides of the area so blind them before doing anything else.
Watchtower #9
Location: Otisburg, an abandoned building west of the Fire Station.
Coordinates: 2615, 1386
The last Watchtower in Batman: Arkham Knight is protected by Gun Emplacements from the backside of the Fire Station in addition to 3 soldiers, 2 combat experts, and 3 Medics. Start things off by blinding the turret and Medics early on before making your way to the rest of the enemies and the command console.
With everything done, apprehend the militia leader and take him to GCPD headquarters.