Koboh is the second main region of Star Wars Jedi: Survivor. This tropical area is full of secrets to find and monsters to fight. Koboh is divided into 7 main regions, with each region further divided into its sub-regions. There are a total of 500+ collectibles including Databanks, Force Tears, Priorite Shards, Force Essence and Treasure Chests in Star Wars Jedi Survivor to be found on Planet Koboh. We will be covering every single collectible with map locations and a complete guide on how to obtain them.
The guide is still under construction as we find more collectibles. Keep checking back for updates.
Some collectibles need special powers, which will be unlocked as the Jedi Survivor story progresses, so don’t worry. You can visit Planet Koboh any time you want, even after finishing the main story of Star Wars Jedi Survivor to get your hands on these collectibes.
Keep in mind that here we will be only covering the collectibles found in the open world section of Koboh in Star Wars Jedi Survivor. There are some collectibles within each Jedi Meditation chamber as well which will be covered in each chamber’s own guide
- Dredger Gorge Collectibles
- Rambler’s Reach Collectibles
- Basalt Forest Collectibles
- Stone Spires Collectibles
- Viscid Bog Collectibles
- Prospector’s Folly Collectibles
- Mountain Observatory Collectibles
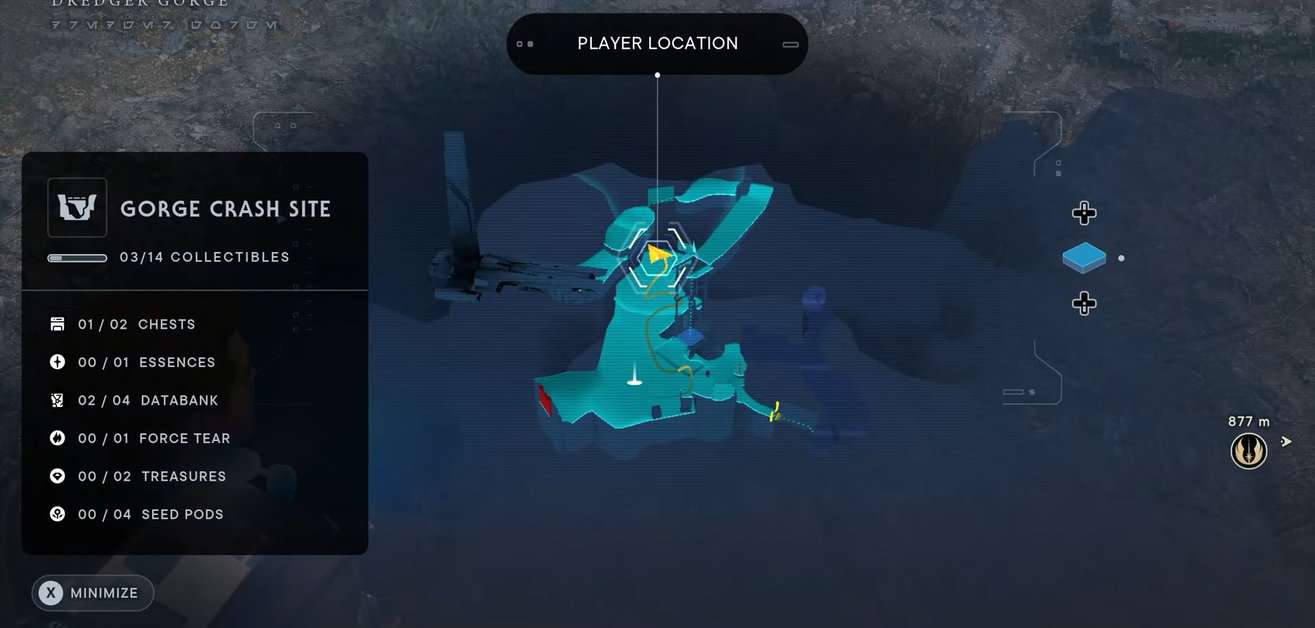
Jedi Survivor Koboh Dredger Gorge collectibles
The first area of Planet Koboh in Star Wars Jedi Survivor is called Dredger Gorge, and it contains a whooping 61 collectibles in total. So, without any further delay, let’s tackle this area and find everything it has to offer.
The Dredger Gorge section of Koboh is divided into 3 regions
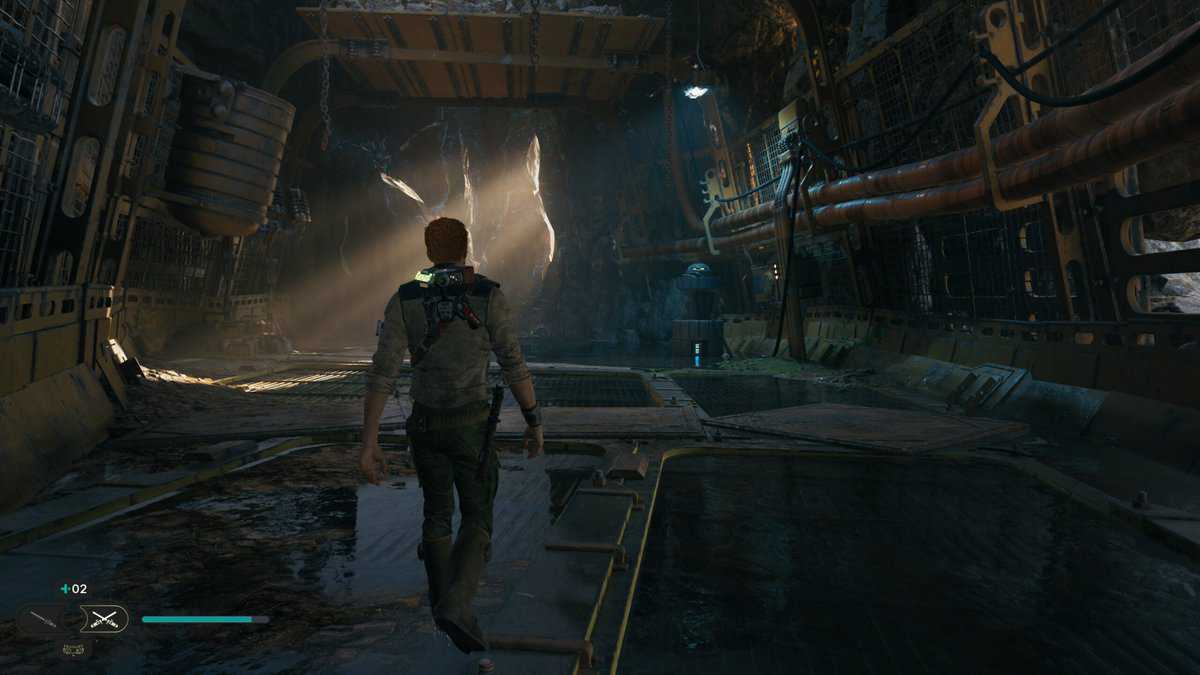
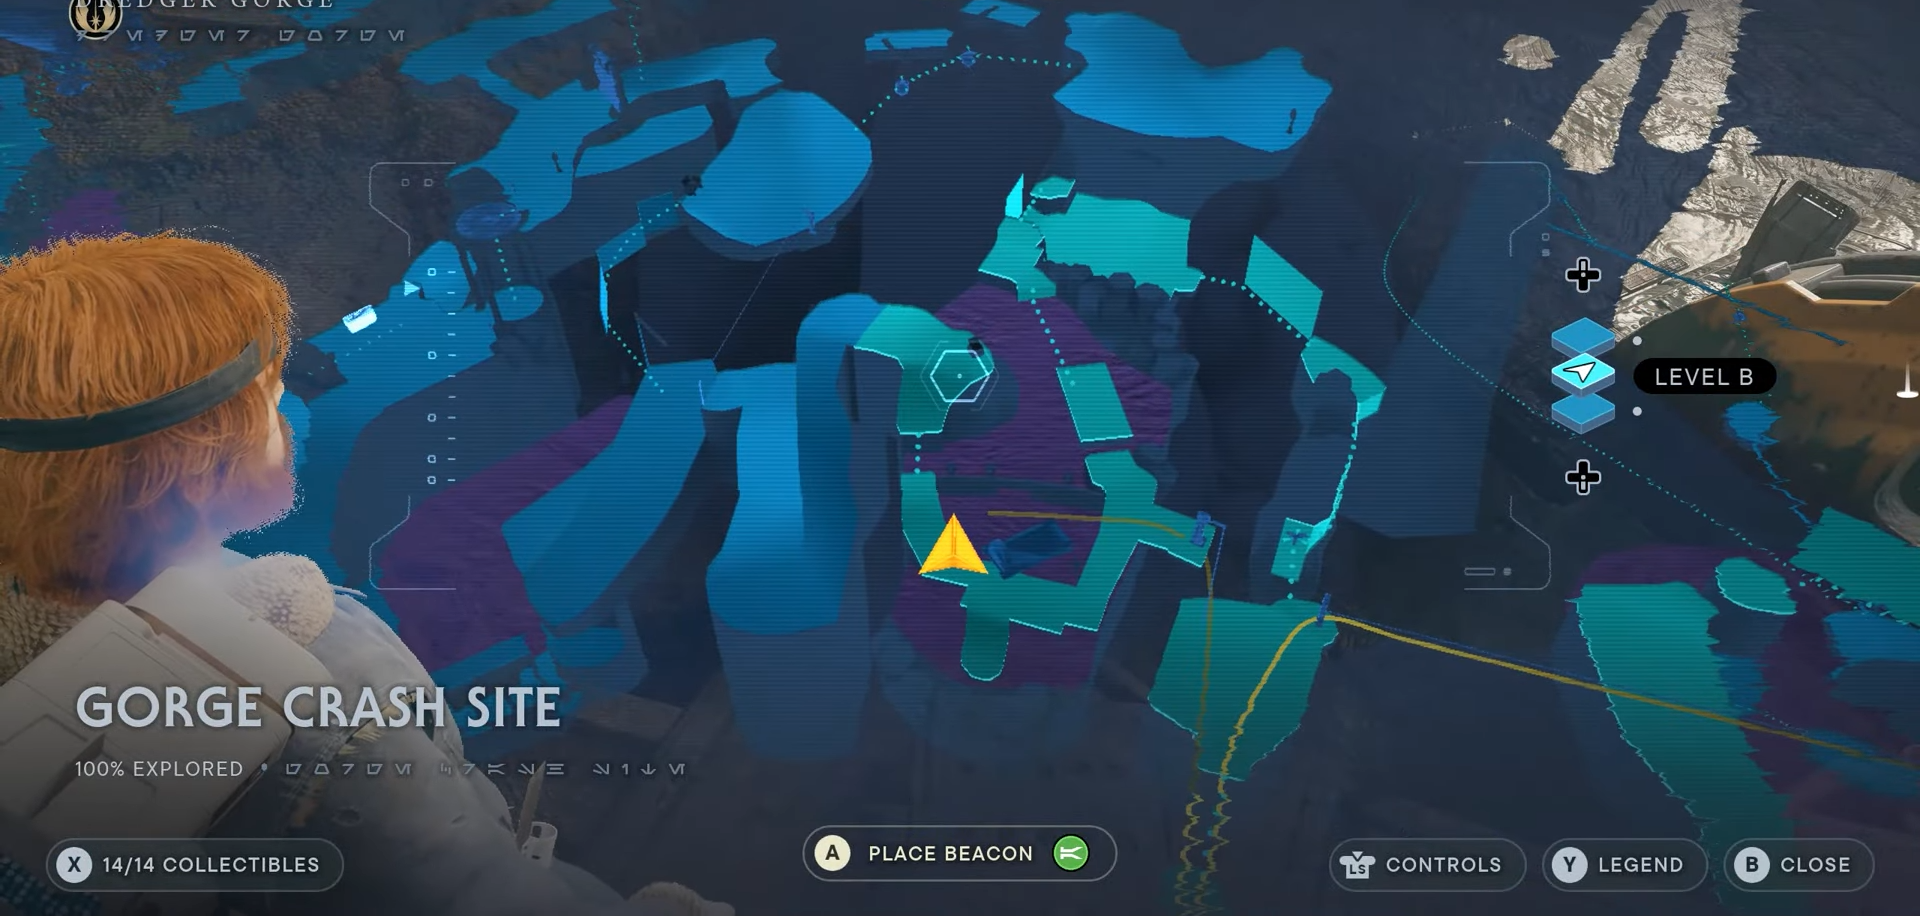
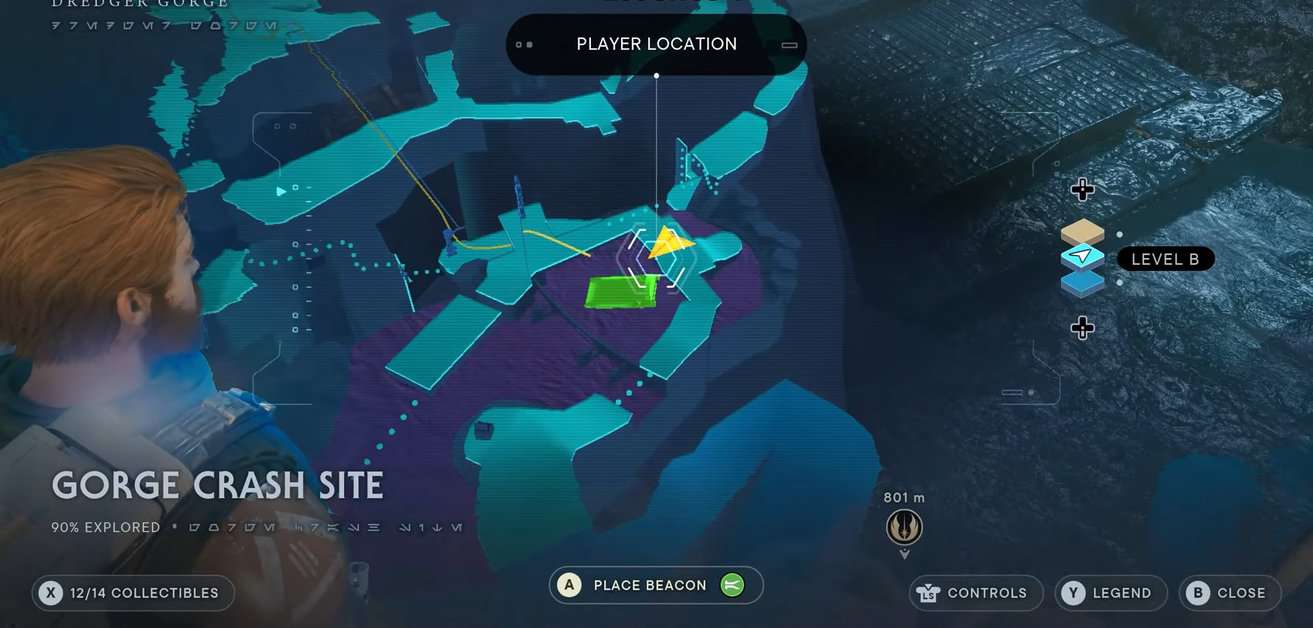
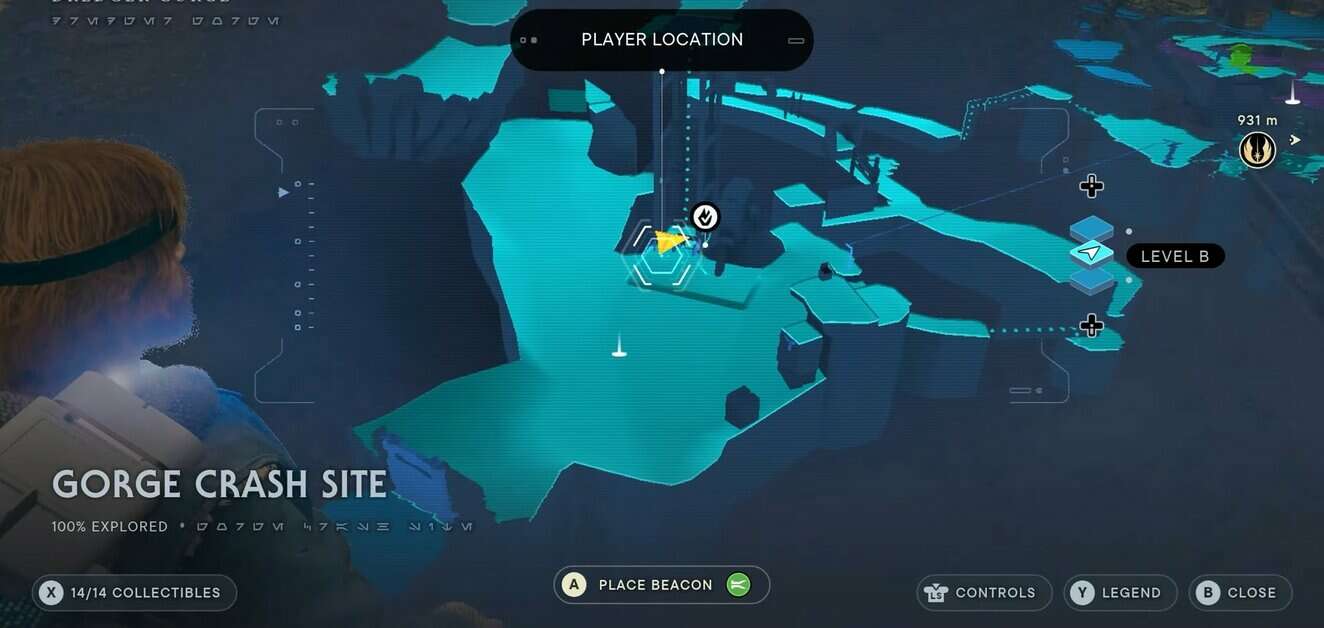
Gorge Crash Site collectibles
Gorge Crash Site Chest # 1
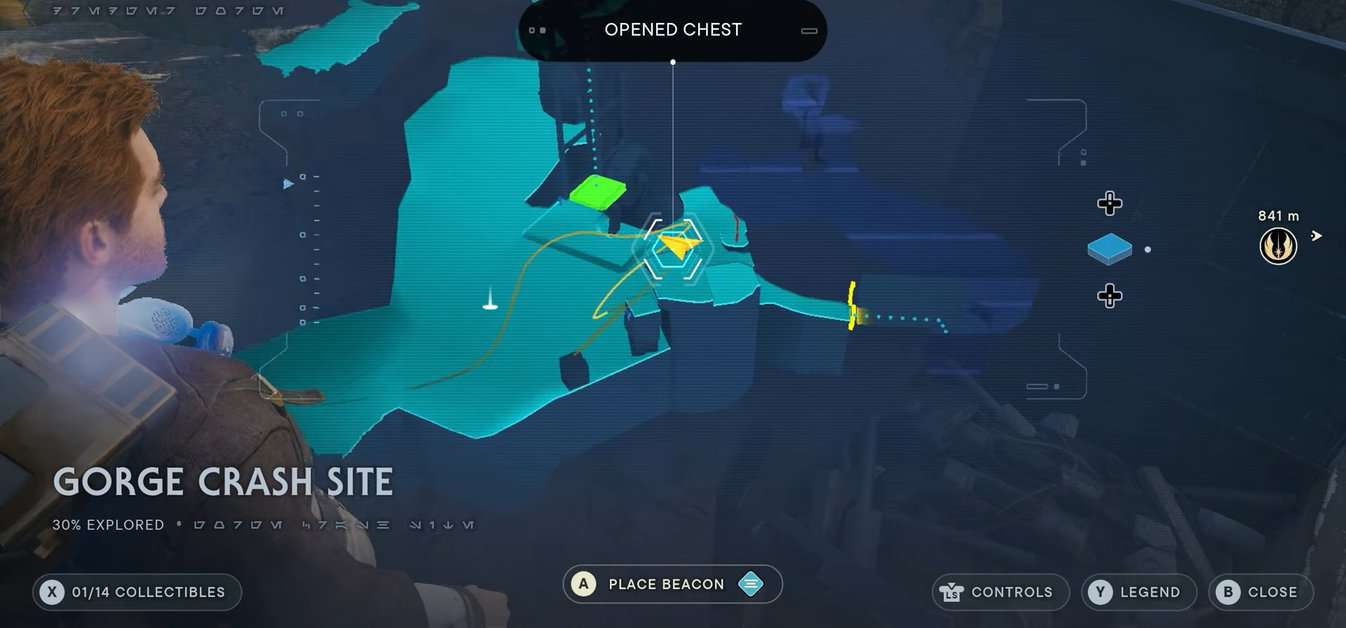
The first treasure chest is on a ledge to the right of the first meditation point of George Crash Site. Climb the yellow blocks using Cal’s rope pull ability to reach the ledge. The reward for opening the chest is Scrapyard Photoreceptors.
Gorge Crash Site Databank # 1
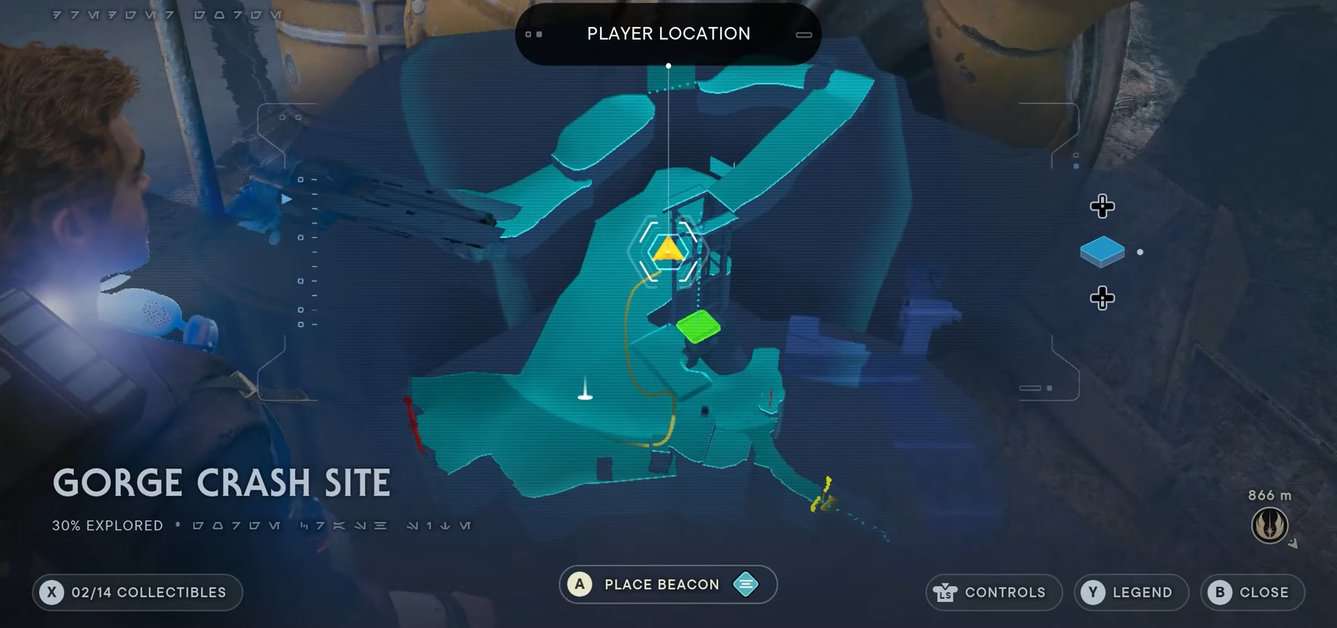
From the first meditation point of George Crash Site, go to the left river path. Use BD-1 to scan Broken Dredging Machine force echo.
George Crash Site Databank # 2
Keep going down the left river path until you reach the very end. Scan the remains of a machine to obtain Broken Mining Droid databank.
Gorge Crash Site Treasure # 1
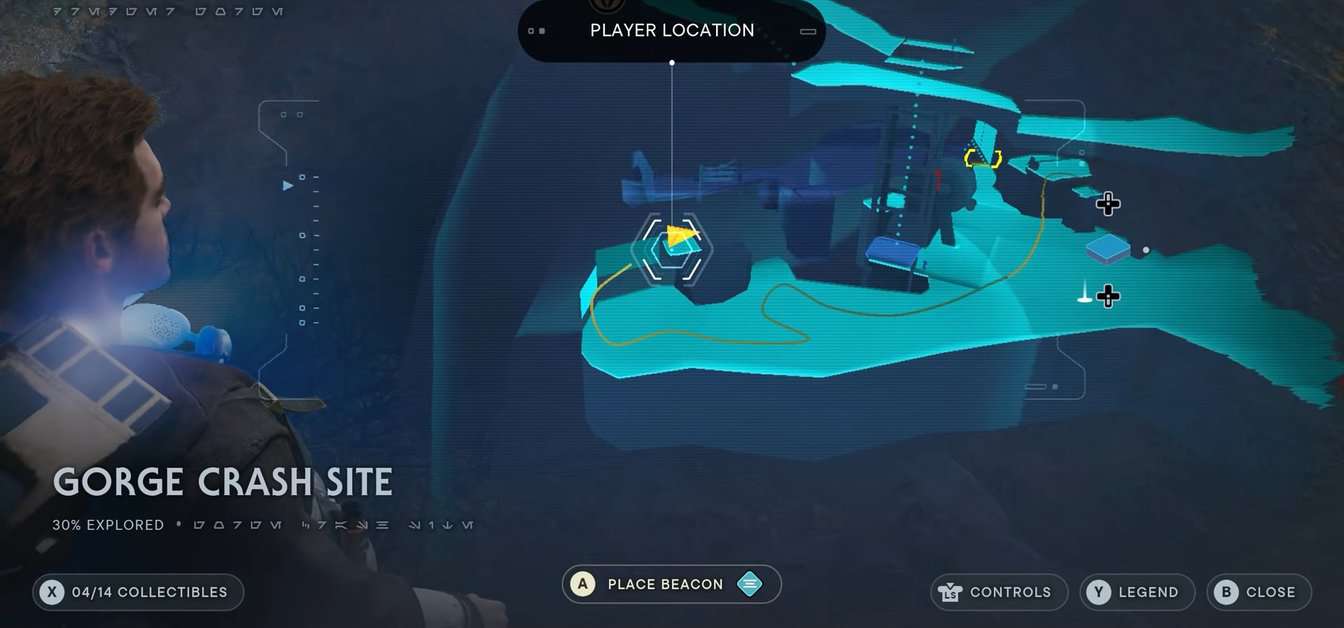
From the second databank location in George Crash Point, wall run twice on the orange walls to the lift until you reach a nest on the ledge. Interact with it to obtain a Priorite Shard.
Gorge Crash Site Seed Pod # 1

Destroy a plant just to the right of the first meditation point in George Crash point. The exact location is below the cliff from containing the first chest. Cal will obtain Cactus Ball: Nabooan Green seed pod for destroying this plant.
Gorge Crash Site Treasure # 2
This one is inside a small cave marked on the map. Use the wall run ability to climb the ledge and claim Priorite Shard as the reward.
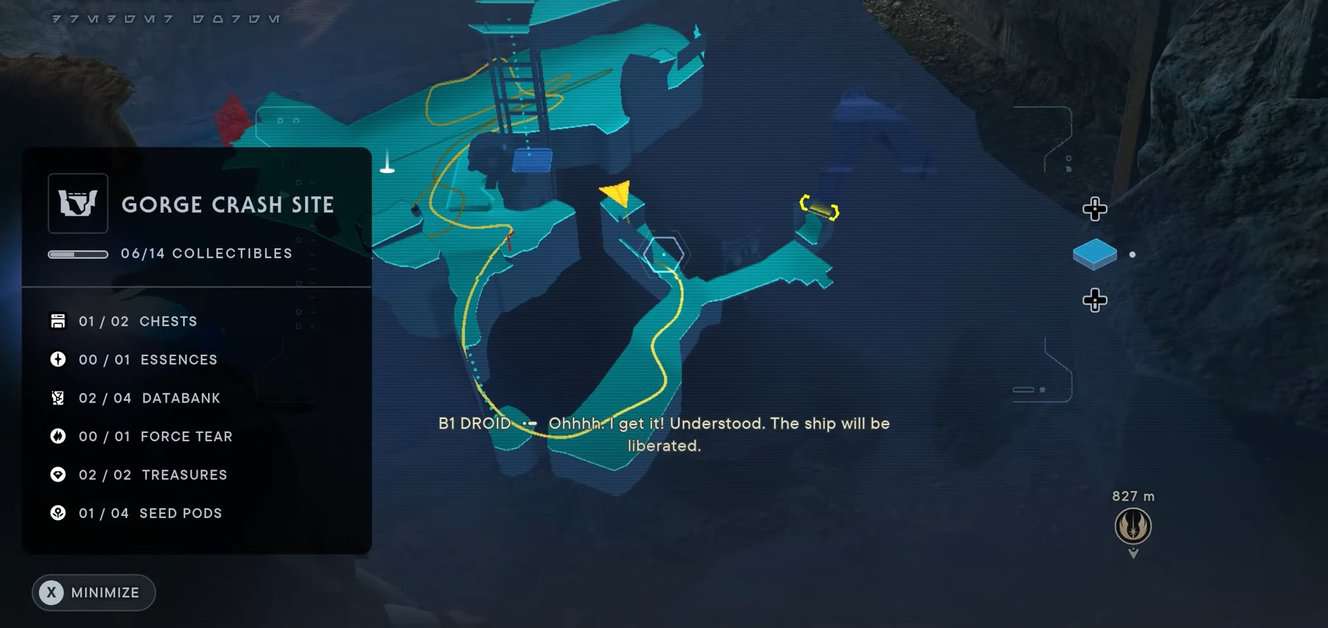
Gorge Crash Site Databank # 3
After defeating the first batch of Bedlam Raiders, go into the dark tunnel marked on the map. Climb a ledge to come across this databank. Use BD-1 to examine the Crushed Prospector databank.
Gorge Crash Site Seed Pod # 2
This plant is growing on a ledge which contains the first shortcut to George Crash Site. Destroy this plant to obtain Cactus Ball seed pod.
Gorge Crash Site Databanks # 4
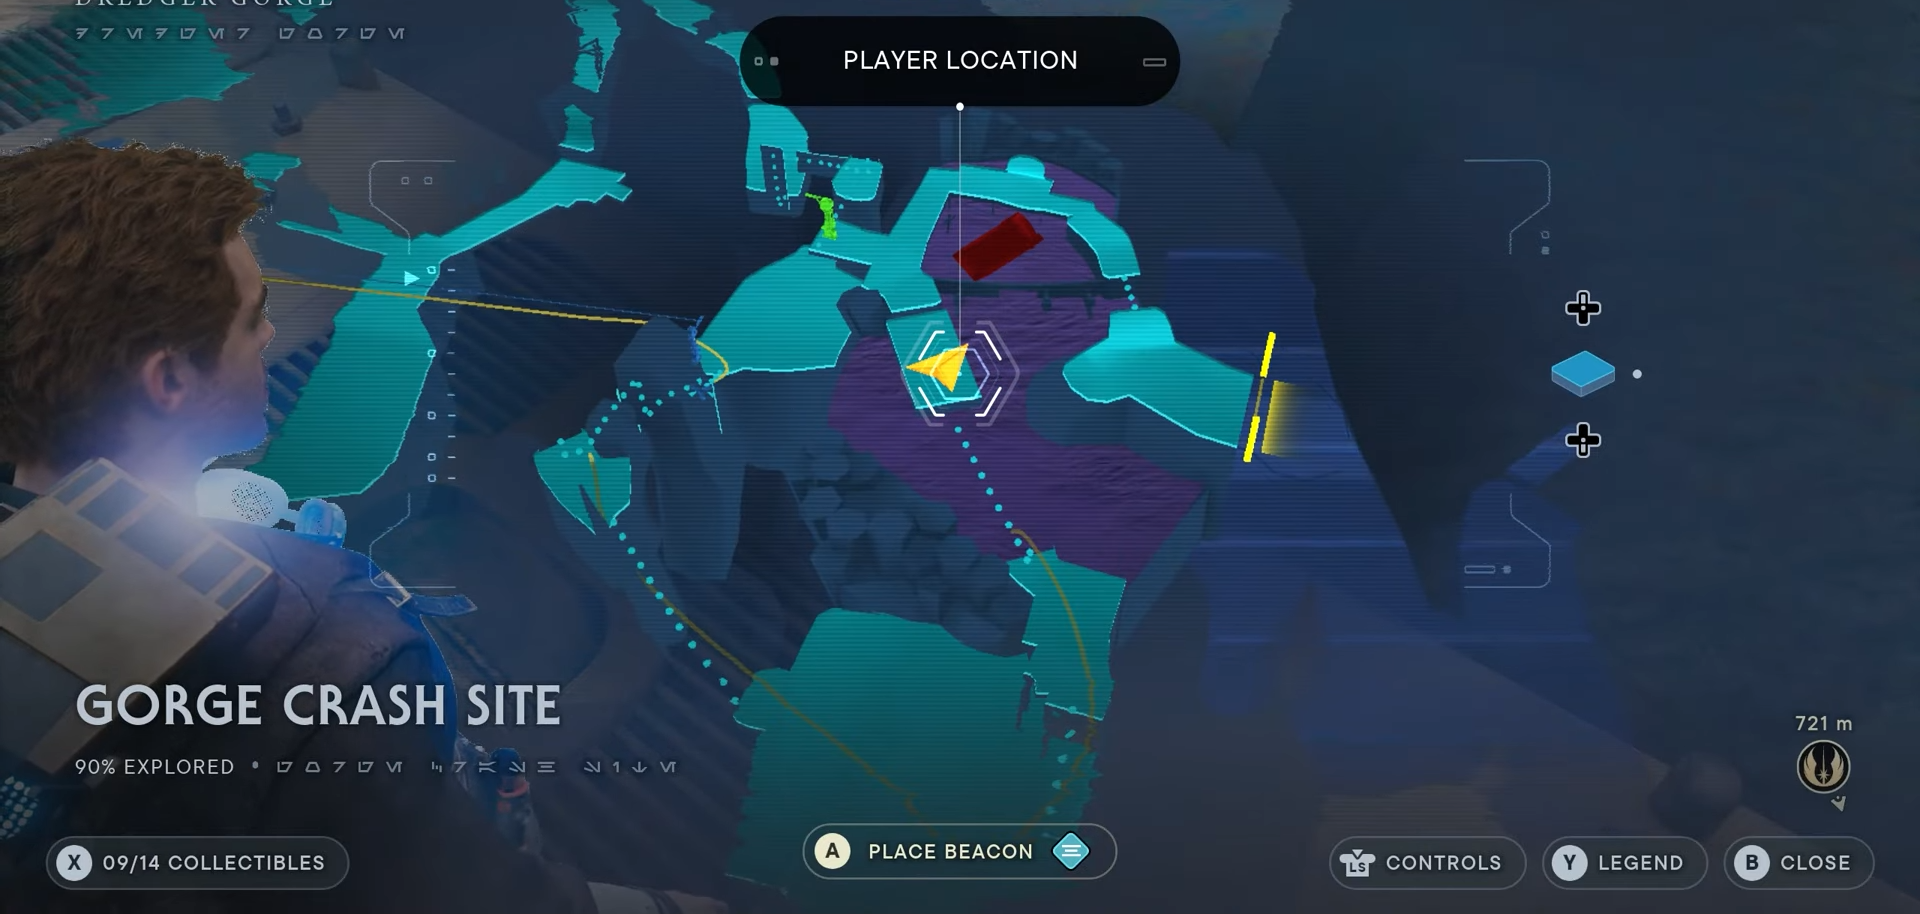
This one is inside the tar pit at the end of George Crash Site. Destroy the columns with a bomb to make the platform rise. Look to your left and scan with BD-1 to obtain Koboh Tar databank.
Gorge Crash Site Chests # 2
This one is at the end of the George Crash site, on the far side of the Tar pit. Open it to obtain Short Beard cosmetic for Cal.
Gorge Crash Site Essence # 1
To obtain this essence, Cal needs to use the Force Lift ability to bring out a submerged Droid’s ship from Tar Pits. Use the shortcut to reach the Tar points from meditation point instantly. Talk to the pit droid right in front of you to rescue it.
Gorge Crash Site Force Tear
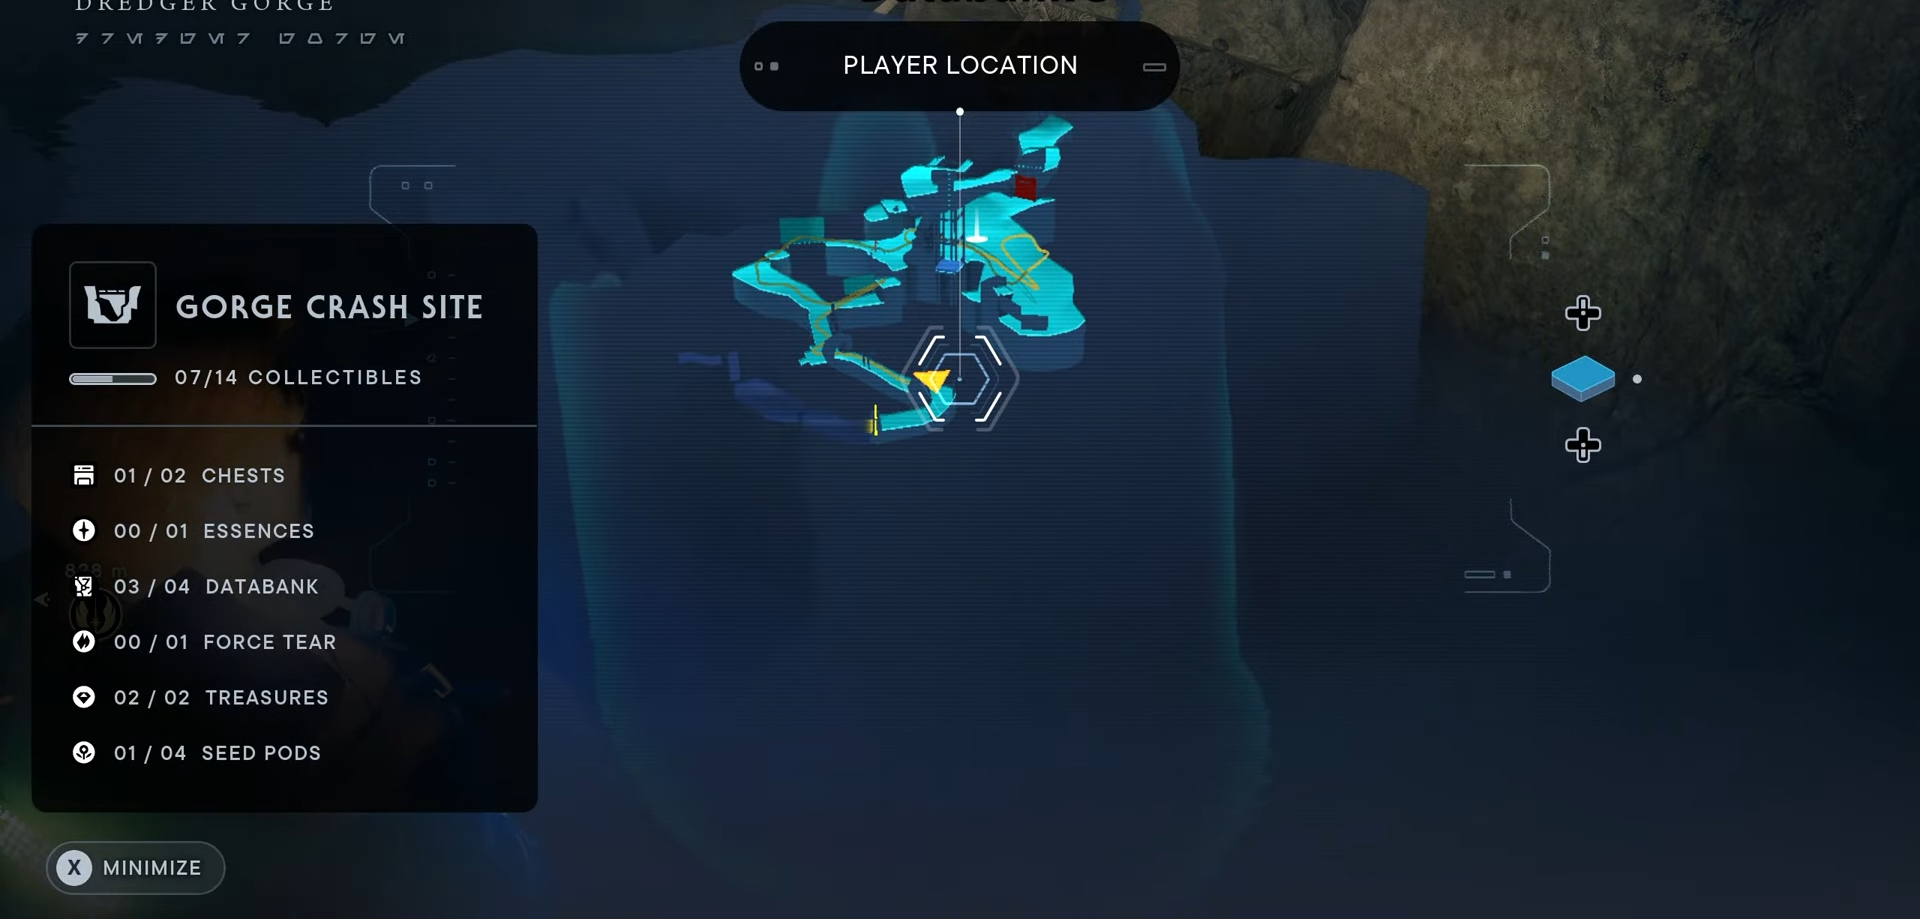
From the Meditation point, turn left and activate the lift. Drop from the lift and use Cal’s Force Lift ability to open a path to a cave below the lift. Interact with it to start Fractured Burden challenge.
Gorge Crash Site Seed Pod # 3
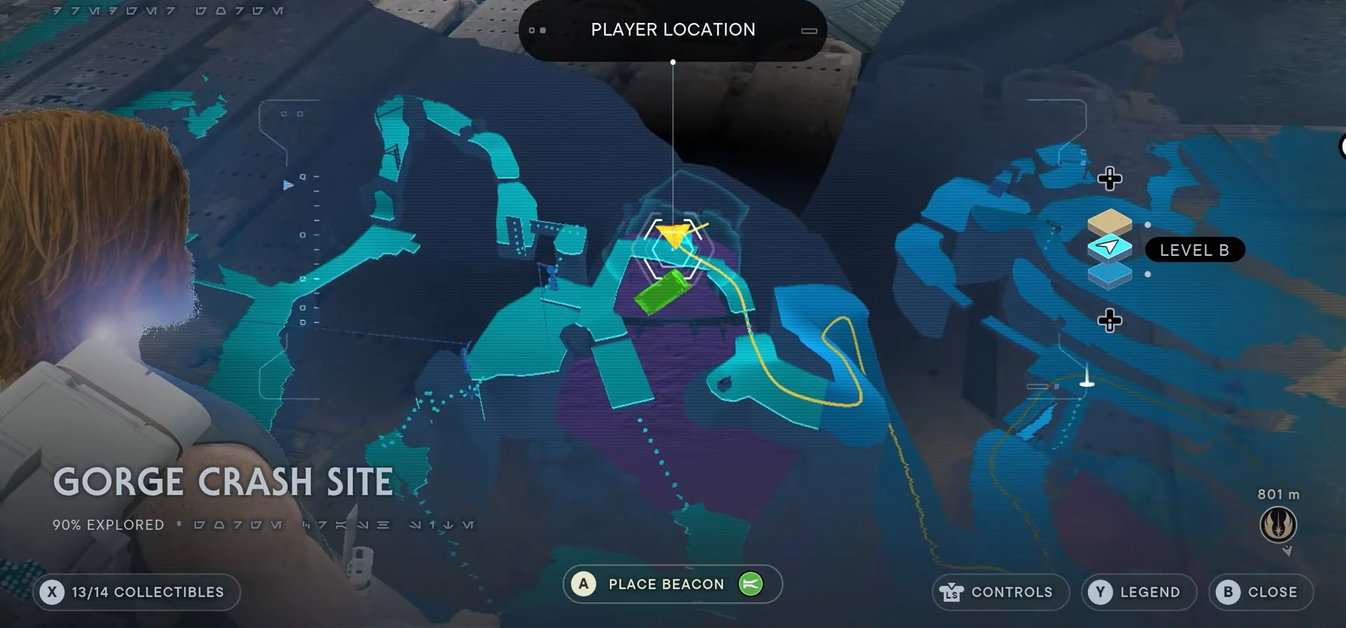
After rescuing the droid from Tar pit, look behind it towards the edge of the pit. You will notice a glowing plant. Destroy it to collect Fire Pineapple: Nabooan Green seed pod.
Gorge Crash Site Seed Pod # 4
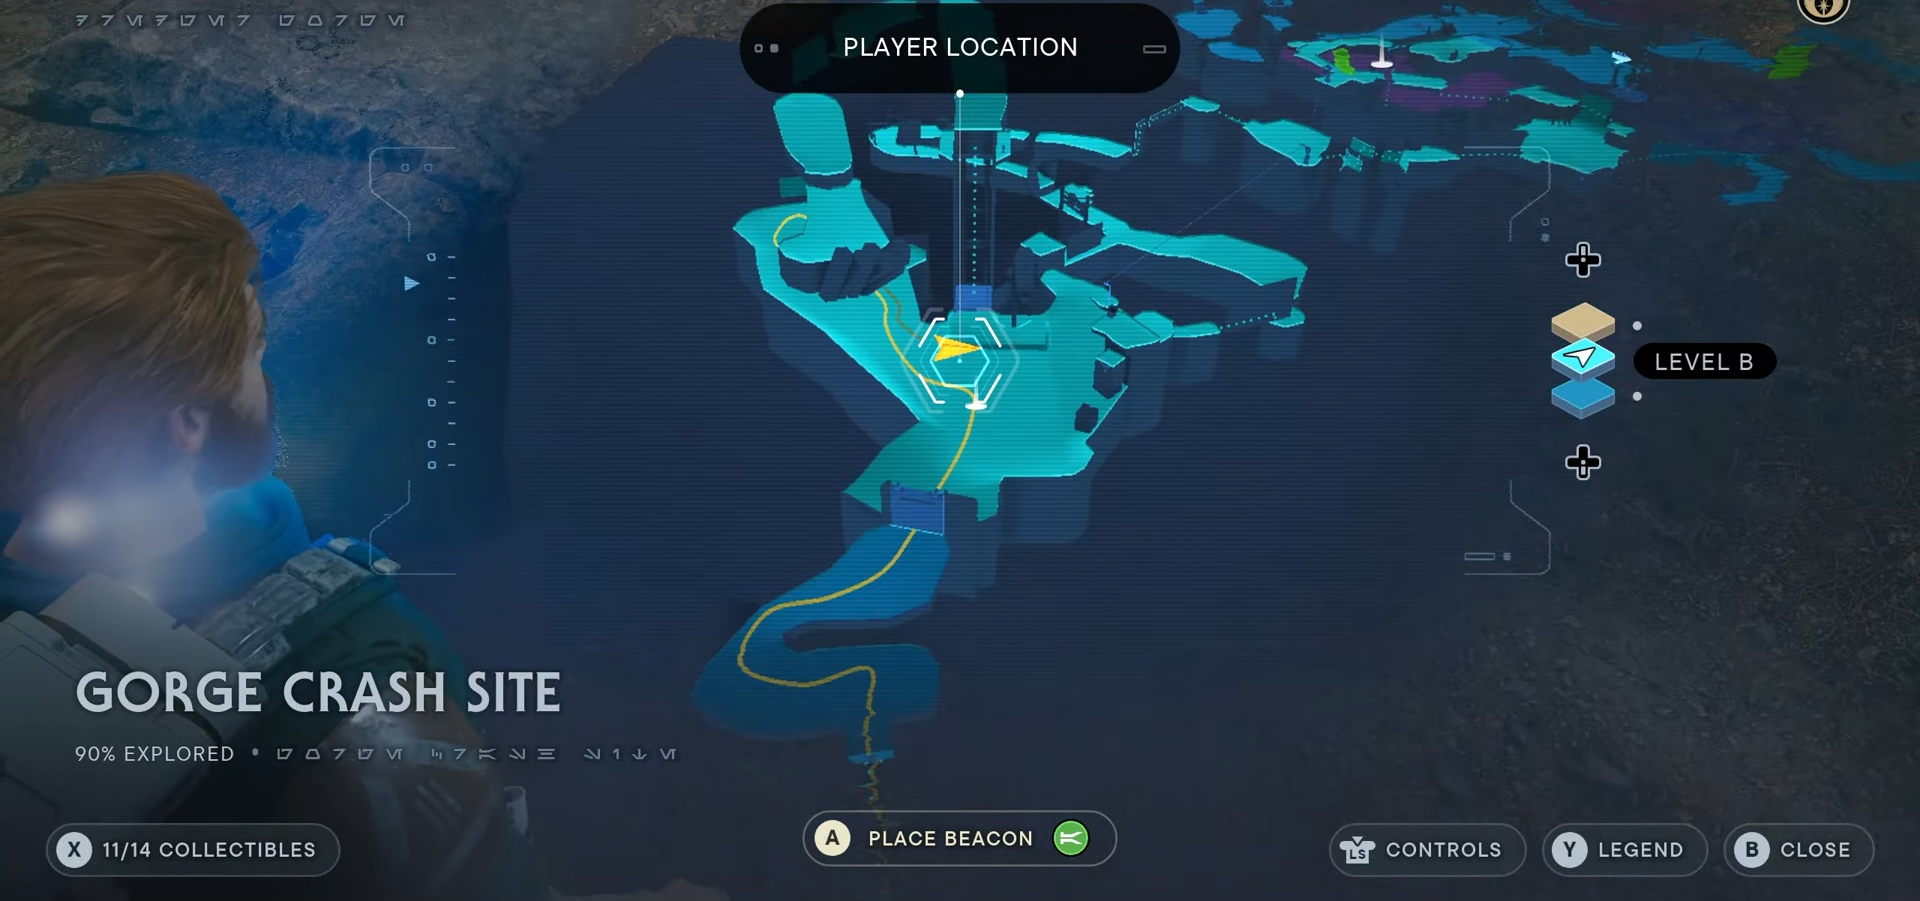
Look to the left of the elevator near the first meditation point in George Crash site to see a glowing plant. Destroy it to get Fire Pineapple seed pod.
Derelict Dam collectibles
Derelict Dam Databank # 1
After making your way to Derelict dam, you will come across a dead body leaning against a tree right before the meditation point. Scan with BD-1 to collect Murdered Prospector databank.
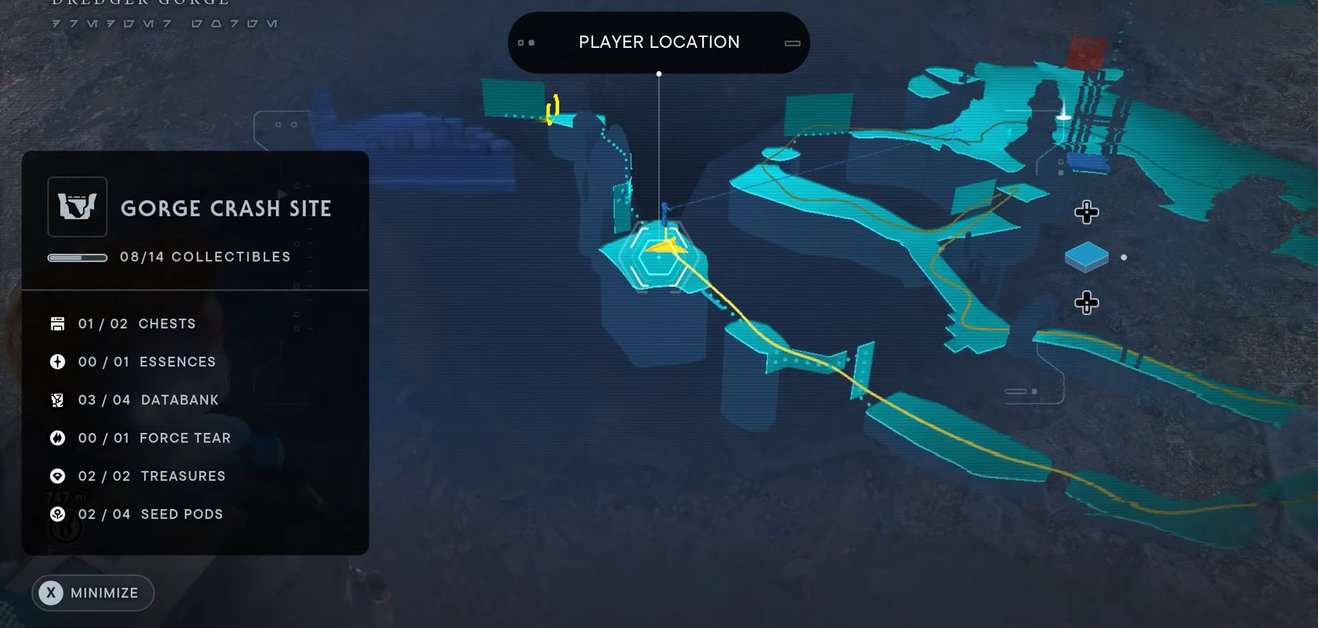
Derelict Dam Databank # 2
From the point marked in the map, go straight and cross a broken bridge. Defeat the Grocco in this area to get access to the vault. Interact with a skull to obtain Grocco Nest databank.
Derelict Dam Essence # 1
This one is inside Grocco’s nest too. Look to the right from Grocco’s next and interact with the blue glowing essence to obtain Health Upgrade.
Derelict Dam Seed Pod # 1
Before the meditation point, go down the ramp where the skull is, to see a glowing plant. Destroy it to get Cactus Ball seed pod.
Derelict Dam Databank # 3
Exactly opposite to seed pod 1location on the same ramp, scan the body to obtain Dead Bedlam Raider databank.
Derelict Dam Chest # 1
From the databank 3, go to the opposite ramp to the left, near a broken lift, to see a treasure chest. Open it to obtain Light Metal weapon material.
Derelict Dam Seed Pod # 2
Turn right from the chest 1 and keep going straight until you come across a glowing plant. Destroy it to obtain Fire Pineapple: Felucian Yellow seed pod.
Derelict Dam Databank # 4
From the location marked on the map, jump to reach the upper ledges (yellow in color). Turn right to the ledge containing a massive plant. Scan the pipes opposite the plant to obtain Dam Flow Pipes databank. This area is exactly opposite to the workbench.
Derelict Dam Databank # 5
Stand on a raft near the edge of a tar pit. Look towards the broken wall and request BD-1 to scan it to obtain Crumbling Dam Wall databank.
Derelict Dam Treasure #1
Drop down from the workbench to a ledge on the left. Keep going until you see a shining Priorite Shard lying beside a rock.
Derelict Dam Chest # 2
Enter the tar pit from the location marked on the map. Keep going right until you reach a platform. Use these platforms to make your way halfway through the pit. Open a treasure chest lying on a submerged rocky structure to obtain Mullet cosmetic item for Cal.
Derelict Dam Databank # 6
This one is inside a cave behind the dam. From the position marked on map, go straight and turn left. Beware of the roller mines. Interact with the databank to obtain A Desperate Escape databank.
Derelict Dam Treasure # 2
Inspect an unlit torch in the area where Vashtan Wolfe is hiding behind a door to obtain a Priorite Shard.
Derelict Dam Chest # 3
In the same area where Vashtan Wolfe is. Run on the walls to the right to reach a ledge (besides the blue lamp). Open the treasure chest to obtain Anodized Metal (BD material).
Derelict Dam Chest # 4
This chest is hidden inside a cave to the left of Dam. Drop into a tunnel from the opening in the floor. Keep going straight until you see a treasure chest BD-1 can slice open. The reward for opening this chest is a Tactical Jacket.
Derelict Dam Databank # 7
To reach this area, use a roller mine near the workbench to destroy a wall. Keep going along this path until you reach a wall with a rope. Beware of a Grocco in this area. Scan the wall to obtain Creature Bones databank.
Derelict Dam Databank # 8
This databank can be found near a workbench at the end of a ledge. Beware of Droids and roller mines in this area. Use BD-1 to scan Abandoned Encampment databank.
Derelict Dam Seed Pod # 3
Right next to the databank 8. Destroy the glowing flower to obtain Cactus Ball: Felucian Yellow seed pod.
Derelict Dam Essence # 2
From the seed pod # 3 location, turn right and go across a stone bridge. Look to your right to see the blue essence. Interact with it to obtain Force Essence. This one is right next to the lift and can’t be missed.
Derelict Dam Databank # 9
From the meditation point marked on the map, turn left and drop down the ledge using the vines. Turn right and scan a steel pipe to obtain Destroyed Dam databank.
Derelict Dam Seed Pod # 4
This one is near an animal skull. Destroy the plant to get Cactus Ball seed pod.
Derelict Dam Chest # 5
From the databank # 5, turn left and go straight. You will notice a treasure chest on the edge of a cliff. Open it to obtain Scrapyard body for Bd-1.
Derelict Dam Databank # 10
From the chest # 5, keep going straight until you reach tar pit. Climb the riverbank to its right and interact with the dead body to obtain the Drowned Prospector databank.
Derelict Dam Seed Pod # 5
Keep going forward along the riverbank from databank # 10 until you reach another glowing plant. Destroy it to obtain Cactus Ball seed pod.
Derelict Dam Essence # 3
In the same area from where you found Cactus Ball seed pod, use the rope to cross the chasm and run along the wall on the left twice until you reach a ledge. The next blue essence is just sitting there for you to collect. Interact with it to gain an additional Skill Point.
Derelict Dam Seed Pod # 6
To the right of the ledge marked on the map. Cal will go through this area after Trontoshell cutscene. Destroy the glowing plant to obtain Fire Pineapple seed pod.
Derelict Dam Chest # 6
To reach this area, go beyond Trontoshell and defeat the enemies in this area. Push the block using force and align it against the wall Cal can run. Double run the same wall to reach a ledge. Open the treasure chest to obtain Scrapyard head for BD-1.
Derelict Dam Treasure # 3
From the area marked on the map (beyond Trontoshell), reach a cave with the help of rope swing. Scale the two walls at the end of the cave by alternate wall jumping to reach the top. Interact with the glowing object to obtain another Priorite Shard.
Derelict Dam Chest # 7
Go through the tunnel of Grocco matriarch by using the Force Lift ability to open the door. Defeat this legendary enemy so you can open a treasure chest and obtain a Stim upgrade.
Derelict Dam Treasure # 4
This one is hidden in Tar Pits. From the location marked on map, climb a platform in Tar pits using vines. Defeat a bedlam raider and look to the right. You will notice a lot of rusty pipes. Walk on those pipes until you reach the opening of a small cave. Hang from the pipe to move further. Drop in the cave and interact with the glowing object to receive another Priorite Shard.
Derelict Dam Treasure # 5
Use the force lift ability to pull down a massive cylinder right in front of you (from the position marked on map). Defeat a bedlam raider in this area and keep going forward until you come across a cave entrance blocked by vines. There is a small alley right next to the entrance. Climb it using Cal’s wall climb ability to reach a ledge. Priorite Shard is yours for the taking.
Derelict Dam Essence # 4
Pick up the glowing device from the same alley and bring it to a platform opposite to where you fought the bedlam raider. Place it on a glowing switch. This will shoot a laser at the vines blocking the entrance to the cave. Enter the cave to retrieve a roller mine and use it to destroy a wall right next to the cave entrance.
Use BD’s poison dart ability to burn the vines blocking Cal’s path. Run along the metallic sheets to climb up the platform. Turn left and go outside to find another blue essence, New Perk slot.
Derelict Dam Databank # 11
From the ledge where you fought the bedlam raider, drop down on a platform resting on tar. You will notice a glowing blue object on the right. Double jump followed by dash to reach this ledge. Interact with it to obtain The Dredger Runner force echo.
Derelict Dam Force Tear
To reach this Force Tear, Cal first needs to go to Boiling Bluff and ask for the help of Trontoshell to teleport him back to Derelict Dam. Turn back to find the Force Tear. Interact with it to start Fractured Agility challenge.
Derelict Dam Treasure # 6
Ride the elevator near the workbench to reach the area marked on the map. Go left and cross the stone bridge to come across a shining object. Interact with it to obtain another Priorite Shard.
Derelict Dam Seed Pod # 7
In the same area where you defeated a bedlam raider. Go to the opposite side of the cliff (from where Cal entered this area) and destroy a glowing plant to obtain Fire Pineapple: Alderaanian Blue seed pod.
Derelict Dam Seed Pod # 8
Ride the lift near the workbench to travel to the top of the cliff. Turn left to find a glowing plant. Destroy it to get Fire Pineapple: Dathomirian Red seed pod.
Derelict Dam Seed Pod # 9
In the same area. From the last plant, turn right to reach the middle of the cliff. Destroy the glowing plant to obtain Fire Pineapple seed pod.
Derelict Dam Seed Pod # 10
Keep going to the right until you come across the third and final glowing plant of this area. Destroy it to obtain Fire Pineapple seed pod.
Derelict Dam Chest # 8
After obtaining the electric dart ability for BD-1 in chapter 5, go back to the cave where Vashtan Wolfe is. Hit the blue switch with the electric darts to open the door. Defeat Vashtan Wolfe to unlock another treasure chest in the same area containing Two-Tone Metal weapon metal.
Derelict Dam Seed Pod # 11
Go up using the lift from the marked point on the map. Turn right and use Force Lift ability to open a fate into the mines. This is the same area where we defeated Grocco matriarch. Use the air balloons on the left to reach the ledge on the top. Destroy the plants to the right to obtain a Fire Pineapple: Rare seed pod.
Derelict Dam Seed Pod # 12
In the same area, destroy another glowing plant to get an additional Fire Pineapple: Rare seed pod.
Derelict Dam Seed Pod # 13
The next Fire Pineapple: Rare seed pod can also be obtained by destroying the third glowing plant.
Derelict Dam Treasure # 7
Right before the blue essence, interact with the shining object to collect another Priorite Shard.
Derelict Dam Essence # 5
In the same area, interact with blue essence on the left edge of the cliff to obtain an additional Skill Point.
Derelict dam Treasure # 8
From the area marked on the map, turn right and look down. You will notice two parallel stone bridges above the tar pit. Jump on the left bridge and interact with the glowing object to receive a Priorite Shard.
Derelict Dam Treasure # 9
This one is hidden in a small area inside the tar pit. Drop down into the pit right in front of the shattered wall. Make your way through the wall and turn right to find another Priorite Shard.
Derelict Dam Treasure # 10
From the meditation point on the top of the cliff, turn left and jump on a yellow bridge (temporary one made from broken dam parts). Instead of moving on to the next ledge with Droids, drop down to find another Priorite Shard.
Winding Ravine collectibles
Winding Ravine Chest # 1
This chest is inside an alley with marked walls. From the position on the map, run on the wall to your right until you come across a gap to the left. Double jump to reach this area and wall run again to reach the treasure chest. Open it to receive Warm-Metal weapon material.
Winding Ravine Essence # 1
The blue essence in the marked area is out of Cal’s reach. You need to solve a puzzle to access this upgrade. Place the first movable box between the two ledges. It will now act as a bridge for Cal to move the next block from one ledge to the other. After moving the second box to the next ledge, use it to reach the inaccessible ledge. Interact with the blue essence to increase maximum Force.
Winding Ravine Chest # 2
Inside the same area, place the second box on top of the first. Now move both blocks towards the Northeast region of the ravine. There is another inaccessible cave above this area. Place the blocks beneath it and use the wall run to reach the top of the stacked boxes. Go up and receive Goatee Beard for Cal from the treasure chest.
Winding Ravine Treasure # 1
Wall run inside the cave and keep to the left until you reach the highest ledge. Take a Priorite Shard as your reward.
Winding Ravine Treasure # 2
During the ending section of the ravine, Cal comes across a wall run section ending in a rope swing. Instead of going forward, turn back and swing to the top of the pillar. Another Priorite Shard awaits.
Winding Ravine Seed Pod
After reaching the top of the ravine, drop down to the ledge with two shiverpedes. This ledge contains 5x Rare Cactus Ball seed pods.
Winding Ravine Chest # 3
From the previous ledge, drop down on the next ledge containing the shortcut to the beginning of the winding ravine. Open the treasure chest to receive the Hunter Lightsaber. This will also complete a rumor “Find the Gorge’s Secret”.
Jedi Survivor Koboh Rambler’s Reach collectibles
The second area of Koboh is also its biggest and is choke full of secrets for Cal to discover. Let us help you in obtaining every single collectible Rambler’s Reach in Star Wars Jedi Survivor has to offer.
Rambler’s Reach is divided into 19 different zones, each filled with numerous collectibles
- Southern Reach
- Flooded Bunker
- Corroded Silo
- Water Treatment Works
- Riverbed Watch
- Hunter’s Quarry
- Sodden Grotto
- Phon’Qi Caverns
- Rambler’s Reach Outpost
- Pyloon’s Saloon
- Smuggler’s Tunnels
- Harvest Ridge
- Fort Kah’lin
- Untamed Downs
- Alignment Control Center
- Swindler’s Wash
- Bygone Settlement
Southern Reach collectibles
Southern Reach Chest # 1
This chest is on a ledge just behind the camp of Mosey. Open it receive Full Beard cosmetic for Cal.
Southern Reach Seed Pod # 1
From the location of Mosey’s camp, go left until you come across two Gorger. You will notice a shining plant to the right near a rock. Destroy it to obtain Tuber Maw: Nabooan Green seed pod.
Southern Reach Treasure # 1
Look straight after obtaining the first seed pod and you will notice some vines. Climb those vines to reach the top of the ledge and obtain the first Priorite Shard of Rambler’s Reach.
Southern Reach Chest # 2
From the same ledge, go right until you notice another treasure chest inside a cave. Beware of the shiverpede. Open it to receive Kashyyyk Paint weapon material.
Southern Reach Databank # 1
This databank is on the cliff above Grocco. Use the rope to swing to this ledge and interact with it to obtain Besotted Force Echo.
Southern Reach Essence # 1
Keep going straight from the last collectible and you will notice a blue essence on the edge of the same cliff. Interact with it to obtain an additional Skill Point.
Southern Reach Seed Pod # 2
Right in front of Grocco’s resting place. Destroy the glowing plant to obtain Tuber Maw: Felucian Yellow seed pod.
Southern Reach Seed Pod # 3
Drop down the gap in the floor of the cliff, marked on the map. Turn right to notice a ledge with a door. This Tuber Maw seed pod is right beneath this ledge.
Southern Reach Databank # 2
Scan the silo with BD-1 before climbing it to obtain Unusual Silo databank.
Southern Reach Seed Pod # 4-11
Climb the ledges to the left from the position marked on the map to reach a grassy path. Destroy the glowing plant to receive Tuber Maw: Rare seed pod.
Destroy another glowing plant on the opposite side to receive Tuber Maw seed pod.
Climb the ledge in front of you to find another Tuber Maw seed pod.
Detroy two more glowing plants to obtain Tuber Maw seed pods from the same area.
You will notice another plant to the right of the waterfall. It also drops Tuber Maw seed pod when cut down.
One plant is near a big rock near the right edge of the cliff. Once again drops Tuber Maw seed pod.
Another one between the rocks in the same area. Destroy it to obtain the final Tuber Maw seed pod of the area.
Southern Reach Treasure # 2
From the top of the silo, follow the path to reach a small cave hidden to the right of the map. It houses another Priorite Shard.
Southern Reach Seed Pod # 12
This flower is near the damaged dam structure opposite the gate of Rambler’s reach. Destroy it to obtain Spine Fluff seed pod.
Southern Reach Seed Pod # 13
From the previous plant, turn back and look at the right wall. There is another glowing plant hugging the wall. Destroy it to obtain Spine Fluff seed pod.
Southern Reach Treasure # 3
This Datadisc can be obtained by destroying a scavenger droid hiding behind the silo. Beware of Gorgers and Bramliks in the area.
Southern Reach Treasure # 4
Reach the top of the silo using Cal’s alternate wall jump ability. Defeat the droids there to receive another Priorite Shard lying on the edge of the roof.
Southern Reach Databank # 3
It is in the same area from where you collected a lot of seed pods. Go behind the waterfall to reach a small cave. Interact with it to receive another Force Echo.
Southern Reach Seed Pod # 14
Climb the ledge from the position marked on the map to come across two rifle Droids. Defeat them and move to the next ledge containing Tuber Maw seed pods.
Souther Reach Seed Pod # 15
Use the Relter to glide from the ledge marked on the map. Drop on the ledge with another Relter sitting on its ledge. Destroy the glowing plant near the Relter to obtain Spine Fluff: Rare seed pod.
Southern Reach Treasure # 5
Look closely at the ledge where Relter was sitting before. Collect the next Priorite Shard from this point.
Southern Reach Treasure # 6
This one is hidden beneath a small door on a dam marked on the map. Use the Force Lift ability to open the door and receive another Priorite Shard.
Southern Reach Chest # 3
To reach this chest, Cal needs to solve a puzzle inside Hunter’s Quarry. From the position marked on the map, go up and use Force Lift ability to open the door to the Quarry. Drop down to the bottom. Beware of the Koboh black matter. Make your way to the left platform and bring a roller mine to place on the glowing switch. The device will shoot a laser that will open your path into Rambler’s Reach Outpost.
Now use BD-1’s spray ability to guide the laser to a house with Koboh black matter. A cutscene will follow showing the destruction of the house. Go inside the house and open the treasure chest to receive Quickdraw Blaster for Cal.
Southern Reach Seed Pod # 16
This plant is on the path which leads you down to Mosey. Beware of strolling Grocco in the area. Destroy the plant to receive Bluebell Squish: Nabooan Green seed pod.
Southern Reach Seed Pod # 17
From the path marked on the map, go above and look to your right to find another glowing plant. This path also leads to the bunker. Destroy it to obtain Cactus Ball: Alderaanian Blue seed pod.
Southern Reach Seed Pod # 18
Turn left from the meditation point and follow the path marked on the map. Destroy another glowing plant to the right to receive Bluebell Squish seed pod.
Southern Reach Treasure # 7
This is in the same area from where you received Quickdraw blaster. Look up the entrance gate of Rambler’s Reach Outpost to find a skull. Pull it using Cal’s force ability. Collect another Priorite Shard from the skull.
Southern Reach Seed Pod # 19
Use the rope to in the area marked on the map to reach a ledge with a glowing plant. This rope is right on the top of resting Grocco. Destroy this plant to obtain Tuber Maw: Alderaanian Blue seed pod.
Flooded Bunker collectibles
Flooded Bunker Treasure # 1
Right after entering the bunker, look to your right to find a Priorite Shard next to a dead body.
Flooded Bunker Databank # 1
From the last location, remove the lid using Cal’s Force Lift ability to drop down in a pool. After getting out of the water, investigate a small alley to the right. Ask BD-1 to scan Damage Assessment databank.
Flooded Bunker Databank # 2
Dive again into the water and keep going down until you see a tunnel to the left. Get out of the tunnel and use vines to reach the next platform. Interact with the destroyed console to scan Abandoned Water Filtration System databank.
Flooded Bunker Essence # 1
Enter the room to the left and you will notice a blue essence on the far side. Interact with it to obtain a Health upgrade.
Flooded Bunker Chest # 1
Go back and now raise the platform in the water using Force Lift ability. Use it to travel to the opposite platform to find the first chest. Open it to obtain Coated Metal weapon material.
Flooded Bunker Chest # 2
The next chest is beside the first one. Open it to obtain another Coated Metal weapon material.
Corroded Silo Databank # 1
Enter the corroded silo from its roof using Cal’s Force Lift ability. Go down until you come across a green shield. Cross it and run the wall to reach the next platform with two bedlam raiders. Use BD-1 to scan Curiosity Sours databank sitting on top of attaché cases.
Corroded Silo Databank # 2
Climb the next platform and run the walls to drop down until you reach a yellow platform. Scan with BD-1 to obtain New Acquisitions databank.
Corroded Silo collectibles
Corroded Silo Chest # 1
Slice open the chest at the end of the walkway to obtain Goatee and Mustache cosmetic for Cal.
Corroded Silo Chest # 2
Close the shutter and drop down after running the walls. Use zipline to reach the next area with a bedlam raider. Turn back and run the wall to reach the upper platform. Use Cal’s Force Lift ability to smash the container and receive Arakyd Heavy Body for BD-1.
Corroded Silo Chest # 3
Drop down to the platform where you defeated the bedlam raider. Look down at the cage floor to notice another container Cal can smash using Force Lift ability. Doing so will grant you Bumpy Rubber weapon material.
Corroded Silo Databank # 3
Go straight through the corridor until you reach a lift. Defeat the enemies and look to your right. Use Force Lift to align a board Cal can run on. Make your way to the next ledge and interact with a box to receive Whispered Words force echo.
Water Treatment Works Databank # 1
Cut the cables and go straight into the dark tunnel. Turn left to reach a cave with a water tank leaking tar. Scan it using BD-1 to get Leaking Water Storage databank.
Water Treatment Works collectibles
Water Treatment Works Databank # 2
Climb the ledge and move to the next area. Run along the shutters to reach the dead body. Interact with it to obtain Lawful Good force echo.
Water Treatment Works Chest # 1
Before going any further, turn right and you will notice another platform. Double jump followed by dash to reach it. Slice open the treasure chest to receive Edgehawk emitter.
Water Treatment Works Chest # 2
Drop down and go back into the dark tunnel. Keep going straight until you see another treasure chest. Open it to receive Edgehawk switch.
Water Treatment Works Chest # 3
Return to the platform with the dead body. Open the blocked path using Force Push ability. Slice open the treasure chest to receive Edgehawk grip.
Water Treatment Works Chest # 4
Unlock the shortcut and turn right to open the final treasure chest of this area. It contains Scrapper Hair cosmetic for Cal.
Riverbed Watch collectibles
Riverbed Watch Seed Pod # 1
From the position marked on the map, turn back and go through an alley between a cliff and a bunker. Keep hugging the right wall until you come across a glowing point. Cut it down to obtain Tuber Maw: Dathomirian Red seed pod.
Riverbed Watch Treasure # 1
Kill the scavenger droid near the prospector shop on the riverbank to obtain a Priorite Shard.
Riverbed Watch Treasure # 2
After defeating all the droids on top of the silo, go back to the back of its roof to find another Priorite Shard.
Riverbed Watch Seed Pod # 2
Go in the opposite direction of Prospector’s shop until you reach the point marked on the map (right in front of the dam). Destroy the glowing plant on the right to receive Spine Fluff: Alderaanian Blue seed pod.
Riverbed Watch Seed Pod # 3
Turn around to find another glowing plant on the opposite bank. Cut it down to receive Spine Fluff seed pod.
Riverbed watch Seed Pod # 4
Destroy the remaining glowing plant to obtain another Spine Fluff seed pod.
Riverbed Watch Databank # 1
Turn back and go straight. Turn left until you reach the point marked on the map. You will notice a dead body. Interact with to obtain Doma Unbowed force echo.
Riverbed Watch Databank # 2
Right next to the meditation point marked on the map. Scan with Bd-1 to obtain The Warlord’s Standard datapoint.
Riverbed Watch Databank # 3
Unlock the shortcut and climb the lift area to go up. Traverse the net outside the window to go to the top of silo. This area has way too many enemies so beware. Interact with the broken machine to obtain A Brokered Alliance force echo.
Riverbed Watch Databank # 4
In the same location where you killed a scavenger droid. Look to the opposite side of prospector’s shop to find a cave with a nest. Interact with it to obtain Battle Droid Blues force echo.
Riverbed Watch Chest # 1
After defeating all the enemies on the roof of Silo, turn right from the point marked on the map to find an opening. Climb the crates to reach the next floor and turn right to come across a treasure chest. Slice it open to receive Bun Hair cosmetic for Cal.
Riverbed Watch Essence # 1
Turn around and reach the next corner to find a blue essence. Interact with it to obtain a Health upgrade.
Hunter’s Quarry Seed Pod # 1
Go to the marked location on the map. This area is marked by the fighting between Droids and Gorgers. Cut down the glowing plant to obtain Cactus Ball: Dathomirian Red seed pod.
Hunter’s Quarry collectibles
Hunter’s Quarry Seed Pod # 2
Turn around and destroy the other glowing plant to obtain Cactus Ball seed pod.
Hunter’s Quarry Databank # 1
Enter the Hunter Roller Mine Factory via the broken window near the roof. Use BD-1 to scan A Mechanical Touch databank.
Hunter’s Quarry Databank # 2
This one is in the same area. Scan a tablet on a console inside Roller Mine Factory to unlock A Gift Revoked databank.
Hunter’s Quarry Treasure # 1
Look on the opposite console in the same room to acquire a Priorite Shard.
Hunter’s Quarry Essence # 1
Use a roller mine to break a wall outside Hunter’s Quarry Building as indicated on the map. Interact with the blue essence to receive Force upgrade. This will also complete “Investigate the Roller Mine Factory” rumor.
Hunter’s Quarry Databank # 3
It is on the table left of the entrance of the bunker marked on the map. Interact with it to obtain A New Beginning databank.
Hunter’s Quarry Databank # 4
Look to the right inside the same bunker to find a dead body. Interact with it to obtain A Task Too Far force echo.
Hunter’s Quarry Chest # 1
This treasure is located at the very back of the bunker. Slice it open to acquire Light Metal BD-1 material.
Hunter’s Quarry Databank # 5
This is inside a cave with Gorgers. Look at the left wall (with huge skeleton) to interact with it. It unlocks The Wise Hunters databank.
Hunter’s Quarry Chest # 2
Inside the same cave, go to the far end to find a treasure chest inside a small room. Slice it open to acquire Bomber jacket for Cal.
Hunter’s Quarry Chest # 3
Go to the ledge on the left side of the Hunter’s Quarry (marked on the map). Defeat the Grocco to gain access to this treasure chest. Open it to obtain Hunter jacket for Cal.
Hunter’s Quarry Databank # 6
In the same place where you defeated the Grocco, scan a wall to obtain Grocco Sanctuary databank.
Hunter’s Quarry Databank # 7
On the same ledge where you defeated the Grocco, go outside and keep to the right without falling. Interact with the radio to obtain Free Sample force echo. This place is exactly above the meditation point.
Hunter’s Quarry Databank # 8
In the cave where you solved the Koboh black matter puzzle, look at the place from where you obtained the roller mine. Either double jump and dash or use the same roller mine to get past the black matter safely. Interact with the body to obtain An Honest Appraisal force echo.
Hunter’s Quarry Databank # 9
This one is also inside the same cave. Use the force lift ability to open the big gate. Throw the roller mine on to the next glowing mechanism to remove the dark matter. Reach the room and scan a tablet on the ground to unlock The Koboh Emergence databank.
Hunter’s Quarry Essence # 2
Turn around after acquiring the last databank and you will see the blue essence right in front of Cal. Double jump and dash to reach it. Interact with it to gain an additional Skill Point.
Hunter’s Quarry Seed Pod # 3
From the marked position on a cliff, use the jumping platforms (4 of them) to reach the next ledge containing a massive skeleton. Cut a glowing plant near a rock to obtain Pine Fern: Rare seed pod.
Hunter’s Quarry Seed Pod # 4
In the same area, destroy the other glowing plant to obtain Pine Fern seed pod.
Hunter’s Quarry Treasure # 2
From the same area, use the jumping platforms to reach a board Cal can run. Use it to reach the ledge with Relter’s nest. Go inside the small cave and interact with the jackets to obtain a Datadisc.
Hunter’s Quarry Seed Pod # 5
On the same ledge where the massive skeleton is. Go near its head and destroy a glowing plant to obtain Pine Fern seed pod.
Hunter’s Quarry Seed Pod # 6
This plant is between the marked location on map and the purple laser going from the cave to the Hunter’s Quarry. Destroy it to obtain Pine Fern seed pod.
Sodden Grotto Databank # 1
From the position marked on the map, go left and break some cables. Go left and squeeze through metallic bars to reach a cave. Interact with the dead body to obtain Dead Researcher force echo.
Sodden Grotto Databank # 2
On the blue ledge with lots of dead gorgers. The position is marked on the map. Scan a slain Gorger to obtain Dead Gorgers databank.
Sodden Grotto Chest # 1
Keep going down and right from the previous location until you come across a dark cave with a treasure chest located at its end. Slice it open to obtain Scrapyard legs for BD-1.
Sodden Grotto collectibles
Sodden Grotto Databank # 3
This one is on the ledge above the meditation point. Scan the bones on a wall to obtain Massive Ribcage datapoint.
Sodden Grotto Databank # 4
From the meditation point, go right to interact with a skeleton to obtain Prospector’s Remains databank. This meditation point is right before Rancor boss fight.
Sodden Grotto Essence # 1
In the same area, drop down from an opening to start Rancor boss fight. This is an extremely brutal one and you can overcome this monster by following our guide on how to defeat a Rancor. Interact with the essence to obtain a new perk, Shatter.
Sodden Grotto Treasure # 1
From the location marked on the map, go down and right. Squeeze through the small opening and keep going until you come across a scavenger droid. Kill it to obtain a Priorite Shard.
Sodden Grotto Treasure # 2
As soon as you enter the Sodden Grotto, turn left and drop down on a ledge to the right. A Priorite Shard is waiting for you at the end of the path, near some rubble.
Phon’Qi Caverns collectibles
Phon’Qi Caverns Databank # 1
This one is in the basement of a shack near a group of bedlam raiders. From the position marked on the map, go right and remove the door blocking the entrance. Drop down and interact with the grave on the left to obtain Makeshift Grave force echo.
Phon’Qi caverns Databank # 2
After talking to T-1N8, squeeze through the narrow passage to reach the area with growing green plants. Interact with a dead body right next to the meditation point to obtain Abandoned Corpse force echo.
Phon’Qi Caverns Databank # 3
From the position marked on the map, drop down through a hole. A bridge will break on Cal’s fall. Cross the bridge to the right and scan the wall to obtain Cavern Fungus databank.
Phon’Qi Caverns Essence # 1
From the locked door where Seeb Eshan is hiding, turn left and run on the wall to reach the next ledge. Interact with the blue essence to obtain an additional Skill Point.
Phon’Qi Caverns Databank # 4
Drop down the ledge with glowing green flowers (marked on map). Beware of a roller mine in this room. Interact with a corpse to acquire A Gen’dai Plots force echo.
Phon’Qi Caverns Databank # 5
Use force smash power to make a hole in the floor of previous room. Drop down to come across a console. Scan it with Bd-1 to obtain Raider Depot databank.
Phon’Qi Caverns Chest # 1
It is in the same area where the console is. Destroy three roof turrets to get access to this treasure chest. Open it to obtain Bomber Material.
Phon’Qi Caverns Databank # 6
Drop down the ledges inside the cave until you come across a purple locked door. Interact with a wooden log behind the second column to the left to obtain A Cave Too Far force echo. Beware this room is home to a Rancor.
Phon’Qi Caverns Treasure # 1
In the same room as Rancor. Defeat the Rancor and go to the left side of the cave to obtain a Datadisc.
Phon’Qi Caverns Databank # 7
Scan the wall opposite to the datadisc to obtain Rancor Prey databank.
Phon’Qi Caverns Chest # 2
Dive into a small pool in the room where Skoova Steve is. Open the treasure chest at the bottom to obtain Duelist Pommel.
Phon’Qi Caverns Treasure # 2
Destroy the pots after defeating a magnaguard in a cave marked on the map to obtain another Datadisc.
Phon’Qi Caverns Treasure # 3
It is in the room where a purple gate is being guarded by a bedlam raider. Destroy the pots near the entrance of the room to obtain another Datadisc.
Phon’Qi Caverns Treasure # 4
Go to the other side of the room with the purple door housing Urjef Mekor. Destroy the pots near a ledge to obtain the next Datadisc.
Phon’Qi Caverns Chest # 3
In the same area, jump on the wall to the right of the ledge from where you obtained the last datadisc. Climb to the top and open the chest to acquire Slice Magnaguard skill.
Phon’Qi Caverns Essence # 2
In the same room, drop down from the ledge and dash through a green barrier door to the left. Interact with the blue essence to obtain an additional Skill Point.
Phon’Qi Caverns Treasure # 5
In the room with two purple doors, jump on a wall to reach a green barrier window. Cross it to drop in another cave. Obtain a Datadisc lying on the floor.
Phon’Qi Caverns Databank # 8
In the same area, scan a dead body to obtain Dead Jedi databank.
Phon’Qi Caverns Databank # 9
Use the acid ball to burn through the shattered door after being trapped in a room with nowhere else to go. Interact with the corpse to obtain A Fallen Knight force echo.
Phon’Qi Caverns Databank # 10
Keep going forward after you defeat the bosses of this area (marked on the map). Interact with a corpse among the field of glowing flowers to obtain Rayvis’s Search force echo.
Phon’Qi Caverns Databank # 11
In the same room, climb the wall to go through the green barrier. Interact with the console terminal on the right to obtain Republic Control Room databank.
Phon’Qi Caverns Chest # 4
Slice a treasure box in the same room to obtain Map Upgrade: Chests ability which marks all the treasure chests, stim upgrades and BD-1 upgrades on Cal’s Holomap.
Phon’Qi Caverns Essence # 3
From the marked area on the map, go straight and open the shortcut. Turn left to find a blue essence near a lit brazier. Interact with it to obtain another Skill Point.
Phon’Qi Caverns Treasure # 6
Destroy a pot left to the purple gate housing Urjef Mekor to obtain another Datadisc for Zee to examine.
Phon’Qi Caverns Databank # 12
Open the purple gate guarded by a magnaguard by using an acid mine. You can acquire a mine by going to the ledge marked on the map and using Cal’s force pull ability by looking to the left. Interact with a lamp to obtain Scientific Frisson force echo.
Phon’Qi Caverns Chest # 5
In the same room, look to the left to find a treasure chest inside a cave. Open it to obtain the Duelist Grip.
Phon’Qi Caverns Databank # 13
Use an acid mine on a door where you fought the Rancor. Interact with a brazier to obtain As above, So Below force echo.
Phon’Qi Caverns Chest # 6
In the same area, wall jump twice to reach the ledge on the top. Slice open the treasure chest to obtain the Duelist Switch.
Phon’Qi Caverns Chest # 7
Go back to the beginning of Phon’Qi Cavern. Use the slam ability to make a hole in the ground. Drop down the hole to reach a treasure box. Open it to obtain the Duelist Emitter.
Phon’Qi Caverns Databank # 14
In the same area, instead of dropping down the floor, scan a big metallic gate to obtain Cave Turbolift Network databank.
Rambler’s Reach Outpost collectibles
Rambler’s Reach Outpost Chest # 1
Purchase Mysterious Keycode for 10 Priorite Shards from Doma’s Outpost Commodities to open a back door in her shop. Interact with the yellow stim cannister to obtain Stim upgrade.
Rambler’s Reach Outpost Databank # 1
From the marked position on the map, climb a cliff to your right by grappling the vines. Interact with an altar to obtain The First Move force echo.
Rambler’s Reach Outpost Seed Pod # 1
This one is just outside the stable fence. Destroy it to obtain Bluebell Squish: Felucian Yellow seed pod.
Rambler’s Reach Outpost Treasure # 1
From the marked position on the map, keep going left until you see a scavenger droid. Kill it to obtain a Priorite Shard. Beware of Gorgers in the area.
Rambler’s Reach Outpost Treasure # 2
Another scavenger droid is roaming the broken bridge near the stable. Kill it to obtain a Priorite Shard.
Rambler’s Reach Outpost Seed Pod # 2
Go to the top of Pyloon’s Saloon to find a glowing plant. Cut it down to obtain Pine Fern: Nabooan Green seed pod.
Rambler’s Reach Outpost Force Tear # 1
Climb to the top of the tallest tower in Rambler’s Reach outpost. Interact with the force tear to start Fractured Duality challenge.
Rambler’s Reach Outpost Treasure # 3
Go to the top of the same building where you will find Force Tear # 1. Use Relter to glide across the outpost and drop on a building to the right containing another Priorite Shard.
Rambler’s Reach Outpost Seed Pod # 3
In the area marked on the map, go up the ramp until you reach a stone altar to the right. Destroy the glowing plant to obtain Pine Fern: Dathomirian Red seed pod.
Rambler’s Reach Outpost Seed Pod # 4
Climb the cliff in front of you to find another plant to destroy. Drops Pine Fern seed pod.
Rambler’s Reach Outpost Seed Pod # 5
Keep going straight to find another Pine Fern seed pod.
Rambler’s Reach Outpost Databank # 2
In the same area where you found two Pine Fern seed pods, go straight to reach a cave. Interact with a nest to acquire Relter Egg databank.
Rambler’s Reach Outpost Seed Pod # 6
In the same area, drop down a ledge to the right to find a glowing plant. Destroy it to obtain another Pine Fern seed pod.
Rambler’s Reach Outpost Treasure # 4
Go to the outpost and look for a house with Jawas standing at its door. Collect the Datadisc from the shed there.
Rambler’s Reach Outpost Seed Pod # 7
It is on the path leading to the settlement. Destroy the glowing plant to obtain Pine Fern seed pod.
Rambler’s Reach Outpost Databank # 3
Scan the floor of the building marked on the map to obtain Forever Curious databank.
Rambler’s Reach Outpost Databank # 4
In the same house, scan a container to obtain Obsession databank.
Rambler’s Reach Outpost Databank # 5
Go to the house with eye cameras on its front door and a green shield. Use Jedi mind trick on Soont Madas to make him open the door to his basement. Go down and interact with a corpse in a chair to obtain Soont Madas force echo.
Rambler’s Reach Outpost Essence # 1
In the same basement, interact with the blue essence to obtain an additional Skill Point.
Rambler’s Reach Outpost Treasure # 5
Inside an open shed marked on the map. Interact with it to obtain a Datadisc.
Rambler’s Reach Outpost Treasure # 6
Inside the stable right next to a Nekko. Force lift its dung to obtain a Priorite Shard.
Rambler’s Reach Outpost Force Tear # 2
Go into Doma’s shop and interact with a statue there. Cal needs to defeat The Spawn of Oggdo to trigger this event. This force tear contains Fractured History challenge.
Rambler’s Reach Outpost Chest # 3
This one is on the top of a building marked on the map. Open it to obtain Tactical Shirt for Cal.
Rambler’s Reach Outpost Chest # 4
In the same area, drop down to find a blue switch near an open shed. Use BD-1’s electric dart ability to open the door. Enter the room to obtain Swoop Blaster.
Rambler’s Reach Outpost Chest # 5
This one is inside T-1N8 house. To access this house, Cal first needs to rescue her in Phon’Qi Caverns and then talk to her outside her house.
Rambler’s Reach Outpost Seed Pod # 8
Near the back fence of the stable. Destroy a glowing lant to obtain Bluebell Squish seed pod.
Rambler’s Reach Outpost Seed Pod # 9
In the same area near the riverbank. Destroy the plant to obtain Spine Fluff seed pod.
Rambler’s Reach Outpost Chest # 6
Use Nekko to reach a window to the left of the stable. Use force lift to remove the metal grate to the right. Drop down to find another chest containing Unique Metal BD-1 material.
Rambler’s Reach Outpost Chest # 7
Go to a cave behind the Mantis. Use force lift and force slam on a container to obtain Edgehawk Pummel.
Rambler’s Reach Outpost Seed Pod # 10
From the previous position, drop down the ledge to the right. Destroy the glowing plant to obtain Pine Fern seed pod.
Rambler’s Reach Outpost Chest # 8
Open a shutter behind Mantis using force lift to find this treasure chest. Open it to obtain Bomber Pants for Cal.
Rambler’s Reach Outpost Chest # 9
From the position marked on the map, go straight and pass through a short tunnel to reach the outpost. Climb the vines to the right and then force slam another container on the edge of the cliff to obtain Arakyd Heavy Barrel.
Rambler’s Reach Outpost Treasure # 7
Go near the second house with Jawas standing at the front door to collect this Datadisc.
Rambler’s Reach Outpost Essence # 2
From the position marked on the map, go to the top of the buildings and remove the circuit panel. Carry it to another building with the help of a wooden bridge and connect it to the terminal there. Drop down and use BD-1’s electric dart ability to open the house near the Jawas location. Interact with the blue essence inside the house to obtain an additional Skill Point.
Rambler’s Reach Outpost Databank # 6
This one is near the broken yellow bridge on the riverbank. Go to the location marked on the map and scan a broken egg to obtain Turgle’s Shiny Shell databank.
Rambler’s Reach Treasure # 8
Use Nekko to reach the top of the stable. Interact with the shiny object to collect a Priorite Shard.
Pyloon’s Saloon collectibles
Pyloon’s Saloon Treasure # 1
This one is inside a toilet. Interact with it to obtain a Priorite Shard.
Pyloon’s Saloon Databank # 1
Scan a guitar behind the meditation point to obtain Hallikset datapoint.
Pyloon’s Saloon Chest # 1
In the same area, right next to Hallikset. Open this treasure chest to obtain a Scrapper Outfit.
Pyloon’s Saloon Chest # 2
To reach the room containing the second chest, Cal needs to talk to Moran 7 times. He is sitting at the far end of the bar table. Go to the backroom once it is unlocked and open the treasure chest to obtain the Eerin Siina music track.
Pyloon’s Saloon Databank # 2
In the same backroom, scan a pile of boxes to unlock Moran’s Possessions databank.
Pyloon’s Saloon Databank # 3
This will only become available after reaching the endgame. Scan a table near a sitting booth to unlock Angels force echo.
Smuggler’s Tunnels collectibles
Smuggler’s Tunnels Essence # 1
This one is between three pillars inside a cave marked on the map. Interact with the blue essence to obtain an additional Skill Point.
Smuggler’s Tunnels Chest # 1
From the position marked on the map, dive into a hole which leads into a pond beneath the tunnels. The next chest is submerged in the lake to the right. Open it to obtain Chest Tactical material.
Smuggler’s Tunnels Force Tear # 1
In the same area, get out of the water and look to the left of the top ledge. Wall run to reach a door with green shield. Interact with the Force Tear to start Fractured Momentum challenge.
Smuggler’s Tunnels Databank # 1
From the position marked on the map, go up and reach the top ledge. Go through the green barrier door to the right until you reach a dead end. Scan the rubble to obtain the No Way Out databank.
Smuggler’s Tunnels Databank # 2
In the house on Rambler’s Reach containing the green barrier. Interact with a glowing tablet to unlock List of Grievances databank.
Smuggler’s Tunnels Treasure # 1
In the same house lying on the floor of the room adjacent to the green barrier. Interact with it to obtain a Priorite Shard.
Smuggler’s Tunnels Treasure # 2
Drop down the tunnel in the house on Rambler’s Reach marked on the map. The next Priorite Shard is at the end of this dark tunnel.
Smuggler’s Tunnels Databank # 3
In the same tunnel keep going down until you reach a cave. Scan another tablet on the box to obtain Jailbreak Inventory databank.
Smuggler’s Tunnels Treasure # 3
In the same area look at a rubble to obtain the next Priorite Shard.
Smuggler’s Tunnels Databank # 4
Squeeze through a small tunnel in the same area to reach the next cave. Interact with the corpse to obtain Death in the Dark force echo.
Smuggler’s Tunnels Treasure # 4
Cross the green barrier in the same room and collect the final Priorite Shard of this area.
Smuggler’s Tunnels Essence # 2
This one requires a bit of platforming. Dash through the first green barrier to reach a wall Cal can run. Dash through the next green barrier to reach a small room. Interact with the blue essence to unlock a New Perk Slot.
Smuggler’s Tunnels Databank # 5
Go back from the previous place following the same path. After going through the second green barrier, turn right instead of going straight to reach a small ledge with a corpse. Examine the corpse to obtain One Last Victory databank.
Collapsed Passage Treasure # 1
After the wall run section in this area, turn back to find a Datadisc on a collapsed platform.
Harvest Ridge collectibles
Harvest Ridge Chest # 1
It is on top of the cliff as marked on the map. Open the chest to obtain Wanderer pants.
Harvest Ridge Seed Pod # 1
From the previous location, drop down two ledges to the right to come across a glowing plant. Cut it down to obtain Palm Fruit Shell: Alderaanian Blue seed pod.
Harvest Ridge Seed Pod # 2
From the last area, go straight on the ledge and destroy another glowing plant to obtain Palm Fruit Shell seed pod.
Harvest Ridge Seed Pod # 3
Use the wall run on the planks to the left to reach the next ledge. Cut down another glowing plant here to obtain Palm Fruit Shell seed pod.
Harvest Ridge Treasure # 1
Turn back and climb to the top using Cal’s alternate wall jump ability. Reach the next ledge by running across the wooden plank. Reach the end of the ledge to collect a Priorite Shard.
Harvest Ridge Seed Pod # 4
Go to the previous ledge using the wall run. Climb the cliff from there as marked on the map. Destroy the glowing plant right at the edge of the cliff to obtain Palm Fruit Shell: Rare seed pod.
Harvest Ridge Seed Pod # 5
In the same area, destroy more plants to obtain Palm Fruit Shell seed pod.
Harvest Ridge Seed Pod # 6
On the same cliff, Cal will obtain another Palm Fruit Shell seed pod.
Harvest Ridge Seed Pod # 7
Destroy some glowing bugs to obtain another Palm Fruit Shell seed pod.
Harvest Ridge Seed Pod # 8
On the same spot, cutting down a glowing plant will net Cal another Palm Fruit Shell seed pod.
Harvest Ridge Seed Pod # 9
Drop down from the cliff and reach the marked area on the map. Cut down a glowing plant to obtain Bluebell Squish: Nabooan Green seed pod.
Harvest Ridge Seed Pod # 10
Destroy another glowing plant in the same area to obtain Palm Fruit Shell seed pot.
Harvest Ridge Seed Pod # 11
The last glowing plant also drops Bluebell Squish seed pod when cut down.
Harvest Ridge Seed Pod # 12
This one is near the fence on the riverbank. Cut it down to obtain Bluebell Squish seed pod.
Harvest Ridge Seed Pod # 13
From the position marked on the map (near a workbench), go straight until you reach Riverbed Watch. Go up on the left slope until you enter the Harvest Ridge again. Turn left to find a glowing plant. Cut it to obtain Palm Fruit Shell: Felucian Yellow seed pod.
Harvest Ridge Seed Pod # 14
From the position marked on the map, go straight until you come across a glowing plant near the fence to your right. Cut it down to obtain Palm Fruit Shell seed pod.
Harvest Ridge Treasure # 2
Go straight from the marked position on the map and open the door by pulling the rope. Reach the moldy depths where a Nekko is standing. Climb the ledge to the left to obtain a Datadisc.
Harvest Ridge Seed Pod # 15
The next glowing plant is on the left corner of Harvest Ridge. Drops Bluebell Squish seed pod.
Harvest Ridge Seed Pod # 16
Go to the area where two Nekko are standing (right side of the Harvest Ridge Barn). Climb the cliff there and reach its end to find another glowing plant. Cut it down to obtain Palm Fruit Shell: Dathomirian Red seed pod.
Harvest Ridge Seed Pod # 17
Use Nekko to do a super jump near the closed Barn door. Run on the metallic sheets to reach the next ledge from where you can enter the barn. Destroy another glowing plant on this ledge to obtain Palm Fruit Shell seed pod.
Harvest Ridge Databank # 1
Enter the barn and interact with Nekko egg to unlock Home on the Range force echo.
Harvest Ridge Seed Pod # 18
Go to the position marked on the map. Cut down the glowing plant to obtain palm Fruit Shell: Nabooan Green seed pod.
Harvest Ridge Chest # 2
Go to Harvest ridge barn and use Nekko to reach the upper ledge with the help of wall run ability. Turn back and use the second metallic sheet to reach a far-hanging pole. Swing from the pole to reach the top of the Barn. Open the chest to obtain Shortpaw’s Dance music track.
Harvest Ridge Essence # 1
To find this essence, you need to solve harvest Ridge barn puzzle to reach the top of the highest building in the game. Follow our guide on how to do it. Interact with the blue essence on your way to the top to acquire a New Perk Slot.
Fort Kah’lin collectibles
Fort Kah’lin Chest # 1
Near the marked location on the map behind the CIS tanker. Beware of Droid and Bedlam Raider in the area. Open the treasure chest to obtain Bomber Shirt for Cal.
Fort Kah’lin Databank # 1
Go straight from the meditation point and enter an open shed. Scan a dead droid to the left of entrance to obtain Past Signs of Life databank.
Fort Kah’lin Databank # 2
Go left from the meditation point and enter an open room. Scan a table to obtain Bandit Camp databank.
Fort Kah’lin Databank # 3
Keep going to the left of the meditation point in Fort Kah’lin until you reach the end. Interact with a blaster on the door of a locked house to obtain Victorious Surrender force echo.
Fort Kah’lin Chest # 2
In the area where you must fight Spawn of Oggdo. Defeat him to open this treasure chest and obtain Poncho Outfit for Cal.
Fort Kah’lin Treasure # 1
In the same area near the frog statue. Interact with it to obtain a Priorite Shard.
Fort Kah’lin Seed Pod # 1
This one is on the cliff marked on the map. Destroy the glowing plant to obtain Goldenlight Moss: Rare seed pod.
Fort Kah’lin Seed Pod # 2
In the same area, go near the cliff with a water stream. Destroy the glowing plant to obtain Goldenlight Moss seed pod.
Fort Kah’lin Seed Pod # 3
This one is also in the same area. Follow the water stream down the cliff until you reach the wall of the dam. Destroy the glowing plant to obtain another Goldenlight Moss seed pod.
Fort Kah’lin Databank # 4
Use a Relter to glide from the point marked on the map. Turn right and drop on the roof of the very first house. Scan the body of battle Droid inside this house to obtain A House Divided databank.
Fort Kah’lin Databank # 5
In the same house on the opposite side, scan the B1 Droid’s body to obtain Internal Affairs force echo.
Fort Kah’lin Chest # 3
Go to the house with a small gap in its wall to talk to Filkus Gorr. Use Jedi Mind trick on Filkus (cruel option) to make him open a treasure chest in the same house. Open it to collect Mountaineer material.
Fort Kah’lin Essence # 1
It is on the ledge which leads to Spawn of Oggdo’s location. Interact with the blue essence to obtain an additional Skill Point.
Untamed Downs collectibles
Untamed Downs Databank # 1
From the position marked on the map, collect a roller mine (it follows you if you don’t go way too far) and turn back. Go uphill and to the right. Keep going until you reach the entrance of a dark cave. Collect the mine and use it to blow open a wall at the end of the cave. Enter the new area and interact with the floor to obtain Shelter of Last Resort force echo.
Untamed Downs Chest # 1
In the same room, slice open a treasure chest to obtain Santari Khri lightsaber.
Untamed Downs Databank # 2
Go to the cave of Bilemaw as indicated on the map. Defeat this monster and interact with the skull on the right end of the cave to obtain Bilemaw Burrow databank.
Untamed Downs Databank # 3
Go to the cave with bedlam raiders as marked on the map. Climb the vines on a column and use them to reach the inaccessible ledge on the opposite side of the cave. Listening to the bedlam raiders will unlock Turgle Makes a Deal databank.
Untamed Downs Chest # 2
Talk to Gaara sitting on top a treasure chest on the opposite side of the ledge. Use jedi mind trick on Gaara (select unreliable) to make her move away from the chest. Open it to obtain Mountaineer Jacket for Cal.
Untamed Downs Databank # 4
From the position marked on the map, turn right and go up along the water stream. Defeat a bedlam raider surrounded by three roller mines. Interact with the grass to obtain Breaking, Not Entering force echo. It is right in front of a locked bunker.
Untamed Downs Databank # 5
Use Nekko to super jump into a dark cave with glowing green flowerbeds. Drop down and go right until you come across a wall BD-1 can scan. Obtain Mogu Den databank by scanning the wall.
Untamed Downs Chest # 3
From the marked position on the map, go right and run a wall to reach a ledge with Relter. Open this treasure box to obtain Geonosian music track.
Untamed Downs Databank # 6
You need to use a Relter to reach the area marked on the map. Drop down to the top of a ship and turn left to make your way into a dark cave. Interact with the rocks to obtain The Ties That Bind databank.
Untamed Downs Databank # 7
To obtain A Small Mercy databank, interact with a grave in a small cave under the cliff, right in front of the position marked on the map.
Untamed Downs Treasure # 1
From the meditation point inside the caves, go straight and enter the cave beneath the waterfall. Interact with the glowing object to collect a Priorite Shard.
Untamed Downs Databank # 8
In the same cave, scan a wall to the right of meditation point to unlock An Ecological Study databank.
Untamed Downs Databank # 9
Go inside a cave with lots of roller mines and a green shield door. Interact with a destroyed roller mine on the right to obtain Technological Betrayal force echo.
Untamed Downs Databank # 10
Scan a dead body beside a console terminal to unlock The Truth databank. To enter this area, cross the green barrier inside the cave with lots of mines.
Untamed Downs Databank # 11
In the same area, go to the opposite room and scan a tablet on the ground to obtain Gift of Fire databank.
Untamed Downs Essence # 1
In the same room, interact with the blue essence to gain a new Skill Point.
Untamed Downs Databank # 12
In the same area, scan the hanging container on the left side of the tunnel to obtain The Deep Caverns databank.
Untamed Downs Treasure # 2
Collect a Priorite Shard from the position marked on the map. It is right in front of a cave entrance with a meditation point.
Untamed Downs Databank # 13
From the meditation point, double jump and dash to reach the next ledge. Keep going until you come across a sign BD-1 can scan to unlock Warning Sign databank.
Untamed Downs Essence # 2
Slide down into the cave with three large creatures including a Wampa and a Grocco from the position marked on the map. Defeat these creatures and interact with the blue essence in the arena to gain an additional Skill Point.
Untamed Downs Databank # 14
From the same arena, climb the vines to reach the upper ledge. Interact with a pickaxe to obtain The Feeding Grounds force echo.
Untamed Downs Treasure # 3
Force lift a rock and smash it to obtain another Priorite Shard, near a destroyed imperial ship marked on the map.
Untamed Downs Seed Pod # 1
Destroy a glowing point near the path marked on the map to obtain a Bluebell Squish seed pod.
Untamed Downs Chest # 4
To open this chest, you need to hit the blue lamp with BD-1’s electric dart ability. Beware of the Gorgers in the area. Open the treasure chest to obtain Arakyd Heavy Grip.
Untamed Downs Seed Pod # 2
On the top of a cliff near a closed bunker. Destroy this glowing plant to obtain Palm Fruit Shell: Nabooan Green seed pod.
Untamed Downs Chest # 5
This locked chest is on a cliff between Untamed Downs and Harvest Ridge. Shoot the blue lamp with electric dart to unlock it. Open the treasure chest to obtain Hunter Material.
Untamed Downs Seed Pod # 3
Destroy a glowing near the stable gate to obtain Spine Fluff seed pod.
Untamed Downs Treasure # 4
In the same area of chest number 4, drop down from the cliff and dash halfway through the fall to reach an inaccessible ledge. Interact with the shining object to receive a Priorite Shard.
Untamed Downs Chest # 6
In the area with 3 shielded droids, open the room to a bunker by hitting the blue lamp with electric dart. Look through the window to the left side of the bunker to find the blue lamp. Open the treasure chest to obtain Swooper Legs for BD-1.
Untamed Downs Treasure # 5
In the same cave room as Mogu. You can make your way here from both sides. It is on the ledge to the left of the main entrance. Interact with it to obtain a Priorite Shard.
Untamed Downs Treasure # 6
On the ledge opposite the blue lamp of chest number 5. To reach this ledge, drop down from the cliff marked on the map and dash towards it. Interact with the shining object to receive another Priorite Shard.
Alignment Control Center collectibles
Alignment Control Center Chest # 1
This treasure chest is on the right of the meditation point. It can only be unlocked by completing all 7 Jedi Chambers available on Koboh. Open it to receive Treasure Map: Essences.
Alignment Control Center Databank # 1
From the meditation point, go straight until you reach the next room. Interact with a destroyed door to the right to obtain Patience force echo.
Alignment Control Center Chest # 2
Turn back from the meditation point and ride the elevator to the caves. Go up the path and drop from the hole to reach the ledge containing the treasure chest. Open it to obtain Harmony Pommel.
Alignment Control Center Treasure # 1
Climb the destroyed imperial ship and use it to reach the next ledge using double jump followed by dash. Climb the vines to the right and keep going straight until you see a ledge to the left. There will be a body with a shining treasure on the third ledge below the cliff. Make your way to the ledge and interact with it to obtain a Priorite Shard.
Swindler’s Wash collectibles
Swindler’s Wash Seed Pod # 1
From the cliff with green ponds, as marked on the map, jump to another cliff to the right. Destroy a glowing plant to obtain Goldgenlight Moss: Nabooan Green seed pod.
Swindler’s Wash Chest # 1
This one is on a cliff with a fast-moving droid. Slice this treasure chest open to obtain Tactical Pants for Cal.
Swindler’s Wash Force Tear # 1
This force tear is hidden behind a waterfall. From the position marked on the map, go straight and drop down the ledge to reach the waterfall. Interact with the tear to start Fractured Resolve challenge.
Swindler’s Wash Seed Pod # 2
In the same area as the force tear, go back from the cave and climb the ledges to notice a glowing plant on the left cliff. Destroy it to obtain Spine Fluff: Felucian Yellow seed pod.
Swindler’s Wash Chest # 2
It is on the top of a cliff opposite the broken bridge. Open the treasure chest to obtain Tactical Shit for Cal.
Swindler’s Wash Seed Pod # 3
Destroy a glowing plant right next to the chest number 2 to obtain Pine Fern: Alderaanian Blue seed pod.
Swindler’s Wash Seed Pod # 4
In the exact same location, cut down a glowing plant to obtain Pine Fern seed pod.
Swindler’s Wash Seed Pod # 5
The fifth seed pod, Pine Fern, is also in the same location.
Swindler’s Wash Seed Pod # 6
Destroy some fireflies to obtain the last Pine Fern seed pod from this area.
Swindler’s Wash Treasure # 1
Go inside a small cave on a ledge to obtain a Priorite Shard. This place is to the right of the broken dam in Swindler’s Wash.
Swindler’s Wash Treasure # 2
This one is in a cave above Bilemaw. Run across the wall to reach this cave and interact with a glowing object to obtain a Priorite Shard.
Swindler’s Wash Essence # 1
From the same cave and wall run two platforms until you reach the top of a column. Interact with the blue essence on the next column to obtain a Health upgrade.
Swindler’s Wash Seed Pod # 7
On the left side of the riverbank from the position marked on the map. Destroy this glowing plant to obtain Spine Fluff seed pod.
Swindler’s Wash Seed Pod # 8
In the same area, go straight to find another Spine Fluff seed pod.
Swindler’s Wash Treasure # 3
From the pillar where you obtained the health essence, jump on the pillar to the right. Make sure to use dash move to reach it. Interact with the glowing object to receive another Priorite Shard.
Swindler’s Wash Seed Pod # 9
Destroy a glowing plant near the left side of the broken bridge to obtain a Goldenlight Moss seed pod.
Swindler’s Wash Seed Pod # 10
Just right of the meditation point, destroy this glowing plant to obtain a Goldenlight Moss seed pod.
Swindler’s Wash Seed Pod # 11
In the same area, opposite a blocked gate with a security droid. Drops Goldenlight Moss seed pod when cut down.
Bygone Settlement collectibles
Bygone Settlement Chest # 1
This one requires a lot of platforming. Use Nekko’s super jump to zipline a rope to the next platforms. Wall run it to reach the hanging ledges. Swing across them to reach the next wall run platform. Use the zipline at its end to reach the highest ledge of the valley. Open the treasure chest to obtain Geonosian Head for BD-1.
Bygone Settlement Chest # 2
From the same ledge, double jump and use force pull to grab a hanging rope. Swing to the other side and enter the house. Drop down the ledge to come across a treasure chest. Open it to obtain Choppy Forward hair for Cal.
Bygone Settlement Treasure #1
Use Nekko to super jump and reach a ledge to the left of the valley, as marked on the map. Interact with the shining object to obtain a Priorite Shard.
Bygone Settlement Seed Pod # 1
On a ledge in the middle of the settlement. Use Nekko’s super jump to reach this ledge. Cut the glowing plant to obtain Spine Fluff: Nabooan Green seed pod.
Bygone Settlement Seed Pod # 2
Marked on the map near abandoned houses. Destroy this glowing plant to obtain Bluebell Squish: Dathomirian Red seed ball.
Bygone Settlement Chest # 3
From the same location wall run to reach the top of settlement by hanging on the ceiling. Go to the area opposite the house where Jawas are hiding. Wall run again to reach the very top of the settlement and drop on a wooden platform below. Interact with the treasure chest to obtain the Wanderer Jacket for Cal. Open the shortcut to this area by cutting a rope.
Bygone Settlement Databank # 1
From Jawas house, go up and scan rubble inside a destroyed house to obtain Ancient Architecture databank.
Bygone Settlement Treasure # 2
In the same house, interact with the glowing object to obtain a Priorite Shard.
Bygone Settlement Treasure # 3
Climb to the area with air thrusters stopping your way forward. Dash through the obstacle to reach the next climbing point. Drop down and dash forward to reach the next set of ledges. Pull the bridge down and make your way across. Keep climbing until you reach a house with Droids and Bedlam Raider threatening the Jawas. Defeat the enemies to save the Jawas. Open a shutter in the same room with force pull and squeeze through the gap to reach the next room. Interact with the object to obtain a Priorite Shard.
Bygone Settlement Chest # 4
After saving Jawas, go through the path they open for Cal. Open the chest on the left side of the ledge to obtain Geonosian Legs for BD-1.
Bygone Settlement Databank # 2
Pull the door to free the Jawas from the location marked on the map. Scan the floor to obtain the next databank.
Bygone Settlement Treasure # 4
In the same area where the freed Jawas are, go to the back of the ship and collect another Priorite Shard.
Bygone Settlement Essence # 1
Climb the destroyed structures until you reach the top of the settlement where three Jawas are standing on a ledge. Interact with the blue essence to the right to obtain an additional Skill Point.
Bygone Settlement Treasure # 5
Go to the ruined structure area by squeezing through a small gap to the left of the settlement. Interact with the shining object to obtain another Priorite Shard.
Bygone Settlement Seed Pod # 3
From the position marked on the map, go straight until you come across a glowing plant on a stone structure. Cut it down to obtain a Bluebell Squish seed pod.
Star Wars Jedi Survivor Koboh Basalt Forest collectibles
Basalt Forest is the 3rd region of planet Koboh in Jedi Survivor and is further divided into 6 sub-regions
Basalt Rift collectibles
Basalt Rift Treasure # 1
Destroy the pillars in the cave marked on the map to receive a Priorite Shard.
Basalt Rift Seed Pod # 1
Open the shortcut and use the zipline to reach the next ledge. Destroy the glowing plant to obtain Goldenlight Moss: Dathomirian Red seed pod.
Basalt Rift Databank # 1
In the same area, scan a pillar to obtain Basalt Pillars databank.
Basalt Rift Treasure # 2
Wall run in the alley to avoid falling on the slippery slope below. Use rope pull ability to reach the next ledge. Turn around and wall-run again to reach the upper platform. Interact with the object to obtain a Priorite Shard.
Basalt Rift Databank # 2
From the broken bridge, jump to the next cliff and scan a destroyed drop pod to obtain Turf Wars databank.
Basalt Rift Databank # 3
Defeat the three stormtroopers in cave and then interact with destroyed Rawka eggs to obtain Same Story, Different Planets force echo.
Basalt Rift Chest # 1
In the same cave, drop down to reach a hidden area. Open the treasure chest here to obtain Hunter Shirt for Cal.
Basalt Rift Databank # 4
Scan the corpse of a stormtrooper in Bilemaw’s den to obtain Bilemaw’s Revenge databank.
Basalt Rift Chest # 2
In the same area, go inside Bilemaw’s den to find a treasure chest. Slice it open to obtain Hunter Pants for Cal.
Basalt Rift Databank # 5
Scan a table in Toa’s camp to obtain Risk and Revenge databank.
Basalt Rift Databank # 6
Destroy a group of stormtroopers accompanied by a shield wielding one. Scan a broken metallic container on the right of the cliff to obtain The Short Straw databank.
Basalt Rift Chest # 3
This treasure chest is right next to the previous databank. Open it to obtain Crew Cut Hair for Cal.
Basalt Rift Databank # 7
Scan the flowing water on a ledge right before the sleeping Bilemaw to obtain Bilemaw Pools databank.
Basalt Rift Chest # 4
After leaving Bilemaw’s area, drop down using a ledge. Turn around to see a cave beneath the ledge. Enter it to find a treasure chest containing Diligence Pommel.
Basalt Rift Seed Pod # 2
This glowing plant is in the same area as sleeping Bilemaw. Destroy it to obtain Greenlight Moss: Felucian Yellow seed pod.
Basalt Rift Seed Pod # 3
In the same area and opposite the previous plant. Drops Greenlight Moss seed pod when cut down.
Basalt Rift Treasure # 3
Wall run multiple times to reach the upper platform in the area where Mogu is. The building is marked yellow. Interact with the glowing object to obtain a Datadisc.
Basalt Rift Chest # 5
From the same position, go back and down a muddy path to reach a stim cannister. It can be noticed from afar because of the Relter sitting atop it. Open it to obtain a Stim Upgrade.
Basalt Rift Treasure # 4
Destroy a scavenger droid in the area marked on the map to obtain a Priorite Shard. Beware of the shielded stormtroopers. The easiest way to catch this scavenger droid is to attack it from the ledge above his resting position.
Basalt Rift Treasure # 5
In the valley swarmed with the Koboh black matter, climb the vines to reach a cave on the right. Swing from the vines to reach the top ledge of the cave. Interact with the glowing object to obtain a Datadisc.
Basalt Rift Databank # 8
In the same area, keep going left of the cave until you reach a ledge. Don’t climb it and scan it while hanging from it to obtain Koboh Dust datapoint.
Basalt Rift Seed Pod # 4
Destroy another glowing plant inside Toa’s camp to obtain Goldenlight Moss seed pod.
Basalt Rift Seed Pod # 5
From the first datapoint scan turn back and use the zipline. Halfway through jump on a stone bridge and go inside a small cave to the right. Cut down the glowing plant to obtain Goldenlight Moss seed pod.
Nekko Pools collectibles
Nekko Pools Treasure # 1
From the meditation point in Nekko pools, turn back and go into the cave with waterfalls. Interact with the shining object at the end of the waterfall to obtain a Priorite Shard.
Nekko Pools Treasure # 2
Go into the cave to the right of the meditation point as marked on the map. Reach the end to find another Priorite Shard.
Nekko Pools Seed Pod # 1
From the same position, go back and turn left to come across a small valley with a glowing plant. Destroy it to obtain Bluebell Squish: Alderaanian Blue seed pod.
Nekko Pools Databank # 1
In the same area, scan the floor to obtain Nekko Scratches databank.
Nekko Pools Seed Pod # 2
In the same area near the opposite wall, destroy another glowing plant to obtain Bluebell Squish seed pod.
Nekko Pools Chest # 1
From the meditation point, go back up and cross the sliding path with the help of a Nekko. Keep going until you see a cave to the right (right near the broken door). Use Nekko’s super jump to reach the cave. Open the treasure box at the end of the cave to obtain Swooper Body for BD-1.
Bilemaw Den collectibles
Bilemaw Den Chest # 1
From the meditation point, go up until you come across a sleeping Bilemaw. Defeat stormtroopers here and look behind a container on the far side of the ledge to find a treasure chest. Open it to obtain Tactical Material.
Bilemaw Den Essence # 1
From the meditation point, turn right and enter a small dark cave. Interact with the blue essence to unlock a new ability, Confusion: Major Fauna.
Bilemaw Den Seed Pod # 1
From the same area go back and turn right. Keep going until you see a glowing plant near the left wall of the cliff. Destroy it to obtain Goldenlight Moss: Alderaanian Blue seed pod.
Rift Passage collectibles
Rift Passage Chest # 1
From the same platform, turn back and look to the right to find a blue switch. Use BD-1’s electric dart ability to open a treasure chest on the bottom ledge. Simply drop down to the ledge and open the chest to obtain Kashyyyk Paint BD-1 material.
Rift Passage Treasure # 1
From the meditation point, go straight into the caves and use the zipline to traverse to the next ledge. Interact with the shining object at the top ledge to obtain a Datadisc. Forest Array Databank # 1
From the meditation point go straight and scan a thorny barrier to unlock Koboh Barrier databank.
Forest Array collectibles
Forest Array Chest # 1
From the last location, go left and drop down. Quickly move to the next ledge using Cal’s rope pull ability before being killed by Koboh’s black matter. Scale the fence and jump to the platform on the right. Open the treasure chest to collect Hunter Shirt for Cal.
Forest Array Treasure # 1
From databank 1 location, drop down on the right to obtain a Datadisc. Beware of the black matter in the area.
Forest Array Treasure # 2
In the same, a bit further to the right. Force your way through the black matter to obtain the second Datadisc.
Forest Array Databank # 2
To reach this point, go left from the meditation point until you come across a big bird. Climb the ledge and scan the floor to obtain Epic Moltings databank.
Forest Array Chest # 2
In the arena with lots of enemies, as marked on the map, wall run to reach a hanging poll. Use it to reach a higher platform using double jump followed by dash. Open the treasure chest to obtain Light Mustache hair.
Forest Array Databank # 3
Go out of the same arena after defeating the Mogu. Scan a wall at the end of the walkway to obtain Auxiliary Array Telescope databank.
Forest Array Essence # 1
In the same area, drop down on a ledge from the broken fence. Use Cal’s rope pull ability to move to the next ledge. Climb across using the roof. Interact with the blue essence to gain an additional Skill Point.
Forest Array Chest # 3
Go to the top of the forest array building. Interact with the treasure chest on the right to obtain Diligence Switch.
Forest Array Databank # 4
In the same area, drop down into the building and scan the floor in the middle to obtain Orb Amplifier databank.
Forest Array Treasure # 3
After destroying the Koboh Barrier using Orb Amplifier, go into the next room and use the beams to reach the top ledges. Collect a Datadisc from atop a ledge.
Forest Array Chest # 4
In the same area after climbing the platforms, unlock a shortcut by cutting the rope. Go forward until you come across the machine gun-wielding stormtrooper. Turn right and go up the slope. Keep hugging the right wall to find a small crevice for Cal to squeeze through.
Push the beam and make your way across to the next platform. Open the treasure chest to obtain Swooper Head for BD-1.
Forest Array Essence # 2
Turn around and keep going until you reach some swinging poles. Make your way across with their help and a hanging rope. Interact with the blue essence to obtain a New Perk, Fortification.
Forest Array Databank # 5
Go straight from the meditation point in Bilemaw den to reach an area with dead Stormtroopers. Scan the wall to obtain Indomitable datapoint.
Forest Array Treasure # 4
Rotate the Orb Amplifier towards the mediation point. Run along this path to come across another Datadisc as marked on the map.
Forest Array Chest # 5
Use the Orb Amplifier to clear the path to the next chest. Open it to obtain Diligence Grip.
Forest Array Databank # 6
In the same area, interact with the glowing object to obtain Central Rotational Apparatus databank.
Forest Array Chest # 6
While making your way to the top of forest Array after freeing the giant bird, drop down on a platform with the final treasure chest of the area. Open the treasure chest to obtain Hunter Material for Cal.
Forest Array Treasure # 5
In the same area, use a Relter to glide across. Obtain another Datadisc lying among the swarm of black matter. This is a suicide mission so don’t worry.
Forest Array Treasure # 6
On the bridge with a lot of stormtroopers and a Bilemaw, go to its broken end to receive another Datadisc.
Forest Array Treasure # 7
From the workbench marked on the map, drop down into the swarm of black matter. Force your way to the farthest ledge to obtain another Datadisc.
Forest Array Treasure # 8
From the meditation point, go straight until you come across a purple beam on the stairs. Use BD-1’s spray ability to guide the beam on the corruption present on the left pillars. This will destroy the pillars and drop another Datadisc for Cal to obtain.
Forest Array Seed Pod # 1
In the area where a stormtrooper is sitting on platform. Look to the left of the wooden platform to find a glowing plant. Destroy it to obtain Goldenlight Moss seed pod.
Forest Array Treasure # 9
In the arena with the Orb coupler, collect the Datadisc lying among the swarm of black matter.
Forest Array Treasure # 10
The final Datadisc is on a platform plagued by black matter. It is a tricky one. Force your way to the tree in the middle of the platform to obtain your reward.
Rehabilitation Wing collectibles
Rehabilitation Wing Essence # 1
From the meditation point, go straight and then turn right to enter a big hall. Interact with the blue essence to gain Health upgrade.
Rehabilitation Wing Databank # 1
From the same location, go outside and walk on a beam. Hang from the beam to pass the obstacles and reach the next platform. Interact with the fence to obtain Beyond the Abyss force echo.
Jedi Survivor Koboh Stone Spires collectibles
The Stone Spires region of Koboh is in Star Wars Jedi Survivor is divided into three sub-regions
Igneous Fissure collectibles
Igneous Fissure Databank # 1
From the meditation point marked on the map, go into the caves with the pipes. Use Cal’s wall run ability to cross the gap and scan a cage to obtain Caged Nekko databank.
Igneous Fissure Databank # 2
In the same area, go straight and find a force echo hidden behind a structure on a platform. Interact with it to obtain Dark Waters force echo.
Igneous Fissure Treasure # 1
In the same area, climb Nekko’s cage and use it to reach the upper ledge. Interact with the shining object to the left to obtain a Priorite Shard.
Devastated Settlement collectibles
Devastated Settlement Databank # 1
From the meditation point, climb the ledge and reach the chamber with the fast-moving BX-Droid. Squeeze through the crevice to reach the next ledge. Interact with the traveling gear on the left to unlock A Patient Master databank.
Devastated Settlement Treasure # 1
This one requires you to solve a puzzle in the same chamber. Bring an orb in the chamber and first place it on the left wall. Use the movable block to retrieve the orb and place it in the orb coupler. Rotate the contraption in the middle of the room until the purple beam moves to the extreme right.
Use BD-1’s spray ability to direct the purple beam towards the black matter. It will result in destroying the black matter and you will get a Datadisc which was previously trapped in it.
Devastated Settlement Treasure # 2
Go back and up the ramp until you reach Relter’s resting position. Reach the wall with vertical scratches in front of you. Drop down the wall to collect another Datadisc. Don’t worry about falling into the chasm.
Devastated Settlement Chest # 1
Use the Relter to glide to the farthest pillar with a treasure chest. Open it to obtain Harmony Switch.
Devastated Settlement Seed Pod # 1
On the same pillar, destroy the glowing butterflies to obtain Crimson Jelly Spire: Felucian Yellow.
Devastated Settlement Databank # 2
Use the Relter to reach a door on the pillar to the right. Interact with the book to obtain An Instruction force echo.
Devastated Settlement Databank # 3
Climb the ledge outside the room and enter a cave to the right where a Grocco is strolling. Interact with the floor to obtain Technological Deficit force echo.
Devastated Settlement Treasure # 3
In the same room, use BD-1’s spray ability to destroy the black matter. Go behind the orb coupler to obtain another Datadisc.
Devastated Settlement Seed Pod # 2
From the meditation point, use Relter to glide to a column with lots of gorgers (straight). Destroy a glowing plant there to obtain Crimson Jelly Spire seed pod.
Devastated Settlement Treasure # 4
On the same column, interact with a glowing object near the tree to obtain another Datadisc.
Devastated Settlement Databank # 4
Scan a rock with air drafts on the same column to unlock Thermal Vent databank.
Devastated Settlement Databank # 5
Use the relter right in front of meditation point to glide to the platform with Droid shooters. Use thermal vent to gain more altitude and reach it easily. Scan a wall to obtain Chamber Mural databank.
Devastated Settlement Databank # 6
Turn right and enter a chamber on the same platform. Wall run and interact with the rocks on the right to obtain Idle Talk databank.
Devastated Settlement Essence # 1
In the same chamber, interact with blue essence to obtain Force upgrade.
Devastated Settlement Treasure # 5
Turn right and drop down into a chamber with lots of black matter. Use BD-1’s spray ability to burn it all down with the help of purple laser. This will drop another Datadisc for Cal to obtain.
Devastated Settlement Treasure # 6
Go back and bring back an orb to place in the Orb coupler. The orb coupler is on the lower platform to the right. Guide the purple laser with the help of BD-1’s spray ability to burn the black matter on the opposite wall. Guide the purple light through the floor to reach this point. Reward for completing this puzzle is another Datadisc.
Devastated Settlement Seed Pod # 3
Use the relter in the same area to glide towards thermal vents. Use them to reach the highest column with a small pond. Destroy a glowing plant there to obtain Spine Fluff: Dathomirian Red seed pod.
Devastated Settlement Seed Pod # 4
Turn left and destroy another glowing plant in the same area to obtain Spine Fluff seed pod.
Devastated Settlement Treasure # 7
Kill a scavenger robot in the same area to obtain another Datadisc.
Devastated Settlement Chest # 2
Dive in the pool on the same column to find a treasure chest. Open it to obtain Hard Leather weapon material.
Devastated Settlement Databank # 7
Use the relter in this area to travel to the cliff to the right. Use thermal vents to reach there. Kill the two bedlam raiders and go the left edge and interact with the rubble to obtain The Seeds of Concern force echo.
Devastated Settlement Treasure # 8
In the same area, go inside the chamber and pull the block from the farthest wall. Use it to jump inside the gap and obtain another Datadisc.
Devastated Settlement Essence # 2
Place the orb inside the orb coupler and squeeze through the crevice to reach the next room. Use BD-1’s spray ability to destroy the black matter right in front of you. Interact with the blue essence to obtain an Additional Perk, Precision.
Devastated Settlement Databank # 8
Turn right and enter a small area right next to the force essence. Interact with the utensils to obtain A World Away force echo.
Devastated Settlement Databank # 9
Use the Relter to glide towards the cliff right in front of you. This area is known as the Grand Courtyard and needs you to get the help of thermal vents to reach there. Enter the alley to the left and scan a wall to obtain Central Manse databank.
Devastated Settlement Databank # 10
Go back and enter the courtyard from the main gate. Scan a wall to the left to obtain Training Courtyard databank.
Devastated Settlement Databank # 11
Use the rope to climb up and enter the rooms from the broken wall to the right. Turn left and interact with the fallen books in the first room to obtain Cataclysm force echo.
Devastated Settlement Databank # 12
Go to the farthest room in this area and scan a bookshelf to obtain Theses of Yaddle databank.
Devastated Settlement Databank # 13
Go to the room to the right and leave it at the other door. Scan a destroyed wall to obtain Devastated Remains databank.
Devastated Settlement Seed Pod # 5
From the meditation point, go the left ledge of the cliff. Use the Relter there and glide to the extreme left until you reach a ledge with a couple of Rawka and Relter. Destroy the glowing plant in the area to obtain Crimson Jelly Spire: Rare seed pod.
Devastated Settlement Seed Pod # 6
In the same area, kill some fireflies to obtain another Crimson Jelly Spire seed pod.
Devastated Settlement Force Tear # 1
From the same ledge, jump to the next one on the right. Interact with the purple glow inside a broken house to start Fractured Punishment challenge.
Devastated Settlement Treasure # 9
Use Relter from the next platform and use it to glide to the right. Drop down to a ledge on the same cliff. Enter the room to fight a couple of droids. Interact with the shining object at the end of the room to obtain a Datadisc.
Devastated Settlement Databank # 14
Go back and scan a boulder to the right to obtain Fallen Padawan databank.
Devastated Settlement Chest # 3
Take the Relter from the Grand Courtyard to reach a settlement on the left, past the cliff with a pond. Enter the caves with a crevice to the right. Drop down and use Cal’s rope pull ability in combination with the wall run to reach the distant platform.
Open the treasure chest to obtain Fluff Goatee and Mustache beard for Cal.
Devastated Settlement Essence # 3
In the area with the Grocco, climb into the cave and take the orb from the coupler. Take it down to the lower ledge and place it in the coupler to open a locked room. Interact with the blue essence to gain Additional Health.
Devastated Settlement Essence # 4
From the meditation point in the Grand Courtyard, glide the Relter to reach a chamber to the left with another orb coupler present on its ledge. Rotate it to place the purple beam on the wall as shown in the picture.
Reach the area with the help of a Relter and guide the purple light using BD-’s spray ability. Burn the black matter to enter the chamber and interact with blue essence to obtain a new Perk, Ambidexterity.
Devastated Settlement Essence # 5
Go inside the Grand Courtyard and use the rope to reach the walkway. Turn left and climb the vines to reach the roof. Interact with the blue essence to obtain a new Perk, Marksmanship.
Devastated Settlement Seed Pod # 7
From the first meditation point, drop down on the ledge to the left. Destroy the glowing plant to obtain Crimson Jelly Spire: Nabooan Green seed pod.
Devastated Settlement Databank # 15
This one is related to the story and can’t be missed. Interact with the lightsaber to unlock Dagan’s Descent force echo.
Boiling Bluff collectibles
Boiling Bluff Databank # 1
From the first meditation point, use a Nekko to reach the inaccessible ledge to the right. Interact with the nest to obtain The Wheel Turns force echo.
Boiling Bluff Treasure # 1
From the meditation point, go back into the caves and use Nekko to reach the ledge to the right. Interact with a skull to obtain a Priorite Shard.
Boiling Bluff Seed Pod # 1
Drop down and destroy a glowing plant to obtain Crimson Jelly: Dathomirian Red seed pod.
Boiling Bluff Seed Pod # 2
Right in front of the previous seed pod. Kill the fireflies to obtain Crimson Jelly Spire seed pod.
Boiling Bluff Databank # 2
In the same area, interact with the road to unlock Turgle, Saved force echo.
Boiling Bluff Treasure # 2
Go straight and left in the same cave and use your Nekko to reach a wall with white marks. Climb the wall and turn right to reach the next two climbable walls. Just drop down from the farthest wall to obtain the second Priorite Shard.
Jedi Survivor Koboh Viscid Bog collectibles
Viscid Bog section of Koboh in Star Wars Jedi Survivor is further divided into 6 other small areas
Viscid Bog collectibles
Viscid Bog Chest # 1
From the first meditation point, drop down and reach the platform on the left. Open the treasure chest to obtain Drifter Jacket for Cal.
Viscid Bog Databank # 1
On the same platform, scan a destroyed droid to obtain Crashed Vulture Droid databank.
Viscid Bog Databank # 2
Go back from this location and enter a tunnel. Scan the wall to the right to obtain Hastily Abandoned Site databank.
Viscid Bog Databank # 3
Go outside and climb the ledge on the top of the tunnel. Turn right and interact with the containers to obtain Risky Business force echo.
Viscid Bog Seed Pod # 1
Turn back and destroy a glowing point to the left to obtain Crimson Jelly Spire: Alderaanian Blue seed pod.
Viscid Bog Seed Pod # 2
Drop down two ledges to find another glowing plant. Drops Crimson jelly Spire seed pod.
Viscid Bog Seed Pod # 3
This one is in the front of a chamber as marked on the map. Destroy it to obtain Crimson Jelly Spire seed pod.
Viscid Bog Databank # 4
Start from the ledge near the Relter’s resting position. Use the force lift to pull three columns from the bog. Reach the platform at the end of those columns and interact with the climbing gear to obtain Abominable Bogling force echo.
Viscid Bog Chest # 2
Go straight and drop on the next platform to reach the stim cannister. Open it to obtain your next Stim upgrade.
Viscid Bog Chest # 3
Use the lift near the Relter’s resting point to go up. Drop from the lift halfway through and turn right to find another treasure chest. Open it to obtain Persistence Switch.
Viscid Bog Databank # 5
Use the floating balloons in the area to reach the next ledge with relter. Interact with the floor to obtain force echo.
Viscid Bog Essence # 1
Use the Relter to reach the floating balloons. Use them to reach the highest possible location. Interact with the blue essence to obtain a Health upgrade.
Viscid Bog Treasure # 1
Use the zipline to reach the ledge with a resting Relter. Glide it to reach the area marked on the map (past the meditation point and to the right). Use force lift and force smash on a small rubble to obtain a Datadisc.
Loading Gantry collectibles
Loading Gantry Treasure # 1
From the first meditation point, drop down the ledge to the left and look below the ramp. Interact with the shining object to obtain a Priorite Shard.
Loading Gantry Chest # 1
Open a blue switch to the right of meditation point using BD-1’s electric dart ability. Climb the platform to open the now unlocked treasure box and collect Commander Pants for Cal.
Loading Gantry Chest # 2
Go to the right of the first meditation point and cross the gap. Open the next treasure chest in this room to obtain Enforcer Barrel.
Loading Gantry Treasure # 2
From the same area, go straight and turn right. Make your way into the room with the green barrier. Turn left and reach the second platform to obtain a Priorite Shard.
Loading Gantry Chest # 3
Go back and climb a platform in the same room. Pass through the second green barrier to initiate a platforming sequence. Reach the top and open another treasure chest to obtain Persistence Grip.
Loading Gantry Chest # 4
Go straight until you reach a room with orange hue. Once again clear the wall run section to reach the next treasure chest. Open it to collect Commander Jacket for Cal.
Loading Gantry Databank # 1
From the first meditation point go left and us ethe lift to go down. Scan the cylinders to your right to obtain Storage Tanks databank.
Loading Gantry Treasure # 3
Go behind those tanks to collect another Priorite Shard.
Loading Gantry Databank # 2
Drop down the platform and scan a broken tank to obtain Sunken AAT databank.
Loading Gantry Chest # 5
From the same area, cross the tar pit and turn left. Reach the far corner to open another treasure chest. Collect Short Goatee Beard as a reward.
Loading Gantry Treasure # 4
In the same area, climb the containers to the left and collect another Priorite Shard from their top.
Loading Gantry Databank # 3
From the same area, go back and climb the platforms to the left. Interact with the floor to obtain Brave New World force echo.
Lucrehulk Core collectibles
Lucrehulk Core Databank # 1
From the meditation point, go down the ramp to the left. Interact with three dead droids to obtain A New Master force echo.
Lucrehulk Core Chest # 1
Force lift a platform to the left of first meditation point. Get on it and force smash the next one to reach it. Wait for it to go back up again. Go into the room and open the treasure chest to collect Geonosian Photoreceptors for BD-1.
Lucrehulk Core Essence # 1
From the first meditation point go straight and force smash a lift right in front of Cal. Enter the room to the left and interact with blue essence to gain Additional Health.
Lucrehulk Core Databank # 2
Go back and now turn to the right of the lift. Drop down two platforms to notice a corpse. Interact with it to obtain Look on My Works force echo.
Lucrehulk Core Treasure # 1
Go forward and keep turning right until you come across a scavenger droid. Kill it to obtain a Priorite Shard.
Lucrehulk Core Treasure # 2
Jump to the next platform (from where you killed the scavenger droid) to your right to collect the next Priorite Shard.
Lucrehulk Core Chest # 2
Go back until you come across moving blocks. Reach the next platform and force smash a container there to collect Persistence Pommel.
Lucrehulk Core Essence # 2
From where you killed the scavenger droid, go forward and cross the green barrier. Turn left and force lift a gate to find the next essence. Interact with it to gain an Additional Skill Point.
Lucrehulk Core Databank # 3
From the point marked on the map (past a lot of droids), go straight and enter the room. Interact with a destroyed droid to obtain The Origins of Purpose force echo.
Yurt Barracks collectibles
Yurt Barracks Databank # 1
From the meditation point in Lucrehulk Core, go left and past the gate. Keep going left until you reach Yurt Barracks. In the room with red hue, climb the wall halfway and jump to your left to reach a platform. Interact with a destroyed droid to obtain One Man’s Junk force echo.
Yurt Barracks Treasure # 1
Jump to the opposite platform to obtain a Priorite Shard.
Yurt Barracks Chest # 1
Go forward from the previous position to reach a platform with a treasure chest. Slice it open to obtain Enforcer Grip.
Yurt Barracks Treasure # 2
Turn left and jump to the top of the barracks. Use them to reach the house at the end of the platform. Interact with the table at the far corner to obtain a Priorite Shard.
Yurt Barracks Essence # 1
Go back and you will notice a force essence. To reach it, drop down to the left and keep going left until you come across a cage you can climb. Turn around and reach the next room using the double jump. Interact with the blue essence to acquire an Additional Skill Point.
Yurt Barracks Databank # 2
Drop down and go back to the barracks. Enter the first barrack to your right and interact with a box to obtain Bedlam Raider Yurt databank.
Yurt Barracks Databank # 3
From the barrack, turn right and interact with the floor to obtain Location is Everything force echo.
Yurt Barracks Chest # 2
Turn back and keep going right until you come across a gap. Jump to reach the platform to its right. Slice the treasure chest to obtain Geonosian Body for BD-1.
Yurt Barracks Treasure # 3
Now cross the gap and destroy all the Bedlam Raiders. Keep going to the right and drop down in an area with white paint. Jump to the next platform and interact with the shining object to obtain a Priorite Shard.
Yurt Barracks Essence # 2
Go back and turn left from the giant brazier. Open the gate with force lift ability. Interact with the blue essence to gain an Additional Skill Point.
Yurt Barracks Essence # 3
Go back until you reach the brazier. Keep going forward and use the rope to climb up (you must have unlocked this shortcut first). Turn back and jump to the next ledge. Make your way to the ledge on the left. Interact with the blue essence to obtain Health upgrade.
Yurt Barracks Chest # 3
From the shortcut, keep going straight and up (to the left). Turn back after reaching the locked treasure chest. Target the blue lamp with Bd-1’s electric dart ability. Open the chest to obtain Enforcer Body for BD-1.
Generator Underbelly collectibles
Generator Underbelly Databank # 1
From the first meditation point, use the force lift to pull out a platform. Use it to reach the next area. Turn right and scan a machine to obtain Landing Hydraulics databank.
Generator Underbelly Essence # 1
Go back and use the force lift on another lift. Climb it to reach the upper platform. Turn back and climb the marked wall. Use the force smash to bring down a lift. Make your way across the area by wall running. Interact with the blue essence to gain Additional Force.
Generator Underbelly Treasure # 1
Return by using the zipline to the right. Once again use the force lift on the platform. This time keep going forward after climbing the platform. Climb up and kill a bedlam raider standing under electric wires. Keep climbing to the right. Go left and cross the barriers by using the force smash ability. Collect a Priorite Shard from the end of the platform.
Generator Underbelly Databank # 2
O back to reach the shortcut. From there jump towards a platform but use the pull rope ability halfway through the jump to cross the gap. Turn left and interact with the scraps of droids to obtain A Droid Reborn force echo.
Generator Underbelly Databank # 3
Hit the blue lamp in the same area with BD-1’s electric dart ability to open a door. Make your way across and climb a ledge on the left using a lift. Defeat Hytho Pixx boss in the area and scan a wall to obtain Power Generator databank.
Generator Underbelly Treasure # 2
Go back and keep going straight to reach a dark platform. Interact with the shining object to obtain a Priorite Shard.
Generator Underbelly Chest # 1
Go back up using the lift and turn left. Keep going until you reach a door with current flowing through it. Force lift the platform without going through the door. Turn back and reach the platform before it goes back again. Wall run both platforms to reach the next area.
Open the next treasure to obtain the Slice: Droids BX skill.
Forward Control Tower collectibles
Forward Control Tower Databank # 1
From the meditation point, go straight and scan the door to the right to obtain Escape Pod databank.
Forward Control Tower Databank # 2
Turn back from the meditation point and enter the right alley. Interact with console to obtain a force echo.
Forward Control Tower Chest # 1
From the meditation point, go right into the lift. Bring it back up and cross to the other side. Use force slam on the container to obtain Center Part Hair for Cal.
Forward Control Tower Essence # 1
From the meditation point, turn left and jump to a platform using rope pull ability. Interact with the blue essence to obtain Health Upgrade.
Forward Control Tower Treasure # 1
From the meditation point, go back and look up. Force slam to open the ceiling. Climb and go forward to squeeze through a crevice. Wall run on the platforms to reach the upper platform. Force lift the platforms to use them again to reach further up and collect a Priorite Shard.
Jedi Survivor Koboh Prospector’s Folly collectibles
Prospector’s Folly is home to 6 other regions filled with collectibles
Foothill Falls collectibles
Foothill Falls Chest # 1
From the mountain ascent meditation point, turn back to go through a cave to reach Foothill Falls. Dive into the first pool and open a treasure chest to obtain Patience Pommel.
Foothill Falls Chest # 2
From the first pond go straight and look behind the house to the left. Another treasure chest awaits. Open it to obtain Slicked Back Hair for Cal.
Foothill Falls Chest # 3
From the pond, turn right and use The Relter to glide across the gap. Use the floating balloon on top of the house to reach the right platform. Force slam the container to obtain Droid Paint weapon material.
Foothill Falls Chest # 4
In the same area, retrieve a Nekko from the cave to reach a wall otherwise inaccessible. Run on this wall to reach the next platform. Using swinging poles to reach the next platform. Slice the terminal to unlock a roller mine. Take it down and destroy a wall inside the house. Open the stim container to obtain the next Stim upgrade.
Foothill Falls Treasure # 1
Look to the right of the pool to find a Priorite Shard.
Foothill Falls Databank # 1
In the same area, cross the pool to interact with a broken shell to obtain A Curious Pair force echo.
Foothill Falls Databank # 2
Turn back and go into the shelter. Scan the railing with BD-1 to obtain Cargo Elevator databank.
Foothill Falls Seed Pod # 1
Use the Relter to reach the next cliff. Destroy the fireflies on the ledge to obtain Koboh Spiker: Nabooan Green seed pod.
Foothill Falls Seed Pod # 2
In the same area, go to the opposite side and destroy the second glowing point to obtain Koboh Spiker seed pod.
Foothill Falls Databank # 3
In the cave with the Nekko beside a pool, scan a small shelter to obtain Child’s Hideaway databank.
Foothill Falls Treasure # 2
Use Nekko in the same cave to reach the higher walls that Cal can run. Using those walls reach a higher platform to obtain a Priorite Shard.
Foothill Falls Databank # 4
From the location where you unlocked the roller mine, jump on a floating balloon and drop on the ledge marked on the map. Scan with BD-1 to obtain Prospecting Network databank.
Mountain Ascent collectibles
Mountain Ascent Databank # 1
From the first meditation point, go left and interact with the camp to obtain a force echo.
Mountain Ascent Treasure # 1
From the same location, turn back and go where the waterfalls are. Interact with the shining object on the last ledge to obtain a Priorite Shard.
Mountain Ascent Seed Pod # 1
On the same ledge, destroy a glowing plant to obtain Koboh Spiker: Felucian Yellow seed pod.
Mountain Ascent Chest # 1
From the meditation point, go straight and pass the green barrier. Slice with BD-1 to obtain a new ability Slice: Security Droids.
Mountain Ascent Chest # 2
Go past the second green barrier and drop down. Turn left to reach the next treasure chest. Open it to obtain Bomber Pants for Cal.
Mountain Ascent Seed Pod # 2
In the same area, destroy a glowing plant to obtain Koboh Spiker seed pod.
Mountain Ascent Chest # 3
From the second green barrier, turn left and dive into the pool to the right. Open the treasure chest at the bottom to obtain Light Mustache and Patch beard for Cal.
Mountain Ascent Chest # 4
From the same area, wall run to reach the next ledge. Turn left to open a door using the force lift. Slice the chest open to obtain Mustache and Patch beard for Cal.
Mountain Ascent Databank # 2
In the same area, scan some eggs to obtain Shiverpede Nest databank.
Mountain Ascent Databank # 3
Go back and drop down the ledge. Interact with the destroyed plane to obtain Crashed Tie Fighter force echo.
Mountain Ascent Chest # 5
In the same area, use force slam to break a container and obtain Drifter Jacket.
Mountain Ascent Databank # 4
Turn back and keep going up until you reach a hill with a house. Scan the house to obtain Mountainside Hut databank.
Mountain Ascent Treasure # 2
Go back and turn left to enter another cave. Interact with the skeleton to obtain a Priorite Shard.
Mountain Ascent Seed Pod # 3
On the top of the green barrier door. From the hut, go left until you reach this area. Destroy the glowing plant to obtain Koboh Spiker: Rare seed pod.
Mountain Ascent Chest # 6
Use the wall run platforms on top of the second green barrier. Use force slam ability to break a container at the top of the ledge to obtain Scrapyard audio sensors for BD-1.
Mountain Ascent Seed Pod # 4
Go straight and drop down until you reach a cave. Destroy a glowing on the left to obtain Koboh Spiker seed pod.
Mountain Ascent Treasure # 3
In the same area, destroy rubble with force slam to obtain a Priorite Shard.
Mountain Ascent Treasure # 4
Go right and reach the ledge with the help of rope pull ability. Interact with the glowing object to obtain another Priorite Shard.
Marl Cavern collectibles
Marl Cavern Force Tear #1
From the imperial post meditation point, turn right and keep going until you reach a zipline. Enter the cave to the left with floating balloons. Use them to reach the farthest ledge to the left. Interact with the Force Tear to start Fractured Power challenge.
Marl Cavern Essence # 1
Go back and run along the walls near the blue switch to reach the farthest ledge. Interact with the blue essence to obtain a Health Upgrade.
Marl Cavern Databank # 1
Drop down to the lower ledge and scan a drum with BD-1 to obtain Storage Tanks databank.
Marl Cavern Treasure # 1
Drop down further and interact with the shining object to obtain another Priorite Shard.
Fogged Expanse Chest # 1
From the meditation point, go left and enter the cave. Open the treasure chest to the left to obtain Exile material.
Fogged Expanse Chest # 2
From the meditation point, go towards the blue lamps. Reach the cliff on fire and make your way across. Unlock the shortcut and proceed further. On the cliff with 5 roller mines, use force slam to open a container and obtain Soul Patch beard for Cal.
Fogged Expanse collectibles
Fogged Expanse Chest # 3
Use the zip line to reach the cliff on fire. Drop on the ledge to the left of zipline and use force slam to open a container. Reward for opening this chest is Detachment Pommel.
Fogged Expanse Treasure # 1
From the shortcut zipline, turn right and wall run to reach the higher cliff. Use the floating balloon to reach the top of this cliff. Collect a Priorite Shard from between the trees.
Fogged Expanse Treasure # 2
Use the floating balloon to reach the opposite ledge and interact with the object inside the nest to obtain another Priorite Shard.
Fogged Expanse Seed Pod # 1
On the same cliff, destroy a glowing plant to receive Koboh Spiker: Alderaanian Blue seed pod.
Fogged Expanse Seed Pod # 2
Right next to the first plant, drops Koboh Spiker seed pod when cut down.
Fogged Expanse Seed Pod # 3
This one is also in the same spot. Destroy it to obtain another Koboh Spiker seed pod.
Fogged Expanse Databank # 1
From the meditation point go back and hit the blue lamp with BD-1’s electric dart ability. Cross the gap and turn right. Reach the next ledge and interact with a box to obtain Forging Forward Alone force echo.
Fogged Expanse Treasure # 3
Go back and turn right to reach a ledge with blue essence. Use force slam on rubble to obtain a Priorite Shard.
Fogged Expanse Essence # 1
On the same ledge, interact with the blue essence to obtain an Additional Skill Point.
Fogged Expanse Seed Pod # 4-9
Reach the zipline shortcut from the meditation point. Turn left and go up. Turn right at the end of the path to find a glowing plant it. Cut it down to obtain koboh Spiker seed pod. Destroy 5 more glowing plants on the same cliff to obtain 5x Koboh Spiker seed pods.
Fogged Expanse Treasure # 4
On the same cliff, interact with the glowing object to obtain a Priorite Shard.
Fogged Expanse Essence # 2
Use the lift on the same ledge, use the lift to go down. Defeat the bilemaw and interact with the blue essence to obtain a New Perk, Fortitude.
Fogged Expanse Databank # 2
From the cliff with lots of plants, go back and enter the house on the left. Interact with a corpse to obtain a force echo.
Fogged Expanse Databank # 3
From the meditation point, go left and enter a cave to the right. Keep going to the right until you come across a Mogu. Turn right and scan the destroyed box to obtain Monitoring Equipment databank.
Fogged Expanse Treasure # 5
From the meditation point go left and keep going until you reach Mal Caverns. Interact with a skeleton to obtain a Priorite Shard.
Fogged Expanse Treasure # 6
From the area where you defeated the Mogu, turn left and keep going until you come across rubble. Force slam it to obtain a Priorite Shard.
Fogged Expanse Treasure # 7
From the mediation point, go back and keep going up until you reach a ledge with a scavenger droid. Kill it to obtain another Priorite Shard.
Imperial Post 8L-055 collectibles
Imperial Post 8L-055 Chest # 1
From the imperial post meditation point, go left and drop the ledge. Keep going until you come across a locked treasure chest. Turn around and hit the blue lamp with BD-1’s electric dart ability. Open the chest to obtain Textured Rubber weapon material.
Imperial Post 8L-055 Databank # 1
From the meditation point, go right until you reach the farthest ledge. Scan a tent to obtain Abandoned Prospector Equipment databank.
Imperial Post 8L-055 Databank # 2
Go straight from the meditation point and hit the blue switch (with Bd-1’s electric dart ability) on the top right corner of the big gate. Enter the tie-fighter hangar and climb the ledges to the left. Use the wall run platform to reach the next ledge. Scan the console with BD-1 to obtain Docking Clamp Overrides databank.
Imperial Post 8L-055 Chest # 2
From the summit ridge meditation point, use the zipline near the blue lamp. Reach the bridge with the help of another zipline. Go down the lift and turn left at the end of the corridor. Make your way to the last room with a treasure chest. Open it to obtain RSKF-44 barrel.
Summit Ridge collectibles
Summit Ridge Databank # 1
Right next to the meditation point, interact with a corpse to obtain Journey’s End force echo.
Summit Ridge Treasure # 1
Right in front of the meditation point, interact with the shining object to obtain a Priorite Shard.
Summit Ridge Seed Pod # 1
From the meditation point go straight and use the floating balloon to reach the next platform. Destroy the glowing plant to obtain Koboh Spiker: Dathomirian Red seed pod.
Summit Ridge Essence # 1
From the same location go to the next ledge. Bring a floating balloon back to the previous area and use it to reach the highest ledge. Enter the cave and interact with the blue essence to obtain an Additional Skill Point.
Summit Ridge Databank # 2
Scan the machine from where you obtained the floating balloon to unlock High-Altitude Research datapoint.
Summit Ridge Seed Pod # 2
On the same ledge, destroy a glowing plant to obtain Koboh Spiker seed pod.
Summit Ridge Treasure # 2
Use the floating balloons to reach the cliff to the right with a Relter. Use force slam on rubble to obtain a Datadisc.
Summit Ridge Seed Pod # 3
Use the floating balloons to reach the cliff to the left. Destroy the glowing plant to obtain Koboh Spiker seed pod.
Star Wars Jedi Survivor Koboh Mountain Observatory collectibles
The Mountain Observatory on Koboh is divided into three sections, each with its own set of collectibles
Observatory Understructure collectibles
Observatory Understructure Databank # 1
Turn left from the meditation point and go down the stairs. Scan the black matter to obtain Erratic Dust databank.
Observatory Understructure Treasure # 1
Climb the ledge in front of the meditation point. Go to the left and reach the next ledge. Interact with the object at the far side of the ledge to obtain a Datadisc.
Observatory Understructure Treasure # 2
Climb the rope near the meditation point to go all the way back up. Reach the ledge on the left to find a scavenger droid. Kill it to obtain a Datadisc.
Observatory Understructure Databank # 2
Go back and keep going left until you reach a dead-end. Hit the blue switch with BD-1’s electric dart ability to lower the platform. Run on it to reach the next platform. Hit the blue lamp again. Reach the next area by climbing a lot of structures. Reach the next platform with lots of B1 Droids. Interact with the floor to obtain Forfeit Your Lives force echo.
Observatory Understructure Chest # 1
Go back to the opposite side and use floating balloons’ platforms to reach the higher ledge. Enter the room and use the floating balloon to reach the upper floor of the same building. Open the stim cannister to obtain Stim Upgrade.
Observatory Understructure Chest # 2
From the meditation point go back using the rope. Enter the lift opposite the floating balloon. Turn around and open the shutter. Hit the blue lamp to open the door. Turn left and drop down two ledges by precise jumping. Open the treasure box to obtain Showdown Grip.
Diagnostics Corridor collectibles
Diagnostic Corridor Databank # 1
From the meditation point, go straight and enter the room with two droids. Scan the machine in the center to obtain Minor Oculus databank.
Diagnostic Corridor Treasure # 1
Hit the blue switch on the machine to unlock a new path. Kill three bedlam raider veterans and hit the switch again. Proceed by defeating a lot of enemies in this area. Place the floating balloon outside the window to the left. Pass the green barrier and collect a Datadisc from a box.
Diagnostic Corridor Essence # 1
Climb the platform in the same room to obtain a force essence. Place a floating balloon in the room to easily reach this platform. The reward is a Health Upgrade.
Diagnostic Corridor Essence # 2
From the meditation point, go back and take the lift down. Interact with the blue essence to obtain a New Perk, Perplexity.
Diagnostic Corridor Databank # 2
From where you obtained the stim upgrade, go to the lower platform and enter the opposite room. Hit the blue switch to open the door. Keep going and hit another blue switch to gain access to a floating balloon. Use it to reach the isolated island.
Hit the next blue switch to obtain another floating balloon. Use it to reach the upper platform on the left. Enter the room and turn right to interact with the floor. It will unlock a force echo.
Observation Deck collectibles
Observation Deck Databank # 1
From the meditation point, go back and drop down to the left. Scan the railing to obtain Grand Oculus databank.
Observation Deck Essence # 1
Once again drop down but this time go on the left ramp. Keep going and drop into the laboratory. Climb the ledge and turn left. Interact with the blue essence at the end of the corridor to obtain Health Upgrade.