In this Assassin’s Creed Valhalla Jotunheim Collectibles Locations guide we will take look at all the collectibles in you can find in Jotunheim.
Assassin’s Creed Valhalla Jotunheim Collectibles Locations
There are two kinds of collectibles in the Jotunheim location in Assassin’s Creed Valhalla. The first kind of collectible is wealth chests and the second are mysteries.
There are 33 different locations for wealth in Jotunheim along with 8 mysteries in AC Valhalla.
We will take a look at the wealth locations first then we will see where we can find the mysteries.
Let’s get started:
Wealth Locations
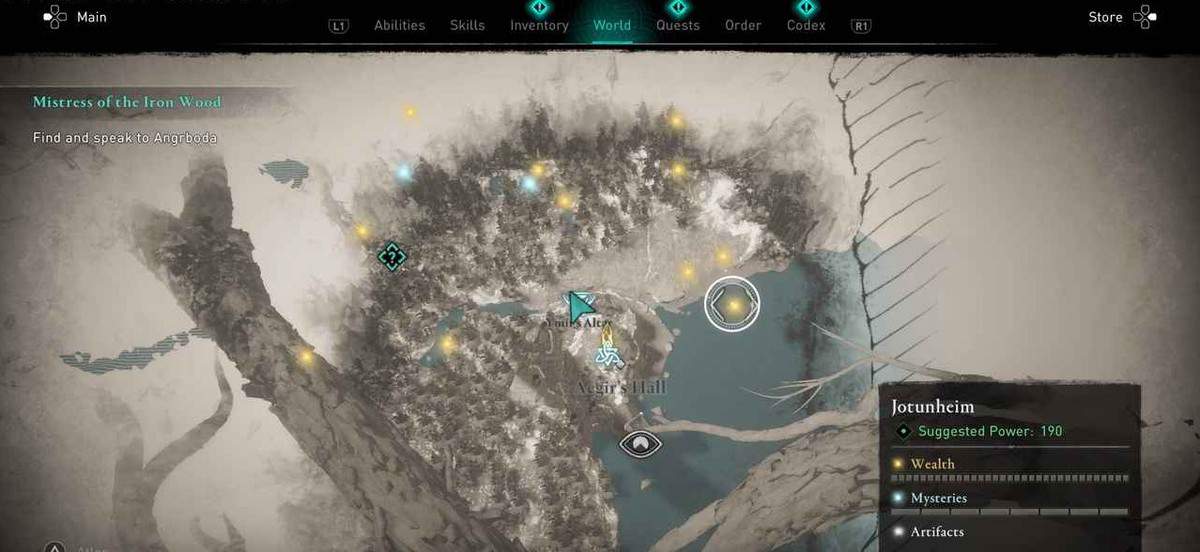
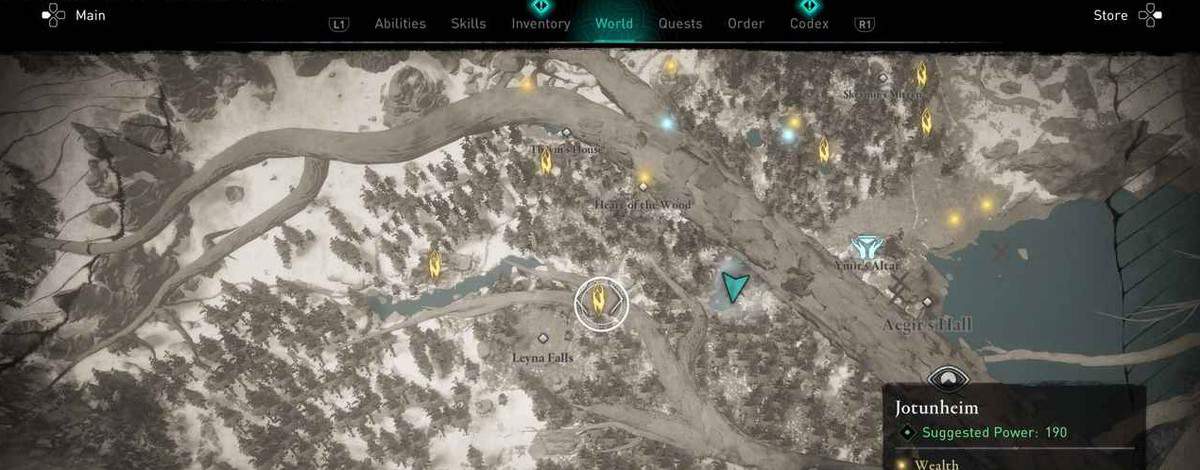
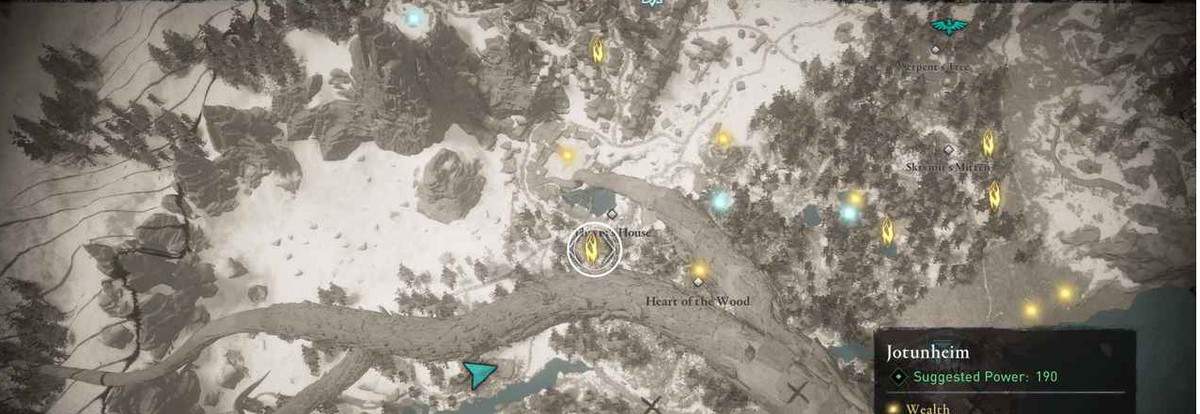
Whenever you synchronize viewpoints, the golden icons for collectibles appear on your map automatically.
In Assassin’s Creed Valhalla, wealth is usually a chest that has the gear or upgrades materials or both in it.
You will need to complete the story through this area first because all the wealth will not spawn before a certain point in the story.
There are also two missable wealth locations for wealth number 12 and 13 and the only way to obtain them is during a story mission.
Let’s take a look at all the locations:
Wealth #1
You can find the first wealth chest at the mentioned location. You will have to go underwater for it.
Wealth #2
For this chest, you will head to the Aegir’s Hall. Make your way to the top floor and you will find a locked chest. Its key is present at the bottom of the mead cauldron.
Wealth #3
When you head to the marker for this wealth chest. There will be two skeleton masks on two separate trees.
When you go through them, there will be a wedding altar in front of you. You will need two keys to unlock this chest.
You will find one of those on the right of the chest, inside the trunk under the stone. Remove the stone to open the trunk and get the key.
The other key is inside the pond on a rock.
Wealth #4
When you get to the marker go behind the thin wall of ice to find the chest.
Wealth #5
For this chest, you will have to go behind a wall after destroying it inside a mine underground.
You will have to release the trap by shooting the crank and the first key will be under the trap. Look left of the crank and you will see some logs hanging.
The other key is on that set of logs.
Get on top of the crane present close and release the logs and then you can move the platform to make the movement of oil jars to the destructible wall easier.
Wealth #6
This area has a lot of enemies so be careful.
Wealth #7
Find the two trees with the masks and go through them. Go right and you will find the chest inside the second top house.
To get to the second house, you can use the ladders present in the first house.
For the key, you will have to use the window to go to the next house and the key is present on top of this house.
Wealth #8
You will find this chest while playing the mission Jotunheim Mystery #3: World Event (The Puppeteer).
It will be present inside the house.
You will know more about it in the mysteries portion of this guide.
Wealth #9
Go to the marker and break the layer of ice on the ground to go underground and you will find the chest.
Wealth #10
Find the gate with the skeleton mask and you will see a shipwrecked boat after passing through it.
However, you will not be able to open this chest as it freezes itself in case you go close to it.
You have to be quick and smart and act like you are just passing by and then slowly and steadily go near and open it.
Wealth #11
The behavior of this chest is almost identical to the previous one. But for opening this one you will have to pass through the pair of skeleton masks.
Wealth #12
As stated above this one can be missed by the player.
You will get a chance to open this chest while playing Jotunheim Chapter 2, Quest “The Lost Cauldron”.
To go inside the Cauldron here you will need to make your way through the narrow entrance of a mossy house. You can find this chest only during this mission so don’t miss it.
You will go inside a cave after this.
The path would be something like this; first, there will be a stack of barrels that you will have to push aside, after that you will go through the wall and then slide under one.
After this, you will see a wooden barricade on the right side, after breaking this barricade you will be able to access the chest.
Wealth #13
This wealth chest is also missable. You will have to enter the same mossy house but for this chest, you will see the chest above where you picked up the cauldron quest objective.
The barrels will help you get up.
You will have to bring them on this side and climb them.
Wealth #14
You will have to destroy the wall the chest is locked behind when you get to the location after walking through the skeleton masks.
You see an orchard ahead of you after you pass the skeleton masks. Here you will require an oil jar.
Take the stairs ahead and you will see another pair of masks. Cross them and you will see a few metal bars.
Throw the oil jar here and destroy the wall in the process.
Wealth #15
Go to Steinnbjorn’s cave to get this chest.
Wealth #16
You will have to climb to the top of the tower with ice. This chest like many others will be locked and you will have to find the key.
The key is present at the top of the top. Take the ladder to go up and pass through the skeleton masks.
When you pass the masks, a tower will appear, and you will have to climb this tower as well. From the top, take the ladder and go to the platform.
You will find the key there. Climb the tower again and go back to the first tower using the zipline.
Open the chest when you get there.
Wealth #17
Near this Wealth’s location is an ice lake. Jump down into the pool and swim towards one of the two sunken structures as shown in the picture below.
You should resurface to a cave with a new house in it.
Enter the house to reappear in a new area with the key and a sunken chest.
Wealth #18
The key is inside the house and to get inside you will need to shoot the lock. There is a load in front of the house and under that, you can find the chest inside an opening in the ground.
Shoot the load to reveal the opening.
Wealth #19
You will find this chest inside the fighting pit. You will find the entrance to the chest under the fighting pits.
Wealth #20
The key is hanging from the body. You will need to push the platform to be able to get to the key.
Wealth #21
Go to the throne room inside the Utgard’s Keep. For getting up there you can use the lifts on the outsides.
Wealth #22
There is a building on the right of the previous building. This is the Utgard’s Keep. Take the stairs and turn left at their end.
After taking the turn keep going on this path and take out the enemies in your way. Go towards the wall with some food in front of it and climb over it.
You will see an ice wall blocking your way. Break it using a melee weapon and keep going. You will come to a locked door.
You will find the key in the same room as this door.
Open the door and keep going and you will find a chest along with some enemies.
Wealth #23
Go left from the previous chest. Take the stairs and you will get outside until you get to an ice wall.
You will need to break the wall as the chest is behind this wall.
Wealth #24
This is part of the climbing section up Utgard’s Keep (the big tower building), at the very top.
From Wealth Chest #23, turn around and jump across the wooden beams to the other side. Enter the room to the right and head upstairs to the top of the tower.
Inside the room at the top, you find this chest.
Wealth #25
Go back down from the tower and make your way to the Feasting Hall. You will see a hole in the wall on the right of the throne that will take you to a kitchen.
Shoot the hooks present on the ceiling inside the kitchen after climbing the ladder.
Use the ropes to get to the movable shelf and shift the shelf right to get to the chest.
Wealth #26
Go to the location on the map and destroy the ice wall. Go inside the cave and jump over the stalagmites to get on the platform.
There will be another ice wall. Break it to get to the chest.
Wealth #27
Get to the location and take out the guards. You will have to slide through to get the key after moving the hay crate.
The chest is inside the prison cell.
Wealth #28
Use Fast travel to get to the Enchanted Tower. Look at your right and you will see a platform. Jump on it instead of performing the leap of faith.
There is another platform underneath. Jump to it and get the chest.
Wealth #29
Now from the last chest.
Climb down towards the haystack and you will find the chest somewhere there.
Wealth #30
You will see a zipline when you get to this chest’s location.
Use it and you will get to a chamber with a chest present there.
Wealth #31
You will see a destructible wall near the previous one.
You will need oil jars to destroy the wall. Behind the wall, you will find the third last wealth chest.
Wealth #32
For this chest, go inside the longhouse. You will have to release the ladder by shooting the crank. Move the platform.
To get to the key area, jump on to the hanging platform. You will find the chest by retracing your steps.
Wealth #33
The exact location of this chest is unknown. It is too well hidden for now. We will update the guide when we find it.
Now let’s take a look at the locations of the mystery collectibles in Jotunheim region of Assassin’s Creed Valhalla.
Jotunheim Mysteries
Mystery #1:World Event (Aegir’s Daughters)
Go to Aegir’s hall and talk to the woman there until you get the chat option “Let’s Drink”.
Once you are back to your sober self, take a look at the item on the ground and then head outside to the wooden mead cauldron.
There is a wooden boat on top of the cauldron. Take a look at it.
Also, examine the barrels on the roof of the opposite house. That’s all for this mystery.
Mystery #2: Flyting
Use this solution (chat options) for solving this mystery:
- I should like to see you try,
- They’re too dull to conquer me,
- I grow weary of your squeak.
Mystery #3: World Event (The Puppeteer)
After getting to the location, shoot the lock on the back door until you can open it.
Once you get in you will see a hairbrush on the table. Examine it and move around the house.
You will hear “An intruder!” at some point because they were deaf enough to ignore the sound of shooting at the door.
You need to talk to the man, but you will have to defeat him before. He will exchange the key for his life.
Mystery #4: Legendary Animal (Steinnbjorn)
This the animal with the highest level (400) in the game. This is a Legendary Animal and no other animal is more powerful than this one.
You need to have at least level 370 before going against this beast.
You will also need a really powerful weapon. Excalibur would be a good option. Stay close to the animal and do as much damage as you can.
Mystery #5: World Event (Pit of Slaughter)
Complete the challenge after talking to the guard in the Fighting Pit.
Mystery #6: World Event (The Giants of Fimbulwinter)
There are two NPCs that you have to defeat for this mystery.
Mystery #7: Cairn
There is a small tower of stones; about human height that you need to validate to solve this mystery.
Mystery #8: Offering Altar
You will find Ymir’s Bloodstones in all the wealth chests. You will need 30 of them to finish this mystery.