The number of enemies that you can face in FO76 is perhaps unprecedented in the franchise. There are more creatures to face with variants so many that it is almost impossible to get tired of facing the same enemy again and again. Our Fallout 76 Enemy Encounters Guide will help acquaint you with all of the enemies that you can face in the game.
Fallout 76 Enemy Encounters
This Fallout 76 Enemy Guide has all the information that you need about animals, robots, and humanoids in the game. They will also level up as you do.
For that reason, we have mentioned how their stats change along with their levels. Not only that, but we also tell you about the mutations to their forms at those levels.
Let’s go ahead and take a look at all of the creatures that you can beat in the game. We mention how the enemies behave in combat, followed by their forms, levels, Health, and all of the various resistance stats that they have.
Let’s go ahead and take a look at all of the creatures that you can beat in the game. We mention how the enemies behave in combat, followed by their forms, levels, Health, and all of the various resistance stats that they have.
1. Anglers
Anglers have massive pace but are not that swift when in combat. They are melee creatures with a lot of health, so stay back and peel off their health.
| Type | Level | Base Health | Damage Resistance | Energy Resistance | Radiation Resistance |
| Angler | 15 | 350 | 150 | 125 | 350 |
| Glowing Angler | 25 | 525 | 150 | 125 | 350 |
| Albino Angler | 37 | 650 | 150 | 125 | 350 |
| Venomous Angler | 51 | 900 | 150 | 12 | 350 |
2. Assaultrons
Assaultrons are very aggressive and pursue their victims until they are dead. Not only that, but they can also become invisible so make sure that you are very careful when it comes to Assaultrons.
| Type | Level | Base Health | Damage Resistance | Energy Resistance | Radiation Resistance |
| Assaultron | 10 | 230 | 60 | 30 | 60 |
| Assaultron | 24 | 660 | 130 | 75 | 130 |
| Assaultron Invader | 36 | 1100 | 130 | 75 | 130 |
| Assaultron Dominator | 46 | 1550 | 130 | 75 | 130 |
3. Bee Swarms
These swarms cannot harm you much, and using energy, melee weapons, and explosive weapons can be great against them.
| Type | Level | Base Health | Damage Resistance | Energy Resistance | Radiation Resistance |
| Bee Swarm | 6 | 20 | 5 | 5 | 5 |
| Bee Swarm | 46 | 130 | 5 | 5 | 5 |
| Bee Swarm | 16 | 50 | 5 | 5 | 5 |
| Bee Swarm | 26 | 80 | 5 | 5 | 5 |
| Bee Swarm | 36 | 10 | 5 | 5 | 5 |
| Bee Swarm | 56 | 150 | 5 | 5 | 5 |
4. Behemoths
Behemoths have a lot of tank stats and are melee based. They can close their distance to you and you must avoid their damage as you deal your own. Do not fall back too much, as Behemoths can throw projectiles when you are too far away.
| Type | Level | Base Health | Damage Resistance | Energy Resistance | Radiation Resistance |
| Behemoth | 50 | 3700 | 150 | 100 | 150 |
| Glowing Behemoth | 65 | 3850 | 250 | 200 | 250 |
| Epic Behemoth | 80 | 4025 | 250 | 200 | 250 |
| Ancient Behemoth | 95 | 4175 | 250 | 200 | 250 |
5. Bloatflies
These flies can be a massive nuisance but are not that hard to kill. Use V.A.T.S to make short work of them.
| Type | Level | Base Health | Damage Resistance | Energy Resistance | Radiation Resistance |
| Bloatfly | 5 | 20 | 15 | 15 | 15 |
| Black Bloatfly | 9 | 20 | 15 | 15 | 15 |
| Festering Bloatfly | 17 | 75 | 15 | 15 | 15 |
| Glowing Bloatfly | 27 | 75 | 15 | 15 | 15 |
6. Bloodbugs
They are very easy to kill.
| Type | Level | Base Health | Damage Resistance | Energy Resistance | Radiation Resistance |
| Bloodbug | 10 | 40 | 25 | 25 | 25 |
| Red Widow Bloodbug | 18 | 140 | 25 | 25 | 25 |
| Infected Bloogbug | 26 | 170 | 25 | 25 | 25 |
| Bloodbug Hatchling | 10 | 40 | 15 | 15 | 15 |
| Glowing Bloodbug | 34 | 180 | 25 | 25 | 25 |
| Vampiric Bloodbug | 42 | 250 | 25 | 25 | 25 |
7. Cargobots
Cargobots do not attack you, take them down for some loot.
| Type | Level | Base Health | Damage Resistance | Energy Resistance | Radiation Resistance |
| Cargobot | 15 | 1450 | 135 | 135 | 135 |
| Cargobot | 35 | 2750 | 135 | 135 | 135 |
8. Cave Crickets
Another animal that does little damage. Avoid it since it is very hard to kill.
| Type | Level | Base Health | Damage Resistance | Energy Resistance | Radiation Resistance |
| Cave Cricket | 30 | 350 | 115 | 250 | 250 |
| Cave Cricket Hunter | 38 | 425 | 115 | 250 | 250 |
| Cave Cricket Piercer | 46 | 600 | 115 | 250 | 250 |
| Glowing Cave Cricket | 60 | 800 | 115 | 250 | 250 |
9. Eyebots
Eyebots are not hostile, so there is no reason to attack them.
| Type | Level | Base Health | Damage Resistance | Energy Resistance | Radiation Resistance |
| Eyebot | 1 | 20 | 10 | 10 | 10 |
10. Feral Ghouls
They are really fast and aggressive. Use your most powerful weapon to take them out as soon as you can.
| Type | Level | Base Health | Damage Resistance | Energy Resistance | Radiation Resistance |
| Feral Ghoul | 3 | 35 | 10 | 20 | 1000 |
| Feral Ghoul Roamer | 9 | 40 | 10 | 20 | 1000 |
| Feral Ghoul Stalker | 15 | 80 | 85 | 140 | 1000 |
| Feral Ghoul Reaver | 22 | 90 | 85 | 140 | 1000 |
| Withered Feral Ghoul | 32 | 125 | 85 | 140 | 1000 |
| Rotting Feral Ghoul | 52 | 200 | 85 | 140 | 1000 |
| Charred Feral Ghoul | 62 | 62 | 85 | 140 | 1000 |
11. Fog Crawlers
You cannot kill them with weak weapons.
| Type | Level | Base Health | Damage Resistance | Energy Resistance | Radiation Resistance |
| Fog Crawler | 27 | 975 | 100 | 100 | 100 |
| Glowing Fog Crawler | 39 | 1200 | 100 | 100 | 100 |
| Skulking Fog Crawler | 51 | 1575 | 125 | 100 | 125 |
| Diseased Fog Crawler | 63 | 1775 | 125 | 100 | 125 |
12. Glowing Ones
These guys are like Feral Ghouls, but with radiation.
| Type | Level | Base Health | Damage Resistance | Energy Resistance | Radiation Resistance |
| Glowing one | 22 | 690 | 115 | 230 | 1000 |
| Putrid Glowing one | 40 | 1150 | 115 | 230 | 1000 |
| Bloated Glowing One | 58 | 1625 | 115 | 230 | 1000 |
13. Gulpers
These guys are fast, so either climb or take them down. Just do not run!
| Type | Level | Base Health | Damage Resistance | Energy Resistance | Radiation Resistance |
| Gulper Devourer | 22 | 750 | 102590 | 90 | 250 |
| Glowing Gulper | 34 | 1025 | 90 | 90 | 250 |
| Gulper Devourer | 46 | 1800 | 90 | 90 | 250 |
14. Hermit Crabs
They cannot get you through tight spaces, so use that to your advantage and take them out.
| Type | Level | Base Health | Damage Resistance | Energy Resistance | Radiation Resistance |
| Giant Hermit Crab | 21 | 625 | 150 | 100 | 150 |
| Alpha Hermit Crab | 31 | 850 | 150 | 100 | 150 |
| Glowing Hermit Crab | 41 | 1050 | 150 | 100 | 150 |
| Savage Hermit Crab | 51 | 1475 | 150 | 100 | 150 |
| Albino Hermit Crab | 61 | 1650 | 150 | 100 | 150 |
15. Honey Beasts
These guys are slow but hard to kill. Take them out from a distance.
| Type | Level | Base Health | Damage Resistance | Energy Resistance | Radiation Resistance |
| Honey Beast | 16 | 450 | 75 | 75 | 250 |
| Putrified Honey Beast | 26 | 620 | 100 | 100 | 250 |
| Glowing Honey Beast | 46 | 700 | 150 | 150 | 250 |
| Ultracite Honey Beast | 56 | 1050 | 175 | 175 | 250 |
16. Liberators
They might become a problem due to their massive numbers but are generally harmless.
| Type | Level | Base Health | Damage Resistance | Energy Resistance | Radiation Resistance |
| Liberator MK 0 | 5 | 25 | 10 | 10 | 10 |
| Liberator MK I | 10 | 30 | 10 | 10 | 10 |
| Liberator MK II | 18 | 100 | 10 | 10 | |
| Liberator MK III | 30 | 150 | 10 | 10 | 10 |
| Liberator MK IV | 42 | 200 | 10 | 10 | 10 |
| Liberator MK V | 54 | 300 | 10 | 10 | 10 |
17. Mirelurks
Shoot their bodies, not their shells!
| Type | Level | Base Health | Damage Resistance | Energy Resistance | Radiation Resistance |
| Mirelurk | 12 | 50 | 90 | 90 | 250 |
| Mirelurk Razorclaw | 18 | 160 | 90 | 90 | 250 |
| Mirelurk Killclaw | 26 | 250 | 90 | 90 | 250 |
| Glowing Mirelurk | 34 | 275 | 90 | 90 | 250 |
| Bloodrage Mirelurk | 42 | 350 | 290 | 303 | 250 |
18. Mirelurk Hunters
These guys have a lot of speed but no shells, so they are more vulnerable.
| Type | Level | Base Health | Damage Resistance | Energy Resistance | Radiation Resistance |
| Mirelurk Hunter | 24 | 275 | 90 | 90 | 250 |
| Glowing Mirelurk Hunter | 34 | 375 | 90 | 90 | 250 |
| Albino Mirelurk Hunter | 46 | 650 | 90 | 90 | 250 |
19. Mirelurk Kings
These guys have a lot of resistance and are very tough to beat.
| Type | Level | Base Health | Damage Resistance | Energy Resistance | Radiation Resistance |
| Mirelurk King | 30 | 1275 | 50 | 75 | 250 |
| Mirelurk Deep King | 40 | 1575 | 50 | 75 | 250 |
| Glowing Mirelurk King | 50 | 2200 | 140 | 350 | infinite |
20. Mirelurk Queens
They are very fast and can poison you. Best option against them is to run away.
| Type | Level | Base Health | Damage Resistance | Energy Resistance | Radiation Resistance |
| Mirelurk Queen | 20 | 2125 | 150 | 100 | 150 |
| Mirelurk Queen | 50 | 3725 | 150 | 100 | 150 |
21. Mole Miners
They are found in numbers but are slow and melee only. Quite easy to take down.
| Type | Level | Base Health | Damage Resistance | Energy Resistance | Radiation Resistance |
| Famished Mole Miner | 2 | 40 | 50 | 25 | 250 |
| Tired Mole Miner | 4 | 45 | 50 | 25 | 250 |
| Mole Miner | 14 | 225 | 50 | 25 | 250 |
| Angry Mole Miner | 22 | 250 | 0 | 75 | 250 |
| Furious Mole Miner Battler | 40 | 400 | 100 | 75 | 250 |
22. Mongrels
These enemies are very easy to kill.
| Type | Level | Base Health | Damage Resistance | Energy Resistance | Radiation Resistance |
| Wild Mongrel | 3 | 35 | 10 | 10 | 10 |
| Vicious Mongrel | 12 | 35 | 10 | 10 | 10 |
| Feral Mongrel | 20 | 150 | 15 | 15 | 15 |
| Albino Mongrel | 30 | 200 | 15 | 15 | 15 |
| Rabid Mongrel | 40 | 250 | 15 | 15 | 15 |
| Glowing Mongrel | 50 | 350 | 20 | 20 | 20 |
| Alpha Glowing Mongrel | 60 | 750 | 20 | 20 | 20 |
23. Mr. Handies
Very fast, but not that difficult to kill.
| Type | Level | Base Health | Damage Resistance | Energy Resistance | Radiation Resistance |
| Mr. Handy | 8 | 35 | 10 | 5 | 10 |
| Prison Marshal | 14 | 55 | 10 | 5 | 10 |
24. Mr. Gutsies
Quite similar to Mr. Handy, But a little harder to beat.
| Type | Level | Base Health | Damage Resistance | Energy Resistance | Radiation Resistance |
| Mr. Gutsy | 22 | 280 | 80 | 70 | 80 |
| Lieutenant Gutsy | 32 | 350 | 110 | 100 | 110 |
| Major Gutsy | 40 | 425 | 110 | 100 | 110 |
| Colonel Gutsy | 47 | 600 | 110 | 100 | 110 |
25. Protectrons
They do not pose any substantial threat. Aim for their head.
| Type | Level | Base Health | Damage Resistance | Energy Resistance | Radiation Resistance |
| Protectron | 5 | 25 | 15 | 15 | |
| Protectron Watcher | 14 | 25 | 15 | 15 | |
| Protectron Guardian | 26 | 75 | 50 | 75 | |
| Protectron Defender | 36 | 75 | 50 | 75 |
26. Rad Ants
Quite easy to kill, just keep your distance and keep shooting.
| Type | Level | Base Health | Damage Resistance | Energy Resistance | Radiation Resistance |
| Forager Ant | 12 | 65 | 10 | 20 | 250 |
| Soldier Ant | 16 | 95 | 40 | 50 | 250 |
| Glowing Ant | 20 | 110 | 40 | 50 | 250 |
27. Rad Roaches
Watch out for their noise and kill them, they are not that difficult to beat.
| Type | Level | Base Health | Damage Resistance | Energy Resistance | Radiation Resistance |
| Rad Roach | 1 | 20 | 5 | 5 | 250 |
| Glowing Rad Roach | 5 | 30 | 5 | 5 | 250 |
| Radroach | 10 | 35 | 5 | 5 | 250 |
28. Rad Stags
They usually do not attack you. Kill them to get meat.
| Type | Level | Base Health | Damage Resistance | Energy Resistance | Radiation Resistance |
| Ratstag Yearling | 1 | 10 | 20 | 250 | |
| Radstag Doe | 4 | 10 | 20 | 250 | |
| Radstag | 10 | 30 | 40 | 250 | |
| Erratic Radstag Doe | 12 | 30 | 40 | 250 | |
| Albino Radstag | 16 | 90 | 50 | 250 | |
| Erratic Radstag | 21 | 90 | 50 | 250 | |
| Rabid Radstag | 24 | 90 | 50 | 250 | |
| Devolved Radstag Doe | 26 | 110 | 60 | 250 | |
| Glowing Radstag | 32 | 110 | 60 | 250 | |
| Devolved Radstag | 40 | 130 | 70 | 250 |
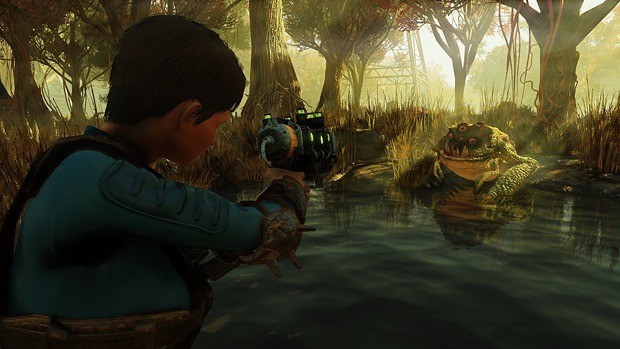
29. Rad Toads
A medium threat, take them down when you see them.
| Type | Level | Base Health | Damage Resistance | Energy Resistance | Radiation Resistance |
| Rad Toad | 5 | 60 | 25 | 25 | 250 |
| Parasitic Rad Toad | 18 | 150 | 10 | 10 | 250 |
| Glowing Rad Toad | 28 | 225 | 100 | 100 | 250 |
| Albino Rad Toad | 40 | 250 | 150 | 150 | 250 |
| Scorched Rad Toad | 50 | 350 | 150 | 150 | 250 |
30. Radrats
Use V.A.T.S as soon as you see it.
| Type | Level | Base Health | Damage Resistance | Energy Resistance | Radiation Resistance |
| Radrat Pup | 1 | 30 | 10 | 20 | 250 |
| Mangy Radrat Pup | 4 | 35 | 10 | 20 | 250 |
| Mangy Radrat | 16 | 100 | 40 | 50 | 250 |
| Infected Radrat | 20 | 120 | 40 | 50 | 250 |
| Glowing Plagued Radrat | 25 | 150 | 40 | 50 | 250 |
| Radrat Pup | 8 | 45 | 10 | 20 | 250 |
| Infected Radrat Pup | 12 | 55 | 10 | 20 | 250 |
31. Robobrains
These guys are very hard to kill. You must attack their brain or run away. There is no other way to deal with this creature.
| Type | Level | Base Health | Damage Resistance | Energy Resistance | Radiation Resistance |
| Robobrain | 30 | 325 | 135 | 70 | 135 |
| Robobrain Sentry | 35 | 400 | 135 | 70 | 135 |
| Robobrain Tactician | 40 | 425 | 135 | 70 | 135 |
| Robobrain Warmind | 45 | 450 | 135 | 70 | 135 |
| Robobrain Devastator | 50 | 600 | 175 | 100 | 175 |
32. Scorchbeasts
Avoid these guys until they are on the ground. Only then, can you kill them. Try to battle them using your team and flee when you are alone.
| Type | Level | Base Health | Damage Resistance | Energy Resistance | Radiation Resistance |
| Scorchbeast | 50 | 3700 | 125 | 125 | 125 |
| Scorchbeast | 80 | 3900 | 200 | 200 | 200 |
33. Deathclaw
Avoid these guys until you are actively seeking to kill them. Attack from distance and use something to keep them away.
| Type | Level | Base Health | Damage Resistance | Energy Resistance | Radiation Resistance |
| Deathclaw | 21 | 625 | 150 | 150 | 150 |
| Alpha Deathclaw | 31 | 850 | 150 | 150 | 150 |
| Glowing Deathclaw | 41 | 1050 | 150 | 150 | 150 |
| Deathclaw Matriarch | 51 | 1150 | 300 | 300 | 300 |
| Savage Deathclaw | 61 | 1300 | 300 | 300 | 300 |
| Albino Deathclaw | 71 | 1450 | 300 | 300 | 300 |
| Chameleon Deathclaw | 81 | 1575 | 300 | 300 | 300 |
| Mythic Deathclaw | 91 | 1725 | 300 | 300 | 300 |
The Scorched
They are always in groups. Kill the melee enemies and then take out the other ones.
Sentry Bots
They have high damage and high resistances. Make sure you use mines and try to outsmart them, as you cannot fight them face to face.
Stingwings
These guys are very hard to kill, so use V.A.T.S as they do not have that much health and can be swiftly taken care of.
Super Mutants
Avoid them as much as you can. When you do face them, take them out using cover and by constantly moving around.
Vertibots
They escort Cargobots, but are easy to destroy if you use cover.
Wolves
Standard Wolves which attack in packs.
Yao Guais
These guys are almost impossible to kill but do not do that much damage. Try to avoid them as much as possible.
Floaters
You will find them in Red Rocket filling station, Nicholson’s End, Solomon’s Pond and Grafton. There are three variants in them namely Floater gnasher, Floater Flamers and Floater Freezers.
Brahmin
Found in West Virginia and generally peaceful enemies. There are two variants namely Brahmin and Blue Ridge Brahmin. You can get Brahmin Loot, Brahmin meat and enemy loot from them. They are mutated cows used to transport weighs.
Wendigos
Found in West Virginia and appears more like a human with a skinny body structure. They have large claws and are highly mobile. They deal high damage and hence are extremely dangerous. There are three variants of these enemies namely Ravenous Wendigos, Diseased Wendigos and Glowing Wendigos.
Owlets
You can find the Owlets in Grahm’s cooking pot during the event in the forms of Owls. They are not dangerous at all as the radiations have not mutated them into something more but the opposite. They have lost all features and can’t even fly.