Spaceship piloting and dogfighting, while not the main focus, are integral to the Starfield experience, and you can enhance it using HOTAS. While default controllers/keyboards get the job done, many aspects of flight feel limited.
The prospects are bleak, considering the developers denounced any chance of Starfield having Joystick support. However, just because it’s not officially supported doesn’t mean it isn’t possible. Many community members have provided tips for setting up a HOTAS on PC. Here are all the steps to do that.
1. Download and install JoyToKey
The first thing you need to do is download the JoyToKey keyboard emulator. This tool will map your Joystick’s inputs to the equivalent mouse inputs. Grab the free version from the website and follow the installation guide.
2. Launch JoyToKey and configure Joystick
With JoyToKey installed, launch the app, and a small window will open. You’ll notice two colored tabs that read ‘Joystick 1’ and ‘Joystick 2’. Ignore them now and scroll to the top ribbon, clicking on ‘Settings(S).’ Click on ‘Configure Joysticks…(C)’ from here.
From here, calibrate the HOTAS to ensure it reads the inputs while playing Starfield. Click ‘Configure Game Controller Property‘ and select your Joystick in the next panel. From there, you can calibrate it. Return to the ‘Calibrate Analog Stick’ menu and select the second option, ‘Advanced setting for each device.’

Here, ‘Stick 1’ will be dedicated to your Twist, while ‘Stick 2’ will be dedicated to your slider. Apply the following settings to each stick from the drop-down options:
Stick 1
- Horizontal: X-axis
- Vertical: Y-Axis
Stick 2
- Horizontal: RZ-axis
- Vertical: Axis 7
The settings above will optimize your stick to handle ship movement and aim seamlessly.
3. Map buttons to the Joystick
Now, we move on to translating commands to the Joystick. Return to the first menu and Click on the relevant Buttons you want to map. Look at the panel that reads Button, Function, Auto, and Comment. ‘Button’ will detail the command type, while the function will be the mapped command.
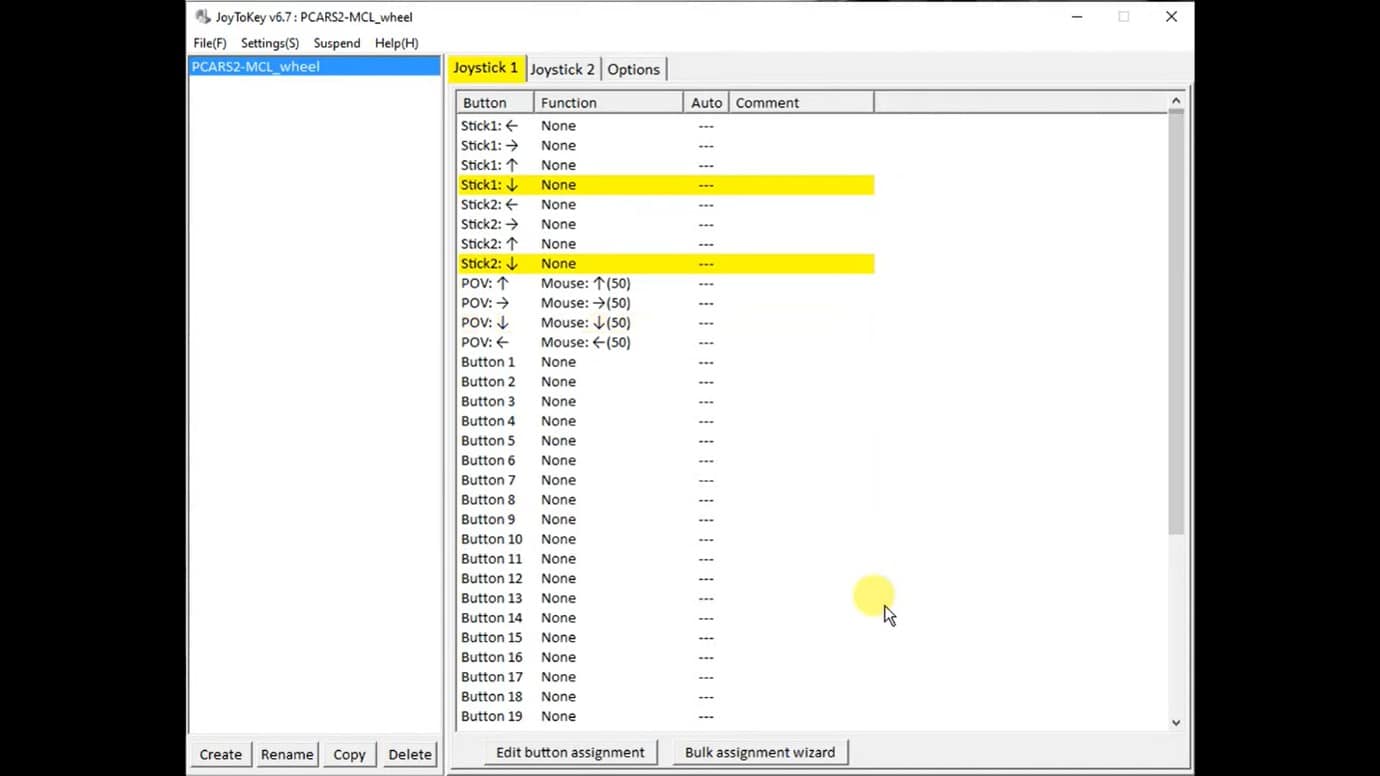
If you aren’t sure which HOTAS button is being referenced, use it, and the panel will highlight it. Knowing the default keyboard and mouse bindings will help here. G, for instance, corresponds to missiles. Picking a HOTAS button and assigning the G key will let you access missiles in Starfield.
Rinse and repeat until you’ve got all your relevant buttons mapped, and your stick will be good to go. With all that done, congratulations, you’re now ready to sail the stars in a more immersive manner.
Something worth noting, though, is that your choice of Joystick matters. In Steam especially, certain older HOTAS models reportedly don’t work. However, cases like the Logitech HOTAS x56 seem to work fine. The list of compatible sticks may improve as the modding scene develops and more updates are released.