
Palworld is an all-new survival game inspired by Pokémon that allows you to collect Pals and train them for battle while putting them to work on building your base and fighting alongside you.
What makes this game even more entertaining, is its multiplayer feature that allows you to connect with other players and explore the fantastic world with your friends.
You have the option to either join a public server or a dedicated server if you do not want random strangers intruding into your game.
Palworld developers already maintain several dedicated servers you can join but the main reason to set up your own server is to allow yourself to play with more than 3 people, 31 to be exact.
How to join a dedicated server
You can choose to join an existing dedicated server set up by someone else as long as you know the Host’s IP address. Simply navigate to the game’s Multiplayer menu and select “Join Multiplayer Game”.
Now enter the Host server’s IP address and connect. This will launch your game in the said dedicated server. Do note that depending on the server’s settings, it might ask you for a password before you can connect.
How to create a Palworld dedicated server with Steam
There are a few ways for you to set up your dedicated server and most of them involve paying for an external server or renting a third-party server. However, there is a way to set up a multiplayer dedicated server for free but it will require a lot of work to get it running.
Step 1 – Download Palworld Dedicated Server
If you have purchased Palworld on Steam, search for Palworld Dedicated server on Steam and install it. Make sure to check the small box that says “Tools” otherwise it won’t show up.
Step 2 – Launch the Dedicated Server
Launch the Dedicated Server from Steam and wait for a black CMD screen to pop up. The server will now be live for as long as you do not close this window. Make sure to allow it through the Firewall
Step 3 – Invite friends to your dedicated server
Now head back to Steam and launch Palworld, navigate to “Join the Multiplayer Game” and share your IP address with the people you want to invite to your server.
We highly advise that you only share your IP address with the people you trust. Make sure to allow Port Forwarding by heading to your Router’s Interface.
How to set up a Palworld dedicated server without Steam
Creating your Palworld that goes beyond the limitations and rulesets of Steam is possible. This, however, does require a bit of technical knowledge and experience.
Step 1 – Get Steam CMD and Server Files
If you don’t own the game on Steam, download SteamCMD which is an official Valve tool to set up Dedicated servers. Once downloaded, extract it into a separate folder.
Step 2 – Create the BAT file
Next, right-click in the Folder and create a new Text Document. Rename this file to Start.BAT and remove the .txt extension.
This will change the file type to a batch file and we will be using this file to start and update the Palworld Dedicated Server. Now open this file with a text editor and paste the following command into it.
steamcmd.exe +login anonymous +app_update 2394010 +quit
Save the file and close it. Double-click to run the start.bat file and wait for it to configure and generate the files needed.
Step 3 – Run the BAT file
Now, run the bat file once again and wait for it to finish checking for updates. Once it is done, it will launch the server in a separate window. The server will not look like much at this point so we need to set it up properly.
Step 4 – Set up a server
Open the folder where you downloaded the SteamCMD and navigate to the following directory – Steamapps>Common>PalServer. Here you should see a file named “DefaultPalworldSettings.ini”. Open this file with a text editor like Notepad and copy everything from the fourth line onwards.
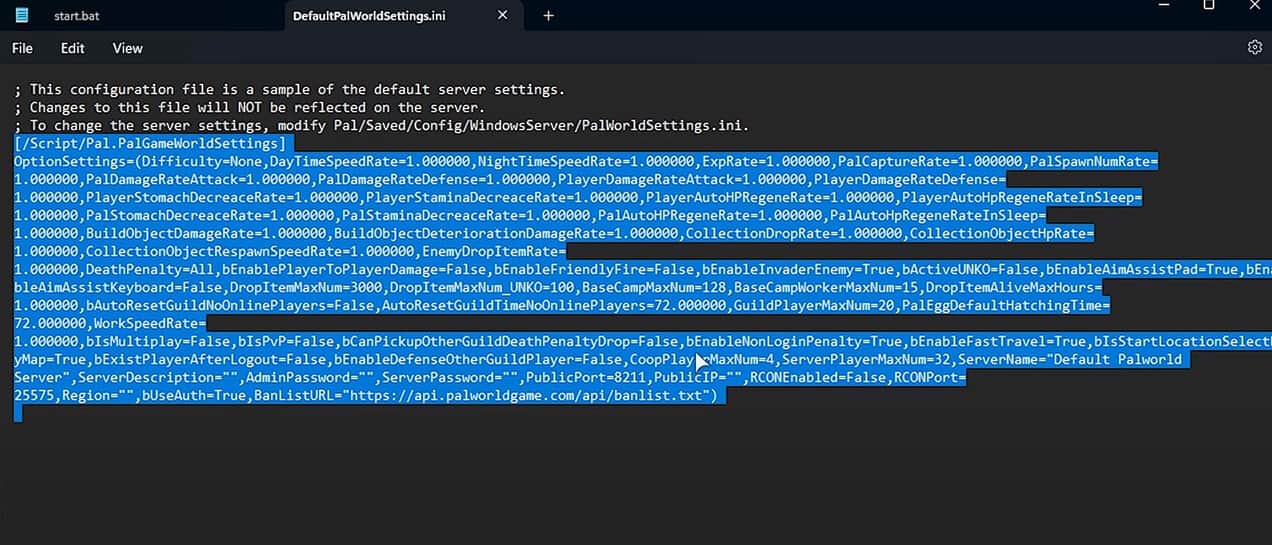
Navigate to the directory – Pal\Saved\Config\WindowsServer and open PalWorldSettings.ini. Paste everything you just copied into here.
Do note that you can modify details in the inverted commas like the server’s name and maximum player number or the server password. Save and exit the file.
Step 5 – Configure the server
Close everything else and go back to the main server folder. Open the start.bat file and wait for it to launch the server.
Then launch the Palworld game app and go to the “Join Multiplayer game”. At the bottom of the screen, you will see your server’s IP address, click connect to join the server.
Once again, make sure to allow the necessary exceptions through your system’s Firewall and allow Port Forwarding through your Router.
Once all this is done, you can invite your friends to your Palworld Dedicated server by sharing your IP address. Once again it is important that you only share your IP address with your friends who you can trust.