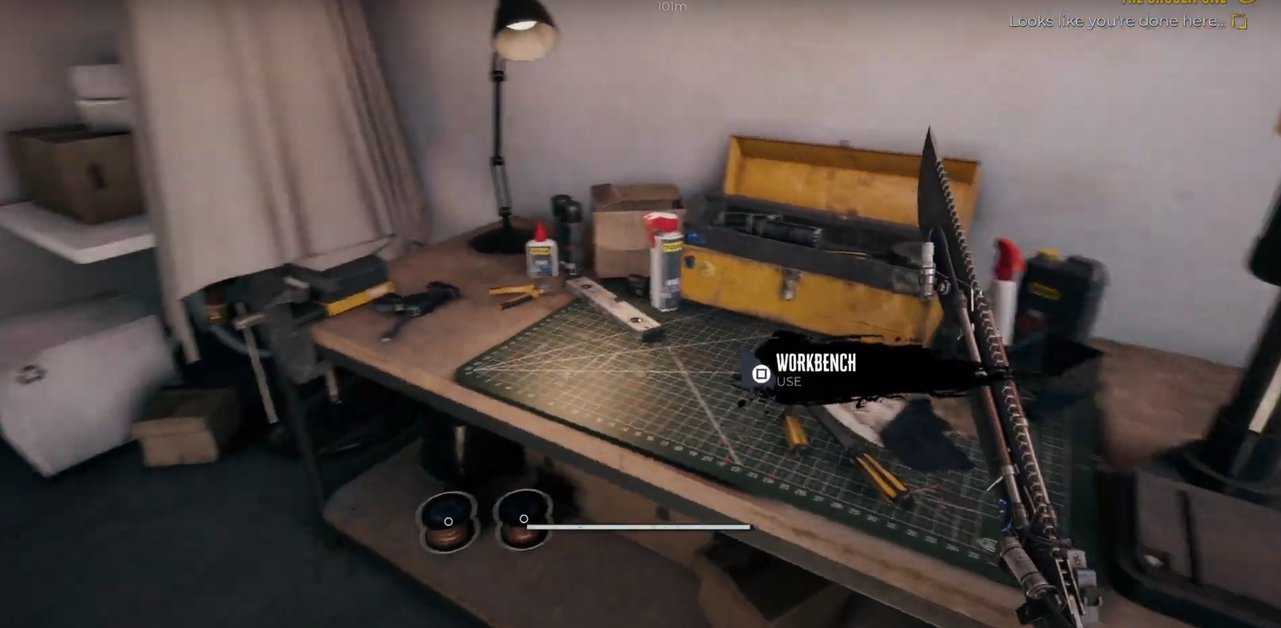
Dead Island 2 is filled with various weapons for players to choose from clearing out the zombie hordes. However, as you are combating these zombies across the map, your favorite weapons may lose their effectiveness because of their constant use. That is where the Dead Island 2 workbenches come in.
There are plenty of workbench locations in the Dead Island 2, and not only can you repair your weapons there but you can also upgrade and modify them with newer perks and mods to improve stats, provided you have the blueprints. You can also scrap the weapons that are of no use to you as this will earn you some other resources.
Workbenches, therefore, are the key to success in Dead Island 2. Here are the exact locations you need to go to find Workbenches in Dead Island 2.
Dead Island 2 workbench locations
Here is a list of all the workbenches found in different regions of DI2
Bel Air workbench locations
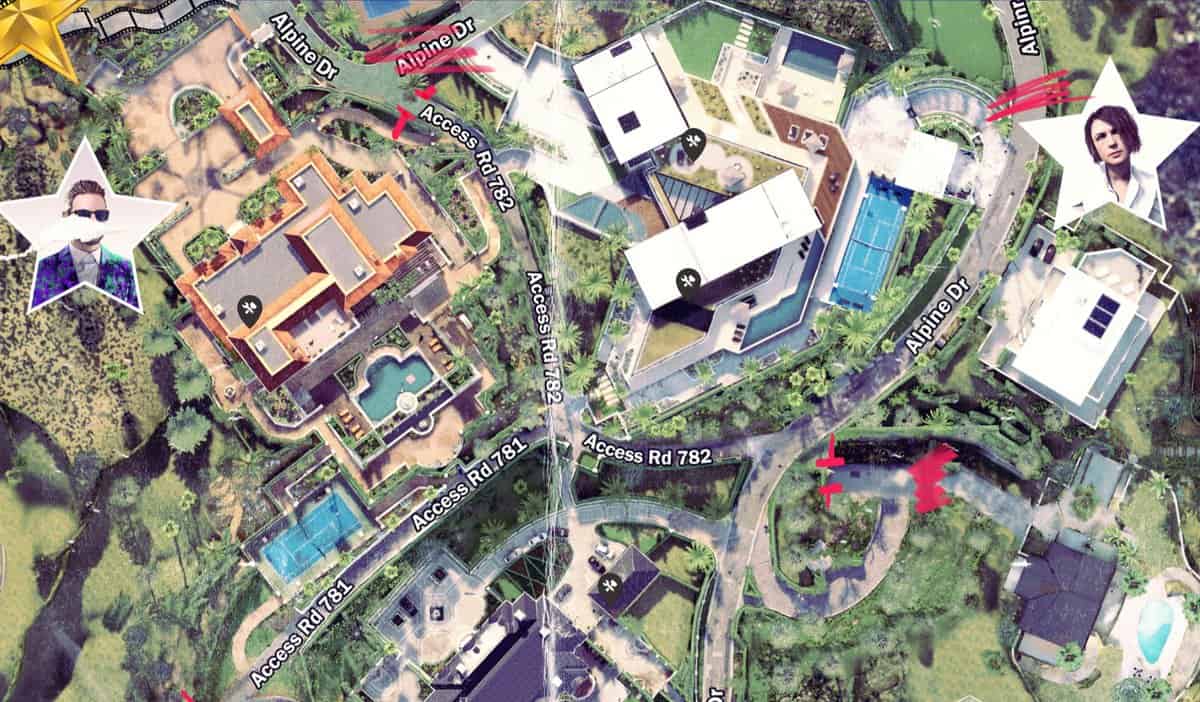
Workbench # 1: Swanson Estate
Go into the Panic room and there you will find this workbench. As you visit the Panic room early in the game, you will find it unavailable. Come here after visiting Emma’s Estate and you can use this Workbench then.
Workbench # 2: Emma’s Estate
For this Work Bench, go to the first floor at Emma’s Estate. Use the blueprints you obtained during your main quest “Call the Cavalry” and learn how you can take advantage of these work benches.
Workbench # 3: Curtis Estate
Go into the middle of the district and you will enter the Curtis Estate. Reaching there find the large garage. Work Bench is located inside this Garage and at the entrance of this garage you will find a switch near a door. Push the switch to open the door, destroy the crate and then look for a little gap between shelves.
Workbench # 4: Patton’s Sewer Hideout
From Emma’s Estate head south east and you will find Patton’s Sewer. The workbench is located here but you won’t find it as you initially visit the place while searching for Brentwood Sewers. Come here later and you can then easily use this workbench.
Halperin Hotel workbench locations
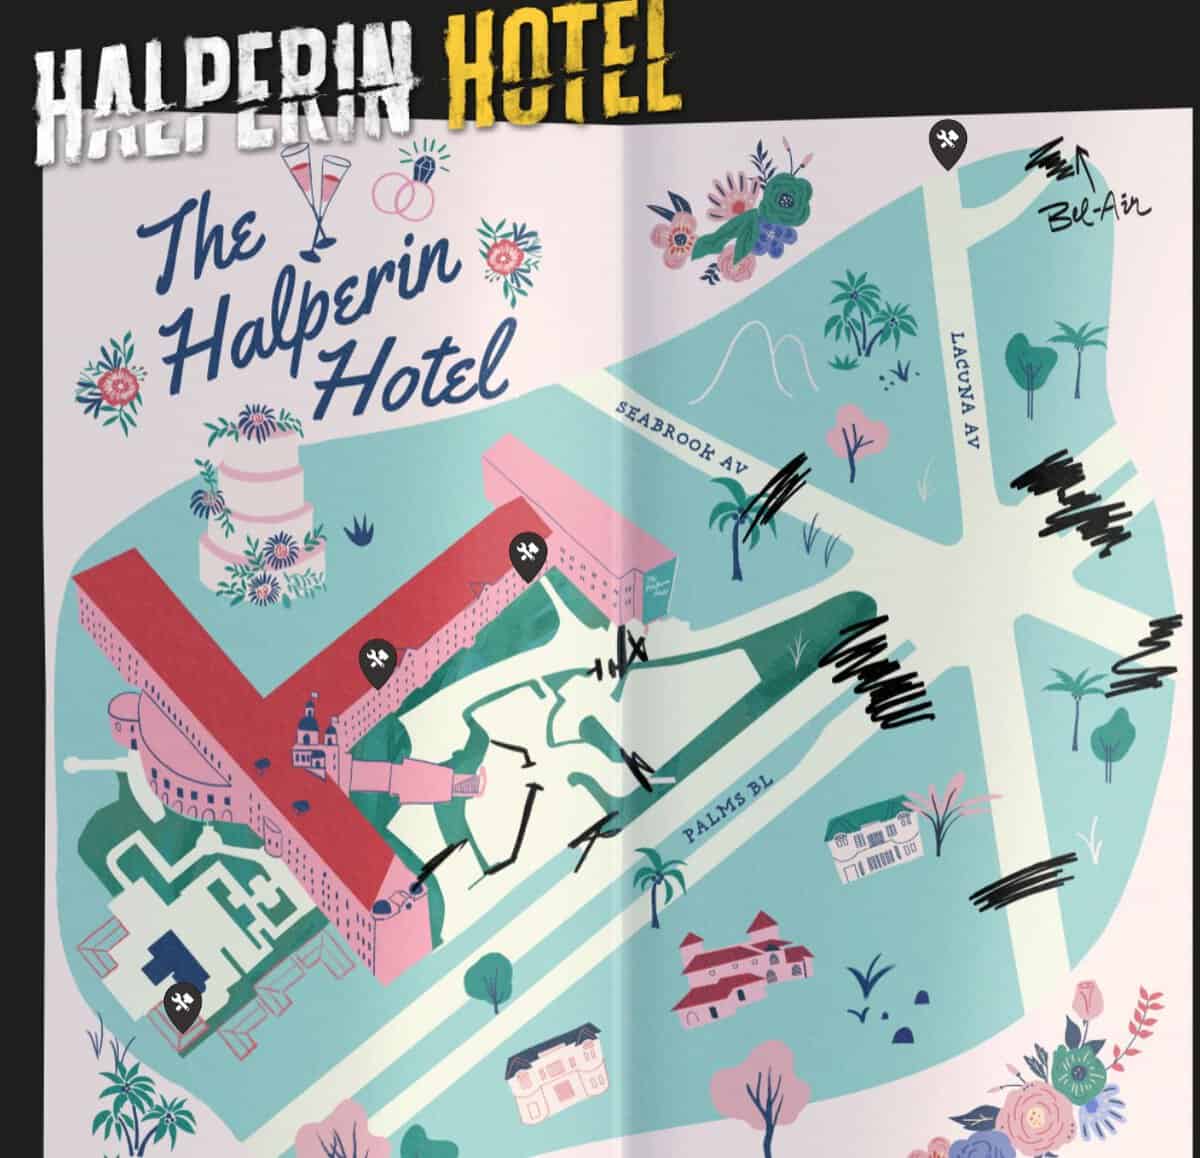
Workbench # 5: Lacuna Av
Go to the north end of the Lacuna Av in the Halperin Hotel. There you will find a container and this workbench is located inside this container.
Workbench # 6: Halperin Hotel Second Floor
This is an easy find, simply go to the second floor of the Helperin Hotel and you will easily find the Workbench next to the elevator.
Workbench # 7: Halperin Hotel Room 307
This workbench is inside Hotel Room 307. To reach this, you don’t need to do any effort as the main story will automatically take you to this place.
Beverly Hills
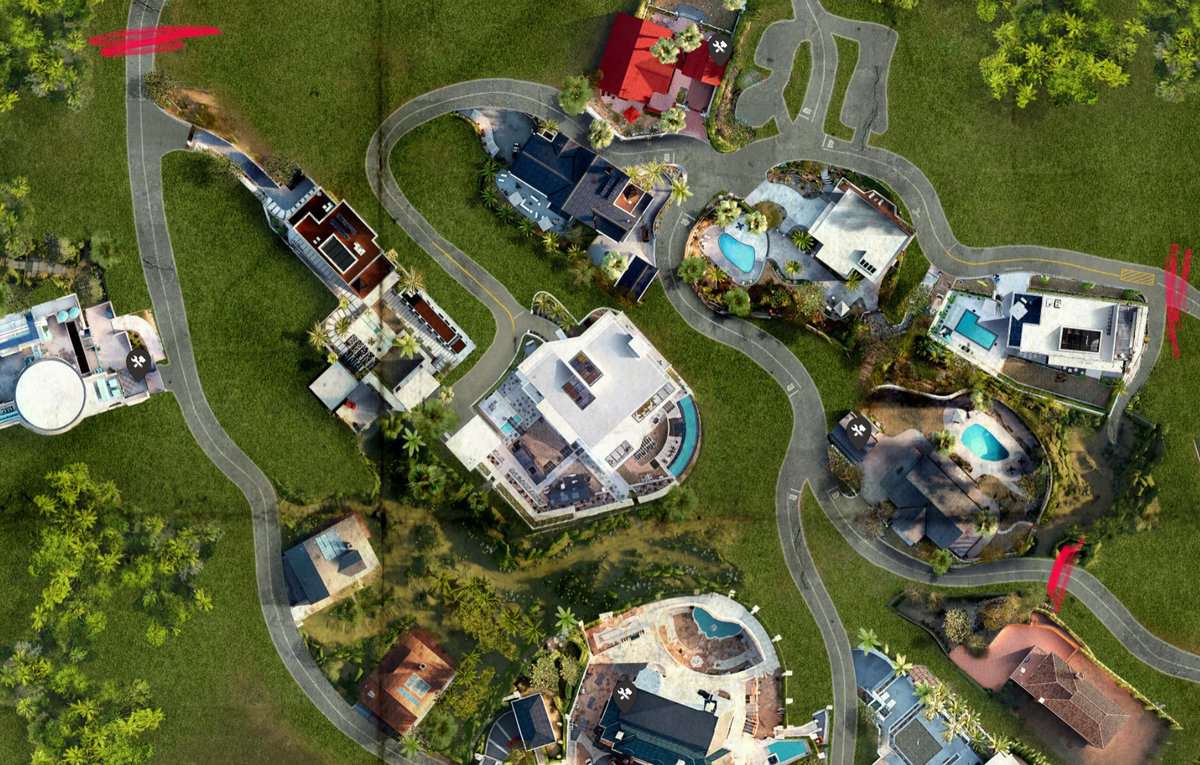
Workbench # 8: Garage in Francesca’s Estate
To find this work bench you need to enter the garage in Francesca’s Estate. Go to the north-east of Beverly Hills and you will find Francesca’s Estate.
Workbench # 9: Garage in Jessie’s House
Using this workbench located inside Jessie’s House requires you to first fight with a monster clearing out the place. You will visit Jessie’s House during “O Michael, Where Art Thou?” main quest, and as you reach the house speak to Rikki to open up the garage.
Workbench # 10: Construction Site
As you are moving around in the district, you will find a house under construction at the southern end. This is where this workbench is located.
Workbench # 11: Hydroelectric Power Plant
To access this workbench you need to visit Hydroelectric Power Plant in Beverly after visiting the Monarch Studios. As you come here, complete all the different tasks you are given in the Power Plant as doing so will give you keys to the Gate Control Room. The Workbench is located inside the Control Room.
Monarch Studios workbench locations
Workbench # 12: Makeup Trailer
To find this workbench go to the Makeup Trailer that is in the parking lot on the left side of the Studios.
Workbench # 13: Stage 7
Go to the Stage 7 and there you will find a huge door. Here you need to solve a puzzle to open that door and get access to the other part of the building. The workbench is located in the other building.
Workbench # 14: Sound Stage 3
Travel to the eastern side of Monarch Studios and you will find the Sound Stage 3. This is where this workbench is located and you will find a blueprint near it.
Workbench # 15: Trailer near Stage 3
This trailer is located to the south of Stage 3, therefore go there and you will find this workbench.
Workbench # 16: Outdoor Stage
After your fight with boss Alesis Hernandez, look at the map and go to the top eastern corner of it. That is where you will find this workbench.
Brentwood Sewer
Workbench # 17: Eastern Sewers
Go to the eastern side of Brentwood Sewer and you will find this Workbench pretty easily. There will be a footprint near the workbench, don’t forget to pick it up.
Workbench # 18: Middle Sewers
Go to the middle of Brentwood Sewer and you will find this Workbench pretty easily. However, on your way, you have to fight against a couple of enemies and after reaching it you will also find a blueprint near the workbench.
Workbench # 19: Western Sewers
Head towards Venice Beach on the West side of Brentwood Sewer and as you reach a ladder that leads you to Venice Beach you will find this workbench.
Venice Beach
Workbench # 20: Blue Crab
This place offers you a workbench and a blueprint, moreover, you don’t have to do much effort to reach it as visiting this place is a part of Dead Island’s 2 main story.
Workbench # 21: Lifeguard Hut
This workbench is inside the hut located in the south of the beach. However, to reach the hut you first need to kill the Zombies that are surrounding it.
Workbench # 22: Lifeguard Tower
This workbench is located at the top of the Lifeguard Tower on Venice Beach. This is an easy find and you won’t need to struggle to use it.
Ocean Avenue
Workbench # 23: Southern District Entrance
Entering Ocean Avenue from Venice Beach side, you will find a container. This workbench is located inside it.
Workbench # 24: Serling Hotel
A workbench is located in the Serling Hotel on Ocean Avenue and you’ll automatically come to this place as a part of the main story to meet Dr Reed.
Workbench # 25: Venture Walk Underground Parking
To find this workbench, first, see the icon for this workbench on the map and reach the North Eastern part of the District. As you reach the location you won’t be able to find it, therefore, go to the underground parking. There’s a room next to parking and that is where this Workbench is located.
Workbench # 26: Thalia Residences
This workbench is located in apartment 2c in Thalia Residencies and is one of the easiest finds.
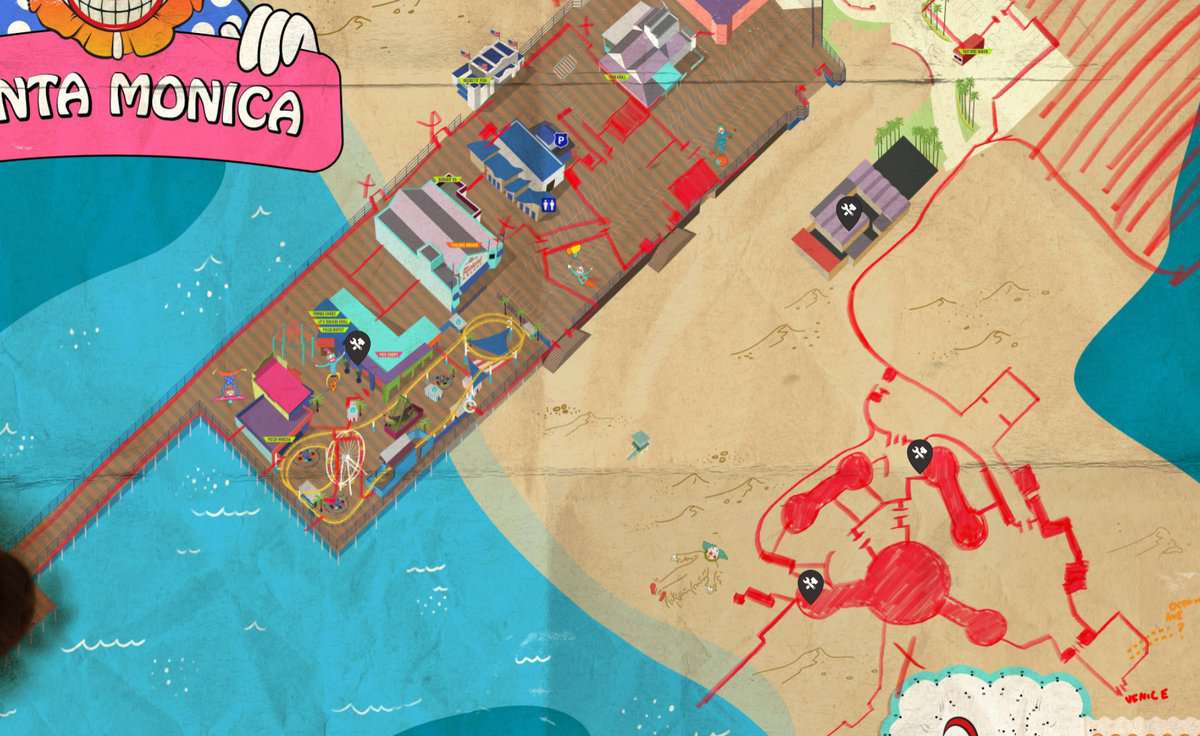
Santa Monica Pier
Workbench # 27: CDC HQ
A workbench is located inside the CDC headquarters. Go to the CDC HQ and then enter a white-colored tent. The workbench is in the right-most tent.
Workbench # 28: Main Dome
Enter the Main Dome by interacting with a keycard reader. Here you will find so many butchers there to clear them out first before using the Workbench.
Workbench # 29: Lifeguard HQ
Enter Lifeguard HQ in the center of the district and you will easily find a workbench there.
Workbench # 30: Broadwalk
Go to the beach and walk towards the Ferris wheel. At the end of this Broadwalk, you will find this workbench. You will also visit this place while doing the sidequest “Red Tide” to find Cooper’s Boat.
Metro
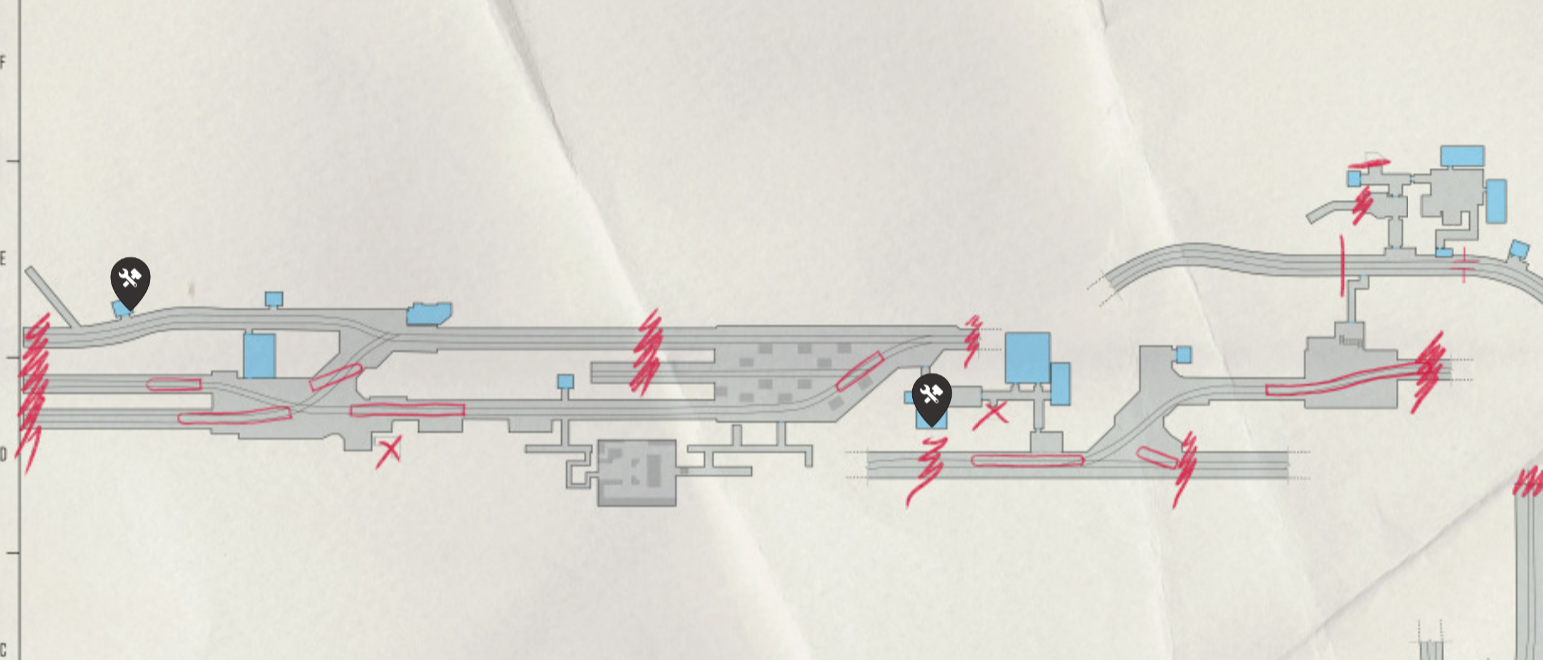
Workbench # 31: Subway Entrance
Go to the west end of the metro and you will find a little room. That is where this workbench is located.
Workbench # 32: Central Tunnels
Go into the middle of the Metro Tunnel and you will find this workbench there.