Dead of the Night is another map released for Black Ops 4 Zombies that follows the Chaos storyline. The interesting thing about this map, though, is that it contains multiple easter eggs. That includes the main, long one, as well as optional (mini) easter eggs that you can do in the same playthrough.
The optional easter eggs are not part of the main Dead of the Night lore but they do offer some pretty powerful rewards. We will be telling you how to complete all of them in BO4 Zombies.
How to complete the main Dead of the Night easter egg
The main Easter Egg is one of the lengthiest in the Black Ops 4 Zombies game but it makes up for it with the exciting new enemy variety and somewhat creepy challenges it gives. Keep a notepad around you and stick to the
Step #1: Get the Sentinel Artifact
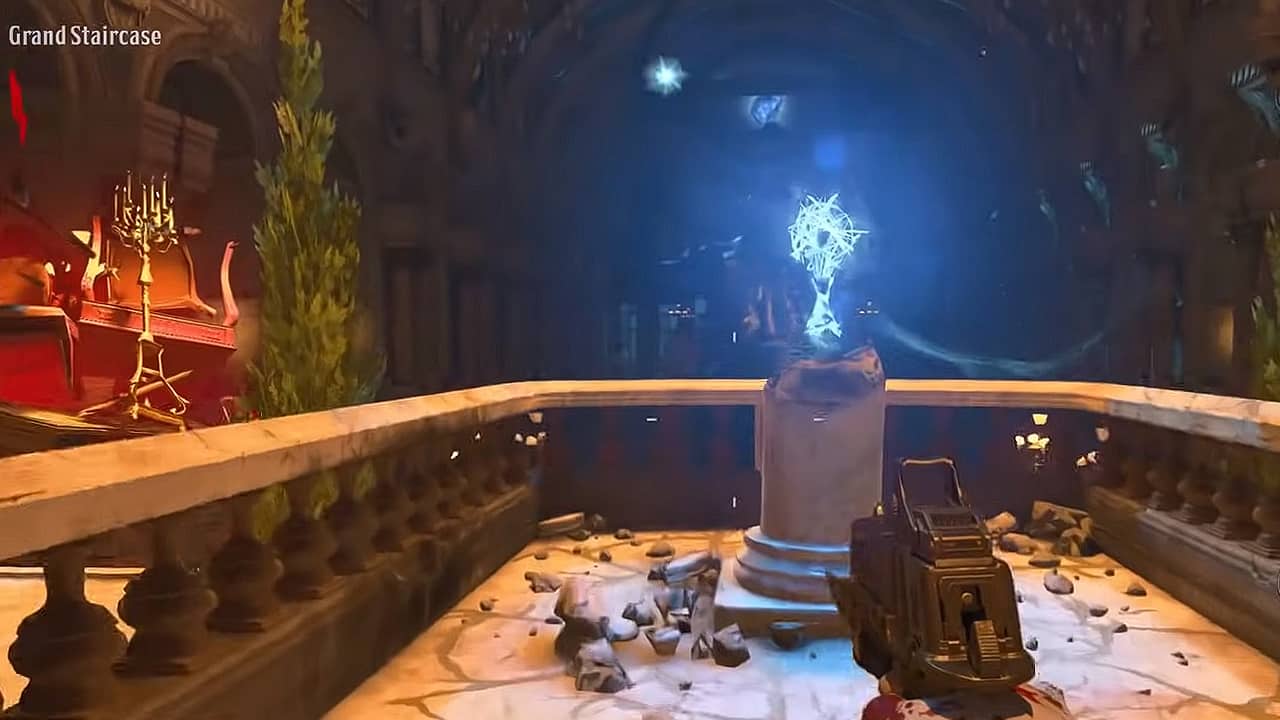
The Sentinel Artifact from Voyage of Despair makes a second appearance in Dead of the Night. This is the first thing you need to locate and interact with for the Easter Egg to progress. It is close to where you spawn the Grand Staircase. Simply make your way to its location and interact with it to gain access to the complete map.
Step #2: Activate the Pack-a-Punch
The next step is to unlock the Pack-a-Punch machine but it is especially tricky to do this on Dead of the Night compared to other maps and requires you to follow several steps and complete certain challenges.
Gaze into the Crystals
Look for 3 vases with colored smoke coming out of them. There are multiple vases scattered around the map but you need to find the ones that have blue, green, or purple smoke coming out of them. These can be found at any 3 of the following locations:
- Master Bedroom
- Study
- Library
- Wine Cellar
- Trophy Room
- Bedroom Hallway
Shoot or knife these vases to reveal crystal inside. Now you must kill some zombies near each of these to charge them up. Once charged, the crystals will start glowing and will give you an option to gaze into them if you get close.
Collect the Tuning Forks
Gaze into one of the crystals and note down the item you see. You have to locate this item on the Dead of the Night map and interact with it.
These items are randomized in each game so be sure to note them down exactly as you see them. Depending on the item you see in the crystal you will have to complete a specific type of challenge after interacting with that object.
If you see a clock, find it on one of the following locations on the map:
- Billiards Room
- Main Hall
- Dining Room
You will know it’s the right clock if the hands on the clock are spinning around. Interact with the clock and a symbol will appear on the ground. Now you must survive while staying inside the circle and killing the zombies that approach you. Having other players with you will increase your likelihood of survival by a lot. Once this challenge is complete grab the Tuning Fork from the clock.
If you see a Perk, head to that perk machine on the map. The Perk you see will vary each game but you can find all the perk machines at the following locations:
- Mausoleum
- Gardens
- Forest Terrace
- Grand Staircase
- Wine Cellar
- Entrance Hall
Interact with the perk and your screen will turn black and white. Now survive the vampires attacking you until your screen goes back to normal and you will receive another Tuning Fork.
If you see any other object, you will find it at one of the following locations:
- Rope – Wine Cellar, On the back of the tall chair, by the same place as the Silver Plate spawn.
- Creepy Girl Painting – East Gallery, On the wall in the East Gallery.
- Old Man & Girl Painting – Smoking Room, On the wall in the Smoking Room.
- Woman Painting – Music Room, On the wall in the Music Room.
- Creepy Doll – Entrance Hall, Along the left-hand wall, next to a tall vase.
- Scroll – Study, inside a lockbox on a bookshelf, right next to the debris unlock for the room.
Interact with the object you saw in the crystal and a ghost should appear. You need to follow this ghost wherever it goes. Once it reaches its destiny, it will disappear into another object, usually in the cemetery and the final Tuning Fork will spawn on that object.
Head into the Forrest
Once you have collected 3 Tuning forks, head to the cemetery and interact with the black sludge blocking the gate. The sludge will disappear giving you access to the forest.
This is where the Pack-a-Punch machine is but be careful as a werewolf may attack you. Kill all the enemies to secure the area and activate the Pack-a-Punch.
Step #3: Craft Silver Bullets
The next main objective for the Dead of the Night Easter Egg is to craft Silver Bullets that you will need to use to kill the giant werewolf. To craft the silver bullets, you need to find 3 silver parts and 3 other very specific parts for the gunpowder. You can find these parts at the following locations:
Silver Parts
- Silver Trophy – Dining Room or Library
- Silver Candle Stick – Entrance Hall, Billiards Room, or Wine Cellar
- Silver Plate – Wine Cellar
Take all 3 silver parts to a workbench to craft them into molten silver
Gunpowder Parts
- Charcoal – Main Hall by the fireplace
- Vampire Poop – Cemetery, in the corner opposite the mystery box
- Sulfur – Greenhouse Laboratory
Once you have all the parts, take them to the workbench again to finally craft silver bullets. Be sure to equip your strongest gun with these silver rounds.
Step #4: Build the Ballistic Shield
Now with all the zombies, vampires, and werewolves chasing you, it is time you build yourself a decent shield. The shield required for this easter egg needs to be crafted using 3 parts. The 3 parts can be found in the following locations:
Main Plate
- East Balcony – Leant against the balcony stone railing, left of the Saug 9mm wall-buy
- Grand Staircase – Leant against the pillar, right of the Sentinel Artifact location
- West Balcony – Leant against the wall at the end of the balcony, under the left-most of three tall windows
Shield Window
- Study – On a square table to the right of the entrance from the Billiards Room
- Library – On a broken bookshelf in the far corner, next to a huge vase
- Library – On the sofa blocking the inaccessible staircase
Counter Plate
- East Hallway – On a chair in the corner of the hallway, by a table with a lamp
- Dining Room – Underneath a double candle on the wall, on the right-hand side of the bar
- Dining Room – On the floor to the left of the doorway to the Greenhouse Terrace, next to the marble pillar
With all 3 parts in your inventory, go to a workbench and craft the shield. If your shield gets damaged or broken through the course of the game, you can repeat these steps to build a new one.
Step #5: Get the Alistair’s Folly Wonder Weapon
The Wonder Weapon on the Dead of the Night map is a revolver that shoots green plasma beams. This powerful weapon is called Alistair’s Folly and can be acquired from a mystery box.
To get it for free instead, you need to look for 4 colored symbols. These always spawn near a perk machine and we can narrow down their locations to:
- Blue symbol – Cemetery or Mausoleum
- Green symbol – Greenhouse Terrace or Gardens
- Yellow symbol – Forest Terrace
- Red symbol – Master Bedroom, East Gallery, Wine Cellar or Dining Room
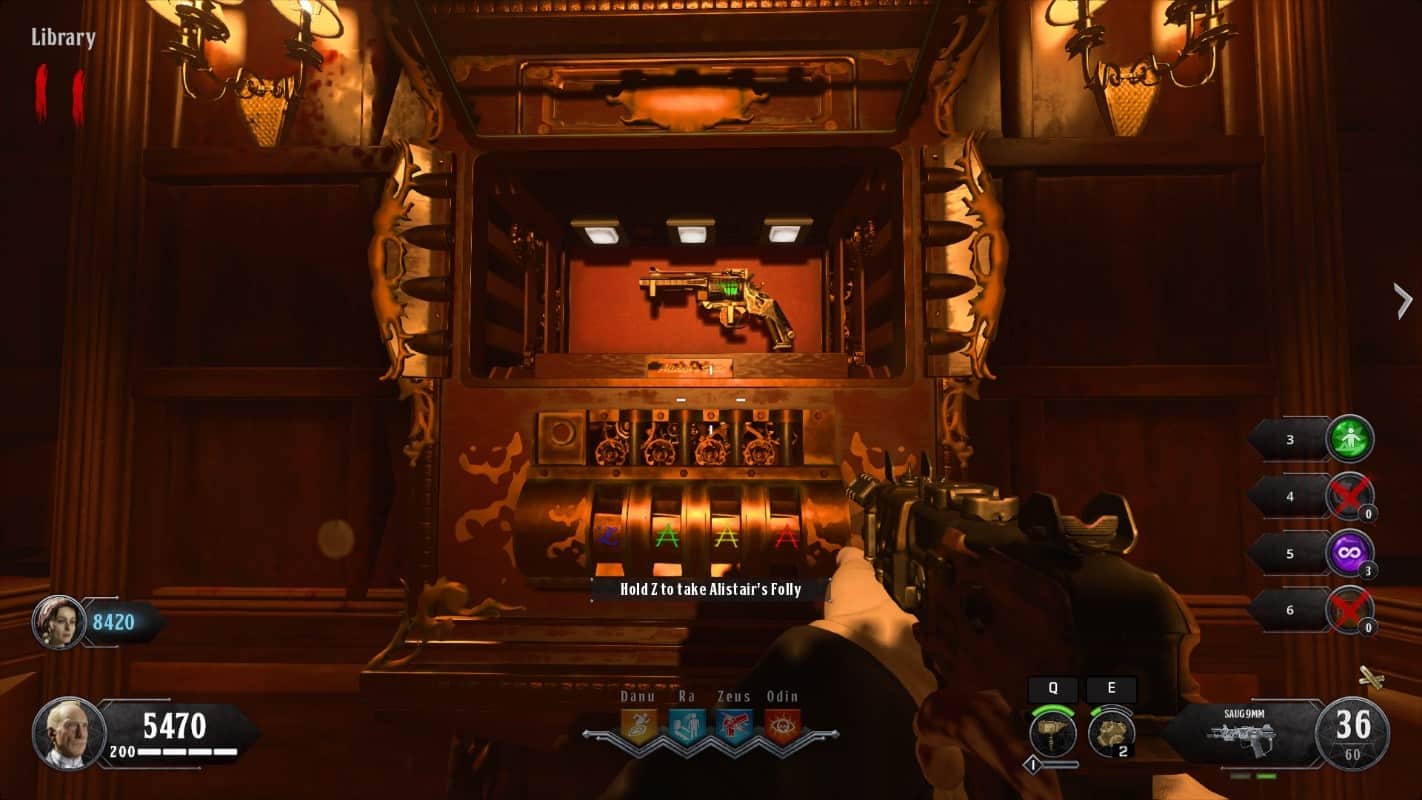
Note down these symbols and their colors and head to the Library, where you will find a locked Alistair’s Folly. Input the codes into the machine below it to claim a free version of this Wonder Weapon.
Step #6: Create Prima Materia
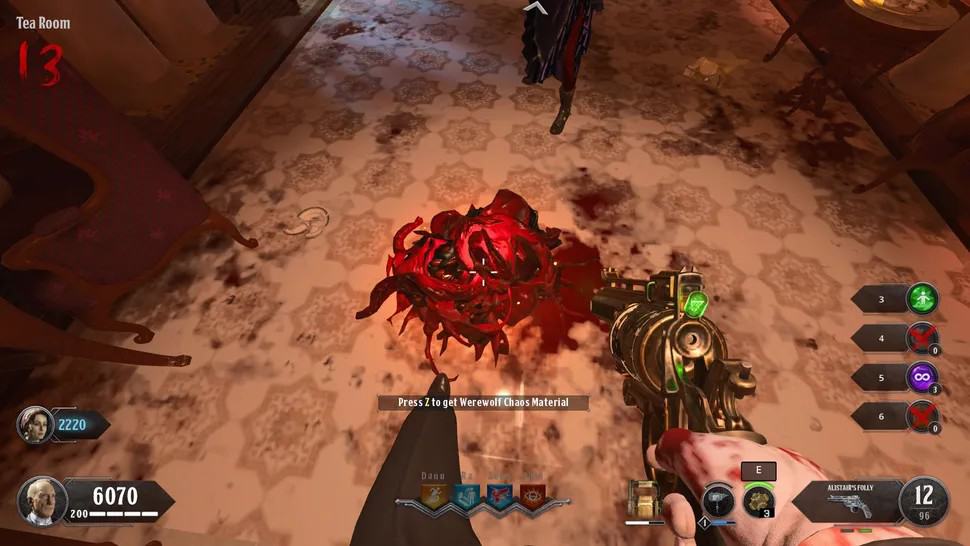
Head back to the Forest and kill a werewolf with your silver bullets. The werewolf should drop Chaos Material. Take it to the Greenhouse Laboratory and place it in the large machine there.
Wait for a few seconds for the machine to process the item and then collect the Prima Materia to progress with the Dead of the Night Easter Egg.
Step #7: Upgrade Alistair’s Folly
There are 2 upgrades for the Wonder Weapon Alistair’s Folly.
First Upgrade – Chaos Theory
Head back to the Library and look for a peculiar bookshelf. There should be a book with a golden symbol on it. Melee it with your Shield equipped and the bookshelf will open up revealing a hidden room. Collect the part from inside the room and take it back to the workbench in the Greenhouse Laboratory to craft the Chaos Theory upgrade.
Second Upgrade – Alistair’s Annihilator
It is important to upgrade Chaos Theory to Alistair’s Annihilator to complete the Dead of the Night Easter Egg. For the second Wonder Weapon upgrade, you need to collect 3 parts.
Vampire bile
Kill some vampires with charged shots from the Chaos Theory you just upgraded to. The vampires will drop yellow-colored bile. Collect 4 of these and it should be enough.
Nosferatu Chaos material
Head to the cemetery and look for a red glowing gravestone. Interact with it and wait for Nosferatu to spawn. Kill him along with all the other vampires that spawn in the area and collect the Nosferatu Chaos material.
Bat Chaos Material
Head to the Mausoleum stairwell area and look for lit lanterns. Shoot the one with the glowing orange tint with your WW to turn it off. After this, you have 90 seconds to hit the next one that lights up.
Repeat this for 5 lanterns until all of them are off. It might be better if you have other players with you who can easily take out the other lanterns.
Once all 5 of the lanterns have been turned off, a vampire bat will spawn and you need to shoot it with your silver bullets or with charged shots of Chaos Theory for it to drop the Bat Chaos Material.
The final Part
Head back to the forest and look for some mounds of dirt on the ground. You need to kill some zombies with charged shots of Chaos Theory. This will cause the zombies to dig up those mounds.
Do this for all the mounds in the area until you find the last part needed for the Wonder Weapon upgrade in one of those mounds.
Make your way to the Greenhouse Laboratory and place the Nosferatu Chaos Material inside the same machine as before to create Prima Materia. Do the same for the Bat Chaos Material. Collect all the Prima Materia and go to the workbench to craft the Allistair’s Annihilator upgrade.
Step #8: Complete Telescope, Knight, and Effigy Questlines
Now you must return to the crystals we gazed into to unlock the Pack-a-Punch machine. Interact with the crystals again to gaze into them once more. This time however you will see one of the 3 objects: A stone effigy, a circular object (telescope), or a knight.
Each of these objects has its own questline that you must complete before you can unlock the final step for the Dead of the Night Easter Egg. We will detail all 3 of these Black Ops 4 easter egg questlines below.
Effigy Questline
The purpose of these questlines is to collect 3 stone slabs, we are tackling the Effigy stone slab first but you may attempt them in any order that you see fit.
Collect Branches
Head to the Cemetery and look for 5 birch tree branches with leaves falling off them. Shoot these branches to break them off and interact with them.
Look for your gravestone
Now look for a gravestone that has 1912 as the date of death on it. It belongs to your character if you are playing solo. If you have multiple players with you, the gravestone belongs to one of the characters in your game. Have that player interact with the gravestone. Make sure that player has the Alistair’s Annihilator equipped.
Enter Afterlife
After interacting with the gravestone, a scarecrow will appear nearby. Fire at the ground near the scarecrow with the Wonder Weapon’s charged shots to set it on fire. The same player must now step into the fire and will be taken to Afterlife, making them invisible to other players.
Have that player head into the mansion and look for a ghost follow the ghost until it reaches the effigy and starts to burn. This will cause a stone slab to appear on the ground.
Survive
Have all players interact with the stone slab and be ready to fight off a big wave of Zombies, Vampires, and werewolves. You will be locked in the cemetery and must survive until all the enemies are defeated.
When this is done, Collect the stone slab to move on to the next challenge of the Dead of the Night Easter Egg.
Knight Questline
For the Knight Questline, if you saw an image of a knight in one of the crystals, you need to activate a Fire Gate Trap. The easiest ones to find are in the Library and the Entrance Hall.
You need a Fire Energy Core to activate the trap. These are pretty common collectibles in Dead of the Night and chances are you already have a few of these in your inventory.
Place the core in the trap and activate the fire trap. Shoot the flames with charged shots from Alistair’s Annihilator. This should turn the flames blue. Walk through the fire with your Ballistic Shield to set it on blue fire.
Light Fireplaces
Now you need to look for 3 sets of 4 fireplaces across the mansion in the Dead of the Night and ignite them with the blue fire using your shield. The sequence is important for the easter egg so be sure to do them in the following order
First Set
- Smoking Room
- Library (right side of the door)
- Library (left side of the door)
- Billiards Room
Second Set
- Main Hall (east side)
- East Gallery
- Main Hall (west side)
- West Gallery
Third Set
- Trophy Room
- Master Bedroom
- Music Room
- Dining Room
Melee the fireplaces with your shield set ablaze in blue flames to light them and after igniting the 4th fireplace in each set, be sure to pick up the energy core they drop. You also need to be quick so keep them in time and plan accordingly.
The Knight Statues
Now look for 3 knight statues and interact with them to obtain their energy cores. The statues can be found in the following locations:
- Cemetery – To the right of the Cemetery entrance
- Gardens – Follow the path to the right of the gazebo
- Main Hall – By the East Hallway entrance
Once you interact with a knight statue, its energy core will be released. Stay close to it and escort it to the forest and make sure each of the colored orb goes into the same-colored symbol.
You must do this for each knight statue one at a time. Interact with the symbols to spawn 3 ghostly knights and fill them up with souls. To do this you must kill around 10 zombies near each knight.
If done correctly, the knights will start moving towards the Pack-a-Punch machine and for a triangular symbol on the ground. Werewolves will start spawning around you. Kill a werewolf with silver bullets in the symbol for the stone slab to drop.
Now interact with the stone slab to begin another survival challenge like the previous questline. Once completed grab the stone slab to complete the Knight Questline.
Telescope Questline
We are tackling this questline last because it is the most tedious one but you can do these questlines in any order you want.
First, head to the Cemetery and shoot the metal rod on the roof of the Mausoleum. This will electrify the metal rod and a beam will appear pointing towards the Atlas’s statue in the Main Hall.
After that, go to the spawn and interact with the 3 dials that you see to rotate the rings and align the stone. Keep rotating the rings until the light is reflected through the end of the room rather than the wall. The statue’s head will break and the laboratory will light up. The beam will now be pointing to the telescope in the Greenhouse Laboratory.
Zodiac Signs
Several zodiac signs will spawn on the map along with numerous scratch marks. For each zodiac sign, you will find scratch marks in 2 or 3 places. Note down the Zodiac symbol and add up the number of all the scratches you found in its vicinity.
The number that these scratch marks add up to determine the order in which you must input the signs. For example, you found a zodiac sign and near it, you found a scratch mark with 3 lines, another with 5 lines, and one more nearby with 5 lines, you tally up the scratch marks to be 13 and not 3.
The location of the Zodiac signs randomizes each game but they will be at one of these locations.
- Entrance Hall – left of Danu statue, under the table without the doll
- Billiard room – by the side of the pool table
- Billiard room – under the chess board table
- Wine cellar – lower shelf of wine rack
- Library – behind Egyptian statue
- Trophy room – next to the window, behind the lamp
- Study room – on the wall by the stairs
- Dining room – broken pillar on the door leading to Greenhouse
- Main Hall – behind candle stick, to the right of stairs
Once you have located 3 Zodiac signs and determined the total number of scratch marks around them. Enter them, from lowest to highest, into the Telescope panel in the Greenhouse Laboratory.
The telescope
Pull out your shield and interact with the Dome Crank. Melee the Dome Crank to keep it open. Go downstairs to activate the Electric Trap and run through it with your Ballistic Shield equipped. Doing so will electrify your shield.
Now melee the Telescope with your electrified shield. This will cause a beam of light to shoot up into the sky and the stone slab to appear beneath the telescope.
Interact with the Stone slab and survive the wave of enemies. Once the Defense challenge is over, you can claim the final stone slab and move on to the final hurdle in completing the Dead of the Night Easter Egg.
Step #9: Defeat the final boss

Having obtained all 3 stone slabs, prepare for a tough boss fight. Make sure each player is well-equipped and has plenty of ammo including the silver bullets and bombs. When ready, head to the forest and interact with the giant stone wheel to start the boss fight.
The final boss for Dead of the Night is an invisible werewolf and has 3 phases.
Phase 1
The first phase of the boss fight can be hard to understand in your first encounter with the boss as he will be invisible and the game barely gives you any pointers. This is where our easter egg guide comes in clutch.
3 statues are holding a crystal around the area. Rotate the crystals so that their light beams are pointing toward the green tile.
Once all the crystals are aligned and their light beams turn green, lure the werewolf into the green tile to trap him. The moment he gets trapped, he will become vulnerable. Open fire until he enters phase 2.
Phase 2
Phase 2 will throw waves of multiple powerful enemies at you, including werewolves, regular and Nosferatu vampires, and of course zombies. Your objective is to simply survive till the end.
Phase 3
In Phase 3 do exactly what you did however the green tile will not be visible until you have aligned all crystals correctly. Keep rotating the crystals until they turn green. Shoot the werewolf when he gets trapped. Rinse and repeat till he dies.
This will trigger the final cutscene and conclude the main easter egg for the Dead of the Night map in Black Ops 4 Zombies.
How to complete the Savage Impaler easter egg in Dead of Night
Now that we are done with the main easter egg, we can explore what else the Dead of the Night has to offer. This includes a Wooden Stake Crossbow called Savage Impaler.
This side easter egg is thankfully much easier compared to the main easter egg for this map. The savage Impaler is the second Wonder Weapon on Dead of the Night and is quite effective against vampires which can be a pretty annoying enemy type. Follow a series of simple steps to obtain this Wonder Weapon for free.
Step #1: Knife the candles
Look for 6 different candles on the map and knife them. The candles can be found in the following locations:
- Music Room
- Master Bedroom
- Study
- East Gallery
- Dining Room
- Wine Cellar
Step #2: Interact with tombstone
Head to the forest and make your way to the Pack a Punch machine. Now look for a grave that has a swirling pattern on it. Interact with the tomb and you will enter a zombie rush mode during which your screen starts to bleed. You can enter this mode multiple times but only once during a round for each of the players in your party.
Step #3: Escort the ghost
Once you enter the zombie rush mode, head to the Mansion and start looking for a ghost. The ghost is randomly spawned so look in all of the rooms.
When you find her, stay near the ghost and escort her to the Mausoleum. She will spawn zombies that are glowing blue. Kill them to get the 2 rings, necklace, and watch.
For each item to drop, you must kill the zombies first with your regular weapon, then with your equipment, then your specialist weapon, and lastly with the shield.
The way you kill is very important to get these items that are needed to complete this Dead of the Night side easter egg and get the Savage Impaler.
Step #4: Activate and complete the ritual circle
With all 4 items in your inventory, head inside the Mausoleum and interact with all of the circles that are on the floor to place the required items in there.
Each time you place an item, the circle will change from white to blue. kill 6 vampires inside the circle. The entire circle will turn blue once you have completed all of the requirements correctly. If the circle turns white instead, that would mean you were too slow and need to try this step again.
Step #5: Grab the Savage Impaler
For the final step of this side easter egg in Black Ops 4 Zombies, head to the Cemetery and interact with the tomb by the stairs.
The tomb will shift forward and you will be able to enter the crypt to get the Savage Impaler crossbow. Once you pick up the weapon, a lockdown challenge will begin and you must survive long enough to walk away with the Wonder Weapon.
How to complete the Mystery easter egg song in Dead of the Night
You can unlock the Easter Egg Song “Mystery” quite easily on Dead of the Night by finding and shooting 4 colored coins. If they explode, it means you did it correctly. The coins can be found at the following locations:
- Main Hall – Underside of the table opposite of Mozu wall-buy.
- East Hallway – Behind the right door to the Dining Hall.
- Wine Cellar – Inside the broken wooden barrel near the stairs.
- Library – Top of Ra statue looking down from Study.
Free Rewards on Dead of the Night
Speaking of free stuff, Dead of the Night has even more rewards for you in addition to 2 Wonder Weapons. These may not be as impressive as the Wonder Weapons but they are still free.
Pool Table Reward
Go to the pool table in the Billiards Room and shoot the balls into the pockets from numbers 1 through 9. If you succeed, a reward will spawn but you will be greeted with a grenade if you mess up.
Leaking Barrels Rewards
Find some leaking barrels in the Wine Cellar and knife them in order from the fastest dripping one to the slowest. If done correctly, a secret room will be unlocked. Head inside to claim a free power-up.
Jump Scare location in Dead of the Night
Continuing the legacy of many of the previous Black Ops zombie maps, there is a jump scare in Dead of the Night which you might have found while trying to complete the main easter egg.
To experience it for yourself, go back to the colored crystals that you used to unlock the Pack-a-Punch machine. Try to interact with the same crystal many times in a row and the jump scare will be activated.