The easter egg on the Classified Zombies map of Black Ops 4 requires some elaborative steps where you must retrieve Project Skadi, find some secret codes around the map, and input them into a machine.
Though it may sound a bit tedious, it rewards you with an awesome weapon called Winter Howl and a cutscene that sheds light on the map’s lore.
Long-time fans of Black Ops might recognize this map as a rework of the classic map called Five from Black Ops 1 Zombies. This map is based on the Pentagon and comes with the season pass. So, you must have purchased the Black Ops Pass to solve this easter egg.
Do note that there is another easter egg on the Classified Zombies map that can only be solved by reaching round 150. Now reaching round 150 is already a tall order but what makes it near impossible is the glitches and the blue screen. Even though you can attempt to reach round 150 by turning on the cartoon mode to reduce the likelihood of the game crashing.
The easter egg can take some time and effort to solve so we recommend that you unlock the majority of the map area and acquire enough points before attempting the Easter egg.
Step #1: Turn on the Power
So, the first thing that should take priority over everything else is to turn on the power. Without power, you cannot interact with the code machines and subsequently, you cannot progress any further with the easter egg.
Head down to the lower level to find the laboratory and you will find the power switch there. Simply turn it on to progress.
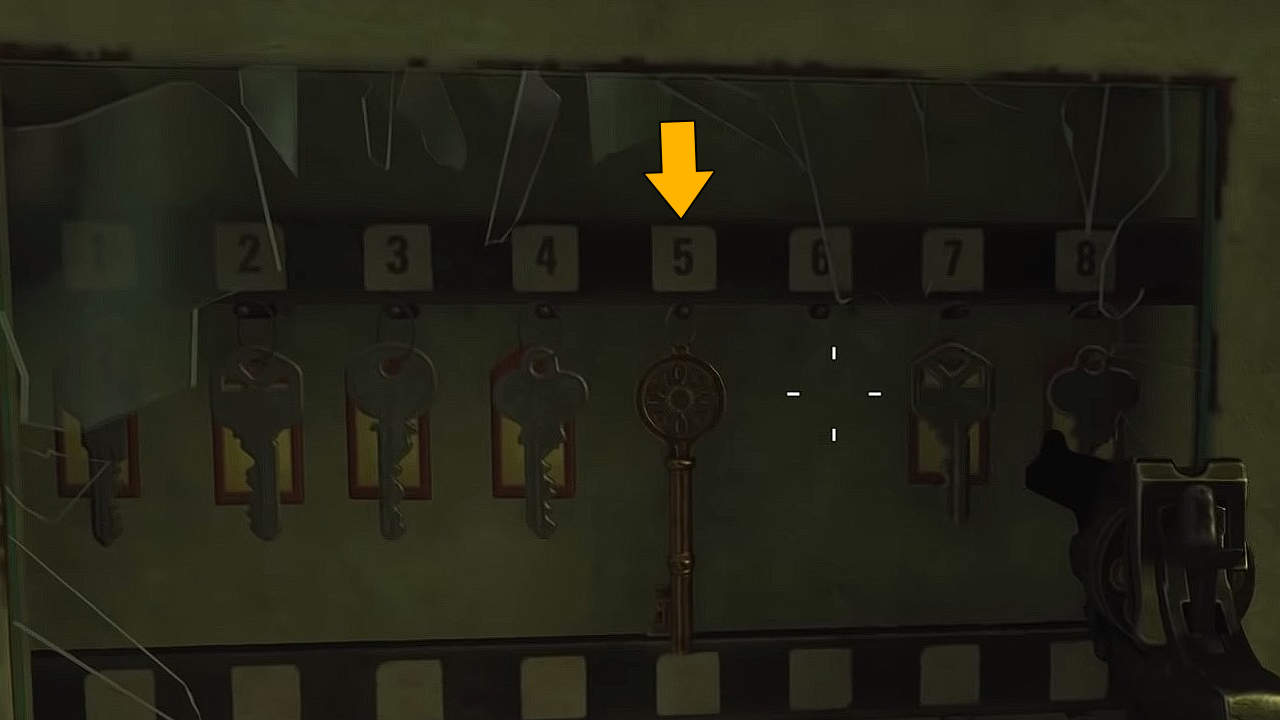
Step #2: Get the drawer key from the war room
Head to the lower level of the War Room and look for a key rack on the wall in the circular room. collect the “Drawer Key” that you will find hanging on the number 5 spot.
Step #3: Activate the Pack-a-Punch
To find all the codes you need to Pack-a-Punch your weapon to make it explosive. Note that you should do this before looking for codes, otherwise, you will not be able to progress with the Classified easter egg in Black Ops 4 Zombies. To activate Pack-a-Punch you need to find three parts.
First, head into the Main Offices and find the first part near the Brew Perk machine. From there, head through the South Laboratory into the Morgue. You will find the piece on any of the bodies or the chair in the small room inside the Morgue.
Afterward, you need to head for the Panic Room and find the third part needed for the Pack-A-Punch in the room.
Next, go to the lab in the basement to find the Workbench in the Weapon Testing Room or any other room you can find the workbench in. You will have to build a Teleporter Signal Amplifier.
Then, go back to the War Room: Lower Level, and head towards the teleporter you used to teleport to the Panic Room. You will get an option to amplify this teleporter with the new item Teleporter Signal Amplifier. Turn on the Def Cons once again in the same order as above.
Now, head towards the center of the lower level of the War Room and you will find that you are now able to access the little crate thingy that is levitating. Head towards it and you will be teleported to the Groom Lake. You will find the Pack-A-Punch in this area. Pack-A- Punch your favorite weapon to make it explosive.
Step #4: Get the Secret Codes
Once done, you now need to find the secret codes scattered around the Classified map in Black Ops 4 Zombies. The secret codes are different for each person so be sure to note down each code and where you found it. You will find the codes in the following locations:
Code #1 – Main Offices
Head back up to the main office and look for a desk in the middle of the room. Use the key you found earlier to unlock this drawer and you will see a 4-digit code inside the drawer.
Code #2 – Panic Room
Before heading to the Panic Room, you will have to activate all Defcons (four in total) in a specific order. The order in which you need to activate them is as follows:
- The first one is the top Defcon by the elevator, farthest from it
- The second one is in the Server Room
- The third one is the top one beside the elevator
- Finally, the bottom one in the Lab Elevator
Once done, you need to head for the secret Panic Room that will become accessible after activating the Defcons in the specific order we provided above.
Now, push the second-last computer in the bottom row of the monitors. The monitor should be showing static. Hold the interact button and the monitor will be pushed back, revealing a code below it. Note down this code as the Panic Room code in BO4 Zombies.
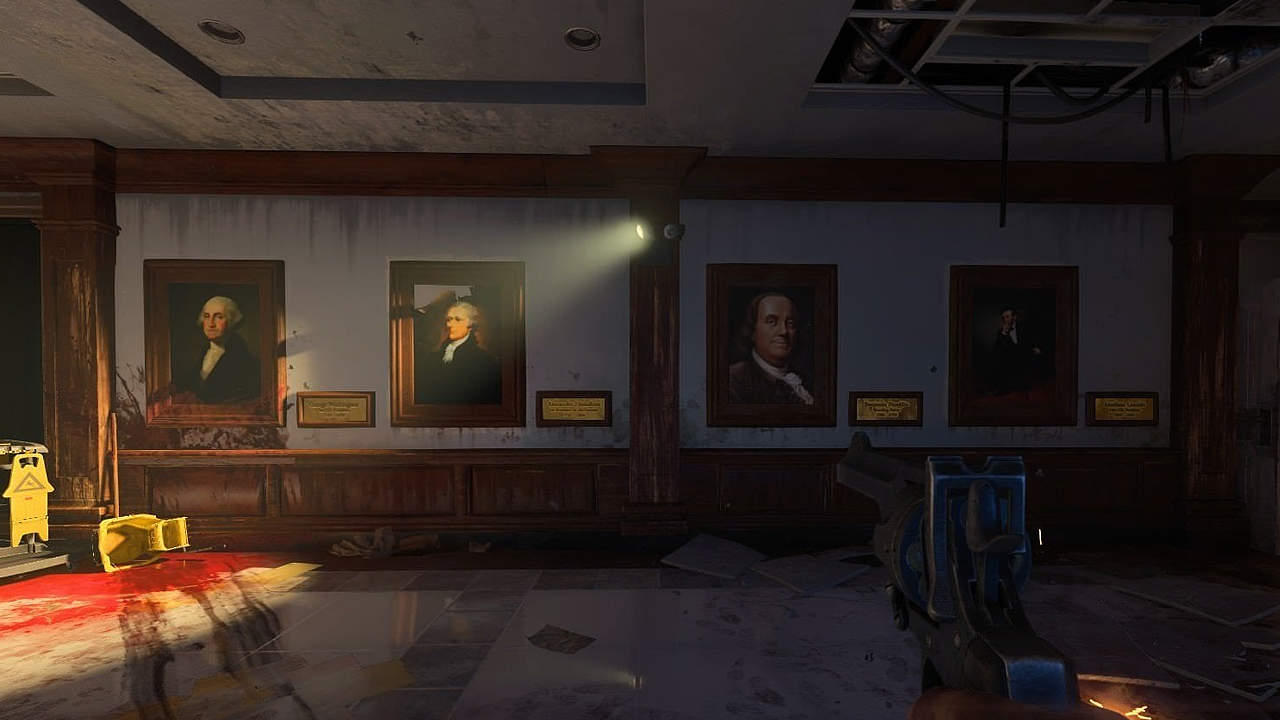
Code #3 – George Washington Nameplate
To acquire the third code, you need to shoot portraits of Franklin, Hamilton, and Lincoln in the order i.e. Franklin, Lincoln, Hamilton, and Franklin again or Washington, Hamilton, Franklin, Lincoln. However, there is a little catch here.
Do note that you will need an explosive weapon to see the code appear. You cannot shoot these portraits without one. The starter pistol works really well. Moreover, you will need to Pack-a-Punch your weapon to make it explosive.
To learn how to get to Pack-a-Punch, please refer to the section at the end of the guide. If done correctly, you will see a secret code under the George Washington nameplate.
Code #4 – South Laboratories
Head into the South Laboratories and towards the little window that you can build a barrier on. Now, spam grenades into the window until you hear a *click* sound.
Once you do, the code will be revealed on the paper on the right side of the window. Do note that this can take some time; therefore, make sure to spam grenades if you do not see it.
Step #5: Input the Codes into the Monitor
Once you are done with everything mentioned above, head back to the War Room Lower Level where you need to insert the codes you found into the Code Sequence next to the Giant Monitor.
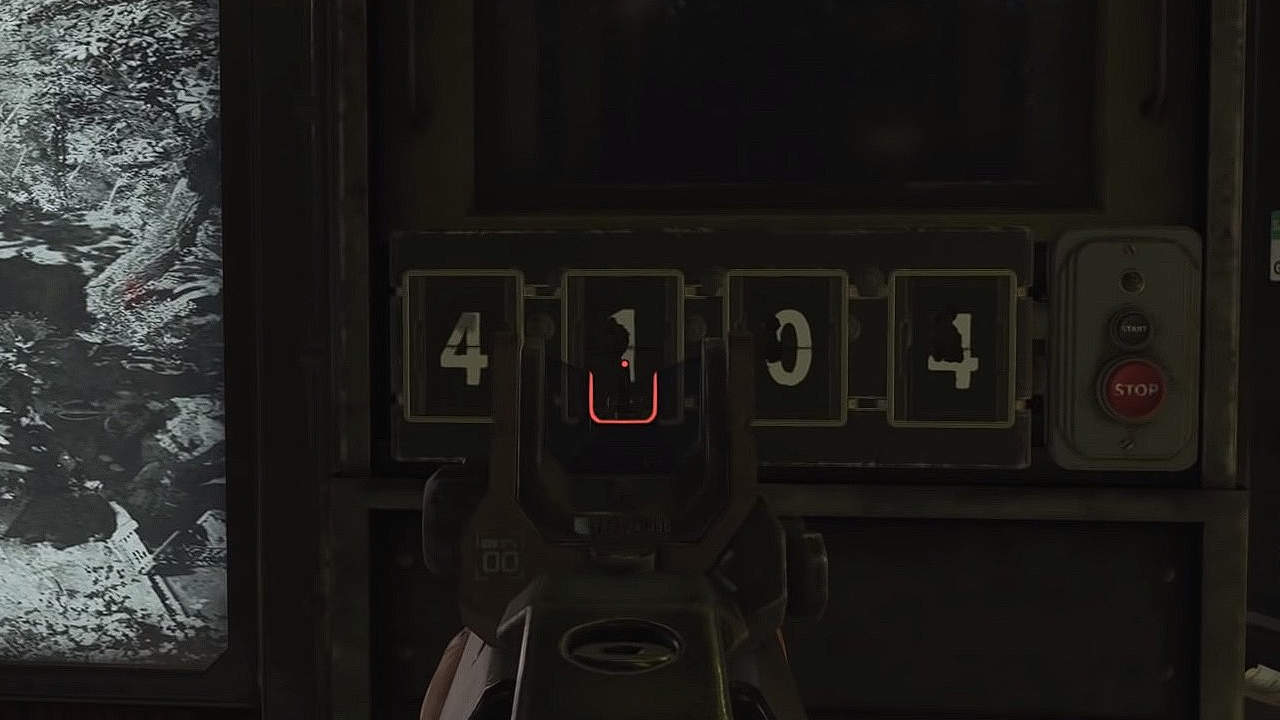
Shoot the four slots to get to one of the 4-digit codes that you found. You need to enter the codes in a very specific order. If done correctly, you will see “Project Skadi Retrieved” on the monitor. Enter the codes in this order:
- Code #3 – George Washington code
- Code #1 – Office drawer code
- Code #4 – Target practice code
- Code #2 – Panic Room code
Step #6: Survive the Groom Lake
Now use the teleporter to go back to the Groom Lake where you found the Pack-a-Punch. You will need to survive 3 rounds in Groom Lake as the final step in completing the Classified easter egg in Black Ops 4 Zombies.
You will notice the area to the left of the Pack-A-Punch is now available to use. Enter this area and you will find a Briefcase with smoke or mist coming out of it.
Interact with it and you will get a weapon named “Winter’s Howl”. This is the Project Skadi Prototype that we have been looking for. Interact with it and you will finally get the Trophy and the weapon.