When we talk about Dark Souls, Boss fights can’t get tougher/complicated than this. If you are stuck in any Dark Souls Boss Fight and defeating that demon seems impossible for you then, keep reading this Dark Souls Boss Strategy Guide for some very useful tips that can help you win the fight.
The golden principle is to learn about dodging enemies’ AoE attacks. There is a reason we call those giant enemies as “Boss”. They will always give you a tough time compared to the regular enemies.
Dark Souls Boss Strategy Guide
For more help on Dark Souls, read our Walkthrough – to complete this difficult RPG, Weapons and Reinforcements – to find the best weapons and upgrades available in Dark Souls, Armor – to find the best Armor to prolong your survival.
Items – to get the useful items in the game, Magic – to get all the pyromancies, sorceries and miracles and Class Guide – to learn about the complex class system of Dark Souls.
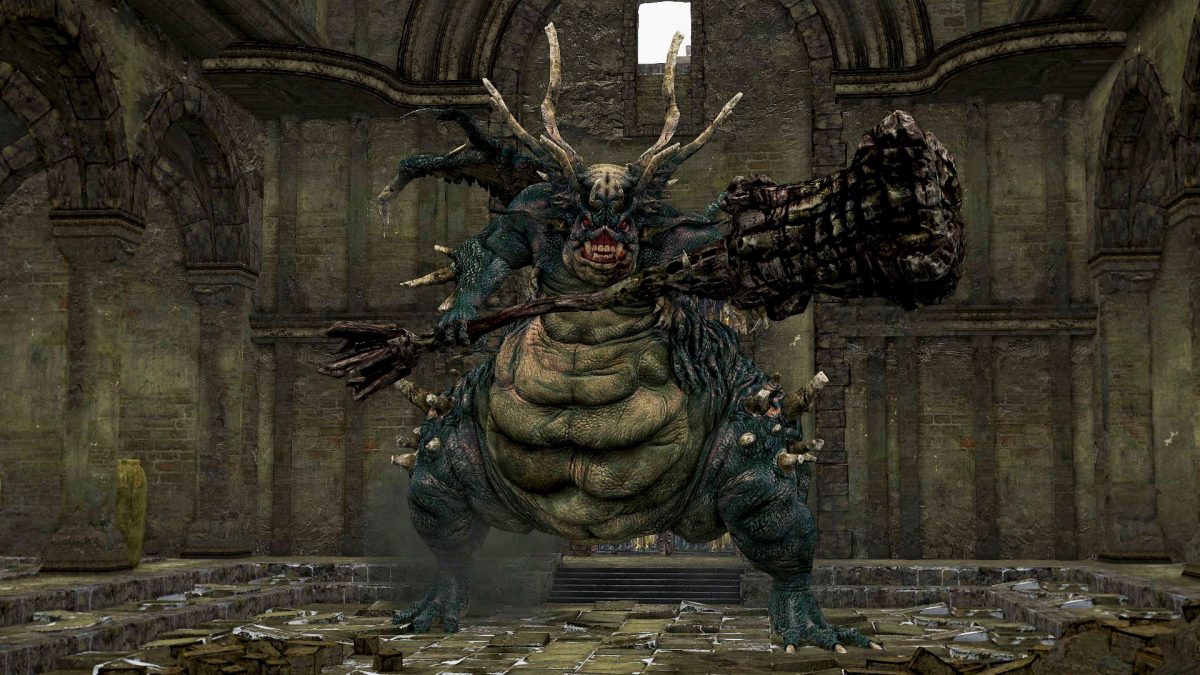
Asylum Demon
The Asylum Demon is the first boss you will face in Dark Souls, he’s giant and swings a huge hammer at you. He’s not that difficult to defeat. He performs these attacks:
Attack From Above: He lifts his hammer and smashes it straight down onto the ground. To dodge this, jump to the side. He sometimes does this same move, but even quicker, giving you less time to react.
Body Slam: He levitates up and then smashes himself onto the ground. To dodge this, move back.
Horizontal Attack: He uses this attack to hit everything present in front of him. To dodge it, stay behind him.
When the fight starts, you will actually be above the Asylum Demon. This gives you the opportunity to use a special attack and deal a large sum of damage straight off the bat. Now, throughout the fight, you should try and stay behind him, rather than in front of him. You should also try not to use the aiming system that much, using that will grant you less mobility, and will practically reduce your character speed. Just stay behind him and keep striking at his back.
Bed of Chaos
You need to doge the arm attacks. They are fast but if you are able to dodge it once, you can enter the its opening. Health potions are vital here. Once you are inside, move along while you break the branches. You will ultimately reach the core. Destroy the core to get rid of this branch demon.
Bell Gargoyles
Don’t stay stationary as the melee attacks through that hammer will do a great damage to you. You can use the shield to block some attacks. You will have to persistent as you won’t get more than a couple of straight hits. Try attacking it from the back when it strikes the hammer on the ground.
When the second Gargoyles enters the fight, both will use fire attacks. Follow their pattern to predict the attack and then dodge it.
Bed of Chaos
As you enter the fight, you will find two orbs in the chamber. You need to dodge the its arm swipes and get close to it. Jump towards its inner side and then break all the branches you find along your way. You will ultimately reach the central core. Destroy it to bring the demon down.
Capra Demon
You can lure the demon below the small ledge and then do a plunging attack. Stairs lead to this ledge in the back of the room. Otherwise, the key is to dodge his attacks by reading the patterns and then attack when you get the chance usually after just after his attack.
Ceaseless Discharge
There is a simple dodge and attack principle to get this dude. Make sure that its instantaneous tentacle attacks don’t get you. Keep moving across the ledge and when you get the chance, hit it as hard as you.
Centipede Demon
You have a small area to fight with this demon. First, you need to leisure it in from the lave to the dry patch so that you can attack it. You can dodge its sting attacks by jumping along the length of the dry patch.
It will jump above you at times, and when it does, you need to strike it hard. Health potions are going to be your best friends in this fight. When the demon is about to die, it will make bombs fall from the ceiling. What should you do? Run away as far as possible and then wait for the opportunity to attack.
Chaos Witch Quelaag
Fortunately, the witch is no that fast and you will have enough time to get it on the counter. Of course, you need to dodge its fiery attacks. You can roll away from it when needed. Since the demon is not that fast so you need to watch out for its AoE attacks. You have plenty of space to move so make it count.
Crossbreed Priscilla
Can’t see the boss? Focus on ground to track her footsteps. You need to keep moving and when you find her in range, hit her a couple of times and dash away quickly. If you lose her tracks, try to be defensive as you can be attacked from any side. You will have to repeat this exercise several times before you take her down.
Dark Sun Gwyndolin
The Dark Sun Gwyndolin can be fought by traveling to Anor Londo, beyond the Dark Moon Tomb, and then heading to the lowest level of the spinning platform. Also, the dark moon séance ring is required to gain access to this fight. However, you can just warp straight to the dark moon to fight Gwyndolin, subsequent to your battle with Gwyn.
This boss will perform the following attacks:
Arrow Flurry: In this attack, he shoots a bunch of arrows straight towards you. Not that difficult to dodge.
Little Blue Orbs: This attack is quite like the Moonlight Butterfly orb attack, but more difficult to avoid. The damage inflicted by this is relative to how many orbs strike you.
Giant Blue Orbs: Less difficult to dodge. High damage with Knockdown.
For this fight, you need the Hawk Ring, a strong bow, like the Dragon Slayer Bow, and about 35 arrows. Once he warps for the very first time, there is a spot you can find which allows you to hit him with Melee attacks, even though he will not be able to fire at you, from the spot.
Until the moment he starts using his Orb or Arrow attack, you need to stay behind a pillar. Once he does use that, run towards him, in a zig-zag pattern, dodging his attacks on your way. Once you reach him, just strike him as many times as possible, before he warps away from you.
Demon Firesage
Don’t try to engage it directly. This demon has a variety of attacks. It can use the lengthy axe along with the fire attacks. When it places its axe on the ground then it’s the symbol of the AoE attack so you need to move away when you see this.
He will jump towards you sometimes and hit axe on the ground. This will be your time to place some hits. Simply put, you can’t dodge its every attack so health liquors will play a vital role in this fight.
Dragon Slayer Ornstein and Executioner Smough
You can’t fight them both alone. Even if you manage to take down one then the other will either grow stronger or bigger. If you want to do it the straight way then hit and trail is the only thing that can help you due to the diverse nature of attacks.
Try isolating them and then attack. You won’t have much time to execute your attacks. Otherwise, if you have some humanity in your bank, you can summon Solaire of Astora through the symbol above the stairs. This will make your fight one on one which is a lot easier than fighting both a the same time.
Four Kings
Inside the Abyss, Kings will be your enemies. At the start, there will be only one and then all four will appear. Your armor’s defense is critical in this fight. You need to defend the AoE attacks using the shield.
Make sure that you are in near as they will execute their damaging AoE attacks from distance. Then the grab attack can take half of your health. So you need to stay close but mobile. They will re-spawn after death till the health bar is depleted so you can’t relax for a second throughout the fight.
Gaping Dragon
You will have to get close to it (in between his legs) to inflict some damage. You can’t stay there for long as it will spit sometimes. Whenever it goes airborne, you should move away quickly to avoid being crushed by its bulky body. Its melee attacks are dangerous but as long as you stay near its leg to the right side, the probability of getting hit will be reduced.
Gravelord Nito
This fight would have been a lot easier without the skeletons which actually make your life difficult. Now the safer option is to lure him towards the entrance. Wait for it to spit the lethal air which takes out all the skeletons in the area and then attack.
Sometimes during the fight, you will have to shift your attention towards the skeletons first as they can overrun you in no time. Nito’s physical attacks are not tough to dodge making it slightly easier for you to reduce the smaller foes first. Don’t be hasty and use any time you get to restore your health.
Great Grey Wolf Sif
This beast demon is one heck of a fight. You need to predict its two spin attacks because of you take both the hits, it will consume your stamina and half of your health bar. It has a sword in the mouth not for playing, so move back when it swings that sword.
The annoying thing in this fight is that you won’t be able to place more than one hit at a time as it quickly jumps back when you make a contact. Your patience will be tested. But if you want to bring the wolf down, you need to keep it steady throughout the fight. It won’t be surprising if it takes you 30 minutes at-least to kill the brute.
Gwyn
Final fights are always tough. And this one too, won’t disappoint you. He has impressive agility and effective physical attacks making a lethal combination. You need to act like a tank and stay defensive. You will need plenty of stamina for blocking and dodging.
You can hit it when it tries to grab you or kick you. Don’t overdo it in the greed of getting more hits. As long as you are alive, you can have more opportunities.
Iron Golem
The prominent part of this fight is that you can fall off the platform you are fighting on. Golem’s physical attacks are strong enough to push you off the cliff even if you are using the shield to block. So try to keep the fight in the center.
After specific amount of damage is done, it will be stunned so you can hit it till it’s dead.
Moonlight Butterfly
Long-range attacks will help you in this fight. Magic attacks will do. You can inflict damage to the creäture while it is in air. It is recommended that you move away to dodge the magic attacks as blocking won’t help.
If you don’t use any magic attacks then wait for the creature to land on the ledge to swing your weapon. You can also summon (if you are human of course) a companion for which the symbol can be found in the grass at the bottom of the tower.
Pin Wheel
This one can create its own copies/replicas and then cast magical spells. Just dodge the attacks and hit it with everything you have. It’s not a difficult fight.
Seath the Scaleless
This monster has the ability to regenerate health. The attribute is associated with the magic crystals at its back. You need to get back there and destroy these crystals first. You need to be cautious of its AoE attack which is symbolized when it gets down on the ground and groans.
Wait for it to use its laser beam and then attack. You will have to repeat the exercise multiple times till you are able to bring it down.
Stray Demon
The Stray Demon is a more powerful version of the Asylum Demon. You can fight him by returning to the Undead Asylum. The battle will start once you head to the center of the platform, on which you fought the Asylum Demon.
When the fight starts, the floor breaks and you fall through, taking some fall damage. Make sure to heal that before battling him.
The Stray Demon has the same moveset as the Asylum Demon, except for a new attack, the fire blast hammer swings. He does this attack twice: The first time, he strikes forward, making an explosion directly ahead of him.
The second time he does an attack which creates an Area of Effect of circular flames.
This attack can be dodged by standing diagonal, right behind the Stray Demon’s right leg. Other than that, do the same strategy you did with the Asylum Demon. Stay behind and strike him from the back.
However, if you have any fast weapon which can inflict bleed, like the Bandit’s Knife.
This fight is going to be very easy since the boss’ weakness is bleeding. All you have to do is stay behind him and wait for him to do his fire slam attack, then quickly strike him three times on the back with the knife to inflict bleed.
Taurus Demon
You can eliminate this foe by using plunge attacks on it. Climb up the ladder near the white door and jump on it when it gets near. While on the ground, you can stay between his legs to avoid the physical attacks.
The exercise may seem troublesome but that’s the easiest way to deal with this demon.
Don’t hold back and share your own Boss Fight Strategies with us by commenting below!