Horizon Forbidden West unsurprisingly packs a lot of collectibles and for completionists, one of them will require them to override the looming giraffe-like creatures called Tallnecks.
Climbing atop these Tallnecks and overriding them will unlock a specific portion of the map, revealing all the different spots of interest on it. If you manage to override all of the Tallnecks in the game, you also unlock the “All Tallnecks Overriden” trophy.
A few of the Tallnecks are easy to climb, but most of them will require you to solve a sort of a puzzle and make a series of small climbs onto smaller structures to actually then climb onto the Tallneck since they are quite large in size.
The following guide hence marks all of the locations where each Tallneck can be found in Horizon Forbidden West.
Horizon Forbidden West Tallneck Locations
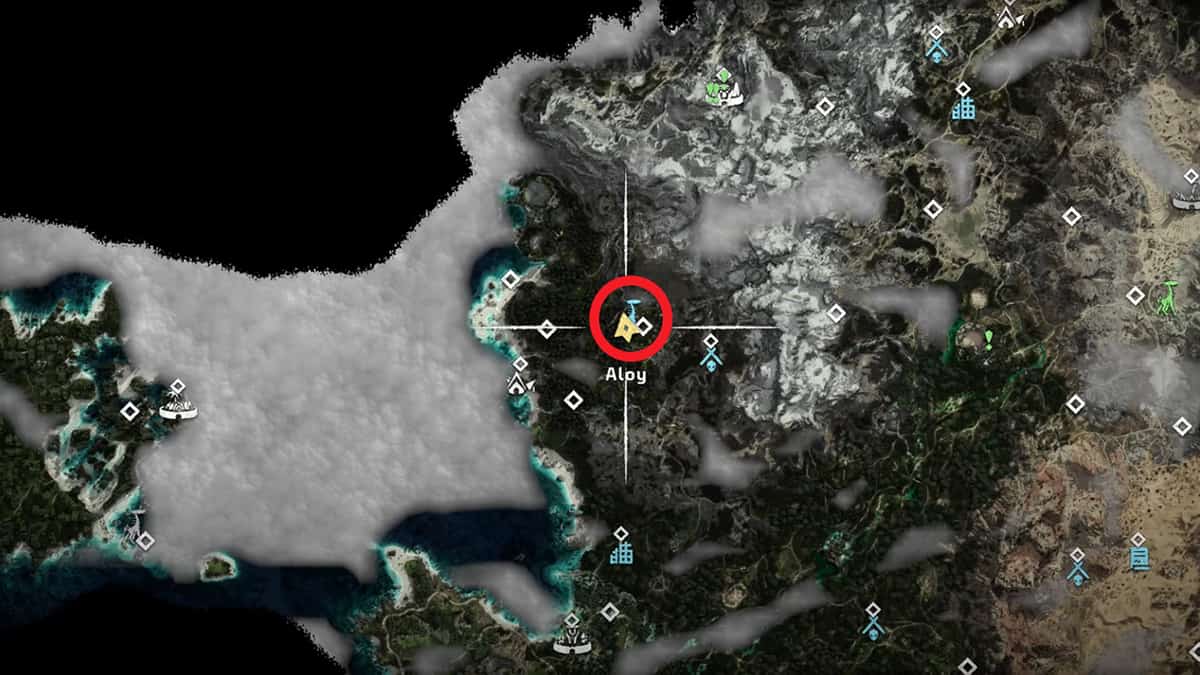
The first thing to know is that the map in HFW marks Tallnecks with a giraffe-like icon. Secondly, there are six of them to override with each of them located in a different region.
Once overridden, the area surrounding the Tallneck will be cleared to show more objectives, hidden collectibles, and such on the map. In addition, overriding all six Tallnecks in HFW will unlock the “All Tallnecks Overriden” trophy.
To override a Tallneck creature in HFW, players will need to get on top of them by either jumping from a high point or using a flying mount, the latter being one of the new features of Horizon Forbidden West.
Before we continue any further, we recommend that you complete the story campaign before heading out to override Tallnecks. This will make the overriding process much easier as you will be able to land directly on top of the Tallneck with the help of the bird that you can fly on.
The Shining Wastes Tallneck
This Tallneck is located in the desert fairly in the middle of the map, just south of the Scalding Spear. It will only be accessible during the 16th Main Quest of the game i.e. “The Wings of the Ten” though, which is started fairly late in the game.
If you try to access this Tallneck before starting the quest, you won’t be able to because it would be seen as a locked icon on your map.
Overriding this Tallneck is one of the main parts of the Quest, in which you will use your Sunwing mount to land on top of it, so it shouldn’t be that much of a problem as it’s about as easy as it gets.
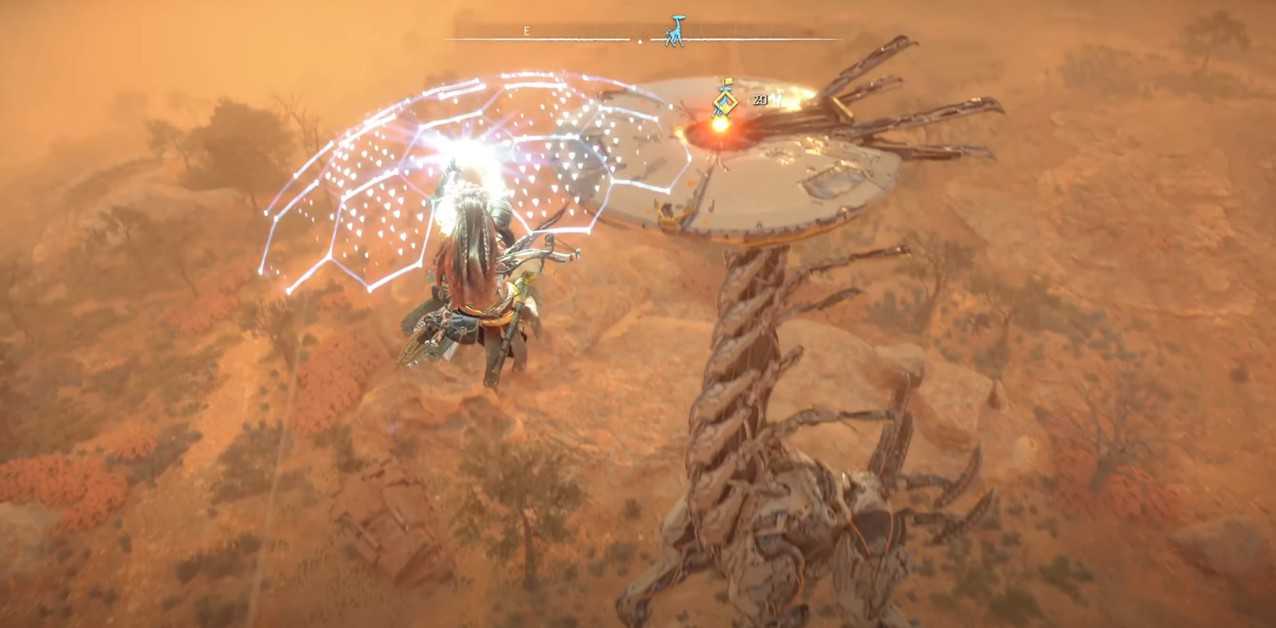
Cinnabar Sands Tallneck
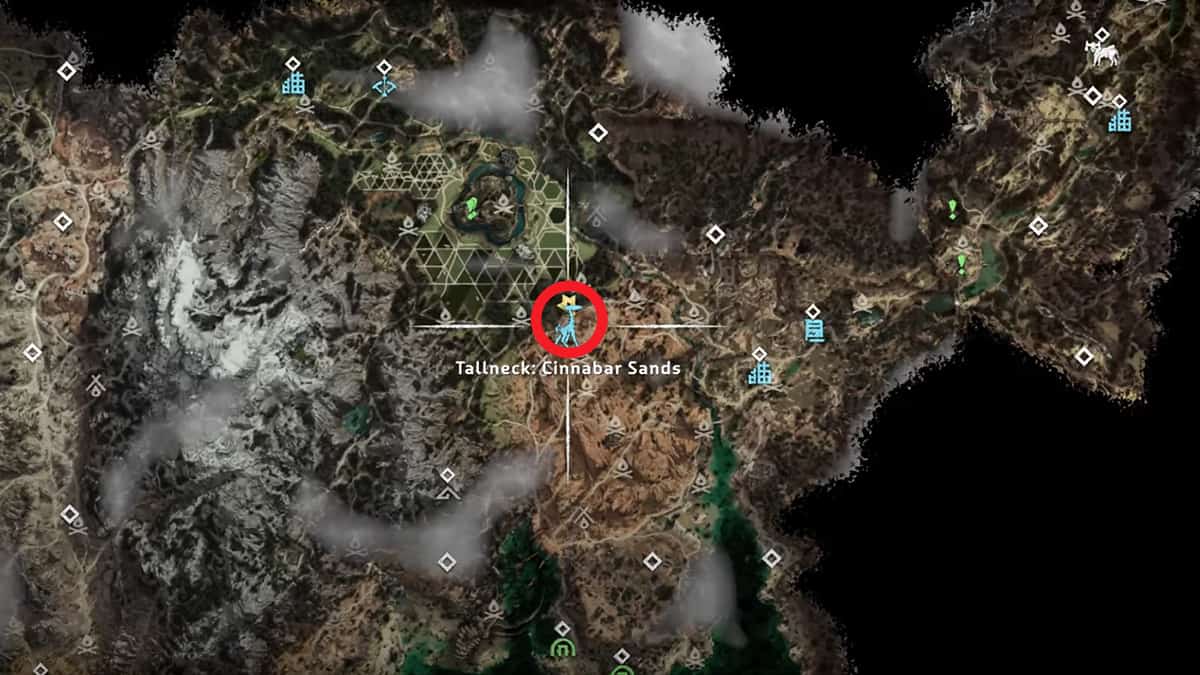
This Tallneck is located to the west of the map and will be seen walking around a decrepit satellite dish in the Cinnabar Sand’s sandy area, which is a little to the south-east of Plainsong.
You can use a flier to get on top of it, but if you don’t have access to it, then there’s another way to climb up the Tallneck – via the satellite near it.
If you get close enough to the area, the Tallneck should appear on your map. Before you start the process though, there are two large machines near the area which you need to get rid of first; a Skydrifter and two Scrappers.
The satellite should give you enough ground to land atop the Tallneck, but it’s non-functional. The puzzle here is to get the Satellite dish to work so that you can rotate it into the position. Right below the Satellite should be a generator that’s missing the power cell, you first need to find the power cell to get it working.
Start climbing the satellite stairs and shoot the ladder’s latch to climb it. You’ll find yourself on a platform with a console on it that rotates the dish, which we’ll use once we get the power cells in.
To the right of the Console should be a ladder, you need to jump across the game and climb it to reach another platform under the dish. To the right of this dish is another ladder that you need to climb down.
On that platform, use your focus to locate the handholds which you’ll use to reach the power cell on the other side. You need to grab that power cell and take it back to the generator at the base of the satellite.
Putting the power cell in will restore the power inside the satellite, so you can now use the console that you found earlier to rotate the dish.
Interact with the console now, then, this time, take the path to the left of it to reach two wires that are preventing the dish from turning. Simply shoot the wires with your arrows and that should get the job done.
Once the dish has rotated into position, all you have to do is to climb the ladder nearby and get to the highest point of the dish. Once you’re there, wait for the Tallneck to come your way. If you think the Tallneck is near enough, jump from the dish and hold SQUARE to pull out your glider to land on its neck.
Use your focus to reveal the handholds you can use to get to its top, after which you can override it.
Landfall Tallneck
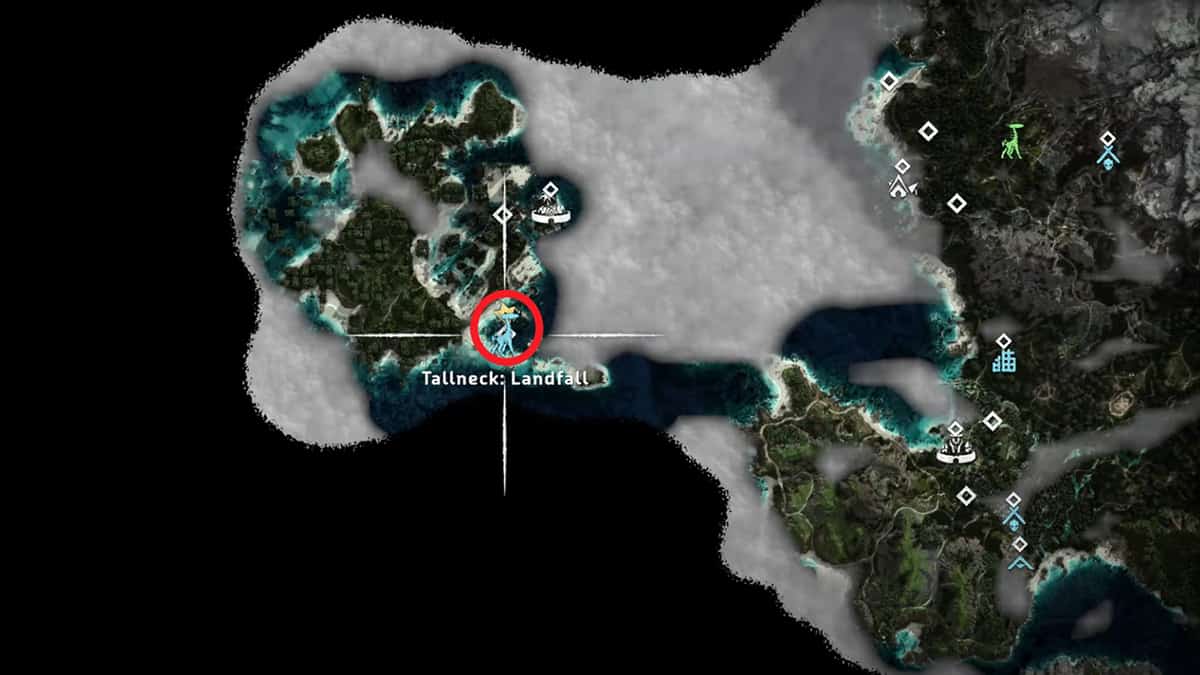
The third Tallneck is located way at the western edge of the map, just south of The Digsite. The Tallneck is a bit tricky to override as it is completely submerged in water except for its head. Therefore, you need to repair the canisters of the Tallneck by going underwater before you override it.
Go to the location marked on the map and look for the top of the Tallneck. Then, dive in the water and scan the creature to look for the repair points.
Now, you need to find the parts by going to the land in the direction of the objective markers. First, you have to swim left to the broken-down structures where two Glinthawks are resting. There should be a large platform here that you can climb on.
There should be a small structure on the left of the platform you’re on with a ladder on it. Shoot the latch to bring down the ladder, but it would be broken, so Aloy needs to find another way to it.
There should be a large box underwater you can bring close to the ladder. Once done, climb on top of it and jump into the wall opening to the left of the ladder.
Here, there should be a yellow rope, cross it and then head right to discover two large gaps. You can leap across these gaps and use your grapplehook to pull yourself up.
There should be a staircase here, atop which, a Glinthawk. Eliminate the Glinthawk and loot the scrap pile nearby to find one of the Power Converters you need to repair the Tallneck.
Now you need to find another Power Converter. From the scrap pile, you were just on, jump left into the water and swim north to discover another set of broken-down structures. You need to swim carefully though, as there is a Snapmaw in the waters you should avoid.
Upon reaching the other set of structures, you need to swim under a large structure and then to the surface in the middle of it. Inside the structure, make a right to see some metal beams above you. Use your pullcaster to place the beams into position and climb up them. Then, head up the stairs to discover another scrap pile and loot it to get the second Power Converter.
Now you need to head back over to the Tallneck. You can do so by using the zip lines nearby into a small tower. Jump down from the broken wall and swim to the Tallneck. Again, be wary of the Snapmaw here.
Place the Power Converters you found into the Tallneck to get it moving. You’re not done yet, because you still need to climb it first, which requires more swimming and running.
Follow the Tallneck to reach yet another set of broken-down structures. Now you need to go back into the water and towards the structure. You should see a small gap in the wall of the building to your right. Go through it and swim back to the surface.
Use the stairs ahead of you to reach a higher level. From here, you can grapple onto another structure behind you.
Reach that structure and then drop down to the platform to your east. This is the last platform you need to reach to jump onto the Tallneck. From the edge to the right, you can jump onto the Tallneck’s back. You can then continue your climb up from its neck to reach its head. Now you can use your spear, finally, to override the Tallneck.
The Stand of the Sentinels Tallneck
The next Tallneck is located in the abandoned treetop village area called The Stand of the Sentinels. This area is near the beach, just east of Tide’s Reach. Before you begin the process of overriding this Tallneck, do note that there will be some Stalkers nearby. Dealing with them first is advised as they can be a nuisance later on.
You can start off at the center of the search area where you should see a broken bridge. Jump across the gap and grapple onto the other end of it. From here, take two successive lefts to cross one more bridge that will lead you to another gap. This time, you need to use your glider to get to the other end, which can be done by holding SQUARE.
Next, there should be a ladder on the left which you can use to climb onto a platform. From here, use the ropes to cross the bridge on the left.
Now you have to wait for the Tallneck to approach you. Once it does, jump onto its back. This doesn’t mark the end though, as you cannot climb it the rest of the way.
The Tallneck will walk a small distance before reaching another platform with a horizontal yellow rope on the edge. Climb onto this platform, as it will lead you to another platform that is way higher. Move along this platform to cross a bridge that will lead to a horizontal log. Jump onto the log and climb up the wooden wall ahead.
The wooden wall will lead you to another platform, at the north of which is another broken bridge. Use the ropes to cross the bridge, then leap over the gap to the right of it and use your grappling hook to pull yourself to the top. Here, you should find two Fire Clamberjaws which you need to take out.
Move forward to a ladder near a tree trunk, you need to shoot its latch and then use it to climb to another platform. You should see a zipline here, use it to make your way to another platform. There should be handholds on the tree you just ziplined to, you can use them to climb up even further.
From here, use your grapple to climb onto another platform nearby. This is the final platform that you need to reach. It should have a small part sticking a bit out to its left. Head over to that part and wait for the Tallneck to arrive.
You should be able to jump onto the railings at the edge of the Tallneck’s head. Head over to the left of its head to climb all the way up. At that point, you should be able to override it.
The Stillsands Tallneck
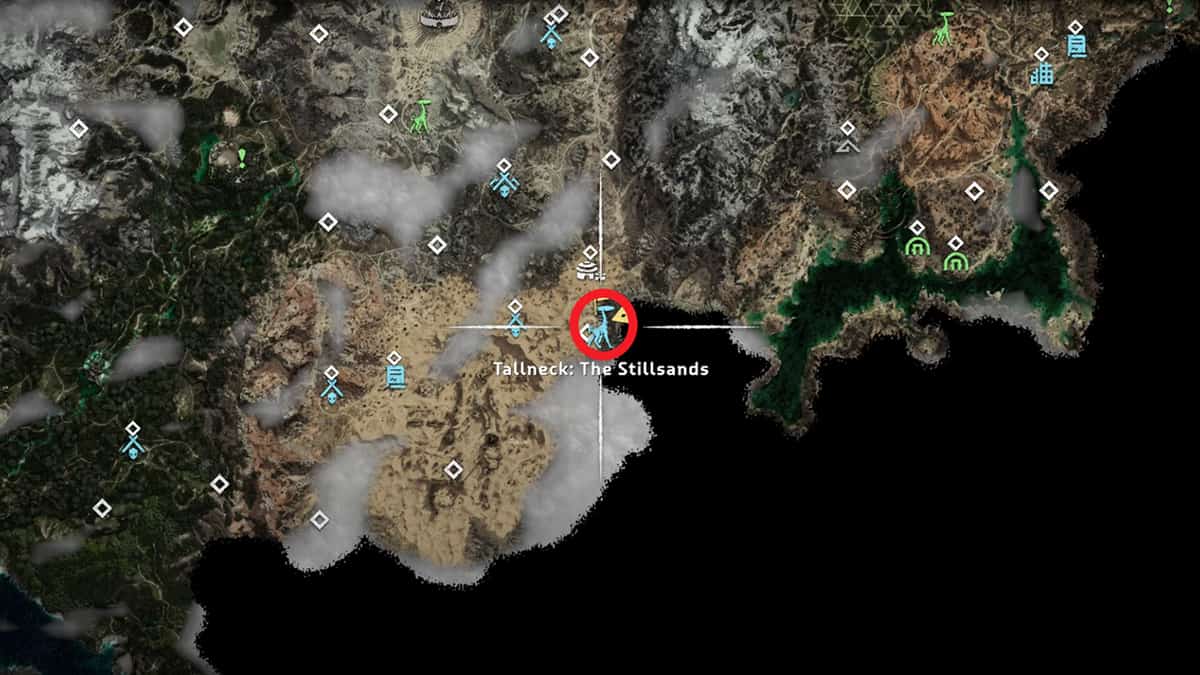
This Tallneck is located at the bottom of the map and to the right of the previous Tallneck, specifically to the south of Camp Nowhere.
This particular Tallneck is damaged, so Aloy suggests anchoring and repairing it to climb on top of it. Starting off, you will need a Ballista. If you head over to the broken machine nearby and examine the remains using your focus. Then, use your focus to examine the rest of the objects nearby, including a Ballista near a corpse.
Once you grab onto the Ballista, you need to use your focus once again and shoot the glowing blue parts of the Tallneck, which are the Energy Shield Breaches. Upon contact with the target, the Ballista will break, meaning that you’ll have to find another one.
If you head over the south to some tents, there should be another Ballista there, along with a Burrower and an acid Bellowback. You need to get rid of them first as they’ll only be a nuisance.
Once that’s done, use the second Ballista you found to shoot the same spots on the Tallneck.
Now, there is another Ballista you need to find, which is just to the left of the previous one. Here, there will be a Skydrifter and two more Burrowers which you need to get rid of first.
Use the third Ballista to shoot the same spot on the Tallneck to damage it and make it fall.
Once it’s down, you can simply head over to its head and override it.
Salt Bite Tallneck
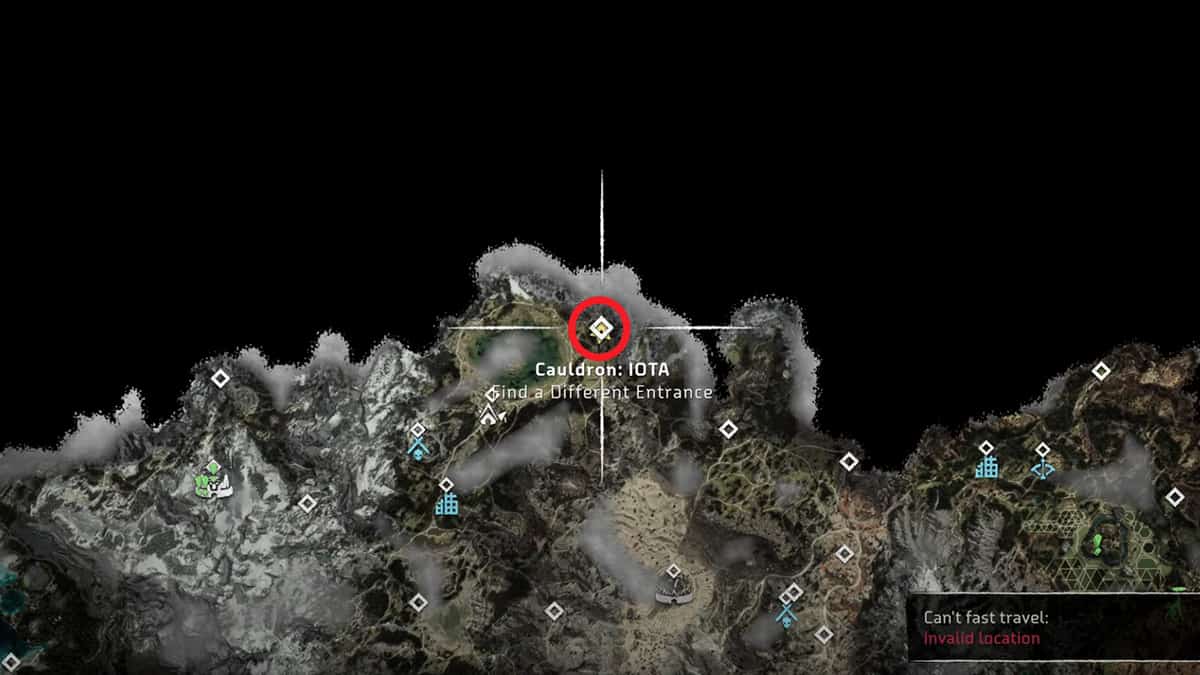
This Tallneck is located a little to the east of the Salt Bite lake, which is way at the northern end of the map. The Tallneck is hidden though, so you need to find Cauldron: IOTA at the top side of the map to make it visible.
Head to the marked location and go inside the entrance to start the Cauldron: IOTA, which should be in between a crack in the mountains. Keep going straight until you reach the end of the area.
The process of overriding this particular Tallneck is done automatically while completing the Cauldron.