
The Witcher 2 has a highly flexible character development system. Up to 51 abilities are distributed in 4 trees where Geralt can invest his talent points. However, the maximum level Geralt can attain is 35 which means you won’t be able to acquire all talents in a single playthrough of the Witcher 2.
Many high-ranking abilities have prerequisites that you must meet to unlock them. The linkage of abilities in the 4 different trees allows players to follow a specific development path to attain a streamlined build for Geralt. However, 6 mandatory points must be invested in the Training tree before the other trees are unlocked.
This guide reviews the builds for all three main character trees in The Witcher 2, including Swordsmanship, Magic, and Alchemy. These builds exclude the six abilities acquired in the training talent tree.
Best Swordsmanship Talents in Witcher 2
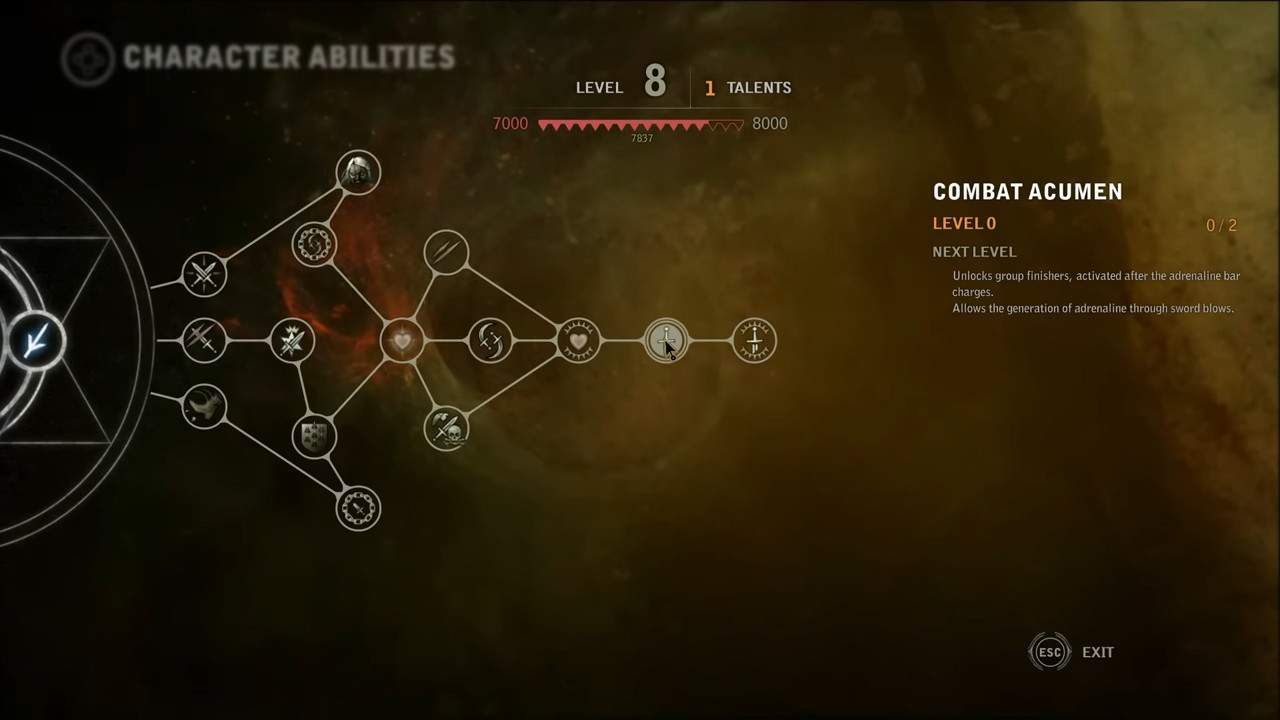
Swordsmanship is perhaps the easiest build to choose from. Irrespective of your build, add a few points into preliminaries like Riposte and Position. The rest is really up to your style and what type of character you are planning to make. Use the following build to maximize your potential as a swordsman:
| Ability | Level 1 | Level 2 |
|---|---|---|
| Hardy | Increases Vitality by +25 | Increases Vitality by +100 |
| Invincible | Increases Vitality by +50 and reduces damage taken by -5% | Increases Vitality by +150 and reduces damage taken by -15% |
| Combat Acumen | Increases adrenaline generated by sword blows by +30%. All resistances and chances of all critical effects increase by +20% | Increases damage dealt by +10% and reduces damage taken by -10% |
| Whirlwind | Increases adrenaline generated by sword blows by +10%. all resistances and chances of all critical effects increase by +10% | Increases adrenaline generated by sword blows by +10%. All resistances and chances of all critical effects increase by +10% |
| Riposte | Allows retaliation | Increases the chance of Instant Kill by backlash by +10% |
| Position | Damage taken by backstab: 150% | This ability allows you to execute a group finisher. When activated with a full adrenaline bar, sword attacks regenerate adrenaline. |
Best Magic Talents
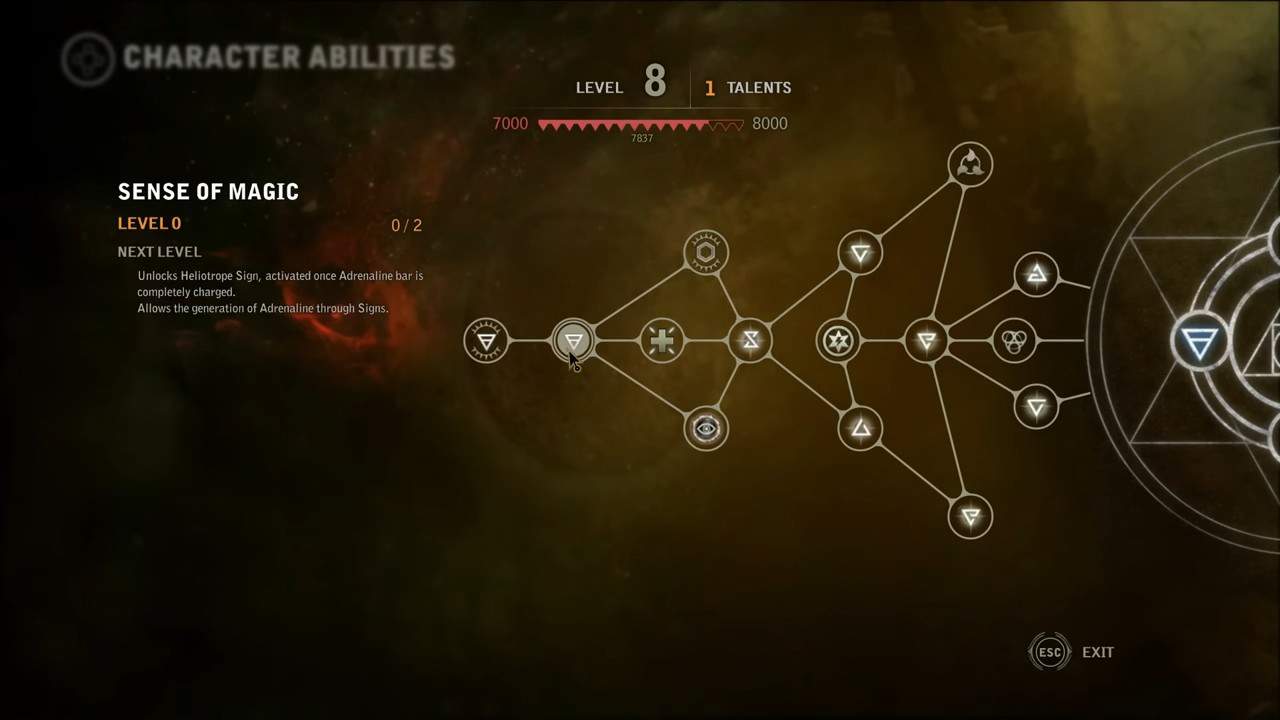
The Magic Tree has a lot of variety and powers to offer. You should choose which of these abilities to use based on the Signs you will use. Do thoroughly pre-plan the type of Signs you will use and what kind of magical impact you wish in fights. We recommend investing in the following skills:
| Ability | Level 1 | Level 2 |
|---|---|---|
| Enhanced Aard Sign | Unlocks Aard level 2 and increases Sign range by +2m | Unlocks Aard level 3, increases Sign range by +6m, and gives you a wider AOE |
| Enhanced Axii Sign | Unlocks Axii level 2 and increases damage by +20%. Bewitched opponent gets +20% vitality. | Unlocks Axii Level 3 and increases damage by +50%. Bewitched opponent gets +50% vitality. |
| Destructive magic | Increases sign damage by +5 | Increases sign damage by +10 and increases vigor by +1 |
| Enhanced Quen Sign | Unlocks Quen level 2, sign duration increases by +20s, and damage deflected increases by +20% | Unlocks Quen level 2, sign duration increases by +60s, and damage deflected increases by +50% |
| Enhanced Yrden Sign | Unlocks Yrden level 2, allowing you to set 2 Yrden traps at once | Unlocks Yrden level 3, allowing you to set 3 Yrden traps at once |
| Enhanced Igni Sign | Unlocks Igni level 2 and sign range increases to 3m. Incineration chances increase by 50-60%, Incineration damage increases by +4-+6, and Incineration duration increases to 8-12s. | Unlocks Igni level 3 and sign range increases to 6m. |
| Energy Flow | The chance of critical effect of a sign increases by +5% | The chance of critical effect of a sign increases by +15% |
| Magical Sense | Allows the use of the Heliotrope sign and allows you to fill the Adrenaline meter through sign usage | All resistances increase by +5%, and Adrenaline generation through Signs increases by +50% |
| Power Control | Increases all resistances by +20%, Sign Damage by +3, and Adrenaline generated through signs by +10% | Increases all resistances by +30%, Sign Damage by +10, and Adrenaline generated through signs by +60% |
Best Alchemy Talents
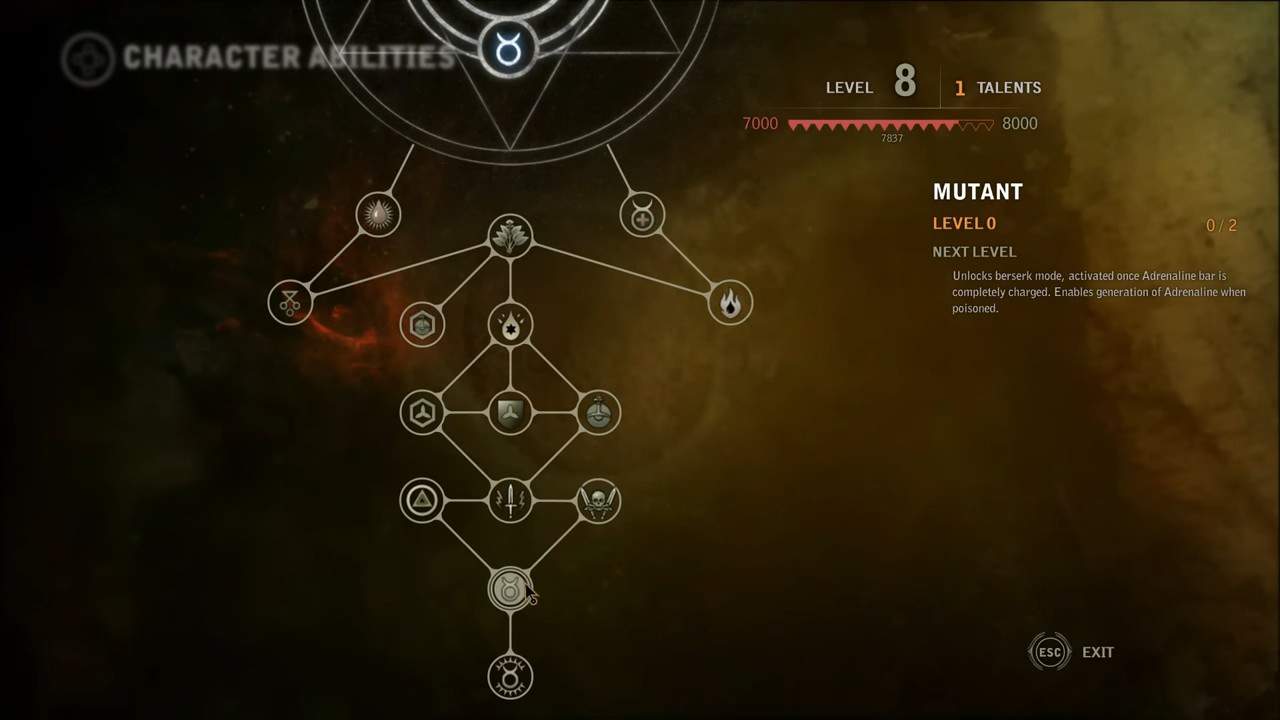
The Alchemy tree is perhaps the most complicated, and the Alchemy specialization is perhaps the most complicated. Potions in The Witcher 2 don’t have as much effect as they did in the first game – the only reason one would wish to fully master Alchemy is for the Mutagen abilities. However, this is one very long trip with many entanglements as so many abilities have chains of prerequisites in the tree.
Apart from Alchemist and Side Effect – which should be chosen irrespective of the character-build type, the Alchemy builds are ridiculously point-intensive, and investment in them should be made only if you plan to take the build.
| Ability | Level 1 | Level 2 |
|---|---|---|
| Side Effect | Increases the chance of producing a mutagen as a by-product of alchemy by +2% | Increases the chance of producing a mutagen as a by-product of alchemy by +10% |
| Alchemist | Increases damage dealt by bombs and traps. | |
| Specialization: Potions | Increases potion duration by +10% | Increases potion duration by +40% |
| Harvester | Increases the amount of alchemical ingredients harvested by +1 | Increases the amount of alchemical ingredients harvested by +2 |
| Catalysis | Increases the effects of all potions | |
| Specialization: Oils | increases the duration of oils by +10% | increases the duration of oils by +40% |
| Taster | Allows the consummation of an additional potion | Increases damage dealt while you’re poisoned by +15% and reduces damage taken while you’re poisoned by -10% |
| Impregnation | Increases the effects of all mutagens | |
| Metathesis | Increases damage dealt when poisoned by +5% | Increases damage dealt when poisoned by +25% |
| Condensation | Increases Vigor regeneration while poisoned by +15% | Increases Vigor regeneration while poisoned by +35% |
| Mutant | Allows you to use the Berserker mode, activated by the adrenaline bar, and allows you to fill your adrenaline bar while you’re poisoned. | Increases the amount of adrenaline generated while poisoned by +25% |
| Amplification | Increases the amount of adrenaline generated while poisoned by +15%, Increases damage done while poisoned by +10%, and reduces the amount of damage taken when poisoned by -5% | Increases the amount of adrenaline generated while poisoned by +50%, Increases damage done while poisoned by +30%, and reduces the amount of damage taken when poisoned by -25% |
Choosing Your Play-Style
Before we go through the individual talent trees, it’s important to understand the different ways you can specify Geralt. Though the Training tree is mandatory, how you develop Geralt after the availability of the three main trees is entirely up to you. Generally, players can build their character in one of three ways.
Specialists
With this route, you’ll master one tree only with barely any investment in the other trees. This is a good practice in The Witcher 2 as it allows for rapid strengthening for Geralt. The downside is that it works best only for specific circumstances and may not be ideal for slightly different situations.
Two Tree Expertise
This is the best formula for any RPG game, as it provides a hybrid style of play and allows one to deal with multiple situations. This method is slightly difficult to apply as it is time-consuming, but it shows its upsides in later levels.
Jack of all trades
This is super-risky in The Witcher 2. With this formula, you’ll invest equal points in all the trees. This means you won’t have mastery over any particular type of scenario and will instead be suited to survive in all types. It will also mean that Geralt will be significantly weaker in some regions for a long time.