Hell on Earth is the very first mission of the game and starts with a priest signal on your HUD which you must find while following the mark on your map. The first objective is making your way to the Deag Nilox’s Chamber. We have prepared a detailed Doom Eternal Hell on Earth Walkthrough to help you out.
If you are interested in 100% completion of Hell on Earth mission, you might want to check out our guide on all the secret collectibles as well.
Doom Eternal Hell on Earth
As the mission starts you will encounter a few demons especially as soon as you open the first gate in the area. In the start, you will have a shotgun but with low ammo but don’t worry as you will proceed a chainsaw will be given to you which will trigger the next objective where you will have to chainsaw the spawned demons.
Once you are done dealing with the demons follow the marker which will lead you to a flashing door, interact with it. The door will push all the way back and a screen prompt will appear telling you how to perform a double jump.
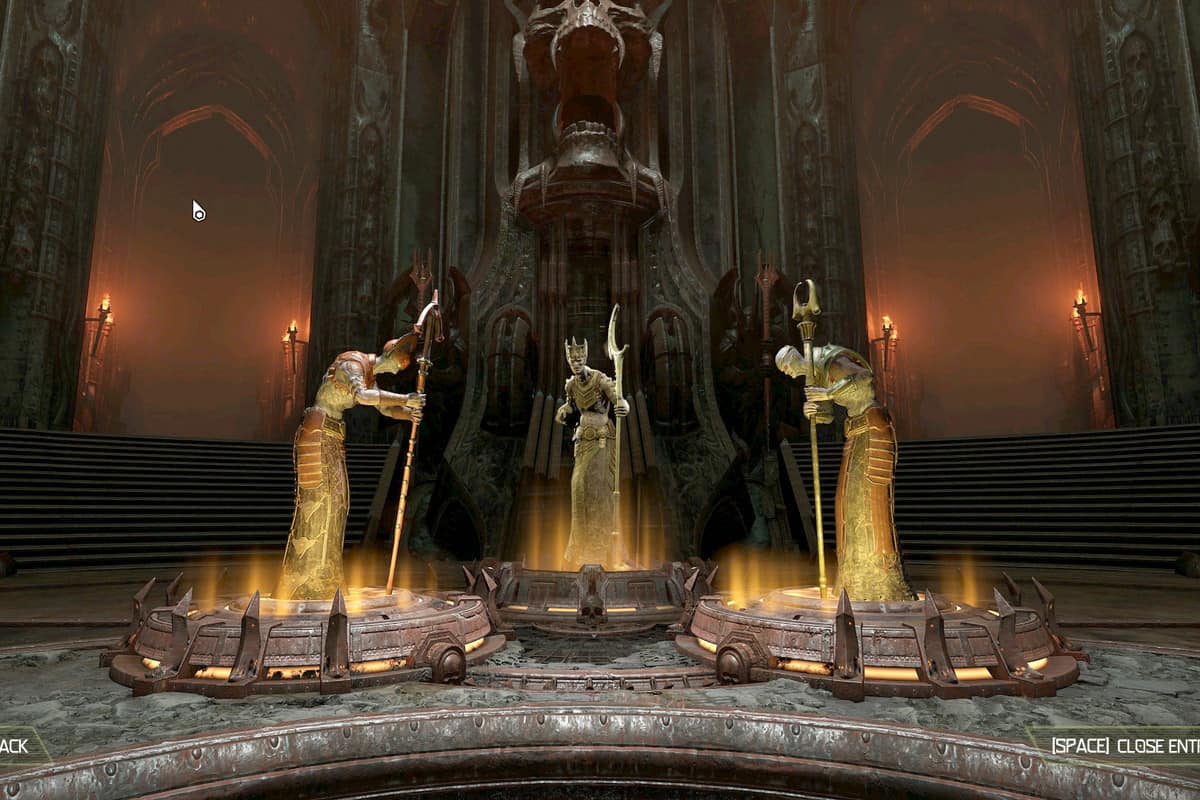
Upon going further you will be asked to choose a weapon mode this is where you can select from among the options available. After choosing your preferred mode you must follow the marker and once you break the door the real challenge starts.
A lot of demons will be spawned here along with bombs being fired at you by the soldiers that are more difficult to kill. So avoid these and kill all the hostile enemies.
Upon killing all the demons and the soldiers, your waypoint will be updated and you will finally be taken to the Deag Nilox’s Chamber.
In the Cinematic scene, you will choke the Hell priest to death and will exit his chamber upon which Vega will tell you that 2 more hell priests are still to be killed.
Your updated objective is to interrupt the Deagic Council for which you must follow the marker. Yet again you will face some demons and soldiers which you must kill before your next checkpoint updates. You will also encounter an Arachnotron here but you can disable it by shooting at the firing gun mounted on top of it.
The drone moves around a lot so aim well otherwise he might be able to kill you. Don’t worry about the ammo as you can find plenty of it in the area. Jump your way up to the next marker where you will be able to heal your weapon.
Advance further and follow the marker which will take you to Subway and then to Citadel. Along your way kill all the hostiles and pick up health and ammo. Finally, a drone will spawn here which you must kill in order to update your next checkpoint.
As you advance further, following the marker, you will be taught how to climb a wall. Once you do that you will be taken to a Yellow Key which you can use to access the Yellow area which leads to a mall in which you will kill all the hostiles. You must also avoid the cannons in the walls which could otherwise damage you a lot.
After you reach the subway train your next challenge is the Cacodemon but don’t worry you can stagger it by throwing a grenade in its mouth and then kill it.
Follow the markers and kill all the enemies on your way. You will have to use the wall climb technique in order to reach the next checkpoint. Your next objective is to get aboard the citadel which your marker will lead you to.
Upon entering the Citadel you will have to get to the lift which will take you to the higher chamber. Interact with the lift which will take you to the council where a cutscene will start resulting in the end of the mission.