
Destiny ships with a total of 11 Crucible maps for PvP games, with one of them being a PlayStation exclusive while the other 10 are available for both PS and Xbox players.
More maps are expected to be added soon but meanwhile, players can have an insane amount of fun in these maps, if they can forego the somewhat terrible lag compensation the game offers in PvP.
For more help on Destiny, read our PvP Tips, PvP Loadouts and Easter Eggs.
Destiny Crucible Multiplayer Map Tips
Unlike some other FPS games, the layout of all the maps remains the same irrespective of the game mode players are currently in.
Proper usage of the player’s class and weapons while does guarantee a good amount of kills and helps in taking the team to victory, knowing the layout of each map is equally important as it can help with strategies and surprise a group of enemies for some easy kills.
Destiny Multiplayer Map Layouts
Anomaly Map Tips and Strategy
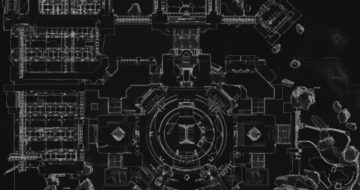
Anomaly is a somewhat symmetrical map taking place in a Research Base on Earth’s Moon. The tight hallways and sudden corners provide great opportunities for an ambush, especially if the player has a decent shotgun.
Using a long-range weapon in this map would be suicidal since it is almost impossible to score a killing shot in the area unless the players are in the outer ring and no one is aware of their presence.
The Motion Tracker can be extremely useful when players are in the inner ring because of the close combat nature of the area. A good use of a super or heavy weapon can easily wipe out a decent number of enemies if timed properly and players actually get to surprise their opponents.
Those interested in a bit of camping to rake up some kills can position themselves close to the “bolt holes” that connect both the inner and outer ring.
Any unsuspecting runner that crosses this area can be ambushed and killed off easily, or they can also be used to escape a tough firefight in the ring areas.
Asylum Map Tips and Strategy
Taking place in the ruins of a Venusian city, Asylum offers some great close and medium-ranged combat opportunities with a street running through the center serving as means of quick movement from one end to another.
The only trouble here is the windows and buildings overlooking the street so players should always keep an eye out on their motion tracker to avoid any ambush and get out of the area quickly.
Since almost all the buildings on the map are two-floor structures, enemies could be waiting players up a staircase so it’s best to avoid the obvious route and use jump to traverse the building through some window.
The best strategy however is to get up to the upper floor from one of the buildings at the end of the lane and then move from there. Once inside a building, a shotgun with a good rate of fire and damage can easily kill a number of enemies.
The street in the center can also be used by snipers to take down targets at the other end. Players camping on the upper floors of buildings can easily kill unsuspecting hostiles on the floor below them if they focus on their motion trackers to estimate their locations and then move down sneakily or just wait for them to come up and surprise them.
Bastion Map Tips and Strategy
Bastion is a large and pretty open map set on sandy Mars. This map can be great for sniping enthusiasts as most of the sandy exterior provides a great line of sights to take down enemies from a distance while they are moving around the map and the targets would be dead even before they could reach cover.
The vehicles and a turret near the dune structure can be used to quickly kill any opponent but players on vehicles should avoid entrances to the interior area as a surprise rocket launcher can quickly kill them.
The rocky interior portion of the map offers good medium to close-range combat where the motion tracker comes in handy to find enemies around the corridors.
Ambushing a bunch of them stuck together in some tight corridor with Titan’s Super can get players a nice number of kills instantly. The motion tracker can also be used by those leaving the interior to make sure the outer area is not being patrolled by someone on a vehicle.
Movement outside should be restricted close to the walls of the interior region to avoid being killed by a sniper from a distance or an elevated position, while also giving the chance to sneak up on them.
Blind Watch Map Tips and Strategy
Blind Watch is basically set on the rooftops of a water processing facility on Mars, where a still working and rotating turbine can be used by snipers to kill targets on the open rooftops while also using the rotating structure to their advantage and avoid being seen.
The interior portion of the map offers some great ambush opportunities with a shotgun or a Heavy weapon due to the sudden and tight corners.
The right side of the map offers some great cover for prolonged medium-ranged firefights despite being open to ambush from above so players should continuously monitor their Motion Tracker here.
The rooftops can also allow entry to the interior structure through windows instead of going through the obvious stairway route from the inside.
It’s a good idea to have a balanced loadout that offers medium to long-range firepower along with the option to fight in the interior with a shotgun or a hand cannon.
Burning Shrine Map Tips and Strategy
Burning Shrine is a small map with most of it being interior hallways and rooms with only a small portion on the exterior burnt surface being somewhat open.
One of the hallways also has a rotating stone wedge that occasionally blocks the line of sight to the next room. Since most of the map is set in the interior portion, close-quarters combat will mostly occur so players should be equipped with appropriate weapons like a shotgun, auto rifle, or a Heavy weapon like a machine gun.
Some medium-ranged fighting can happen in the big hallways so a balanced loadout with at least a scout or pulse rifle is advised. A few sudden corners can be used to ambush moving players so Motion Tracker should be carefully monitored and movement should be slow.
A raised hallway runs through the center of the map which can be used to move from one end to another mostly undetected and attack the enemy forces from behind. Grenades can be really helpful in flushing out enemies before entering a room or turning a corner.
Exodus Blue Map Tips and Strategy
Exodus Blue is a timed PlayStation exclusive and will be available for Xbox players in the future. The map takes place in a junkyard in Old Russia so there is plenty of cover available behind rusting machines and some structures.
A large building in the center cuts the line of sight of snipers wishing for some easy kills from the other end of the map.
The amount of cover present can help players get out of tough firefights against a large number of enemies, or force a close-quarter encounter if they manage to get close to an enemy and then finish them off with a shotgun or a quick melee attack.
The pipelines on the left side have a fatal drop so players should be careful when running past them to ambush players so that they don’t accidentally fall off and die.
Sticking to the edges of the map allows players to easily use the motion tracker to detect incoming enemies and be prepared while its use in the middle can confuse players because of player movements across the walls.
Medium to close-range weapons work best in this map but some skilled snipers can take up position on a higher-up structure to manage a few kills before they have to eventually leave their position.
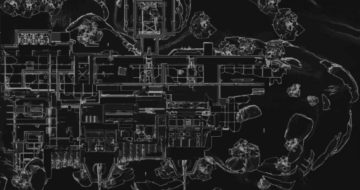
Firebase Delphi Map Tips and Strategy
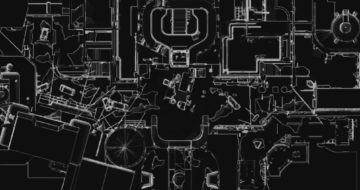
Set in a Cabal outpost on Mars, Firebase Delphi provides an all-rounder combat experience within the facility and outside it.
The interior of the firebase is huge with a lot of hallways and doors connecting them as well as a Command Center which is a two-portion structure, each overlooking one part of the map. The outside has a bunker and a U-shaped arc of open area.
While most of the conflict is focused in the hallways, depending on the game mode some firefights can occur outside the base as well.
Camping is almost impossible on the map as there are multiple ways to reach any part of the map, however, 2 or 3 group players can camp together but that also makes them an easy target and can be killed with one good use of a Super ability or Heavy weapon.
Motion trackers must be observed carefully while in the hallways since movement across walls can be detected as well. The whole team can lock down the innermost hallway by covering all the entrances but it’s only useful in game modes like Clash.
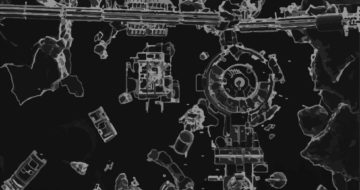
First Light Map Tips and Strategy
Taking place on a Research Base on Earth’s Moon, First Light is pretty open for most of the map, with only a few rocks and some destroyed structures and debris for cover while through the center of the map, a few damaged buildings provide shelter from above while leading players from one end to another which can be especially useful in Control.
The map has three turrets overlooking each entrance to the central structures while Interceptors and Pikes spawn once in a while which can be used to kill enemies in some enclosed spaces by firing through the doors.
The interiors offer good close combat as well as the option to kill up to 5 enemies with a single Super ability.
Campers behind doors or objects can easily be flushed out by grenades or players can simply choose to enter through a different way since every structure has at least two entry points.
Sniping can only be done on the edges of the map, near the turrets but most of the other areas in the map offer good medium and close combat options.
The motion tracker can be really helpful when outside the buildings but can be confusing when inside them because enemies can walk on rooftops, although they are pretty open targets when they do so.
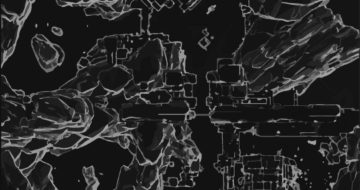
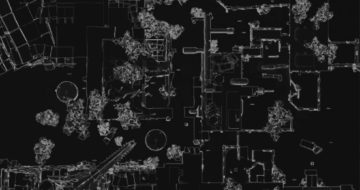
Rusted Lands Map Tips and Strategy
Offering a mix of interior and exterior combat, Rusted Lands, a small to medium-sized map takes place in a damaged and overgrown factory complex littered with debris useful for cover as well as various underground pathways which allow for safe movement across areas.
Most of the combat happens in the central area in and around a multi-floor building, especially during modes like Control.
Careful use of motion tracker is rewarded here and if some players managed to hold down some part of the map, they can camp there to their heart’s fill since it becomes really impossible to take such a position back except in some rare cases with a well-executed Super.
Snipers can stay at the end of the map and kill targets from a distance in modes like Control as some of the capture points present a somewhat clear line of sight.
Since the map is multi-layered, a few locations in the map have multiple entry points so it’s not a good idea to camp there, or even stay too long.
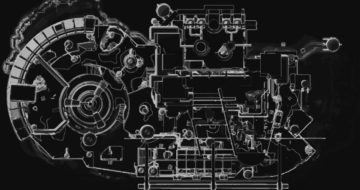
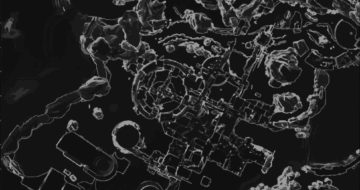
Shores of Time Map Tips and Strategy
Taking place in a beautiful-looking hybrid of marshland and ruins on Venus, Shores of Time offers long to medium-range combat experience and is suited for all types of game modes.
Some places in the map require careful jump timings or players can fall down and die but those jumps expose them for quite a long time allowing for enemies to easily kill them.
Motion tracker is really useful here especially when turning corners or entering dimly lit caverns.
The caves can be good positions to camp if players can cover both the normal entrances as well as one rock wall which has a small opening above which allows players to double jump through.
The tight entrances to the caves can get jammed if too many players rush in and provide a great way to score some easy kills through a Super or Heavy weapon.
Team coordination can really pay off in Shores of Time when pushing against a position that the enemy has locked down. The central area allows for bypassing campers as well as quick access to objectives and ammo spawns.
Twilight Gap Map Tips and Strategy
A multi-level complex set against the majestic backdrop of The Traveler, Twilight Gap heavily focuses on team play and coordination.
Multiple routes as well as the multi-layered structure of the map allow for a large number of entries to all the points on the map so camping would be suicidal even if someone is constantly monitoring the motion tracker.
Lone wolves can only survive on the outer edges of the map but those areas don’t provide much fun since most of the fights take place in the interior part of the structure.
Players inside the structure should constantly stay on the move and don’t stay in a place for too long, even to reload, at least not without someone to protect their back.
The motion tracker is pretty much useless in the middle portion of the map as it will pick up movements throughout the whole structure. The multiple elevations allow for some players to sneak past the enemy and flank them to help team members pinned down.
Don’t forget to share your own Map Tips with us by commenting below!