Batman: Arkham City raises the number as well as the difficulty of Riddler Trophies compared to the previous installment. There are now over 200 question marks for you to find as Batman which includes 37 in the Amusement Mile district alone. This does not include the 35 Catwoman Trophies that also count towards the Riddler Challenge.
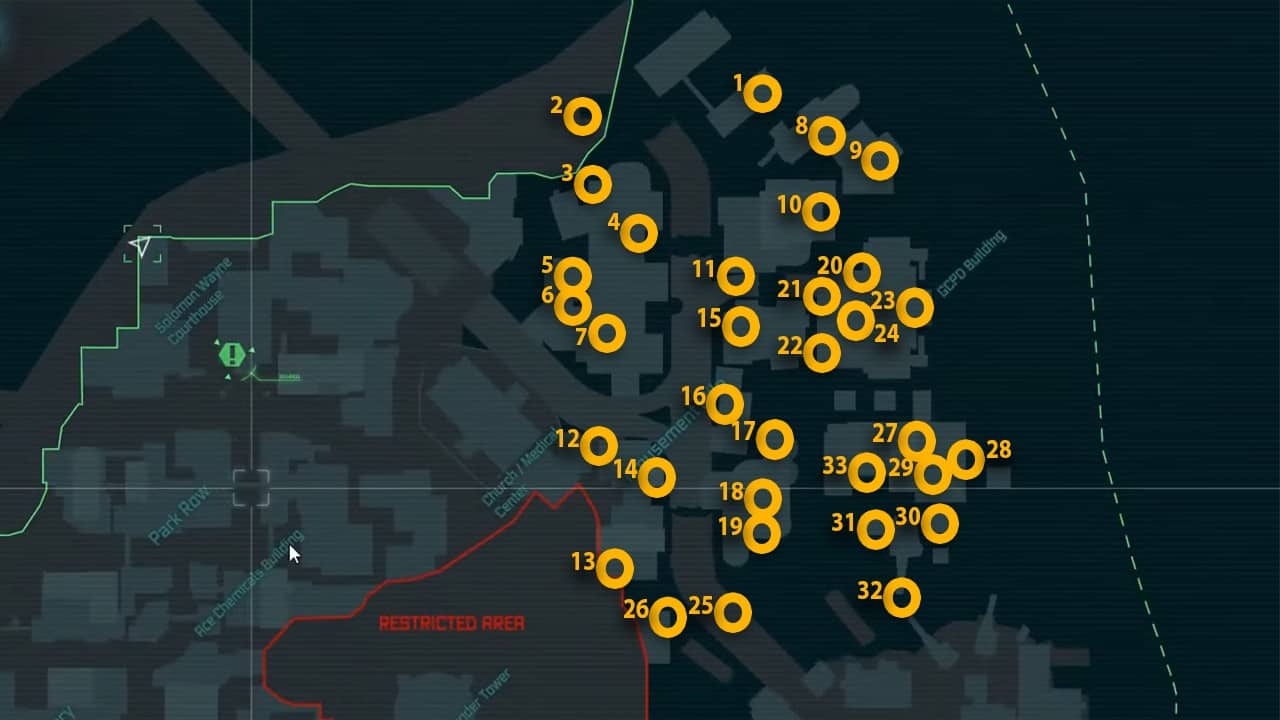
The map image below marks the locations of all Riddler Trophies in the Amusement Mile. You do not have to interrogate dozens of Riddler’s henchmen to reveal their hidden locations. Thus, saving you a lot of time.
We recommend playing through the main campaign first before pursuing the Riddler’s trophies since some of them are locked behind story-accessible areas. It’s best to go after them later in the game to avoid backtracking.
How to get the Amusement Mile Riddler Trophies in Batman: Arkham City
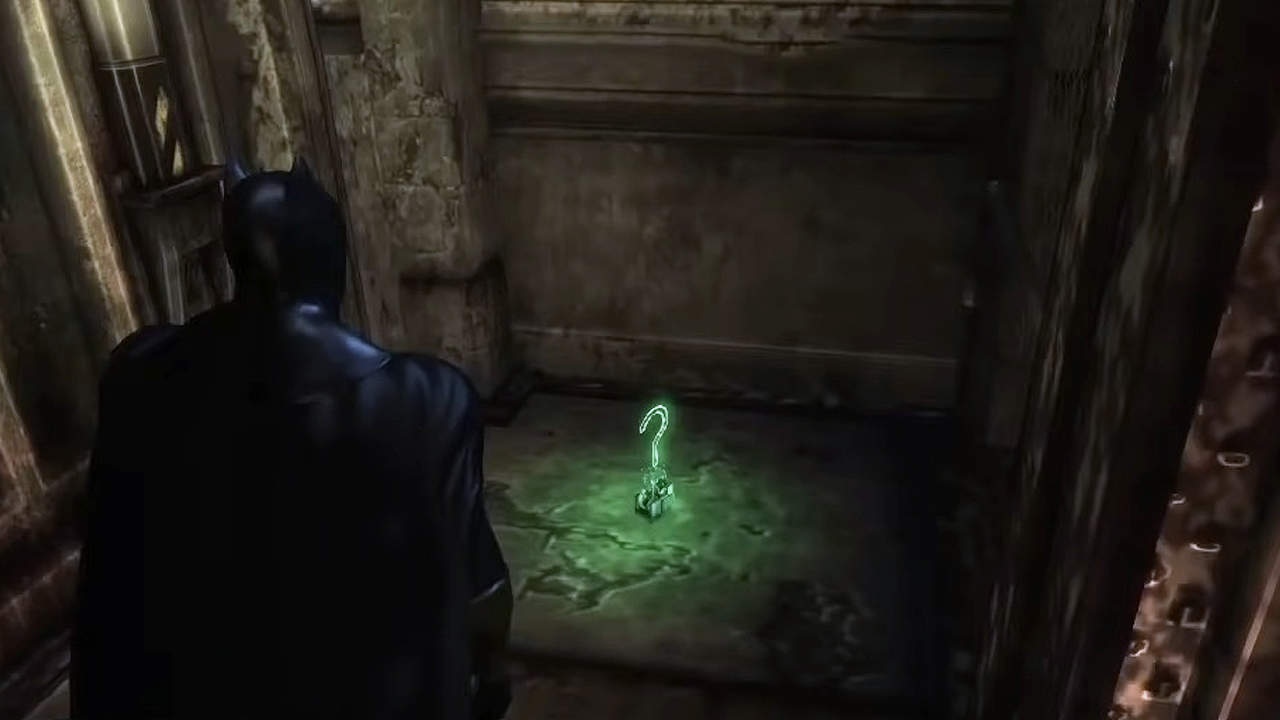
Riddler Trophy #1
Requirements: Explosive Gel
There is a shack with a destructible wall on the rooftop of the building adjacent to the abandoned hotel where Poison Ivy resides. You will find it north of the GCPD building, in the top right corner of the Amusement Mile map. Use Explosive Gel on the wall to burst through and grab the Riddler Trophy behind it.
Riddler Trophy #2
Requirements: Freeze Blast, Batclaw, Disrupter
West of the Abandoned Hotel, you will find an entrance into the building with a skull on it through the water. Glide down to the platform near it and use your Freeze Blast on the water to create a platform for yourself.
There is a camera in front of you that you need to disable using the Disrupter. Use your Batclaw on the hooks on the wall to pull yourself in.
You will find this Riddler Trophy in the area behind the fence in Batman: Arkham City.

Riddler Trophy #3
Requirements: None
Head up to the western rooftop of Gotham Casinos, the one with the pool. There is a wooden walled shack in the southern corner that you can break through by rolling. The Trophy will be behind it but mind the bad guys in the area before approaching.
Riddler Trophy #4
Requirements: Line Launcher
Go to the balcony in front of the Gotham Casino’s neon sign. The Riddler Trophy is behind the wooden walls on your right.
To break through, stand on the pressure pad in the left corner and use the Line Launcher to zipline across.
Riddler Trophy #5
Requirements: None
This Riddler Trophy is locked behind a pressure pad puzzle on the rooftop east of Gotham Casinos in Batman: Arkham City. The goal is to activate all three pads without touching the ground.
Head up to the very top one first and then glide down to the lower ones to complete the puzzle.
Riddler Trophy #6
Requirements: Line Launcher, Remote Electrical Charge
This Trophy is right next to the previous one. Drop down the ledge on the left and use your Line Launcher to move over the flowing water. Use your Remote Electrical Charge to power the industrial electromagnet in the back and then go back up to grab your Riddler Trophy.
Riddler Trophy #7
Requirements: None
The next Riddler Trophy can be found at the back of the Gotham Casino rooftop in the Amusement Mile. It is moving up and down so you need to time your slide to grab it. Begin the run-up while the Trophy is facing up so it turns towards you by the time you get to it.
Riddler Trophy #8
Requirements: Freeze Blast, Explosive Gel, Batclaw
This Amusement Mile collectible is in a locked cage on top of The Sea Pier, west of the GCPD building. Look down the southern edge and you will find three question marks on the base of the building on the other side.
Use your Freeze Blast to create a makeshift raft and jump onto it. Get close to them using Batclaw and apply the Explosive Gel on the dots of the question marks.
Grapple back up and stand on the pressure pad before detonating them. You can now grab the Riddler Trophy for yourself.
Riddler Trophy #9
Requirements: Batclaw
You will find this Trophy above the previous one, on the pink dolphin rooftop of The Sea Pier. Just stand on the pressure pad to open the cage and use your Batclaw to snatch the Riddler Trophy.
Riddler Trophy #10
Requirements: None
Glide under the Gotham sign of the building northwest of the GCPD. Land on the pressure pad below the platform and then grapple up to grab the Riddler Trophy.
Riddler Trophy #11
Requirements: Remote Control Batarang, Batarang
Under the broken bridge between GCPD and the Gotham Casinos buildings, there is a time trial puzzle. Stand on the pressure pad to lower the gate of the middle archway across the waters.
There are three switches in there that you need to hit using your Batarangs and hitting the first one will start an 8-second timer. Target the ones on the sides first with the Remote Control Batarang and finish it by using the simple Batarang on the middle one.
The cage will now be open and you can grab another Amusement Mile Trophy in Batman: Arkham City.
Riddler Trophy #12
Requirements: Explosive Gel, Batarangs
This Riddler Trophy can be found at ground level behind the building east of the Church in Batman: Arkham City. It is the one left of the Gotham City Olympus entrance.
There are 6 question mark switches that you need to hit in order to open the cage enclosing the Trophy. You can do this by using Explosive Gel on the lower row and then hitting the upper row using Batarangs from the top. Make sure you detonate the gel quickly after or the puzzle will reset.
Riddler Trophy #13
Requirements: Disruptor
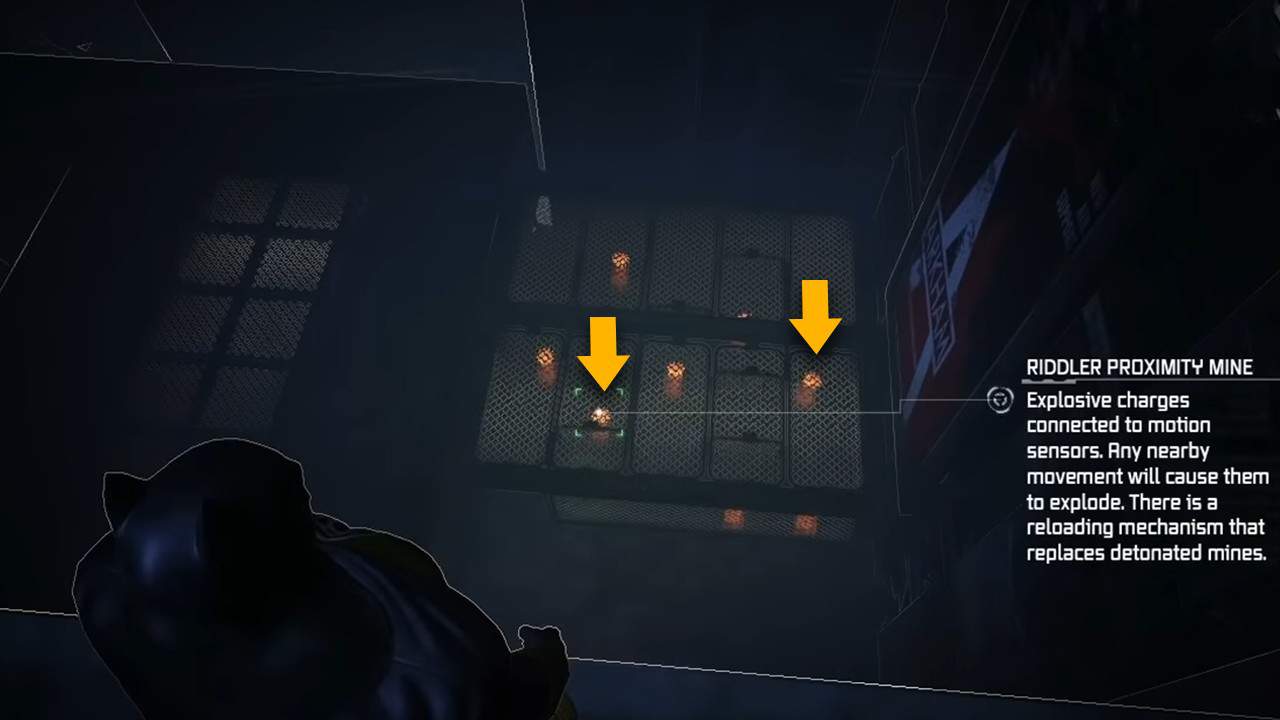
Head to the lower rooftop of the building southeast of Gotham City Olympus, the one bordering the Wonder Tower restricted area.
There is a fenced maze below littered with Riddler Proximity mines. From left to right, detonate the 2nd and 5th mines using the Disruptor. Then crawl through the gaps to grab the Riddler Trophy.
Riddler Trophy #14
Requirements: None
On the higher rooftops of the same building, there is a pressure pad puzzle on the ledge east of the building. Simply walk from right to left across to complete the puzzle and grab the collectible.
Riddler Trophy #15
Requirements: Cryptographic Sequencer
This Riddler Trophy is locked behind a cage on the rooftop east of the Gotham City Olympus in Amusement Mile. Hack into the panel on the side using the Cryptographic Sequencer to open the door.
Riddler Trophy #16
Requirements: None
There is a breakable wooden wall under the Gotham City Olympus blue neon sign. Just glide from any nearby building to break it and grab the Trophy.
Riddler Trophy #17
Requirements: None
Head to the lower rooftop behind the Gotham City Olympus building to find a pressure pad puzzle. Just step on the pad when it’s green to pick up the Riddler Trophy.
Riddler Trophy #18
Requirements: Remote Electrical Charge
Just grapple up to the roof south of the building where you got the previous collectible. The Trophy is in the metal ball inside the metal cage. Just stand on the pressure pad and use your Remote Electrical Charge on the industrial electromagnet to pull the metal ball. Then just go up to the gate next to the magnet to collect it.
Riddler Trophy #19
Requirements: None
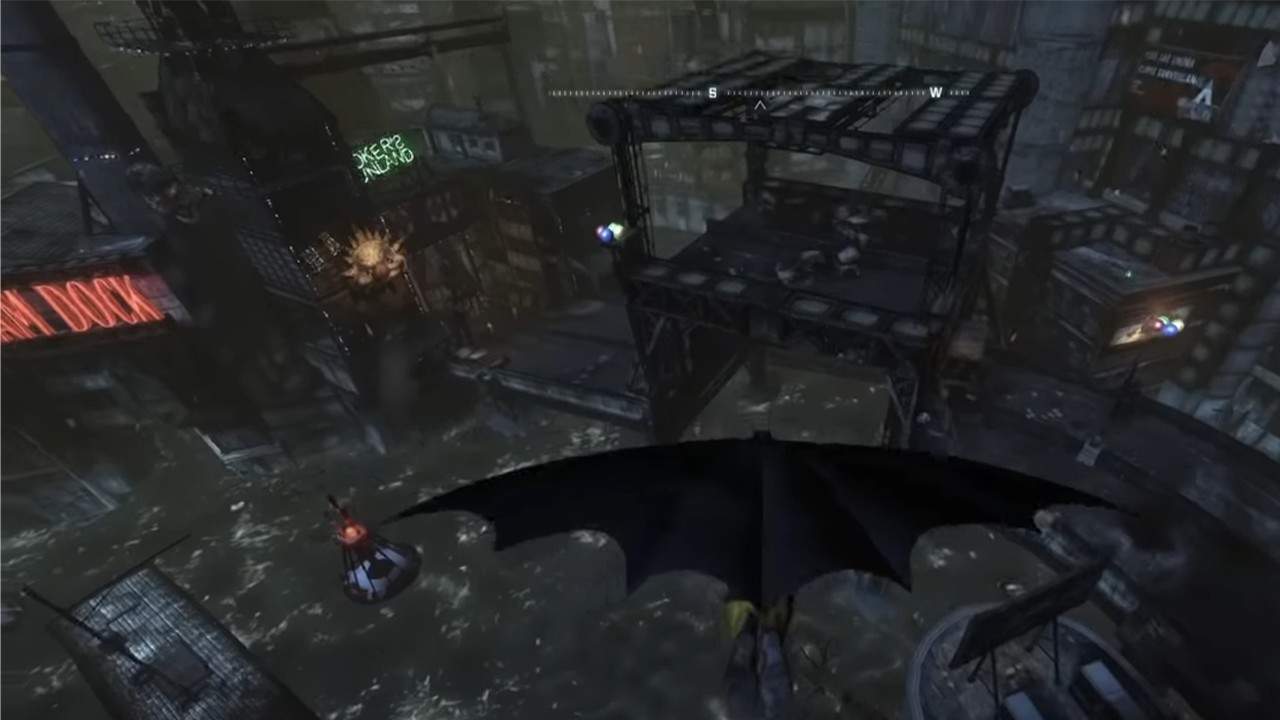
Grapple up to the GCR Tower north of the North Gotham Docks to get this Riddler Trophy in Batman: Arkham City. It will be on the second level from the top, near the Joker’s Balloons.
Riddler Trophy #20
Requirements: Remote Electrical Charge, Explosive Gel
Head to the fenced area west of the GCPD building, the one east of the Krank Co. Toys. Use the Remote Electrical Charge on the mechanism above the silver gate to lift it. Slide under the gate and burst through the wall across using Explosive Gel to grab the Trophy.
Riddler Trophy #21
Requirements: None
There is a destructible wall behind the GCPD building, on a ledge near the water on the western side. You can glide down from the building with the neon Gotham side to break it and grab the collectible inside.
Riddler Trophy #22
Requirements: Cryptographic Sequencer
This Riddler Trophy is locked behind a cage near the stairs southeast of the GCPD entrance. You won’t be able to see the lock from this side so you need to go up the stairs and glide to the building across. Turn around and hack the terminal inside using your Cryptographic Sequencer.
Riddler Trophy #23
Requirements: Batclaw
Go to the docks behind the GCPD building and use your Batclaw to grab the collectible in the archway with the Police Headquarters sign.
Riddler Trophy #24
Requirements: None
Glide to the terrace in front of the GCPD building in Amusement Mile; the Riddler Trophy is hiding under the staircase. It has a passageway on the side that you can crawl through to get it.
Riddler Trophy #25
Requirements: Freeze Blast, Batclaw
Glide to the boat in the water west of the Gotham City Docks next to the lifted bridge. The Riddler Trophy is on the underside of the bridge that you can grab using the Batclaw. Just remember to use your Freeze Blast to create a platform to get close to it first.
Riddler Trophy #26
Requirements: None
There is a pressure pad puzzle on top of the building southeast of Gotham City Olympus. You need to activate all three pressure pads without landing anywhere else. After activating all three, you will have 7 seconds to grab the Riddler Trophy which is on top of the second pressure pad.
Riddler Trophy #27
Requirements: Freeze Blast, Batclaw, Cryptographic Sequencer
Go to the balcony behind the GCPD building, the one facing the sea. The Trophy is under the boat shelter on your left.
Create a raft using Freeze Blast and pull yourself towards the gate with the help of Batclaw. You need to hack into the security panel to open the door and grab the collectible inside.
Riddler Trophy #28
Requirements: None
This Trophy is in a cage behind the building west of the GCPD in Amusement Mile. There are red pressure pads on the cage floor that you need to avoid so just glide from the GCPD balcony facing the shore.
Riddler Trophy #29
Requirements: Remote Control Batarang
There is a ventilation shaft behind the Krank Co. Toys neon sign with a locked Riddler Trophy beside it. There are trap doors inside the vents that are constantly opening and closing. There are two switches at the back of the vents that you need to hit.
Throw the Remote Control Batarang as the first door lifts and go straight to hit the first switch. For the second one, just turn to the left around the mid-way point in the vents.
Riddler Trophy #30
Requirements: Batarang
West of the Krank Co. Toys building there is a small tower left of the huge crane. Stand on the pressure pad and the switches on the wall in front of you will glow in a specific pattern. Just use your Batarang to hit the switches in the same exact order thrice to unlock the collectible.
From left to right the correct orders to hit the switch are:
- First: 1-3-5-2-4
- Second: 4-3-1-5-2
- Third: 3-5-2-1-4
Riddler Trophy #31
Requirements: None
There is a cage on the tower on the right of the huge crane, west of the Krank Co. Toys building. You need to press all the pressure pads without touching the ground to get the locked Riddler Trophy in Batman: Arkham City. Just grapple onto the tower across to boost yourself in the air.
Riddler Trophy #32
Requirements: Remote Electrical Charge, Batclaw
This collectible is suspended in the water from the huge crane between North Gotham Dock and Krank. Co Toys building. Head up to the top of the tower and use your Remote Electrical Charge on the crane controls box to power the crane.
It will lift the Trophy up to your level that you can grab using your Batclaw.
Riddler Trophy #33
Requirements: Batclaw
Go inside Krank Co. Toys of the Amusement Mile using the front door and the Riddler Trophy will be inside the booth on your right that you can grab using your Batclaw.
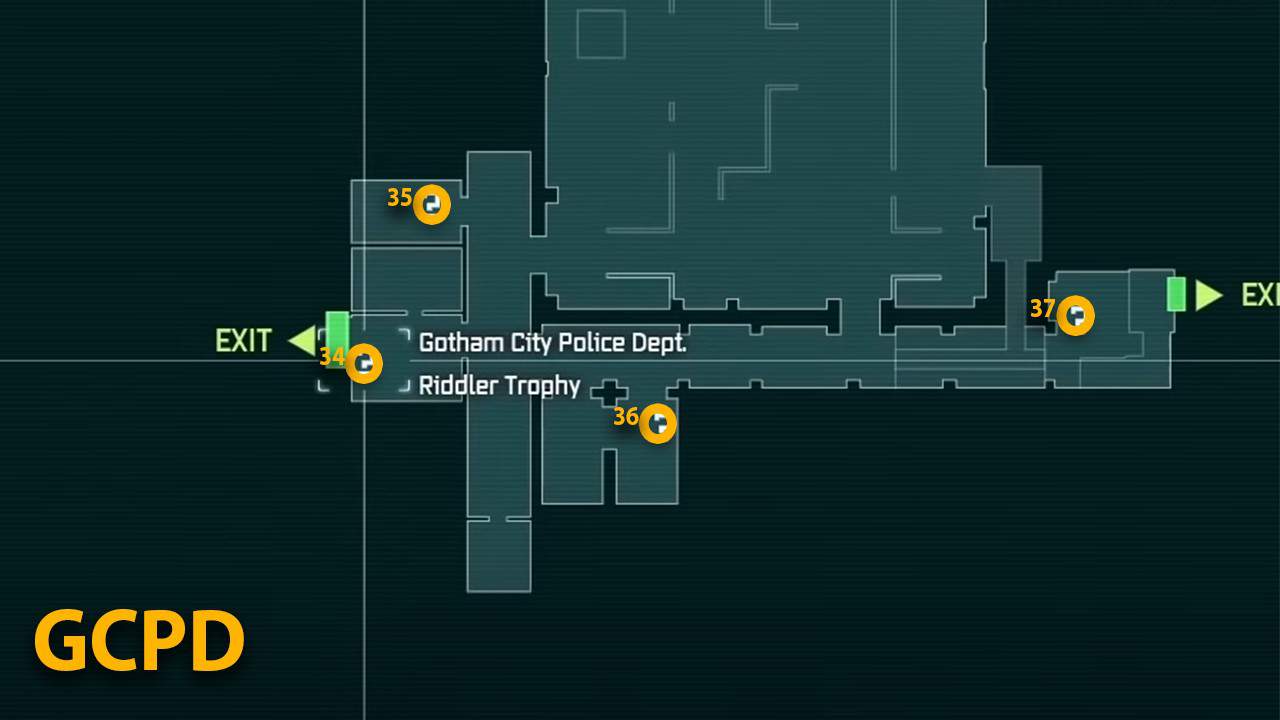
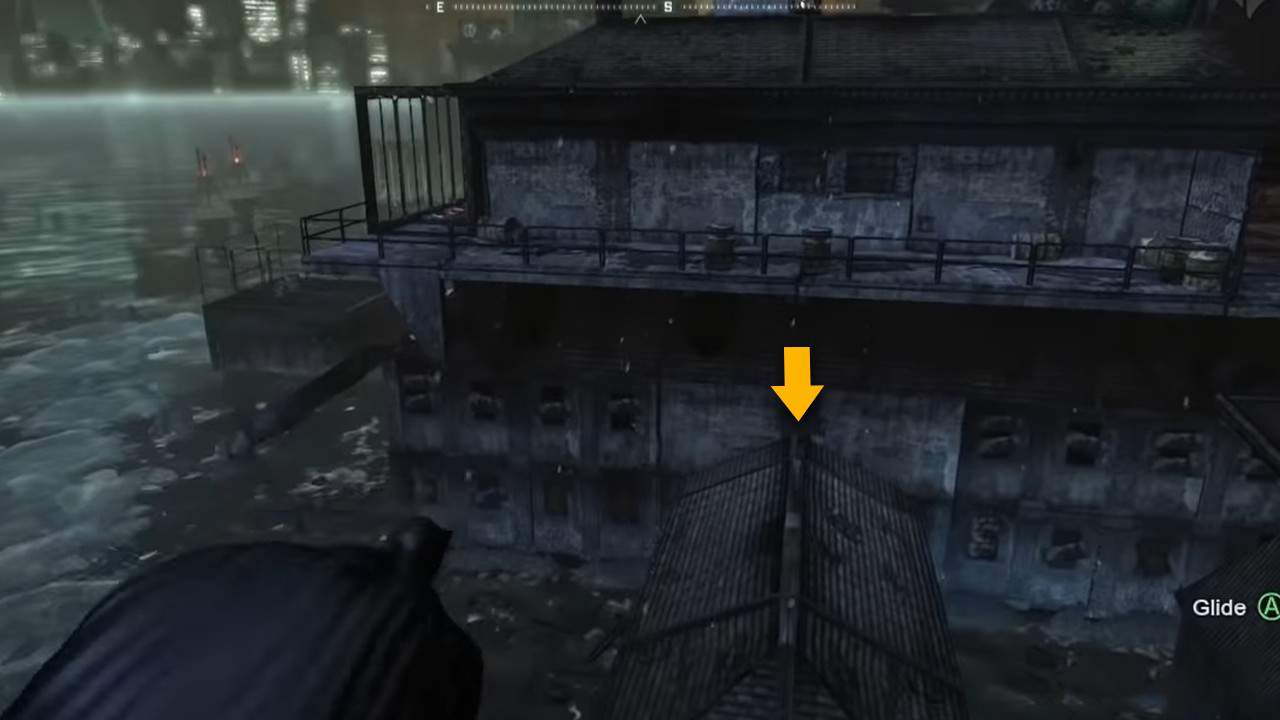
Riddler Trophy #34
Requirements: Freeze Blast, Line Launcher
Enter the GCPD building using the back entrance, it is through the busted wall facing the docks. Go down the stairs on your left and use the Freeze Blast to block the steam pipes ahead.
Duck under the gate and grapple up to the vents above you. Keep following the path till you find a pressure pad puzzle. It is similar to the ones where you can’t touch the ground but can be a little tricky to navigate since it is inside a building.
Use your Line Launcher on the anchor point in the direction of where you came from. Step on this pressure pad and then land on the one at the end of the line. Go back on the zipline and turn right around the halfway point to get the last one.
The Batman: Arkham City Trophy case will unlock, which is also next to the last pressure pad.
Riddler Trophy #35
Requirements: Remote Control Batarang
Instead of going up into the vents, go straight across the hallway for this collectible. Turn right from the corner and the Riddler Trophy will be inside the locked cell at the end.
There is a fuse in the back of the cell that you need to hit to unlock the door. To do this, return to the stairs where you will find electricity between the broken wires on the ceiling. Throw your Remote Control Batarang through it to electrify it, retrace your steps, and enter it through the small hole in the top right corner of the cell door to hit the fuse box. The cell door will now be unlocked, so you can go back to grab the collectible.
Riddler Trophy #36
Requirements: Cryptographic Sequencer, Explosive Gel
Go straight down the hallway from the stairs, there is another locked cell on your left just before the corner. Hack into the security panel next to the door using the Cryptographic Sequencer to open the cell.
The wall just to the left of the cell door is a destructible one. Apply the Explosive Gel to explode through and grab one of the last Riddler’s Trophies of Amusement Mile.
Riddler Trophy #37
Requirements: None
After going down the stairs, enter the Morgue on your right. The last Trophy will be on the table inside.