Seelies are mysterious beings roaming the land that lead you to their court and reward you with chests that contain all kinds of rewards. In this guide, we will be pinpointing all the Seelie Locations in Genshin Impact Enkanomiya region to help you go after these free chests as quickly as possible.
Genshin Impact Enkanomiya Seelie Locations
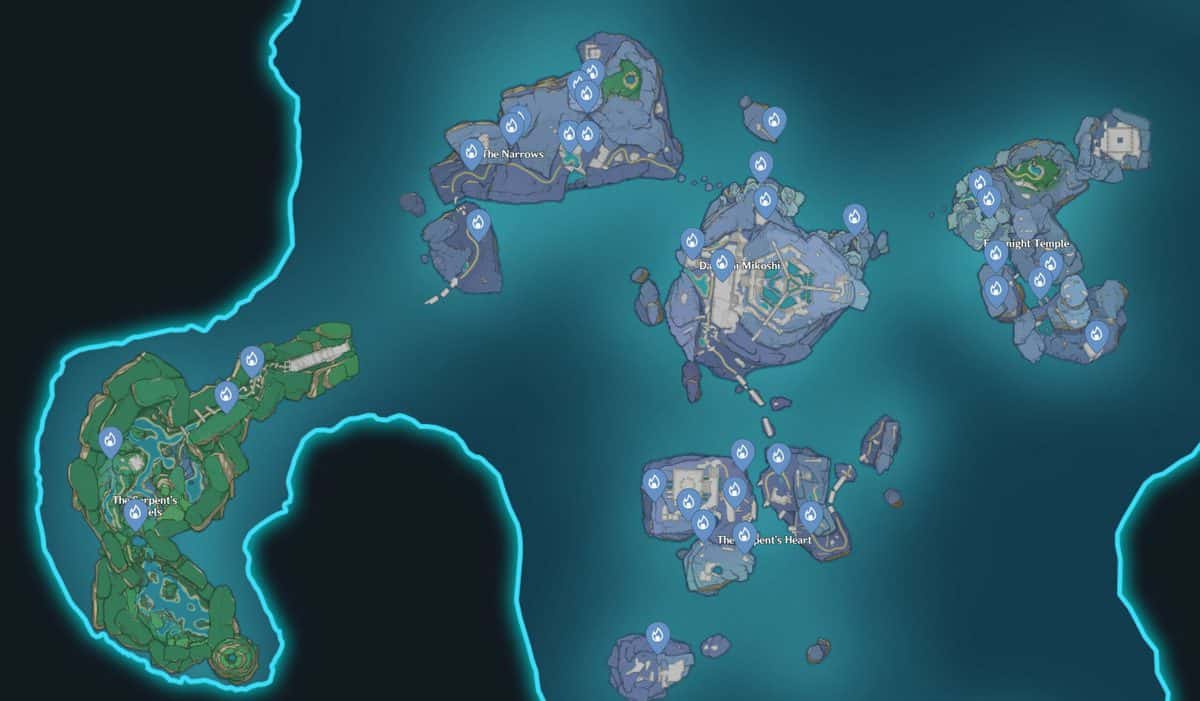
You can chase and collect rewards from 39 Seelies in the Enkanomiya map region of Genshin Impact. In this guide, we will be walking you through all of these Seelie locations in the Enkanomiya region of Genshin Impact to make this task a lot easier for you.
Here is an image of the Enkanomiya region with all the Seelie locations highlighted:
Evernight Temple Seelies
Evernight Temple Seelie #1
We will start with the Evernight Temple that has 9 Seelies. The first Seelie can be located at the top left corner of the Evernight Temple, in the middle of the pond.
Evernight Temple Seelie #2
After collecting the chest, you need to head down until you reach another small pond surrounded by cave walls. Climb the wall on the left to find the Seelie.
Evernight Temple Seelie #3
Roam around the outer edges of the cave you were just In and you should be able to spot the next Seelie on the left side.
Evernight Temple Seelie #4
Go to the middle of Evernight Temple and you should be able to spot 3 tall pillars and a chest in the middle. Open that chest to find the next Seelie.
Evernight Temple Seelie #5
You should be in the center-left of the Evernight Temple area. Climb to the higher rocks to open a chest using a Sigil Key and find the next Seelie.
Evernight Temple Seelie #6-7
Go to the bottom left area of Evernight Temple until you come across some ruins to spot the next Seelie. Chase it until you spot an Evernight switch. Turn it on to find the next Seelie as well.
Evernight Temple Seelie #8
Go to the very bottom of the temple rock and climb the massive stairs of the building to reach a room and spot the Seelie on the other end.
Evernight Temple Seelie # 9-10
Face the cavity on the inner left edge of the rock and glide/dash to the other edge of the cliff to find the next Seelie.
Once this Seelie settles down, go back to the other side and shimmy along to the right side until you reach a closed entrance. Climb the pillar on the right to find the Seelie waiting for you.
The Serpent’s Heart Seelies
The Serpent’s Heart Seelie # 11
Moving on to the next area, we will start our Seelie chase from the bottom area of The Serpent’s Heart. The Seelie should be easily visible, roaming around the area, waiting for you to chase it.
The Serpent’s Heart Seelie # 12
Keep heading straight ahead after collecting the last chest to find the next Seelie out in the open.
The Serpent’s Heart Seelie # 13
Go to the top left of the rock and then glide off the cliff to spot a blue suspended platform hugging the cliff. Reach that platform to start chasing the Seelie.
The Serpent’s Heart Seelie # 14
Move to the left part of The Serpent’s Heart, where all the temples and ruins are, and spot the Seelie near the front courtyard. You will have to defeat all the enemies in the area or simply keep dodging until the Seelie stops running and settles down.
The Serpent’s Heart Seelie # 15-16
There are two broken pillars in the bottom left part of the rock and that’s where you’ll find the next 2 Seelies. Climb both pillars and chase them one after the other.
The Serpent’s Heart Seelie #17
Go back to the Temple area but this time, stick to the left outer edges until you reach the cliffs. Dropdown until you spot a Seelie near a blue tree.
The Serpent’s Heart Seelie #18
This is a tricky one. You need to travel along the same ridgeline of the temple and then drop down to enter it through the broken staircase. Once inside, climb the pillar on your immediate right to enter a very secluded, big room where the Seelie is chilling.
The Serpent’s Heart Seelie #19
The last Seelie of this area is located on the sole rock on the bottom left. Go to the middle of the ruins to find the Seelie hugging a half-destroyed tree.
Dainichi Mikoshi Seelies
Dainichi Mikoshi Seelie #20
Go to the top-right edge of Dainichi Mikoshi and jump down until you reach the very bottom of the narrow canyon and spot the hidden Seelie.
Dainichi Mikoshi Seelie #21
Go to the bottom parts of the temple and look around the center-left area to find the next Seelie.
Dainichi Mikoshi Seelie #22
Start making your way to the top of the area and find the next Seelie hovering around the edge.
Dainichi Mikoshi Seelie #23
Go back to the place where you found the last Seelie and take a left from the edge to go through the crack in the wall to find the next Seelie.
Dainichi Mikoshi Seelie #24
Go to the small suspended island next to the cliff to find the next Seelie. You will have to avoid falling in the cavity by dashing as you glide forward. The Seelie is on top of the pillar.
Dainichi Mikoshi Seelie #25
Go back to the main island and find this Seelie chilling on one of the verandas on the left side of the temple.
The Narrows Seelies
The Narrows Seelie #26
Go to the Narrows and start from the very bottom of the area. You will find this Seelie in the gardens, next to the shiny pillars.
The Narrows Seelie #27
Start moving up the road and you’ll soon come across the 27th Seelie of the Enkanomiya region of Genshin Impact.
The Narrows Seelie #28
Go left where the canyon branches out and you’ll find this Seelie hovering at the top of a tree trunk.
The Narrows Seelie #29
Now look back and you’ll spot another Seelie in the same area, on top of a half-destroyed pillar.
The Narrows Seelie #30
Keep moving up the main road until you come across a waterfall. Enter the room on the right side of the waterfall’s base and head inside to find the next Seelie.
The Narrows Seelie #31
The chest will reveal the next Seelie for you to follow and then it’s just a matter of the Seelie reaching its resting place and unveiling the chest for you to loot.
The Narrows Seelie #32
Find the next Seelie inside the ruins. You will have to go through the blue gate to reach the other side and see the Seelie.
The Narrows Seelie #33
Drop down to the bottom parts of the ruins and chase the next Seelie to reveal the chest.
The Narrows Seelie #34
Go back to the middle of The Narrows and climb the rocks until you locate a bunch of bushes in the middle of the area. The Seelie is hiding inside the bush on the right side.
The Narrows Seelie #35
There is a pond in the middle part of the Narrows, slightly towards the top right side. That’s where you’ll find the next Seelie.
The Serpent’s Bowels Seelies
The Serpent’s Bowels Seelie #36
We will start from the top of The Serpent’s Bowels. The 36th Seelie can be found on top of two huge pillars.
The Serpent’s Bowels Seelie #37
Start heading down gradually until you come across a massive room on your left. Go inside that room and keep on going until you locate the next Seelie.
The Serpent’s Bowels Seelie #38
Head to the Middle of The Serpent’s Bowels to locate the ruins. You need to drop down into the crevasse and find the second last Seelie of this region hiding underneath.
The Serpent’s Bowels Seelie #39
The last Seelie of the Enkanomiya region of Genshin Impact can be located on The Serpent’s Bowels, near the bottom middle of the area. You will have to find it inside a cave near the massive purple tree.