What is FTP ?
FTP is acronym of File Transfer Protocol, the protocol for exchanging files on internet, it uses TCP/IP to enable data transfer. Basically it enables you to download a file or upload one using to a server.
FTP Private Server
You can make your very own ftp server of any scale using readily available ftp clients like G6 FTP Server, Serv-U FTP or Bullitproof v2.15. For this tutorial we will be using G6 FTP Server Client.
Download G6 FTP Server
Ports Required To Be Forwarded
Before we start with ‘how to’ part of ftp server, forward these two ports.
ftpserv1 TCP/UDP 8024 (Port given during installation)
ftpserv1 TCP/UDP 21 (Port given during creating a Domain)
FTP Server Client Installation
Install G6 FTP Server.During Installation, setup asks for a port which the client use (it is not the port which appears after your ftp server address but sill it must b remembered, however it shouldn’t be 21). Then make an account with username and password (both must be remembered for later usage), all other things in installation are common.
G6 FTP Server Step by Step Guide
Step 1
Now Run the G6 FTP server, and go to ‘Actions’ and select ‘New Server’. Now give Name, Description, host address (127.0.0.1 or localhost), port (given during installation) and Username & Password (given during installation), and hit Enter.
Step 2
Now login to the created server by double clicking its name from left column, it will ask for username and password that you already have given. If the two monitors icon appear as yellow then you have successfully logged into your server. (Like ServerABC in the above screenshot)
Step 3
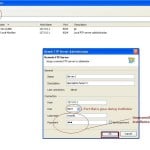
From left column right click on Domain and select ‘New Domain’. A window will prompt asking for Name of Domain, give name and select Limit of Clients that can connect to your server and Max number of connections per IP.

In the next step it will ask you to give IP, now give your public IP (internal IP like mine was 192.168.1.4, but after * sign, like *192.168.1.4) and leave the port as 21, and check the two CHECK BOXES given below.

Now it will ask to create a certificate or use a created one (the choice is yours here, just write something in ‘Name’ text box if you want to pass this step quickly). In the next step you have to choose whether you want to make log files of activities in your server or not.

Now give directory of the folder which you want to share on your FTP server.
Step 4
You are done making an FTP server. You can access your FTP server by writing “ftp://Local_IP:21” like “ftp://192.168.1.4:21” (if you are accessing it through LAN) Or “ftp://Public_IP:21” like “ftp://119.153.38.155:21″( this is your external IP, to Check your External IP visit whatismyip.com).
Note: 21 is the port given During Creating the Domain.
You can mask your IP like ftp://reo-noob.no-ip.org:21 using our Static Ip Tutorial.
Step 5
You can use many options given in G6 for improving and customizing your server by right-clicking the domain name and selecting Properties. Users can vary Transfer Speeds/limits, change security options, ban IPs, Ban Files, check statistics of the server and more!

Have fun using your very own FTP server but *Be cautious about the security settings.