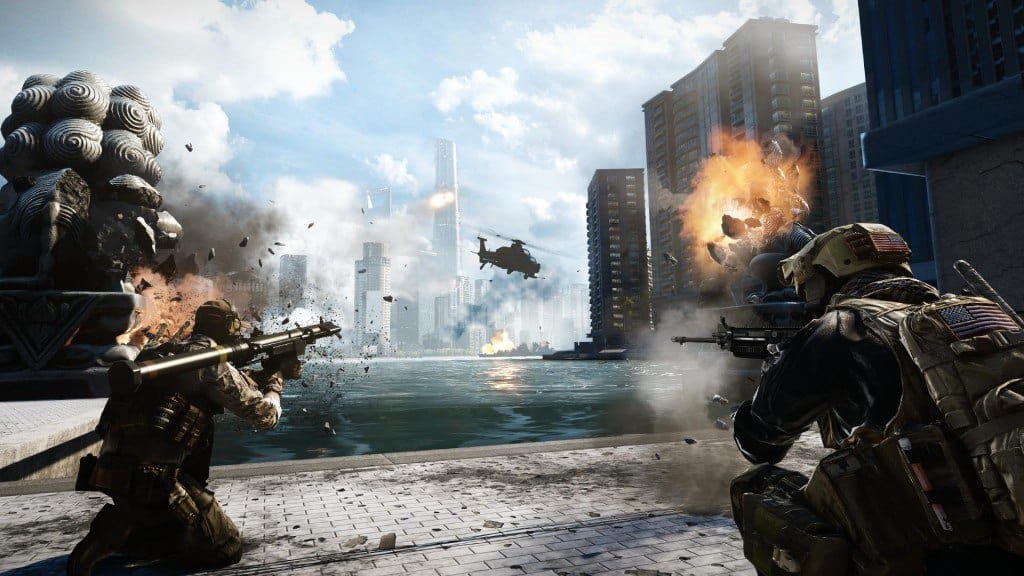
Tall, falling skyscrapers, deadly attack helicopters, and dominating armor – it’s all there in the Siege of Shanghai, one of the multiplayer maps in Battlefield 4.
The map has a unique mix of air, ground, and sea terrain with predominant ground and air vehicle warfare, making it an intense, modern battleground.
Battlefield 4 Siege of Shanghai Map Tips and Strategy
The Siege of Shanghai map is set in an urban part of Shanghai near the seaside.
Towering skyscrapers, narrow streets, and a vast open sea to travel across are the constituents of this multiplayer map, with large amounts of land-based vehicular warfare, and tight infantry combat.
Levolution in this map is triggered by the destruction of a damaged skyscraper, which is not only a treat to watch, but also creates as new control point in Conquest, called Ruins, changing the position of the flagpole for C permanently.
The four cracked pillars on the ground level of the building need to be destroyed with explosives, which brings the skyscraper tumbling down. Dust and ash will occupy the surroundings as a result, making visibility low in the regions.
Bollards can also be activated near the bridge north of the scraper to prevent vehicle access, giving the control point holders a tactical advantage.
Conquest Tips and Strategy
Recommended Squad: Assault, Engineer, Engineer, Support, Recon
Conquest mode will have you capturing various control points located on different parts of this urban map. The Siege of Shanghai is dominated by land vehicle battles and infantry combat, making it all that exciting for those on-foot soldiers and the tank destroyers.
The terrain design of the map is fairly narrow, and on land you will need to travel across one control point to go to the other. This linear setup can be bypassed by using the sea, but there is generally a lack of sea vehicles in this map.
This means that one team can actually completely block-off the other’s progression by control three points located one after the other, forcing them to fight for one point to get to the next.
Since this is a map that encourages the use of land vehicles, engineers are of the utmost importance, both for maintenance of their team’s vehicles and for countering enemy vehicles with mines and rocket launchers.
Like most of the other maps, there are two variations of Siege of Shanghai for Conquest: Large and Small. The only difference is that there are two additional points in the Large version, with more vehicles and bases that are further apart from each other.
Siege of Shanghai differs from other maps because of its brilliant symmetry, making Conquest on it highly competitive, and vastly intense. It is thus regarded as the most balanced and one of the best maps in Battlefield 4 for Conquest.
Bases
The US base is located in the western part of the map. You get an ample amount of firepower in-terms of vehicles, of which the two most important are the attack helicopter and the M1 Abrams tank. You won’t have much choice in the initial progression, but it’s best to distribute your team between A and B points.
These points will remain dormant as far as combat is concerned for the first bit, so make sure you utilize the given time by making ample defensive preparations to fend off an assault from the enemy. Don’t be shy in using your mines to fend off enemies.
The Chinese base is located on the eastern side, and the story is really the same. Points D and E are very easily reachable, and the only viable chose towards the start. Utilize your tanks’ prowess to defend these regions, and utilize your engineers to set up mines and prepare their rocket launchers.
Like A and B, points D and E will remain dormant in the first few minutes of the game, so use the time to set up vital defenses that would block off engaging enemies.
US Vehicles (Large): 1x MRAP, 1x LAV-25, 2x M1 Abrams, 2x PWC, 1x UH1Y-Venom, 1x AH-1Z Viper
US Vehicles (Small): 2x MRAP, 1x M1 Abrams, 1x AH-6J Little Bird
CN Vehicles (Large): 1x ZFB-05, 1x ZBD-09, 2x Type 99 MBT, 2x PWC, 1x Z-10W, 1x Z-9 Haitun
CN Vehicles (Small): 2x ZFB-05, 1x Type 99 MBT , 1x Z-11W
Garage
The Garage (A) is the closest checkpoint to the US Base. The control flag stands at the top of a parking garage between two buildings. There are three different buildings with stairs that lead to the shared parking garage, giving you lots of options as an attacker.
Check for these stairs and associated regions for enemies while attacking/defending the area. There is also an HJ-B launcher located on top of the garage for defense, which should aid you against ground vehicles.
The Garage is mostly be a quiet place once it is captured by the US team, so it is best to leave a T-UGS here so that you only have to return if enemies are spotted here.
Assets (Large): 1x M1 Abrams/Type 99 MBT
Metro
Control point B is the Metro, located just north of the Garage. The flagpole itself can be accessed from three different parts, but the darkness and cover provided around the area make it fairly defendable.
The area is quite hard to access from the inside by vehicles, so most of the clearing up work will have to be left to the attackers. The defenders should plant claymores here, while the attackers remain wary of these tactics.
The outer regions of the Metro have some good cover as well, but the area from the outside is accessible to vehicles, which would make life hellish for infantry walking on the road.
Assets (Large): 1x MRAP/ ZFB-05
Ruins
The Levolution-triggered Ruins control point is essentially C, with the flagpole moved down to the ground level following the Levolution.
In order to increase chances for both teams, you would actually want the building to crumble down as quickly as possible, because this is the most combat-heavy zone, and geographically and statistically the central point of the entire map.
What makes this control point a true decider is not just its location, but also the fact that it gives you a gunboat, which can be used to attack the two remaining enemy control points from the waters, granting your team huge advantage and allowing you to press forward.
The dust and smoke from the collapse also allows infantry units to breathe more easily, hindering the site of ground vehicles and attack helicopters greatly. Thus, after Levolution, the area becomes a deadly infantry battleground with poor visibility.
The control of this point also grants your Commander a Cruise Missile, which adds even more importance to gaining control of this area.
Assets (Large): 2x PWC
Arcade
The Arcade control point (D) is located in the northeastern part of the map. It is primarily based around the large arcade building itself, with multiple accesses, and an elevator that can lead to the rooftop.
The rooftop is an excellent place for recon to scan the regions, and also for engineers to take out the harassing enemy attack helicopter. The flag here is very accessible, so you would also need a team patrolling the grounds. The square road here makes it perfect for an IFV to patrol the entire building defensively.
Assets (Large): 1x MRAP/ ZFB-05
Foodcourt
This control point is located southwest of the CN base, and is the first base the CN will likely capture. It has a decent set of buildings, along with a patio that can be used to overlook the flag.
Like the Garage, this region won’t be attacked too easily, and it’s best to leave a T-UGS nearby to detect enemy movement here. There are stores south of the control point that can be used during defense to buy some time as well.
Make sure you don’t go forward without precautions though. The two east and west roads should be planted with mines as the CN. Also, make sure you use the eastern road for transport to prevent being attacked by the US team.
The US team should do the opposite; moving from the west road to prevent the CN from ambushing on the eastern one.
Assets (Large): 1x M1 Abrams/Type 99 MBT
Rush Tips and Strategy
The intense, fast-paced mode of Rush will have the US attackers arming 10 MCOM stations across 5 different zones of the map, while the CN team attempts to defend.
Both teams will have good land vehicle firepower, but the attackers will have air superiority with an escort helicopter, allowing them to assault from above.
Zone 1
Recommended US Squad: Assault, Engineer, Engineer, Support, Recon
Recommended CN Squad: Assault, Engineer, Engineer, Support, Recon
Zone 1 will have the Chinese starting at the Garage region, spawning in between the Garage and the Metro, while the US starts off from the westernmost part of the map. The US will have air superiority, allowing them to deploy troops from the air using their chopper.
The CN will only have the luxury of a single tank, but that should be more than enough if you have capable engineers ready to destroy enemy armor. In addition to these, you’ll also have those HJ-B stationary rocket launchers to defend against enemy vehicles.
The southern side of the garage also has 0.5Cal. The CN squad should get into positions and utilize these mounted guns to pin down enemy infantry and counter their transport vehicles.
The US needs to keep their armor in the forefront, defending the MRAPs that would be transporting your troops. This can be a very risky job, because it is very easy to lose focus and leave your transport vehicles susceptible to enemy launcher attacks.
The MCOM Station A is located in the main level of the garage, with virtually no cover at all. This can be very dangerous for the attacking team, so make sure you move in groups and take out enemies.
MCOM B is even harder to reach, being at the heart of the garage on the top level between two vans. You will need the helicopter’s assistance for this one.
US Assets: 2x MRAP, 1x M1 Abrams, 1x UH1-Y Venom
CN Assets: 1x Type 99 MBT
Zone 2
Recommended US Squad: Assault, Engineer, Engineer, Support, Recon
Recommended CN Squad: Engineer, Engineer, Engineer, Support, Recon
Zone 2 covers the Metro region of the map. The US attackers start directly south of the MCOM stations. The roads here are narrow and there are plenty of sniping spots.
The CN would want to get their recon teams into position, while their engineers lay mines on the different roads. Both teams will start with the same vehicles, so you would know what to do; same strategy as before.
MCOM station A is located down the first set of stairs of the Metro itself. The area is very easy to defend, so you will need to tread carefully as an attacker and keep an eye out for enemy Recon.
MCOM station B is located in the northern side of the Metro underground. There are four entrances to this objective, which can be trapped with claymores. Again, defending this region is fairly simple, but once the attackers do get access, it can be quite difficult.
US Assets: 2x MRAP, 1x M1 Abrams, 1x UH1-Y Venom
CN Assets: 1x Type 99 MBT
Zone 3
Recommended US Squad: Assault, Assault, Engineer, Support, Recon
Recommended CN Squad: Assault, Assault, Engineer, Support, Recon
Zone 3 will have the CN defending the central region of the map. At the start of the Zone, the skyscraper here will fall, creating a lot of dust and debris, and hindering visibility for both teams greatly.
This is actually a great tactical advantage for the CN team, which would know exactly where the attackers are coming from. Make sure your engineers are looking at the skies though, as the escort chopper can drop off enemies and harass your defenders from above.
The US will have to be careful when entering the dusty area; infrared-equipped enemies will be able to spot attackers easily and take them out. Anyone who gets marked is surely to do from a distant sniper shot.
The best counter here is to use grenade launchers and shoot at the rubble, which can grant you easy kills.
The CN will have the firepower of a tank, and the cover of the dust, giving them added advantage. Use the towers near the building for snipers, and take out anyone who gets marked.
Use the tank to stick near the MCOM station A, which will make it very tough for the US defenders to get access to it. MCOM station B is a bit tougher as there is a lot of rubble around it, making it hard for the tank to be effective, and granting the attackers plenty of cover.
US Assets: 4x Quad Bike, 1x UH1-Y Venom
CN Assets: 1x Type 99 MBT
Zone 4
Recommended US Squad: Assault, Engineer, Engineer, Recon, Support
Recommended CN Squad: Assault, Engineer, Engineer, Recon, Support
Zone 4 will have the US attackers invading the Arcade region of the map and destroying the MCOM stations.
This region is fairly easy to patrol for the CN thanks to the tank. Additionally, you won’t face too much trouble while flying your scout helicopter if you’re smart about it, since there is no real air-to-ground vehicle available, and the Venom isn’t a huge threat.
Use the scout chopper to spot enemies from above, allowing your snipers, tank, and infantry units to prepare themselves.
The scout chopper here is the key to success, but if you lose it, there are possibilities for the US. Use the stationary weapons west of the arcade for medium-long ranged engagement against infantry.
The attackers should utilize their Venom chopper to drop off troops near the MCOM station locations. MCOM station B is almost impossible to get to without clearing the roof, so the escort chopper is a very important part of the attack in Zone 4.
US Assets: 4x Quad Bike, 1x M1 Abrams 1x UH1-Y Venom
CN Assets: 1x Type 99 MBT, 1x Z-11W
Zone 5
Recommended US Squad: Assault, Engineer, Engineer, Recon, Support
Recommended CN Squad: Assault, Engineer, Engineer, Recon, Support
The final Zone will push the CN team all the way back to the Food-court area; the westernmost part of the entire map. The US will start off directly north of the M-COM stations, and will be at an advantage with plenty of firepower from the M1 Abrams and the Venom.
Utilize the openness of the western road for your Abrams tank, pushing it to attack and harass the enemy. Meanwhile, your chopper should make a few runs and drop off troops near the CN base, allowing for a surprise flank that could truly crush the enemy.
The MCOM station A is located at the southwestern side of the Foodcourt. The MCOM station B is located to the west with very little cover.
US Assets: 4x Quad Bike, 1x M1 Abrams 1x UH1-Y Venom
CN Assets: 1x Type 99 MBT, 1x Z-11W
Obliteration Tips and Strategy
Recommended Squad: Assault Engineer, Engineer, Support, Recon
The new intense and fast-paced mode will have you running around the entire map after the bomb, as you attempt to take out three target locations in the enemy’s zone while simultaneously defending yours.
Land vehicles will play a dominant role in the progression and success of your team, with the tanks and IFV being the central part of the attack. The bomb itself is located north of the main skyscraper, in front of the building’s statue.
Acquire the bomb, and escort the carrier by giving him aerial defense while he rides in your team’s IFV. Take him, along with the tank to the various targets to take them out.
US Vehicles: 1x MRAP, 1x LAV-25, 1x M1 Abrams, 1x PWC, 1x UH1Y-Venom, 1x AH-1Z Viper
CN Vehicles: 1x ZFB-05, 1x ZBD-09, 1x Type 99 MBT, 1x PWC, 1x Z-10W, 1x Z-9 Haitun
In Field: 8x Quad Bike
Defuse Tips and Strategy
Recommended Squad: Assault, Assault, Assault, Support, Recon
This mode greatly resembles the classic gameplay of Counterstrike and the Search & Destroy mode in Call of Duty. The CN team will be defending the locations of two Laptops, while the US team attempts to attack and sabotage them. No vehicles are in this map.
The map itself is restricted around the Arcade region. Laptop A is located in the south restaurant, while Laptop B is in the car dealership inside the Arcade. The shutters here can be open/closed through a nearby interaction.
The CN spawn in the northern part of the map, while the US start at the north. The attacking team has the tactical advantage here, but the defenders can quickly surprise them with flanking.
Make sure to lower the shutters in order to make the attackers take extra time to acquire Laptop B region. Take them out while they are busy finding an alternate route.
Domination Tips and Strategy
Recommended Squad: Assault, Assault, Engineer, Support Recon
Domination is a miniaturized version of Conquest mode, with three control points in a restricted region of the map, and barely any vehicles. The map for Domination is the same as Defuse.
Control point A is located in the southern building, while C is in the arcade, and B is on the easternmost part of the map at the wreckage.
B can be easily defended by going to the roof of the Arcade building, provided you have it. Thus, the Arcade building itself is the most important part of Domination in this map.
Squad Deathmatch/Team Deathmatch Tips and Strategy
Recommended Squad (Squad): Assault, Engineer, Engineer, Support, Recon
Recommended Squad (Team): Assault, Assault, Support, Recon, Recon
Deathmatch has been around as long as first-person shooter multiplayer itself, and BF4 contains it too. For the Siege of Shanghai, Deathmatch is primarily restricted to the regions around the Arcade, just like Defuse and Domination.
The roof of Arcade is an excellent vantage point for Recon players to go to and take fools that would be out in the open. Make sure that your allies are defending the entrances and insides of the Arcade so they don’t get to the rooftop.
Holding up the Arcade is a key part for both SDM and TDM, though the latter will have players relatively more scattered. Apart from that, all we can say is that you should do what you do best in a Deathmatch: kill more and die less!
Don’t forget to share your own tips with us by commenting below!