In this Xbox Series X|S Parental Control Settings guide, we’ll tell you all of the parental control settings that Microsoft has to offer in Xbox Series X|S.
Xbox Series X|S Parental Control Settings
A new era of home gaming consoles has given rise to the need for new and better parental controls.
With the diversity of available parental control settings come the complexity of implementing them.
The first step for setting limitations for your seven-year old’s is knowing about all the parental control settings that Microsoft has to offer in their latest generation of home gaming consoles.
Microsoft allows you to set screen time limits, restrict the content that your child is watching, oversee their purchases, look after their privacy, and finally place chat filters.
All of this is only possible if you have a Microsoft account, and signing in to your Microsoft account is the first thing you’ll be doing after getting your hands on Xbox Series X|S
Signing in to Your Microsoft Account
Sign in using your Microsoft account and then set up your Xbox account.
This account will then be used to create accounts for your kids and then monitor them.
The Xbox account will require your email and your phone number. You can add all the payment details later on.
For now, you’re all set for creating your kids’ accounts.
This is done from the Xbox Home menu through the Add New option on the top left of the screen.
Each child account will require an email, so make sure you have some extra email accounts for your kids as well.
Now, let’s make sure that your child does not spend all day in front of the screen.
Setting Screen Time Limits
Your Microsoft account does not only facilitate you with adding parental control settings on Xbox, but also on a Windows PC.
Screen Time limitations can only be set when you log into your Microsoft Account from a browser on any device.
Once you’re logged in, head to the family page.
There, you’ll be able to see all of your kids’ accounts. If you don’t see the account you’re looking for. You can add a new account as well.
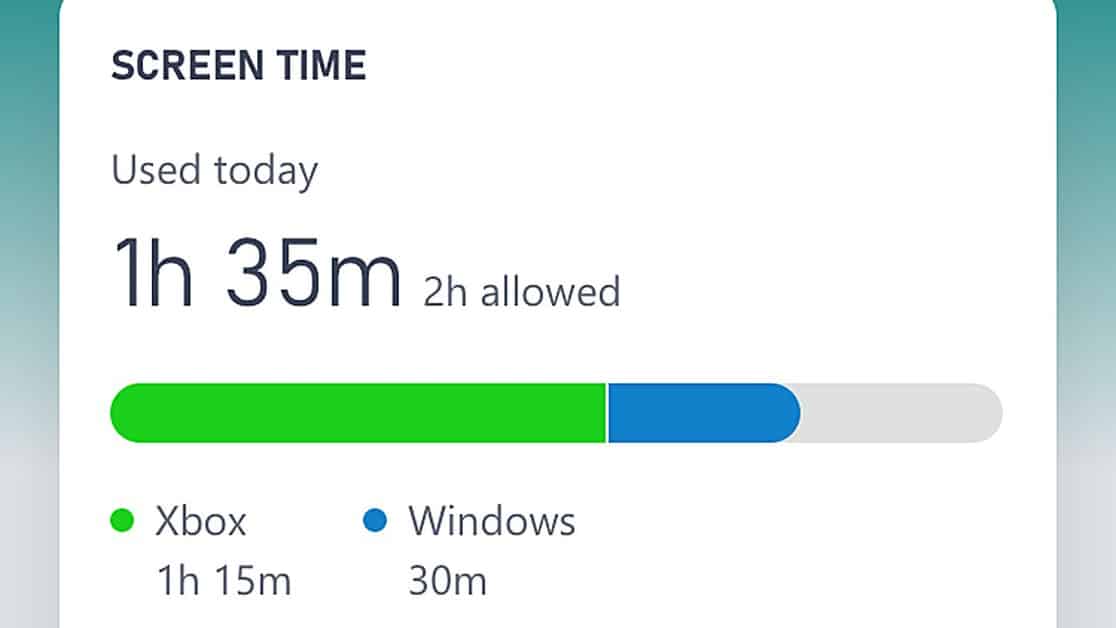
Head to the screen time settings, and you’re free to set the time of day during which you want your child to be present in front of the screen.
You can either select a single time for both Windows PC and Xbox using the One Screen Time Schedule option, or you can set different times for each.
Once the time limit has been imposed, it’s time to let the kids in on it. This is done from the Xbox Notifications settings by turning on System notifications.
Every time the screen time is about to run out, your kids will be notified so they can plan accordingly.
You can also set up a weekly report that will tell you all about the screen time of your kid.
Setting the Privacy
In this section, we’ll be covering all the settings regarding whom your kid can play and chat with.
These settings can be implemented through both Xbox and browser.
Through Xbox
Several Xbox titles allow cross-play between consoles.
If you want your kid to be playing online multiplayer games with only other Xbox players, you can head over to Family settings from System Settings and select a profile.
Next, look for customizing communication and multiplayer option in the privacy settings.
If the “You can play with people outside of Xbox Live” is unblocked that means cross-play is allowed. If it is blocked, then the cross-play is disabled.
Moving on to the chatting restrictions.
You can allow your kid to chat with people you’re comfortable with using the same menu.
The setting is so customizable, you can also pick specific people your kid can talk to within a specific game.
Look for an option named “You can communicate outside of Xbox Live with voice & text”.
You can also place filters for the chat if you don’t want any offensive words appearing in front of your child.
There are four filters available, friendly, medium, mature, and unfiltered.
With friendly being the pickiest filter, and unfiltered allowing all kinds of messages to show up.
Through Browser
Sign in to your Xbox account from a browser and select the profile you want to edit. Next, open the Privacy and Online Settings.
You can select between three privacy settings: adults, teens, and children.
If you’re not satisfied with these pre-existing settings, you can also add a custom setting.
It’s better to set the settings to “Friends Only”.
However, whatever setting you decide to stick with, have your kid log out and log back into the account for the setting to be applied.
Adding Content Restrictions
There has to be a restriction on what kind of content your child is viewing. Be it a game, a video, or social media.
These settings can be applied from Xbox or a browser.
Through Xbox
Head to the Family account settings again and select an account that you want to edit.
You can either select an age limit for your kid and let the Xbox define the restrictions, or you can customize the restriction according to your own needs.
You’ll find all of these options under the “Access to content” tab. But your child can still discover mature content over the internet.
For that, Microsoft has provided you with web filtering.
There is also an always allowed list for those apps and games which are restricted, but you still want your kid to access them.
Through Browser
Log in to your Microsoft account from the browser and select a profile that you want to edit. Next, open the Content Restrictions.
Setting an age limit, blocking unwanted content and websites, all of these actions are performed under the Apps, games, and media tab.
Managing Purchases
This final parental control setting prevents your kid from overspending on useless stuff over the Xbox Store.
Through Xbox
If you check the Ask a parent box, the buy and download settings window. The kid cannot purchase anything without an adult’s permission.
This option is found in Xbox Privacy settings.
Using Browser
Select the account on which you want to impose restrictions and then open Content Restrictions. Turn on the adult approval for buying things.