There are many different structures in Ark Extinction that serve a lot of purposes. The most important function of the bases is to store different creatures as well as charge different items. You can also craft different items in them. You can craft the structures in your inventory if you have all the required items for it.
Structures are one of the new content that comes along with the Extinction DLC which can be used by you in a plethora of different ways. They have tons of different benefits of structures.
We have made a detailed guide on all the structures in Ark Extinction that will take you through them all one by one so that you can understand how to effectively use them.
ARK Extinction Structures
The new structures have a lot of varied uses as you would expect them to. Many of them are not that useful and often are only used as a cosmetic display for one of the things that you did in the game.
However, some of them are especially useful and add mechanics to the game which could end up completely changing the way that you play the game.
Let’s go ahead and take a look at all of the new structures in the game along with how to best use them. Remember that our ARK Structures Guide is a work in progress and we will continue to update it.
City Terminal
The City Terminal is a place that has a few uses but is not extremely important. Mainly, it is used for crafting various Engrams like the Scout and the Enforcer. You can also charge the batteries of Charge Batteries 10 at a time.
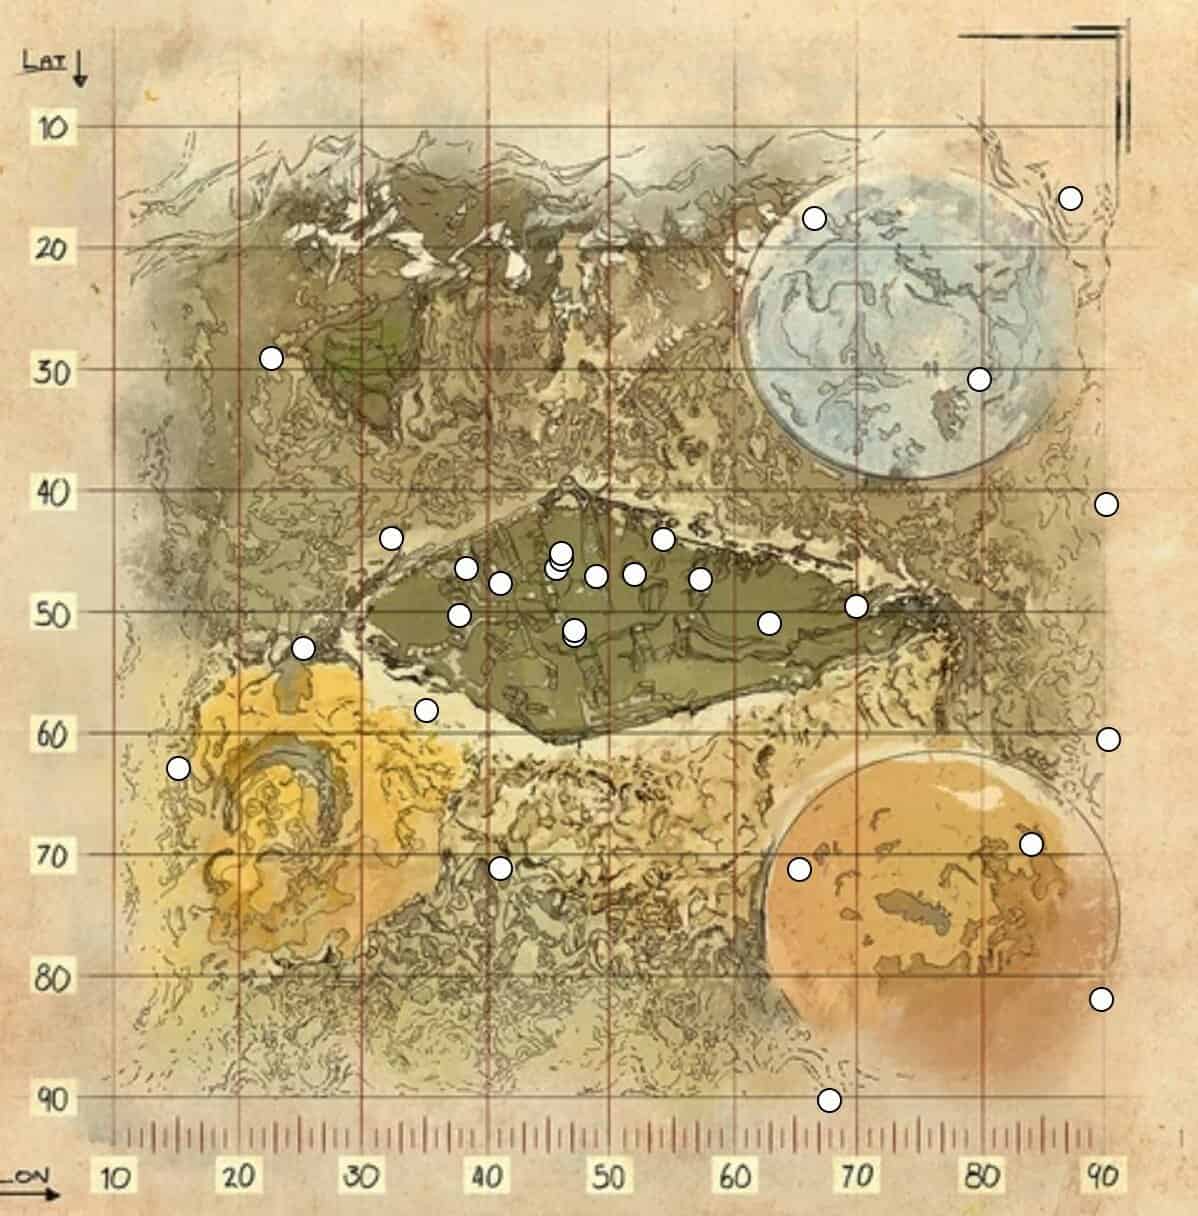
These Terminals can be found in the Sanctuary, Wasteland, Snow Dome, and Desert Dome regions of Ark Abberation. There are many of them so finding them should not be that difficult. You will probably have memorized their locations soon enough.
To learn about the exact locations of the City Terminals, you can look at the map image below:
Cryofridge
The Cryofridge is pretty much the only structure in the game which can be used to charge Cryopods. You will need any source of electricity such as a Tek Generator or wind turbine to power the Cyrofridge.
Although there are other items such as the Refrigerator which can be used to slow down the decay that occurs when the Cryopod has a creature inside it, the Cryofridge is the only item that can also restore the decay of the pod if it is kept inside it long enough.
As long as you are powering the fridge, you can store your Cryopods inside it and they will last forever. Cyrofridge will last 40 days in total without any source of electricity.
You can spawn a Cryofridge if you are in the Single Player mode or if you are in a server that allows cheats. To be able to spawn in the Cryofridge, all you need to do is to open your console and type ‘gfi cryofridge 1 1 0’. If you are on someone else’s server, you will need to type in cheats ahead of it or you will not be able to spawn it.
Remember that the Cryofridge requires electricity to run, and you will need to keep it powered to run it. Once it is powered, you know what to do. A normal generator is probably not going to work, and you are going to need a tech generator if you want to power it up.
Orbital Supply Drop
The Orbital Supply Drop comes into the game from a meteor drop. It has the potential to kill anything it falls on and destroy anything that is in its path.
When you trigger this drop, there will be a protective forcefield that will start to spawn Corrupted Creatures around it.
Whenever the forcefield is damaged, it starts to spread outwards but does not recharge. Eventually, it powers down and never respawns on the same drop again.
If it drops down to 0 health, then it is destroyed, and no one can salvage anything from it. There are waves of enemies from whom you need to defend the drop if you want to avail the contents inside.
To be able to open the drop, you need to take out at least 5 waves. Once you have done that, you can eject the items. Remember that others can get the item dropped too, so be careful of people stealing your drops.
Many Corrupted Creatures will damage the content of the Orbital Supply Drop. Remember that it is a good idea to bring in ranged weapons with you if you do not have a flying creature with you such as the Pteranodon. These creatures will protect the Orbital Supply Drop.
The drops have a fair amount of flying creatures regardless of the difficulty level and you will not be able to deal with them effectively without something that can deal damage in the air.
Healing items are also very important when dealing with the creatures that are a part of the supply drop.
You are almost certain to take a fair amount of damage, so it is best to have some of your team members ready with healing items along with your creatures for when you are swarmed and need to take a breather.
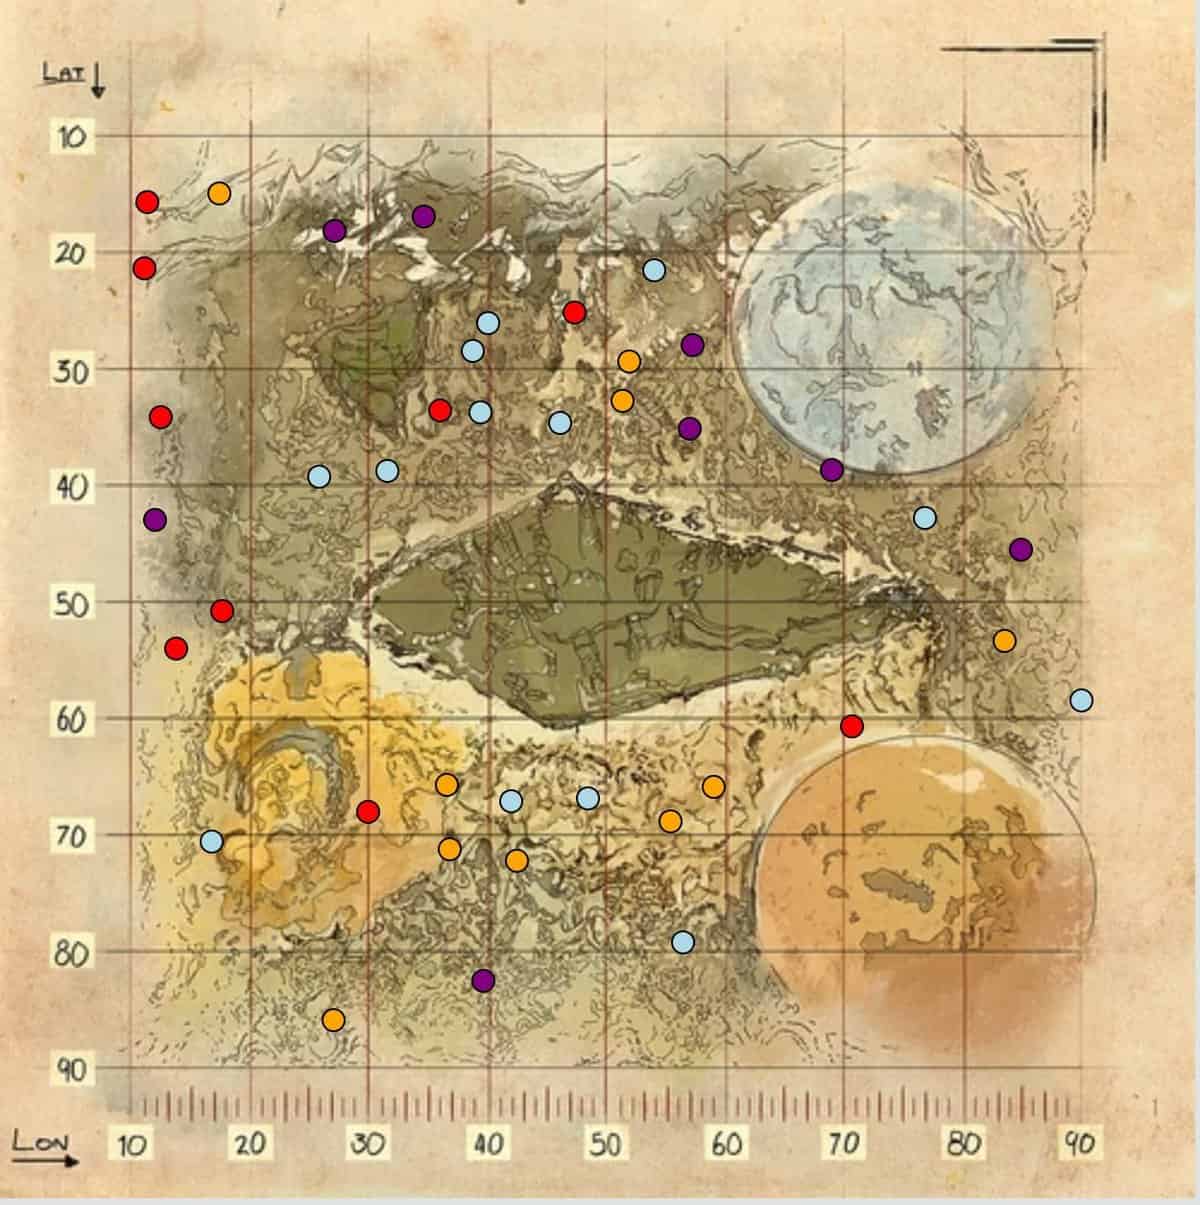
The loot that you get once you can open the Supply Drop is much better than you would otherwise, and that is expected since the drop is much harder to open and may require multiple people to be able to do it efficiently. If you want to learn about the exact location of the Orbital Supply Drops, you can look at the map image below:
Taxidermy Bases
There are a total of 3 different Taxidermy Bases which are known as Small, Medium, and Large. These bases can be used to mount the Dermis of creatures through a stuffed display to show off the creatures that you have killed or tamed. It does not seem to have any utility apart from a graphical one at this moment.
If you want to know how you can use the Taxidermy Tool to farm the skins, then go ahead and take a look at our Ark: Survival Evolved Weapons and Armour Guide. It will give you all the information required as far as the tool is concerned.
The minimum level required to be able to make a small Taxidermy base is 10. Once you have that, you can craft the Taxidermy base.
You will only be able to craft the small Taxidermy base at that level but you will be able to increase the base size as you gain levels. Let’s go ahead and take a look at each of the individual Taxidermy Bases that are a part of the game.
Small Taxidermy Base
The Small Taxidermy Base is the smallest of the bases that you can build. To be able to craft this structure in Ark Extinction, all you need is stone, thatch, and wood.
Once you have them, you can make the base right inside your survivor’s inventory so you do not need to find any other place to be able to craft the base. You can collect the dermis from the dead creatures.
Small Taxidermy Base can then put this dermis from the dead creatures to be used as the outer skin of your saddle, or costumes. The dermis does not provide any protection to the costumes, and it is just for display reasons.
Once you have all the materials, simply craft the base. When you have crafted the base, you can place it down wherever you want to. After the base is on the ground, go ahead and take a look at it.
After that, use the dermis that you had collected from a dead animal before and place it in the dermis slot of the base. Once you have done that, you will be able to see the brand new taxidermy base.
Medium Taxidermy Base
You can also increase the size of your taxidermy base if you want to show off a little bit more than the small base allows for. Medium Taxidermy Base can also put Dermis to your saddles and costumes.
The resources required to make a medium taxidermy base are more than the ones required for the small one but it is still worth it for some players to be able to display their prey for the world to see.
Remember that the bases also have the capacity for storage by default. That means that you can store some of your items inside your base.
The medium base has more capacity than the small one, so this is something extra that you can utilize these show pieces for.
Large Taxidermy Base
This is the biggest possible base structure in Ark Extinction that you can build. It is built in your inventory but the resources required are so much (50 Metal Ingot, 250 Stone, 1250 Thatch, and 1000 Wood) that it is very difficult to be able to craft it inside of your inventory.
The base becomes available to you at Level 32. You can only build the Large Taxidermy Base if you can lift heavy weight. If you cannot lift heavy weights, you can lose the materials in the inventory to not more than 300 stacks.
This base has a saddle and a costume slot which allows for the maximum amount of customization of any of the bases. Any dermis that you place is rescaled, so you do not need to worry about your animal looking small.
This base also offers the largest storage space when compared to the other 2 bases.