Football Manager 2019 is a fun game but with the boring graphics and skins in the game, the game doesn’t really give the classic FM vibe and that is why our Graphics Installation Guide will help you install better graphics for the game.
Football Manager 2019 Graphics Installation
Football Manager 2019 is a good game, sure. It has all the makings of a good manager game. However, the graphics in the game are a bit bland.
Our Graphics Installation Guide will cover how to install several types of graphics, including Logos, Kits, Face Packs, Match Balls, Backgrounds, and Pitch Textures.
Do note that this guide applies only to the Steam (PC) version of the game. Most of the steps are going to be universal across the multiple OSs the game supports but if you run into a problem, please let us know! Without further ado, let us begin:
Before you Begin
Now before you begin, you must have installed the following programs:
If you’re running Windows: 7-Zip or WinRar
If you’re running Linux: 7z or the stock zip extractor based on your Linux flavor. If you’re running MacOS: Unarchiver
It is advised that you read the instructions on respective download pages.
Installing Graphics
After you have downloaded your desired zip file, you might need to copy these files over to the User Data location of your game.
If you’re just starting the game, make sure that you have run the game at least one time before continuing. The location of User Data will be different for each OS:
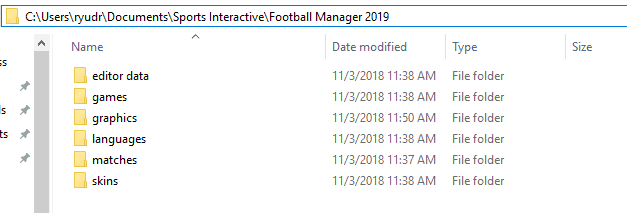
- For Windows: C:\Users\username\Documents\Sports Interactive\Football Manager 2019
- For MacOS (X): /Users/username/Documents/Sports Interactive/Football Manager 2019
- For Linux: /home/documents/Sports Interactive/Football Manager 2019
Replace username by your UserName. For me, it’s “ryudr”.
After you open the folder, you will find a folder named graphics. If you cannot find a folder named ‘graphics’, make a new folder in this location and name it ‘graphics’.
Open it, and copy the contents of the ZIP file you downloaded, inside.
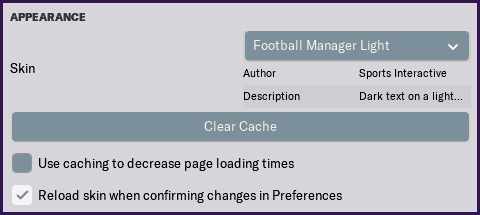
Now boot up the game, and head into Preferences, Interface and untick ‘Use Caching to decrease page loading times’. Similarly, tick ‘Reload Skin when confirming changes in Preferences’.

Installing Match Ball, Pitch Textures
Match Balls and Pitch Textures can also be edited. Download the respective texture packs and extract them in the following locations:
3D Match Ball
Documents\Sports Interactive\Football Manager 2019\mesh\ball\
Pitch Textures
Documents\Sports Interactive\Football Manager 2019\textures\pitch\
2D Match Ball
Documents\Sports Interactive\Football Manager 2019\textures\match_icons\
2D Winter Match Ball
Documents\Sports Interactive\Football Manager 2019\textures\match_icons\winter\
Boot up/restart your game, head into Preferences, Interface and untick ‘Use Caching to Decrease Page Loading Times’. Similarly, tick ‘Reload Skin when Confirming Changes in Preferences’. And you’re good to go!
Installing Club Logos
You can also replace all club’s logos by downloading the logo zip file and copying it over to the following location:
- For Windows: C:\Users\username\Documents\Sports Interactive\Football Manager 2019\graphics\
- For MacOS (X): /Users/username/Documents/Sports Interactive/Football Manager 2019/graphics/
- For Linux: /home/documents/Sports Interactive/Football Manager 2019/graphics/
As mentioned before, if you don’t see a ‘graphics’ folder, create one. Now boot up the game, and head into Preferences, Interface and untick ‘Use Caching to Decrease Page Loading Times’.
Similarly, tick ‘Reload Skin when Confirming Changes in Preferences’.
Installing Player Faces
The faces in the game look a tad weird, sure. Most of the faces are missing, too, because of some legal issues. That is exactly why you should consider replacing them for real Player faces or even custom faces.
Download the player faces and place them in the following location:
- For Windows: C:\Users\username\Documents\Sports Interactive\Football Manager 2019\graphics\
- For MacOS (X): /Users/username/Documents/Sports Interactive/Football Manager 2019/graphics/
- For Linux: /home/documents/Sports Interactive/Football Manager 2019/graphics/
If you don’t see a ‘graphics’ folder, create one. Boot up the game, and head into Preferences, Interface and untick ‘Use Caching to Decrease Page Loading Times’. Similarly, tick ‘Reload Skin when Confirming Changes in Preferences’.
Installing Skins
Skins will only work on the version of the game they are designed for, so please note the game version on the respective page’s download portal or in the ReadMe file. Unpack the zip file and move the unpacked files to the following location:
- For Windows: C:\Users\username\Documents\Sports Interactive\Football Manager 2019\skins\
- For MacOS (X): /Users/username/Documents/Sports Interactive/Football Manager 2019/skins/
- For Linux: /home/documents/Sports Interactive/Football Manager 2019/skins/
If you don’t see a ‘Skins’ folder, you can always make it. Additionally, if the skins you download are in the .fmf format, you can just copy them inside the skins folder. If they aren’t, however, you will need to put the skin files in their respective locations.
Boot up the game, and head into Preferences, Interface and untick ‘Use Caching to Decrease Page Loading Times’. Similarly, tick ‘Reload Skin when Confirming Changes in Preferences’.
Thanks, MichaelTMurrayUK.