
The Final Reich is one of the starting maps available to players in Call of Duty: WW2 Zombies. The map fosters a whole bunch of Easter Eggs that will reveal what to expect from the coming maps in the game.
The old Nazi German aura of the map holds two Easter Eggs for players to uncover, casual and hardcore. Completing both of them unlocks a new playable character known as Klaus as well as a few achievements/trophies on the way.
In this guide, we’ll include everything Final Reich has to offer including how to Pack-A-Punch, craft the wonder weapon, and solve the Easter Eggs in WW2 zombies.
Before we begin with our Easter Egg journey, we’ll go over everything that you need to build and acquire so that you’re fully prepared to battle what awaits you at the end.
Unlock the Pack-a-Punch machine
The first and foremost thing that players must do in every map of zombies is to unlock the Pack-A-Punch machine. The PaP machine in Final Reich is caged inside the sewers and will require players to do a bit of legwork.
The first step is to turn on the three pressure valves found in the courtyard area of the map. The valves will be placed on the western section of the armor station, on the right corner of the Bunker Door and the last will be by the Riverside.
Once you turn all of the pressure valves on, head back to the grenade turret in the center of the courtyard and explode the wooden floor covering the hole. Do be careful of the pests rushing right at you. Kill all of the zombies and jump down inside the hole to switch on the generator.
Return to the courtyard and purchase the Bunker door for 1,250 jolts and then buy the Salt Mine door for 1,500 jolts. To buy the Salt Mine door you first need to redirect the power to the Command Room.
To do this head over to the Morgue and the Laboratory to find two power boxes that need to be turned on. Turn them on in under 60 seconds for the Command Room to receive the power and unlock the Salt Mine door.
Purchase the door for 1,500 jolts and go across the loft to find the Sewers with the Pack-A-Punch machine placed in the cage. To unlock it, press the huge red button placed in front of the cage and ride down three sewer pipes to lift the cage permanently.
The sewer pipes are placed next to the Waffle 28 wall buy, right of the M3 Wallbuy and near the trap in the laboratory. Pay 250 Jolts to slide down the sewers and before ejecting press the red button that appears in front of you to unlock the PaP machine in WW2 zombies.
Build the Tesla Gun
The second thing you need to do before starting any of the two easter eggs of Final Reich is craft the Tesla Gun.
After unlocking the PaP machine, head on over to the Emperor’s Chamber and interact with the Hilt to begin the process of building the wonder weapon.
Kill zombies around the Hilt until the whole room becomes an orange mist. Once that happens, head over to the triangular structure placed at the entrance of the Salt Mine door and interact with the lever placed on the right.
Once that’s done travel to the Command Room and press the red button placed on the main terminal. As you do that, a transfer device will spawn and start floating.
Simply follow the device and stay inside the red circle it creates. You’ll be required to kill zombies in that circle until the device does a small animation and delivers you a part.
Repeat the process once again until you collect both of the parts for the Tesla Gun. When the parts are collected, head over to the Tesla Gun workbench and craft the weapon.
How to complete the Casual Final Reich Easter Egg in WW2 Zombies
As said before there are two Easter Eggs in the Final Reich map. Once you’ve created both of the items mentioned above (Pap and Tesla), it is safe for you to begin with the casual Easter Egg.
Step 1 – Activate the Right hand of God
After crafting the Tesla Gun, head back to the Emperor’s Chamber and interact with the stone head placed on the right side of the Hilt. Do that and travel to the power grid placed behind the Tesla Gun workbench. Interact with the power grid to reveal a few numbers with their respective colors.
What you need to do is memorize or write down the numbers associated with the colors as your next step would be to find power stations around the map and insert the right codes.
Do keep in mind that there will be a certain time limit for you to do this step. We’ve listed the locations of those power stations below:
- Power Station 1: In the Command Room, next to the Power Grid
- Power Station 2: Inside the sewers, next to the entrance of the Mortuary
- Power Station 3: Inside the sewers next to the exit for the Riverside
- Power Station 4: Outside of the bar
Step 2 – Protect the levers
For the next step in the casual Easter Egg for Final Reich, you’ll be required to travel to the Tower and interact with the lever placed in the center. Your job is to protect the lever from zombies. So, use your Pack-A-Punched guns and Tesla Gun to easily get done with this task.
Once the first lever is protected, you’ll be tasked to protect two levers on the frontal pillars this time. Simply rinse and repeat the process to progress further.
Step 3 – Summon the Zeppelin
After protecting the levers, travel back to the Emperor’s Chamber and interact with the stone hand placed on the left side of the Hilt to summon the Zeppelin. Head back to the courtyard and aim at the Zeppelin. As soon as the lights on the ship turn red, shoot at them to retrieve a soul box.
You’ll be required to charge the soul box until it explodes and gives you a battery which you then have to place in one of the hands near the Hilt. Repeat this process three times to get access to the next step.
Step 4 – Find the paintings
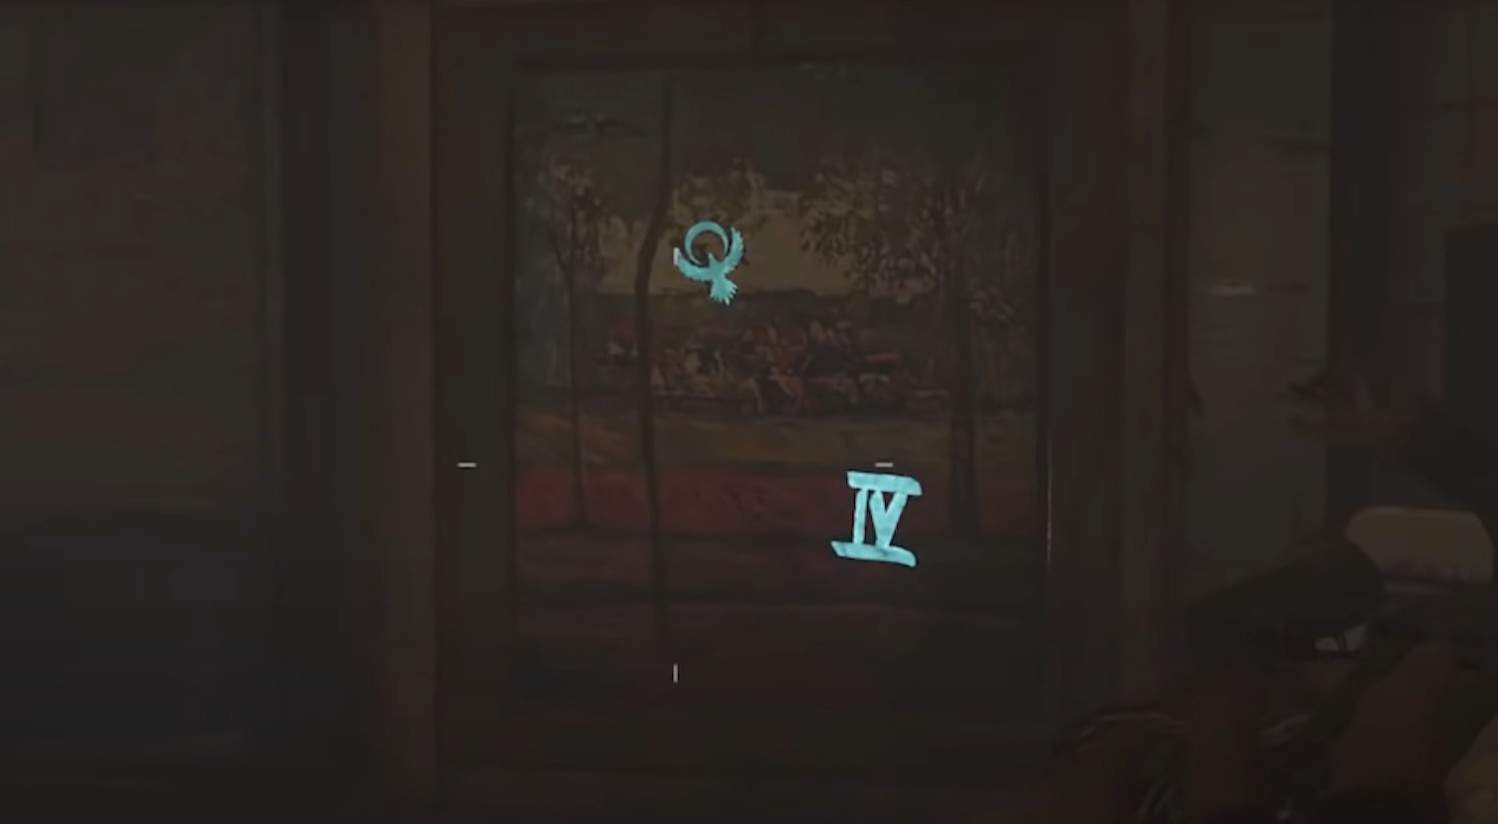
This step requires players to find four paintings around the map and scan them using the Brenner head. This reveals a secret code with a flying bird facing upwards or downwards.
Remember the code as it’ll be used to activate the Barbarossa’s Sword and begin the final boss fight with Panzemorder.
The locations of the paintings are listed below:
- Painting 1: Near the board placed inside the Mortuary
- Painting 2: Inside the bar
- Painting 3: next to the Lee Enfield Wallbuy in the main courtyard
- Painting 4: Left side of the PaP machine the sewers
After finding out all of the four codes, head over to the Emperor’s Chamber and interact with the four swords with four symbols of the birds. Insert the right number associated with the position of the bird to raise the sword and pick it up.
As soon as you pick up the sword, a red orb will spawn over the middle statue, simply take out your Tesla Gun and Shoot at it to begin an animation with the boss charging right at you.
Step 5 – Defeat the Panzemorder
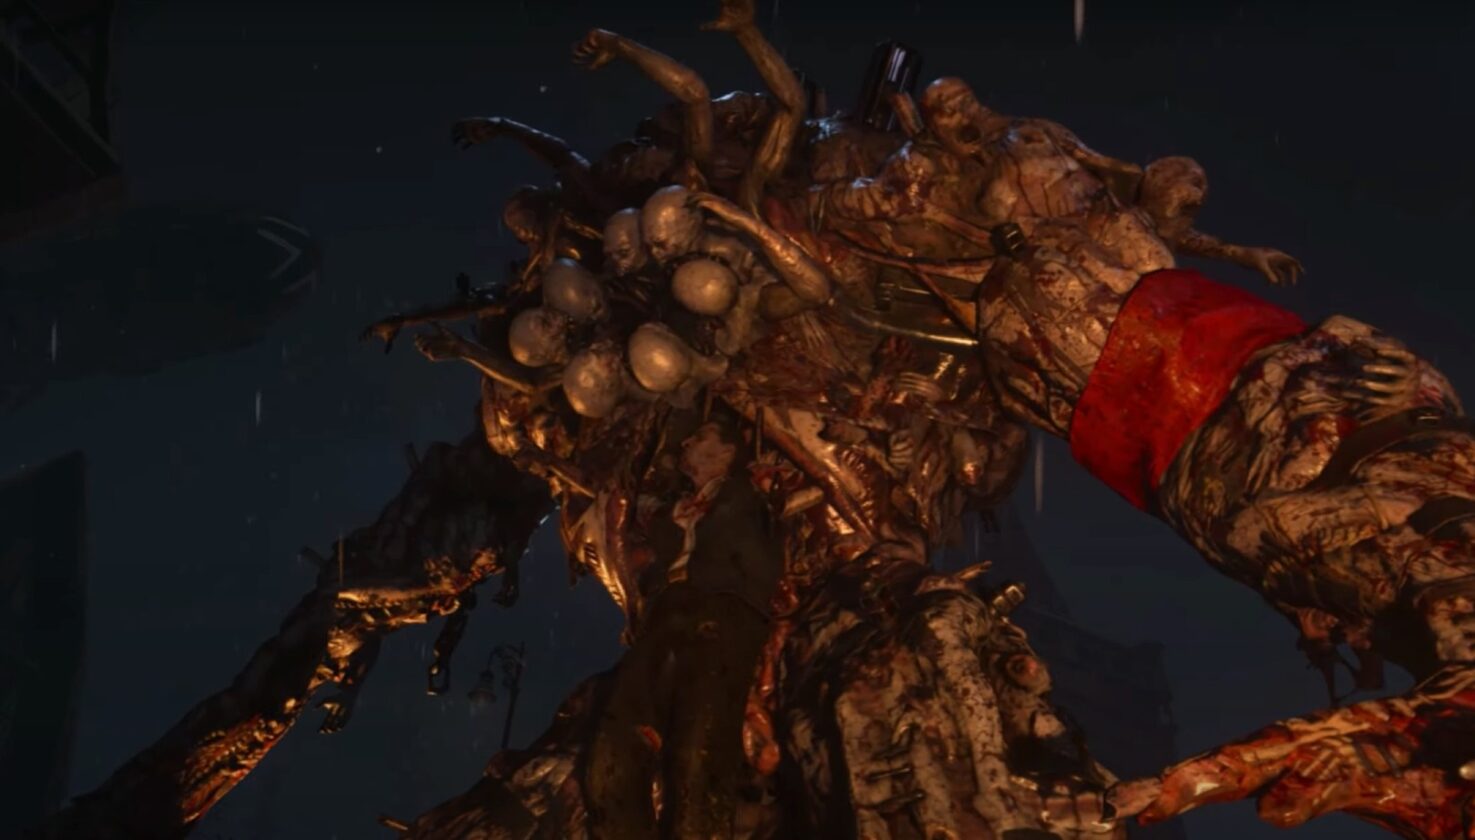
When it comes to defeating the final boss of Final Reich for the casual Easter Egg completion, your guns won’t do much damage to the demonic creature except for stunning him for a few seconds. What you need to do is ignore the zombie and shoot at the red lights of the Zeppelin to drop a soul box.
Repeat the process of Step 4 until the soul box gives you a battery. Equip the battery and place it on the boss’s legs when he’s stunned to do the utmost damage. This process will be repeated a few times until the boss is annihilated and the Easter Egg is marked complete.
Once you’re done with the casual Easter Egg, the only thing left to do is begin the hardcore Easter Egg and save Klaus from the capture of the Panzemorder.
How to complete the Hardcore Final Reich Easter Egg in WW2 Zombies
The hardcore Easter Egg will require players to attempt the first four steps of casual Easter Egg and begin their journey on a different path to save Klaus.
Step 1 – Upgrade the Tesla Gun
Upgrading the Tesla Gun is the key element that will help players progress through the hardcore Easter Egg in WW2 zombies.
There are four variants of the Tesla Gun which are Hurricane, Bloodthirst, Midnight, and Reaper and players will be required to get all of them.
Hurricane Upgrade
To get the Hurricane Upgrade, the player must lure a bomber zombie to the staircase of the Laboratory and explode the small compartment containing a battery pack. Acquire the battery pack and place it in the battery holder inside the electric trap of the Laboratory.
Charge the battery by killing two Berfer zombies with the electric trap and repeat the process twice. Once the battery is charged, take it to the generator where you received the parts for the Tesla Gun and insert the battery in the right vent of the machine.
A lockdown process will begin where you’ll have to kill all of the zombies coming towards you. When the process completes, the generator will give you a part that you can insert inside the Tesla Gun workbench to install the Hurricane upgrade.
Bloodthirst Upgrade
For the Bloodthirst upgrade to the wonder weapon, players must head on over to the Riverside and shoot the flickering street lamp. This will begin a sequence where the next street lamp will also start to flicker but with a green current. You’ll be required to shoot them one by one until you reach the Morgue.
Once you shoot the last flickering lamp, a red battery will fall, simply pick it up and insert it in the battery holder. What you’ll be required to do now is wait for a pest round to start. As it starts, activate the Spike Trap in the Morgue and kill a few pests.
The next set of steps will be the same as before, take the battery to the generator, begin the lockdown process, and insert the newly created part inside the Tesla Gun workbench for the Bloodthirst upgrade.
Midnight Upgrade
Head over to the Riverside and equip the Brenner Head. What you’ll be required to do is aim at the statue on the corner wall and shine the head at it. The statue’s head will fall on the other side of the floor. Simply approach the head and shoot it with the Tesla Gun. This will reveal a battery.
Insert the battery in the holder nearby and kill zombies using the Mine Trap near the holder to charge the battery. Once the battery charges, rinse and repeat the steps as the previous upgrades to acquire the Midnight upgrade for the Tesla Gun in Final Reich.
Reaper Upgrade
For the last upgrade to the Tesla Gun, head inside the Sewers and lure a Brawler towards the lockers. Make sure that the Brawler hits the locker for the battery to reveal.
Once the battery is revealed, kill the Brawler and insert the battery into the holder inside the sewers. For the next step, you’ll be required to kill 2 bomber zombies simultaneously using the Saw Traps to charge the battery.
Now all that’s left is to head back over to the generator and begin the lockdown process to apply the Reaper upgrade to the Tesla Gun.
Step 2 – Collect the Spin Tops
The next step for the hardcore Easter Egg in Final Reich is to find three spin tops placed around the buildings of the maps. These spin tops are easily spottable due to their vibrant colors and they’re usually found:
- Near the quick revive
- Under the window of the Pub
- Behind the upper window of the Pub
- Above the Bunker Door
- Above the huge building of the Riverside
Once the spin tops are found, head over to the toy counter in the courtyard and place the spin tops in the three holes.
Step 3 – Acquire the Record
Inside the drawer of the toy counter, there will be a record that you’ll have to unlock by finding three enigma machines scattered in the zombie spawn areas. These machines are codices and each is associated with the color of the spin tops.
After you’ve spotted an enigma machine, zoom in using the scope of a sniper rifle that’ll reveal a certain number. The number will be between 1 and 12. The spin tops will act as analog clocks and you’ll have to set the time according to the enigma machine with the represented color.
Do all three of them correctly and you’ll have unlocked the drawer with the record. Acquire the record to continue with the final Easter Egg.
Step 4 – Get the Red Talon Sword
After acquiring the record, head back to the Command Room and activate the two electric switches that provide power to the Salt Mine door. In doing so, you’ll find that another panel becomes available to interact with right next to the door of the Emperor’s Chamber.
Interact with the panel to make two coils appear on the left. Shoot the coils with the Tesla Gun to provide power to the two safes in the Command Room. The first safe will be on the right side, at the entrance of the Laboratory.
Shine a Brenner head at the safe to activate it and reveal the codes for it. Insert the five-digit code to receive an artifact in the shape of a half-broken coin. The other half of the coin will be placed in the safe to the left of the Salt Mine door. Repeat the process until you get both parts of the artifact.
After acquiring both parts, head down to the Emperor’s Chamber and place the coin on the left side of the statue to receive the Red Talon Sword.
Step 5 – Activate the Gramophone
Travel to the Riverside area to spot a golden weather vane and press square to interact with it and make it still. The direction the weather vane is stopped at a tiny yellow circle. Find and shoot it to reveal a new set of coils by the Riverside.
If done correctly, you’ll hear an audio and the coil will appear at the Docks. Use any version of the upgraded Tesla Gun and shoot at the coils to open the doors for the Pub.
Head over to the second floor of the Pub and insert the record we found in step 3 into the record player. Now you’ll have to charge the gramophone by killing zombies around it with the Red Talon Sword.
After you get the Gramophone all charged up, it will play some jarring music, which has a faint clicking sound. What you need to do is to carefully listen out for the longest interval between the clicks. Disable the music in the settings to hear the clicking sound better.
Keep count of how many clicks there are between each of the smaller intervals. There are four sequences, each of which can have from 1 to 5 clicks
Step 6 – Activate the Left Hand of God
After you’ve worked out the four numbers, head back to the Emperor’s Chamber and insert the codes in the Left Hand of God where you previously entered the codes of the paintings for the casual Easter Egg.
Enter the numbers and move in a clockwise rotation. If done correctly, the chandelier above you will light up. What you need to do is shoot the chandelier with an upgraded Tesla Gun four times to form a blue orb on the Hilt.
Retrieve the sword from the Hilt and shoot at the blue orb to begin the Final Easter Egg of the Final Reich.
Step 7 – Panzemorder Boss Fight
The boss battle with the Panzemorder will be a slightly modified fight. This time the Zeppelin will only light up one light and you’ll have to be quick to retrieve the soul box.
Once the soul box arrives, a plethora of Brenner zombies will spawn, try to keep a safe distance and take your time to charge the soul box to acquire the battery.
The rest of the fight will play out the same. Defeat the boss and you’ll receive a cut scene as well as unlock the playable character Klaus in WW2 zombies.