Resident Evil 7 Repair Kit Locations Guide to help you find all the Repair Kits in the game that can fix your broken weapons.
There are not a whole lot of weapons in Resident Evil 7 Biohazard, to begin with. Moreover, a couple of weapons you find are broken and require a Repair Kit to be rendered useful.
Although Repair Kits are scarce, they are not too terribly difficult to find. Therefore, you should try and find all of them and expand your arsenal.
For more help on Resident Evil 7 Biohazard, read out our Keys Locations Guide, VHS Tapes Locations Guide, and Endings Locations Guide.
Resident Evil 7 Repair Kit Locations Guide
In our Resident Evil 7 Repair Kit Locations Guide, we have detailed everything you need to know about finding all the Repair Kits in the game.
Fix the Broken Weapon
In order to fix a broken weapon, you need to place the broken weapon and a Repair Kit in your inventory. Once done, simply combine the two items and continue the process to fix the weapon.
There are only two Repair Kits and two broken weapons that we are aware of. The broken weapons include the M21 Shotgun and the M19 Handgun.
Resident Evil 7 Repair Kits Locations
Repair Kit #1
The first one is located inside the third large house which requires two keycards.
To get the red keycard, you need to head over to the master bedroom on the second floor after acquiring the Snake Key. Once there, set the alarm clock to show 10:15 in order to open up a new passage. Head inside the passage leading to the workshop and find the red keycard on the corpse.
The blue keycard is located inside Jacob’s room after you get the Snake Key. Once inside, interact with the table lamp to lower the ravel and head up. Climb up the open the dollhouse to find the blue keycard.
The next thing that you need to find is the Treasure Photo. To find it, head to the Main House and inside the Storage Room on the second floor. Once inside, check the stool on the left-hand side to find the Treasure Photo.
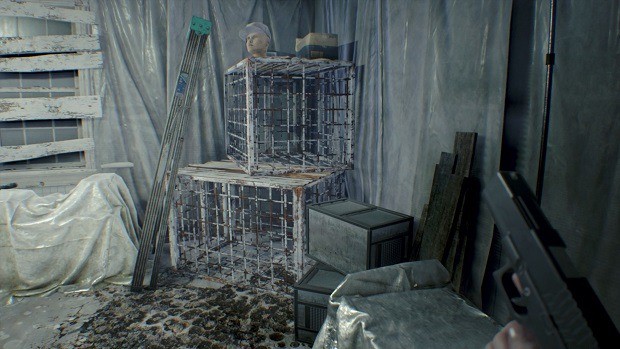
With everything at your disposal, head to the Testing Area and open it up using the keycards. From there, interact with the mannequin head inside the fourth room to find the Repair Kit.
Repair Kit #2
To find the second Repair Kit, you need to head towards the Main House from the Trailer. Do not go up the steps and look for a metal cover between the stairs. This area should lead you to a tunnel which houses another Repair Kit at the end.
This is all we have on our Resident Evil 7 Repair Kit Locations Guide. If there is anything else you would like to add, let us know in the comments section below!