It’s like water under the bridge, playing GTA 5 and all. Well, only if the water is filled with blood, prostitution, insanity, and lots of raw fun. That’s what gives the game its charm (what a strange irony).
Grand Theft Auto gives players lots of options to explore, and there are plenty of fun activities to indulge in. Whether it’s traveling, playing golf, or just getting involved in completely useless bonus activities, GTA 5 never fails to deliver.
For more help on GTA 5, read our Submarine Pieces, Nuclear Waste Management and Properties Buying Guide.
GTA 5 Under the Bridge Aerial Challenges
One of the addictively fun activities you can participate in is being a daredevil and flying under low bridges. For all those trophy hunters, this is the main way to earn the “Close Shave” achievement.
There are lots of bridges scattered across the game world for you to do this crazy feat. We’ll be detailing the location of all the bridges which you can fly under.
Now, you wouldn’t want to be doing this with something crazy like a jet. But then again, why wouldn’t you. After all, it’s Grand Theft Auto, and crazy & reckless are two words that define the series.
Note. Either follow video or Map/Text. Video doesn’t follow the map markers but it is recommended that you follow the video because it is easier to understand what actually you need to do. If you still can’t do it, go to the respective under the bridge location in text for additional tips.
GTA 5 Under the Bridge Locations Video
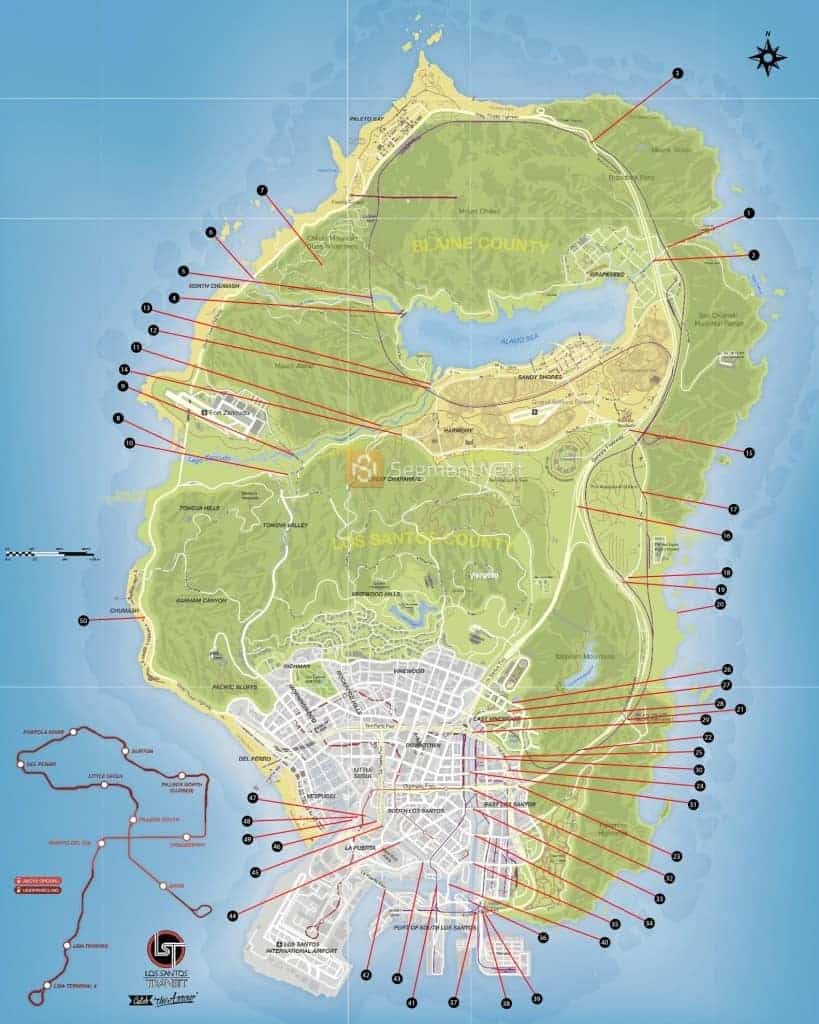
GTA 5 Under the Bridge Map Locations – Click To Open Map
GTA 5 Under the Bridge Locations
Note that bridges that are connected in series are grouped together to give a better flow to your Under the Bridge fun. Also note that the bridges are sequential, so we’ll assume you have done one bridge before you starting the next, and if there is a relation between them, we’ll state it.
Under the Bridge #1
Location. This is a rail bridge located over Grapespeed Avenue. Just fly between the bridge supports while avoiding the telephone poles located on the southern side of the road. Any small plane or chopper can easily fit through here.
Under the Bridge #2
Location. This one is located on Highway 1. You need to find the overpass of Highway 1 following Grapespeed Avenue. The overpass is long, so you will need a stable, slow aircraft to get through it. Make sure to avoid the bridge columns.
Under the Bridge #3
Location. The third bridge is located in the northern areas of Highway 1. Follow Highway 1 to the north till you come across the rail-bridge. Pass under it on either side. Make sure you have a stable aircraft for this one.
Under the Bridge #4
Location. Bridge 4, 5, and 6 are all located on the western river that extends from the Alamo Sea. The first of the three is hard to miss, as it is right on the western parameter of Alamo Sea where it narrows to a stream. On the map it is displayed by a noticeable bridge symbol. Use a small aircraft for this one.
Under the Bridge #5
Location. Continue flying west after bridge 4, following the stream/river. This bridge has a huge gap that even large planes can fit through.
Under the Bridge #6
Location. Bridge 6 is again located after bridge 5, right where the river from the Alamo Sea extends to the Pacific Ocean. Follow the stream west after bridge 5 to find the double arched bridge. This bridge also has a huge gap, so have fun with any plane.
Under the Bridge #7
Location. This bridge is located in the Chiliad Mountain State Wilderness region, east of the western portion of Highway 1, near the Altruist Camp. It’s a mountain bridge located in rough terrain. This one is a toughie with faster planes, so its best performed with a helicopter.
Under the Bridge #8
Location. This is the Great Ocean Highway Bridge, located near the Pacific Ocean just south of Fort Zancudo. This bridge is actually difficult with a chopper because of its low profile, but is quite easy with a small turbo-prop aircraft.
Under the Bridge #9
Location. Bridge 9, 11, 12, and 13 are located on the southwester stream extension of the Alamo Sea. Bridge 9 is closest to the Pacific Ocean, ahead of Bridge 8 and is termed as the Fort Zancudo Approach Road Bridge. It’s a large bridge so you can have any kind of small aircraft.
Under the Bridge #10
Location. This bridge is a part of Route 66, just south of Bridge 9. It’s a large bridge, so you can fly any kind of aircraft here.
Under the Bridge #11
Location. Follow the Lago Zancudo east after Bridge 9, as it gets narrower and narrower. You should approach this wooden bridge from the west, using a light plane with good control. Make sure you pitch up immediately after passing under the bridge to prevent crashing into the hill.
Under the Bridge #12, #13
Location. This bridge is available immediately after bridge 11, provided you are flying west to east on the Lago Zancudo. Use a light-weight aircraft. Bridge 13 is closely tied with this one, available immediately afterwards.
Under the Bridge #14
Location. Bridge 14 is located on Route 68 southeast of Bridge number 9. This gap underneath the bridge is relatively narrow, so it’s best to use a chopper here.
Under the Bridge #15
Location. This is a slightly difficult bridge on the Senora Freeway, located near the southeastern portion of the Grand Sonara Desert. It’s a lowly hanging overpass, and the freeway usually has a lot of traffic, making this bridge a real challenge. Helicopters will likely struggle more than light aircrafts since you need careful handling.
Under the Bridge #16
Location. You will need to find the Interstate 13 Overpass on the Senora Freeway, located south of where bridge 15 is. It’s a tall overpass with a large gap and wide-spaced columns, so feel free to take whichever aircraft through it that you want.
Under the Bridge #17
Location. This is a railway bridge found east of Bridge 16, past the Wind Farm on the Senora Way. Approach from the north so you can also take out bridge 18 and 19. Use a light plane with good control for these bridges.
Under the Bridge #18, #19
Location. Continue flying south from bridge 17, following the Senora Way. You’ll have access to the bridge 18 and 19 in quick succession, which are located at the intersection points of the Senora Way and the Senora Freeway. Be careful of the telephone poles!
Under the Bridge #20
Location. This bridge is located near the eastern Pacific coast near the Tataviam Mounts, right on the edge. It is a land bridge with a gap that is good for lightweight aircrafts to access.
Under the Bridge #21
Location. This bridge is located in the lower eastern regions of the Palamino Freeway, just at the intersection that leads to the Tatavium Mountains. Approach this bridge from southwest to northeast. Use a light-weight aircraft.
Under the Bridge #22
Location. Go further south following the Palamino Freeway after bridge 21. This is a rail bridge over the freeway, and even though the traffic is heavy, the bridge is tall enough for most small aircrafts to pass through easily.
Under the Bridge #23
Location. Bridge 23 is right at the end of the Palamino Freeway. Fly along the El Rancho Blvd near the flood control facility. The place is relatively narrow, so use a low profile lightweight aircraft.
Under the Bridge #24
Location. Head to the Del Perro Freeway and pass under the Vespucci Blvd. Helicopters seem to work best in most inter-city bridge passes.
Under the Bridge #25
Location. Fly north of bridge 24, staying on the Del Perro Freeway, and you’ll come under another bridge. Again, helicopter is recommended.
Under the Bridge #26
Location. This is one of the tougher bridges in the game to go under. In East Vinewood, you’ll need to go under the Highway 18 Flood Control Overpass. The multiple columns make the gaps very narrow and impossible with an aircraft. Use a small lightweight helicopter for this one.
Under the Bridge #27
Location. This is exactly adjacent to the bridge 26 on the south, near Mirror Park. The columns are slightly farther apart as compared to 26, but it is still difficult and should be performed with a lightweight helicopter.
Under the Bridge #28
Location. This is a Flood Control Overpass located on Highway 17, near the southwestern part of East Vinewood. The area is slightly curved, but the gap is good enough for a chopper to fit into.
Under the Bridge #29
Location. This is again located on East Vinewood, and is on the Del Perro Freeway. Yet another Flood Control Overpass, and again, helicopter is the best choice.
Under the Bridge #30
Location. Follow south from bridge 29 onwards to get access to multiple Flood Control Overpasses. Bridge 30 is the easiest one of them as it has a very large gap that even a transport plane could fit through.
Under the Bridge #31, #32, #33, #34, #35, #36
Location. Continue heading south following the flood area. All the bridges till bridge 36 are in a line southward, and are best done with helicopters.
Under the Bridge #37
Location. Bridge 37, 38, and 39 are located close to one another. Bridge 37 is a rail bridge located near the Cypress Flats, southeast of bridge 36. Use a small helicopter for this one.
Under the Bridge #38
Location. This is also located near the Cypress Flats, and is the Buccaneer Bridge. It’s a tricky one, but nothing you can’t handle if you made it through bridge 26. Use a chopper like before.
Under the Bridge #39
Location. This is the Elysian Fields Freeway Overpass in the Cypress Flats, and probably provides the biggest gap of all the bridges in the game alongside bridge 42. Two Boeing 747s could fit under the bridge if they tried.
Under the Bridge #40, #41, #42
Location. Bridge 40, 41, and 42 are all located in a series, starting from the Signal Street Bridge, Banning, and working down the river if you move from east to west.
Bridge 40 is a very low bridge near to the water, so you will have to be extra careful with your chopper (yes, it’s best to use a chopper). Bridge 41 is very similar in structure to bridge 40, so Location. you will need to be careful with this one too. Bridge 42 has a massive gap that could fit a squadron of jet fighters through it.
Under the Bridge #43, #44, #45, #46
Location. Bridge 43 to 49 all run in series across a canal that forks northward from the river that had bridge 40-42. Bridge 43 is low laying and has a curve. Use your skills with the chopper.
Bridge 44 is tall and quite easy to maneuver, and assuming you do it after bridge 43, it will be a breeze with your chopper. Bridge 45 is similar to bridge 43 in structure, while bridge 46 is similar to bridge 44 (confused? Don’t be, just keep on following the canal and you’ll see how easy it is).
Under the Bridge #47, #48, #49
Location. These are tightly clustered bridges that are immediately available after bridge 46. Follow the canal and you’ll come across bridge 47, which is on a curve and has a low-profile. Use the same chopper you’ve been using all along.
Bridge 48 also has a slight curve, but is easier than 47. Bridge 49 is straight and low-laying, but it shouldn’t be troublesome with the chopper.
Under the Bridge #50
Location. The final bridge is an odd one; it’s a pedestrian bridge located on the western part of Highway 1 near Chumash. Since this is one a busy highway and is a pedestrian bridge, you will need to be careful. Use a light-weight airplane for this one, but watch out for the trucks.
Work-in-Progress. Map and Video to follow soon!