Grand Theft Auto V is filled to the brim with things to do and collect and Stunt Jumps s one of them and this GTA V Stunt Jumps Locations Guide will help you with finding them all. It’s time to take out those shining vehicles parked elegantly in your garage for a crazy ride as we’re presenting you all the GTA V stunt jumps that you’d be able to make.
GTA franchise has always been doing crazy stuff and without the Stunt Jumps, GTA V would not be complete, however, these GTA V stunt jumps can only be performed at a specific location and there are a lot of them in the game and we will help you step-by-step on where are the Stunt Jump locations in GTA V.
Whether it be inclines in city or the hammocks in the county; we have got it all covered. These GTA V stunt jumps locations are widespread in the world of GTA 5 and successfully undertaking all of them will unlock ‘Show Off’ achievement/trophy.
For more help on GTA 5, read our Letter Scraps, Easy Money and Spaceship Parts Locations guide.
GTA 5 Stunt Jumps Locations
Although these GTA V stunt jumps are not related to the main storyline of the game; completing them is a must in order to achieve 100% completion status which is tied to another achievement/trophy.
GTA V Stunt Jumps
And like previous GTAs, these GTA V stunt jumps are not coherent and can be performed in any order. Read on to get the location of each stunt jump and don’t forget to add any locations that you come across!
Stunt Jump #1
Preferred Vehicle: Any
Location: Vinewood Hills
From the starting position, hit the dirt road incline and keep on steering the car in order to maintain its balance. Successfully land on the ditch to complete the jump.
Stunt Jump #2
Preferred Vehicle: Any
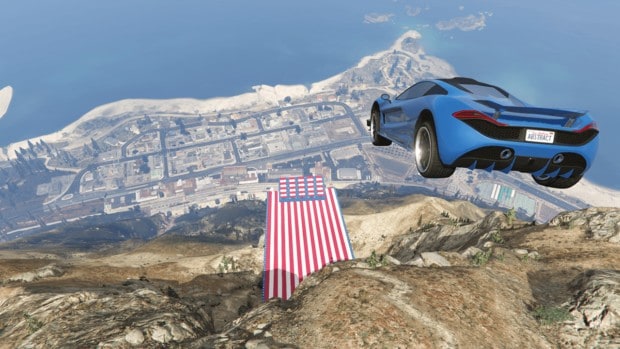
Location: Little Seoul
Maintain your speed and jump from the sand dune with metal sheet on it and try to land on the lower-ramp. You don’t require a fast car for this. Any car would get the job done!
Stunt Jump #3
Preferred Vehicle: Any
Location: North Calafia Way
You will see a flat rock which serves as a ramp for this stunt jump. It can be found in the South of Noth Calafia Way. Successfully landing on the dirt road will complete the jump.
Stunt Jump #4
Preferred Vehicle: Any
Location: Paleto Bay
You also come across this stunt jump in Exercising Demons. Take any vehicle and successfully cross the bridge to complete this jump.
Stunt Jump #5
Preferred Vehicle: Bike
Location: Raton Pass
Keep on moving along the west of Raton Pass and sped off from the rock ramp to land over the ravine on Raton Pass to complete the jump.
Stunt Jump #6
Preferred Vehicle: Bike
Location: Elgin Avenue
You must make the jump and successfully land in Power Street to complete this mission. However, you will need a lot of speed to make this jump. Cross the Elgin Avenue and go over a ramp to make the jump.
Stunt Jump #7
Preferred Vehicle: Sports car
Location: Parking Garage Rooftop
You need to make this jump from the same parking spot where Gauntlet 1 is located. You will need to pass the lower building without touching it and land near Alta Street. As there is a short distance before the jump, you will need some fast acceleration.
Stunt Jump #8
Preferred Vehicle: Del Perro Freeway
Location: Any
You need to jump from the broken railing on the West side of Alta Street and land on La Puetra. Be careful; not to hit any vehicles. Otherwise, you will fail.
Stunt Jump #9
Preferred Vehicle: Bike or sports car
Location: Equality Way
Follow the overpass near the Equality and turn left to get to the edge of the overpass. You will need to cover 180 feet of distance without hitting any vehicles to complete this jump.
Stunt Jump #10
Preferred Vehicle: Any
Location: Rockfored Plaza
You will need to start your jump from the Occupation Avenue and land on San Vitus Boulevard without hitting anything. This stunt jump is kind of difficult especially when the roads are crowded with vehicles.
Stunt Jump #11
Preferred Vehicle: Any
Location: Into Richman
We would advise you to use Franklin for this stunt jump as his driving skills and special abilities will let you avoid the traffic and the tree before the landing zone. You need to land in Picture Perfect Way to complete this jump.
Stunt Jump #12
Preferred Vehicle: Any
Location: El Gordo
We won’t advise you to opt for your favorite vehicle for this jump as it get into the ocean really easily. Grab any normal vehicle to do this. Start slow and make up your speed in the way. You must land on the island to complete this jump.
Stunt Jump #13
Preferred Vehicle: Bike
Location: Hillside
Start this jump from Senora Freeway and remember to get yourself a good runway distance. There are good chances that you may smash into a wall while landing but that doesn’t matter much if you land all the tyres first. Also note that, you will get a 2-start wanted level for making this jump.
Stunt Jump #14
Preferred Vehicle: Bike
Location: Elgin Avenue
This jump is easily done by a bike as it is hard to steer a car during this jump. Begin from the starting position mentioned and land on the Strawberry Avenue to complete it.
Stunt Jump #15
Preferred Vehicle: Any
Location: Pagoda
You will see a ramp at the intersection of Vespucci Boulevard and Decker Street. Avoid being hit by vehicles and rooftops to successfully land on the Rockford Drive.
Stunt Jump #16
Preferred Vehicle: Bike
Location: Get Aweigh
You will see a green ramp near the near the Get Aweigh which is your starting position. Speed isn’t much of an issue here. You just have to make sure that you don’t get hit by oncoming vehicles to complete the jump.
Stunt Jump #17
Preferred Vehicle: Any
Location: South Los Santos
Get to the roof of parking garage behind Towing Impound Lot and sped through the ramp to land on the Innocence Boulevard to complete this jump.
Stunt Jump #18
Preferred Vehicle: Bike
Location: San Andreas
There will be a rail on the edge of an overpass that would serve as your starting position. It is possible to do this in car but it is a whole lot easier with a bike. Land on the San Andreas Avenue to complete this jump.
Stunt Jump #19
Preferred Vehicle: Bike
Location: Paleto Bay
The large sand dune in the construction site next to Paleto Bay serves as the starting point. Hit the ramp and keep to the left and land on the alleyway ahead to successfully complete the jump.
Stunt Jump #20
Preferred Vehicle: Bike
Location: Senora Freeway
The ramp that you need to jump from is located in the South of the Senora Freeway. You will need a lot of speed that PCJ-600 would be able to provide. Land on the Dirt or Freeway under overpass to complete this jump successfully.
Stunt Jump #21
Preferred Vehicle: Any
Location: Golf Course
All you need to do is to cross the gap between the broken bridge in Los Santos Gold Club. Speed is not an issue here and it can be done with a Golf Cart as well.
Stunt Jump #22
Preferred Vehicle: Sports Bike
Location: Dutch London Street
Jump from the broken concrete wall ramp at the Docks and land on the other side of the canal to get success in this stunt jump. Since the speed is important in this jump, we would advise you to get a PCJ-600.
Stunt Jump #23
Preferred Vehicle: Sports Bike
Location: Panorama Drive
Gain a lot of speed and hit the ramp in the Panorama Drive to get to the west side of Sandy Shores Motel. There will be an empty pool where you will land.
Stunt Jump #24
Preferred Vehicle: Any
Location: Los Santos Freeway
Go to the south of Los Santos Freeway to Del Perro Freeway. Hit the ramp on the right side of the road near the Floor Control Drain and stick to the right side. Land on the Los Santos Flood Control Drain to achieve success. Avoid being hit by traffic lest you would fail.
Stunt Jump #25
Preferred Vehicle: Bike or Sports car
Location: Capital Boulevard
Get to the ramp on the east side of three-floor parking garage and sped past through the wooden ramp to land on the Capital Boulevard.
Stunt Jump #26
Preferred Vehicle: Any
Location: La Puerta
Get to the Freeway and look for a ramp between the roads. Sped through the ramp while keeping a left angle to land on the opposite side of the Freeway without hitting any of the vehicles in your way.
Stunt Jump #27
Preferred Vehicle: Bike
Location: Airport
Sped through the construction dump ramp right next to the hanger gate and land on the hanger entry gate to complete the stunt jump and get 3-star wanted level.
Stunt Jump #28
Preferred Vehicle: Bike
Location: The Jetty
Get to the multi-floor garage in the Jetty sped through the glass opening to land at the gas station below. Doing this successfully will complete the jump.
Stunt Jump #29
Preferred Vehicle: Any
Location: Sandy Shores
Get to the starting position and you will see a dune; perfect for a stunt jump. Hit the ramp and try to maintain the balance of your vehicle in the air lest you will get totaled. Successfully land on the Country landing strip to complete this stunt jump.
Stunt Jump #30
Preferred Vehicle: Any
Location: La Puerta
Get to the starting position and jump over the narrow drain to land on the other side of the drain.
Stunt Jump #31
Preferred Vehicle: Any
Location: Daisy-Lee
Go through the cranes and hit the concrete slab near the very end of the docks and land on the Elysian Island to complete this jump.
Stunt Jump #32
Preferred Vehicle: Sports car
Location: Wind Farm
The reason that we have asked you to do this with a car is that; this jump is very hard to complete while riding a bike. Get to the starting position and jump from the very end of the road to land on the Senora Freeway to complete this jump.
Stunt Jump #33
Preferred Vehicle: Bike
Location: Buccaneer Way
From the starting position, try and hit the middle set of rocks to initiate the jump. You will have to cross all the three lanes of Buccaneer Way to successfully complete this jump.
Stunt Jump #34
Preferred Vehicle: Any
Location: Los Santos
Get to the starting position and hit the ramp but be careful not to hit the doorways at the sides of it. A fast car is a must for this challenge but it ca also be done with a bike. Keep to the left of the ramp and reach the canal on the other side to successfully complete this challenge.
Stunt Jump #35
Preferred Vehicle: Any
Location: Los Santos
Start from the same position to the previous one. It is better to use Franklin’s special ability to complete this jump. Furthermore, try to steer left while in the air to successfully get to the other side.
Stunt Jump #36
Preferred Vehicle: Fast car
Location: Los Santos
A car is a must for this challenge as it can’t be done with a bike. Once on the ramp; keep to the left and land on top of the warehouse to successfully complete this jump.
Stunt Jump #37
Preferred Vehicle: Sports car
Location: Los Santos
This jump is easily done by a sports car than a bike. Get on the trailer ramp and try to aim for Elysian Fields Freeway to complete this jump. However, make sure not to go too far away and avoid hitting those grills around the ramp.
Stunt Jump #38
Preferred Vehicle: Bike
Location: Los Santos
Get to the starting position for the jump as shown in the picture and go through the ramp to reach the top of the warehouse. You need to make sure that your tyres hit the floor first before anything else. Otherwise, you won’t be able to make it. A bike comes in very handy in this jump.
Stunt Jump #39
Preferred Vehicle: Bike
Location: Los Santos
Get to the docks and head left to find the ramp that you need to cross in order to reach the security building on the other side.
Stunt Jump #40
Preferred Vehicle: Any
Location: Los Santos
Get to the ramp right next to the railroad tracks and jump over the canal to reach the other side in one piece to successfully complete it.
Stunt Jump #41
Preferred Vehicle: Sports car
Location: Airport
The bike is quite dangerous for this stunt so we would advise you to get a fast moving car. Get to the designated black and white ramp at the airport and land on the small parking lot. Your car may get a lot of twists and turns while in the air but as long as you land on all four wheels you should be good. It is better to use Franklin’s special ability to avoid the car on the right side of the ramp. Sticking to the left side will also help.
Stunt Jump #42
Preferred Vehicle: Sports car
Location: Airport
Quite similar to the previous stunt. Remember that you need to stick to the left side of the ramp and use Franklin’s special ability to avoid the car on the right side of the ramp and you should be good.
Stunt Jump #43
Preferred Vehicle: Bike
Location: La Puerta
This is a huge jump so you will need your maximum top speed in order to make it to the other side. After finding the designated position, take a long route and make the jump to reach the helipad area to successfully complete this jump.
Stunt Jump #44
Preferred Vehicle: Any
Location: Palomino Avenue
After getting to the ramp, make sure not to target the building in front of you. You need to land on the west side of the Palomino Avenue in order to complete this jump.
Stunt Jump #45
Preferred Vehicle: Any
Location: La Puerta
Get to the designated position and hit the ramp. You need to be lightening fast to make this jump; just concentrate on the landing area to pass this stunt.
Stunt Jump #46
Preferred Vehicle: Any
Location: Del Perro
The biggest challenge of this jump is to maintain a good speed along with avoiding the traffic. Combination of both these things is a pathway to victory.
Stunt Jump #47
Preferred Vehicle: Bike
Location: Rockford Hills
Hit the balcony incline to get over the courtyard inside to land on the sidewalk to successfully complete this jump.
Stunt Jump #48
Preferred Vehicle: Bike
Location: Rockford Hills
You will have to cross the whole parking lot and and hit the sidewalk on the other side to complete this stunt jump. Make sure to get a good run-up before making the jump.
Stunt Jump #49
Preferred Vehicle: Any
Location: El Burro
You will have to jump from the metal sheet ramp and land near the telephone booth near the oil drill to successfully complete this stunt jump.
Stunt Jump #50
Preferred Vehicle: Any
Location: Elysian Rock
You will have to jump from the rock formation near the Chum Street overpass and land on the Chum Street to complete the final jump of Grand Theft Auto V. Make sure to hit the ramp at a decent speed or you won’t make it!
That is all for our GTA V Stunt Jumps Locations guide with tips on where to find the Stunt JUmp locations in Grand Theft Auto V.